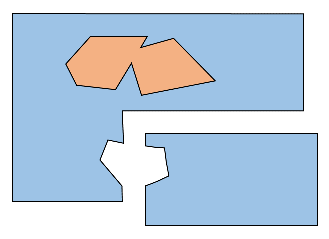
The idea behind navmeshes is simple: Instead of building a graph of waypoints to represent the paths an actor can take to get from one place to another, we build a mesh that represents the area where an actor is allowed to walk. Since I'm quite happy with the way my implementation turned out, here is a quick description of how I generate my navmeshes from the level geometry in 2D using Clipper and Poly2Tri.
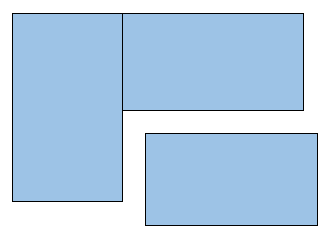
First, we build a list of polygons of all the areas where an actor could potentially walk. In order for Clipper to properly merge them later, the polygons should overlap somewhat. In my case, floor tiles are always rectangular, so I simply enlarged their polygons by one (the smallest possible value since Clipper uses integer coordinates) in each direction.
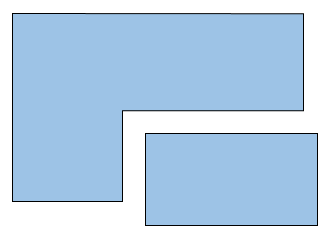
We can then use Clipper to perform a union operation on the list to merge any overlapping polygons. Make sure to use NonZero as the PolyFillType for the operation. This tells Clipper to create polygons that are all wound the same way - counter-clockwise in my case. Using the default value (EvenOdd) may result in polygons that are wound the other way to represent holes.
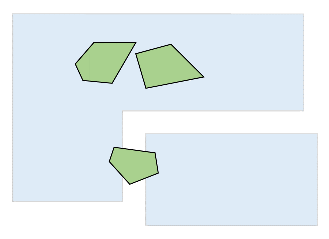
Now we need a list of polygons to represent the areas that are blocked by walls or any other entities. To generate each entity's polygon, take the vertices representing its 3D bounds (a bounding box, collision model or even the actual model), transform them to world space, project them onto the floor and construct their convex hull. The gift wrapping algorithm was fast enough for me and is easy to implement, but you may need a more sophisticated algorithm if your models have a significant number of vertices. Since I have very few entities that actually need a concave 2D outline, I decided that a convex hull is accurate enough in my case.
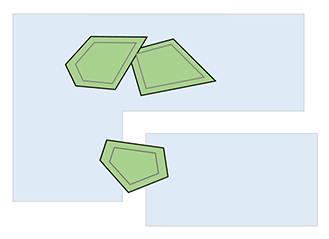
Since every point within the mesh should be a valid position for an actor, we need to expand the blocked areas to account for the size of the actors. Luckily, Clipper provides a very handy OffsetPolygon function to do just that. The method's JoinType parameter controls the number of vertices that Clipper inserts at acute angles. I found that using Square to chamfer sharp corners without inflating the vertex count too much produces nice results.
Now that we have two sets of polygons, we can use Clipper to subtract the blocked areas from the walkable areas. The resulting list contains the modified walkable polygons as well as blocked polygons that are fully contained within a walkable polygon. These holes can be identified by their clockwise winding order. After this step, Clipper's work is done and we need to convert the polygons to Poly2Tri's representation.
Since we used the 3D bounds to generate the convex hulls, it is very likely that the polygons contain points that are in close proximity to each other. Since these points could lead to very long but thin triangles in the final mesh, it is wise to remove them before triangulating the polygons.
Having a mixture of very big and very small triangles in the final mesh makes it harder for a pathfinding algorithm to estimate the distances between nodes. By repeatedly subdividing the sides of a polygon until a desirable length has been reached, we can limit the maximum size of the triangles in the final mesh. Placing Steiner points allows even more control over the final shape of the triangles. These points can be placed at arbitrary positions within a polygon to subdivide it without altering its shape. In my case, with obstacles that are seldom smaller than one square meter/unit, I found that placing Steiner points in a grid every two meters/units produces nice results.
The polygons are now ready to be triangulated by Poly2Tri. While Clipper saves all polygons in a flat list and identifies holes by their opposite winding order, Poly2Tri works best when every walkable polygon is assigned a list of the holes it contains.
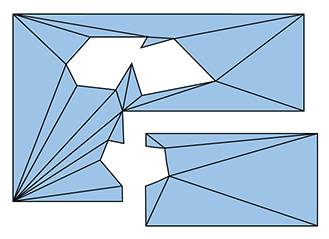
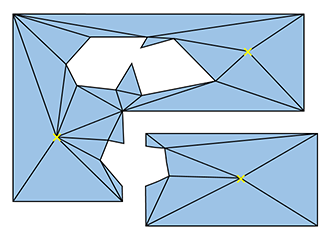
Triangulated mesh without and with additional Steiner points:
We now have a "triangle soup". However, in order to use it for pathfinding, each triangle needs to know about its neighbours.
We now have a list of triangles that we can use with A* or other pathfinding algorithms.
Define potentially walkable areas
First, we build a list of polygons of all the areas where an actor could potentially walk. In order for Clipper to properly merge them later, the polygons should overlap somewhat. In my case, floor tiles are always rectangular, so I simply enlarged their polygons by one (the smallest possible value since Clipper uses integer coordinates) in each direction.
Merge walkable polygons
We can then use Clipper to perform a union operation on the list to merge any overlapping polygons. Make sure to use NonZero as the PolyFillType for the operation. This tells Clipper to create polygons that are all wound the same way - counter-clockwise in my case. Using the default value (EvenOdd) may result in polygons that are wound the other way to represent holes.
clipper.AddPolygons(walkablePolygons, PolyType.Clip)
result := empty list
clipper.Execute(ClipType.Union, result, PolyFillType.NonZero, PolyFillType.NonZero)
Define blocked areas
Now we need a list of polygons to represent the areas that are blocked by walls or any other entities. To generate each entity's polygon, take the vertices representing its 3D bounds (a bounding box, collision model or even the actual model), transform them to world space, project them onto the floor and construct their convex hull. The gift wrapping algorithm was fast enough for me and is easy to implement, but you may need a more sophisticated algorithm if your models have a significant number of vertices. Since I have very few entities that actually need a concave 2D outline, I decided that a convex hull is accurate enough in my case.
blockedPolygons := empty list
for each entity e:
	vertices := 3D bounds of e
	worldVertices := for each v in vertices => transform(v, e.WorldMatrix)
	floorVertices := for each v in worldVertices => [v.x, 0, v.z]
	hull := convexHull(floorVertices)
	add hull to blockedPolygons
Expand polygons to account for actor size
Since every point within the mesh should be a valid position for an actor, we need to expand the blocked areas to account for the size of the actors. Luckily, Clipper provides a very handy OffsetPolygon function to do just that. The method's JoinType parameter controls the number of vertices that Clipper inserts at acute angles. I found that using Square to chamfer sharp corners without inflating the vertex count too much produces nice results.
for each polygon p in blockedPolygons:
	p := Clipper.OffsetPolygons(p, AMOUNT, JointType.Square)
Subtract blocked areas from walkable areas
Now that we have two sets of polygons, we can use Clipper to subtract the blocked areas from the walkable areas. The resulting list contains the modified walkable polygons as well as blocked polygons that are fully contained within a walkable polygon. These holes can be identified by their clockwise winding order. After this step, Clipper's work is done and we need to convert the polygons to Poly2Tri's representation.
result := walkablePolygons
for each polygon p in blockedPolygons:
	clipper := new clipper
	clipper.AddPolygons(result, PolyType.Subject)
	clipper.AddPolygon(p, PolyType.Clip)
	clear result
	clipper.Execute(ClipType.Difference, result)
return result
Optimize holes
Since we used the 3D bounds to generate the convex hulls, it is very likely that the polygons contain points that are in close proximity to each other. Since these points could lead to very long but thin triangles in the final mesh, it is wise to remove them before triangulating the polygons.
Tessellate polygons
Having a mixture of very big and very small triangles in the final mesh makes it harder for a pathfinding algorithm to estimate the distances between nodes. By repeatedly subdividing the sides of a polygon until a desirable length has been reached, we can limit the maximum size of the triangles in the final mesh. Placing Steiner points allows even more control over the final shape of the triangles. These points can be placed at arbitrary positions within a polygon to subdivide it without altering its shape. In my case, with obstacles that are seldom smaller than one square meter/unit, I found that placing Steiner points in a grid every two meters/units produces nice results.
Triangulate
The polygons are now ready to be triangulated by Poly2Tri. While Clipper saves all polygons in a flat list and identifies holes by their opposite winding order, Poly2Tri works best when every walkable polygon is assigned a list of the holes it contains.
walkablePolygons := all polygons with counter-clockwise winding order
blockedPolygons := all polygons with clockwise winding order
triangleList := empty
for each w in walkablePolygons:
	w.Holes := every polygon b in blockedPolygons that is contained in w
	triangulate(w)
	add every triangle in w.Triangles to triangleList
return triangleList
Triangulated mesh without and with additional Steiner points:
Find neighbours
We now have a "triangle soup". However, in order to use it for pathfinding, each triangle needs to know about its neighbours.
triangleIDs := empty map from polygon to int
vertexIDs := empty map from vertex position to int
vertices := empty list

// give every triangle and vertex a unique ID
for each triangle t in triangleSoup:
	triangleIDs[t] := triangleIDs.Count
	for each vertex p in t:
		if p not in vertexIDs:
			vertexIDs[p] = vertexIDs.Count
			add p to vertices

edge { V1, V2 } // undirected edge, edge1 is equal to edge2 if they contain the same vertices

// group all triangles that share an edge
edgeToTriangles := empty map from edge to list of triangles
for each triangle t in triangleSoup:
	edges := list of the three edges of t
	for each edge e in edges:
		add t to edgeToTriangles[e]

// gather each triangle's neighbours
for each triangle t in triangleSoup:
	myID := triangleIDs[t]
	edges := list of the three edges of t

	for each edge e in edges:
		for each triangle n in edgeToTriangles[e]:
			add n to t.Neighbours
We now have a list of triangles that we can use with A* or other pathfinding algorithms.
