In this article we discuss the reasons for using a source control and continuous integration system. We then talk about how to get started with Team Foundation Service - Microsoft's cloud-based service for agile planning, collaboration, source control and continuous integration.
This article will demonstrate this with a hands-on demonstration of setting up a Team Foundation Service account, adding a new project, planning some work and completing your first development task.
To follow through this article, you will need a copy of Visual Studio 2012 and a Microsoft Account.
When you get started with a project, it's really easy to not concern yourself with things like source control. I mean, if you need a backup of your code, you can just copy it into another folder, right? Or maybe rename a file to ".old" whilst you're trying something new. Or if you're making some big changes, how about taking a copy of the whole source code folder to try out your new feature? Or maybe just zip your current source and drop it into a backup folder, stamped with today's date. And what about if your hard drive crashes - simple, just take a regular copy of the code into Skydrive when you need to. Or if you remember to. What if you need to work on a project with a friend, how do you share your changes in a nice way without copying zip files back and forth?
Trust me, I've done every single one of these things in the past. All of which work to some degree, but things can rapidly fall to pieces.
What if you need to revert some changes, or go back to a specific point in time because that great redesign you planned didn't quite work out? Maybe you need to merge just a couple of the features in your "Test" folder back to your main codebase. Or maybe your harddrive crashes and you have to go back to a backup from a couple of days ago - ah, damn, you forgot to backup last week and just lost 2 weeks of work. What if you needed to find when you made a specific change? That folder of zip files named "ProjectSource_20130426a.zip" doesn't look so good anymore.
Using a source control system helps mitigate all of these things. A good source control system lets you keep track and manage all your changes (or revisions) over time. It lets you take copies (or branches) of important milestones and provides tools to migrate code between them. It lets multiple developers collaborate in the same codebase whilst maintaining a definitive version of the code.
When working on a new game project, it's easy to just roll up your sleeves and wade in, cracking open Visual Studio and starting to code. You know what you're building don't you? Surely you'll just do what you need to in order to build it.
Several articles promote the notion of creating an up-front design document, which describes the features of your game and how they'll work together. As a developer you're likely to have a rough idea of how you're going to implement the technical details of the system. You've probably even drawn a diagram on a napkin or in a tool such as Visio.
What's missing is a way of breaking up the features of your game into chunks (or User Stories) and the individual steps (or Tasks) that go into implementing them. You also need a way of helping you prioritise the features (and even tasks), especially if you're working towards a deadline - either self-imposed or one set by a third party. If you're working in a team (or even by yourself), it's important to know which tasks have been completed and what's next to do. If working towards a deadline, it's important to know whether you're on track to hit the dates you've committed to or not and adjust your work (or deadline) to fit your current velocity.
This is where an Agile Planning Tool comes in. A good tool allows you to do all of these things. It helps you store the User Stories and the Tasks that go into completing them. It lets you assign estimates to the Tasks or Stories to give you a good feel for the amount of work you have to do. A good system also links the code you're developing to the tasks you have to do, so by committing code you can mark tasks as "completed". A good system lets you track your current velocity and trace it against your ideal.
How many times have you developed software which just refuses to build on another machine other than your main desktop? How do you know if the specific version of the code in your folder even compiles correctly, let alone "works" functionally? In the past I've found myself sat in front of some old code (even a week can be considered "old" sometimes) and not have a clue which bits of the code is functional.
This becomes especially important if you're working with a group of developers. How do you know that the change you've just made hasn't just broken someone else's code? How do you measure the quality of your code? How often have you spent hours on a Friday trying to get everyone's myriad of changes for the week all building so that you can show your progress to a publisher or project manager on Monday?
A Continuous Integration system helps address these concerns by allowing you to regularly build your software whenever a change occurs and on a set schedule (such as every night). It forces you to automate your build process, so that the chap in the corner with rings around his eyes isn't the only one that knows the magic combination of switches to use for building your project. As part of the build process, you can run your Unit Test suite - perhaps even your deployment process and other environment or integration tests. By continously building and testing your code, you can very quickly discover issues that normally bite you late on. What's more, it gives you the ability to know what your last working build was and have access to the version of the code at any time.
Hopefully by now, I've convinced you that you can reap great rewards from using an Agile Planning tool, Source Control and a Continous Integration system. What's more, if you were able to combine all of these features into a single suite, your life would be almost complete - right?
Luckily for you, Microsoft have created Team Foundation Service (or TFS); a cloud-based solution that combines everything we've just talked about.
You can see a full list of the features at the Team Foundation Service website. But in brief, we get:
All this goodness has to cost the earth, right?
Wrong.
Right now, a team of up to 5 developers can access all of this for free. Microsoft detail the pricing here. It is worth noting that some of these features are in "preview", which means they are available for no charge, however they may be limited or chargable in the future.
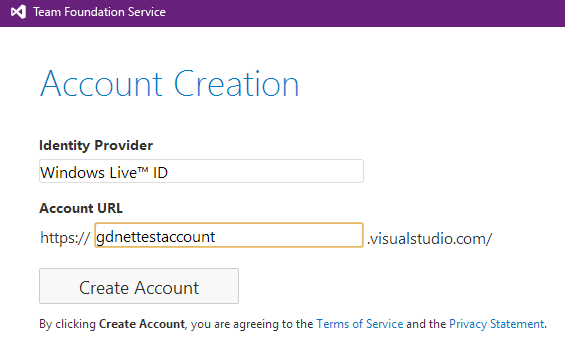
The first step to using Team Foundation Service is to hop over to the Account Creation page. If you haven't go a Microsoft Account, you'll need to head over and sign up.
![Attached Image: tfs_1.png]()
The next step is to create a new Project. Right now you can have as many as you want.
![Attached Image: tfs_2.png]()
You have to choose whether you want to have Team Foundation Version Control (TFVC) or Git Source Control with your project. It's really up to you. If you're inexperienced with version control, it's easy to get started with TFVC.
![Attached Image: tfs_3.png]()
You also have to choose your project template. Again, it's up to you which you want to follow - popular choices are Microsoft Visual Studio Scrum 2.2 or MSF for Agile Software Development 6.2. The project template dicates the type of work items you see, the states they can be in and how to transition between them.
In this example, I'll create a new project called "GDNet Test" using the Microsoft Visual Studio Scrum 2.2 template and TFVC version control system.
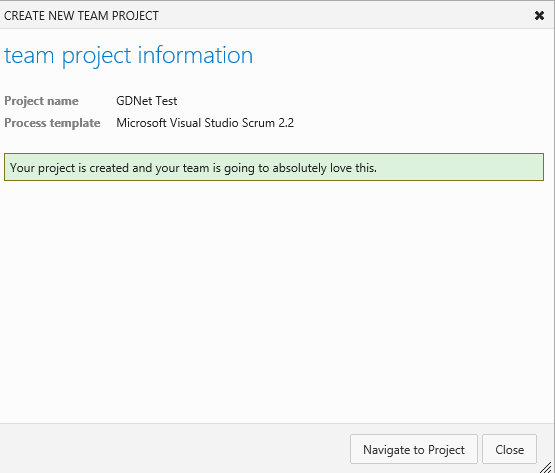
When you're ready, your project will be created on the system and you're ready to go...
![Attached Image: tfs_4.png]()
In this article, we're going to create a "Hello World" application. The first place to start is by creating the user story of the feature we're developing. In this case, it's "Hello World".
Add an item to the backlog and fill out the details.
![Attached Image: tfs_5.png]()
Here, you could go to town and add estimates, acceptance criteria and more detail than I've added.
What we will do, however, is start adding some tasks.
![Attached Image: tfs_6.png]()
Clicking the New Task button opens up a window for some information.
![Attached Image: tfs_7.png]()
We need to add the following tasks:
![Attached Image: tfs_8.png]()
From here, drag the "Create Visual Studio Project" task into "in progress" to denote you're working on it.
So the first task we have is to create the Visual Studio solution and add your project.
![Attached Image: tfs_9.png]()
I've checked "Add solution to source control". When you create your project, you'll be prompted to add it to TFS.
Set up your Team Foundation Service in Visual Studio
![Attached Image: tfs_10.png]()
For this, use the url for your account. This will be the [accountname].visualstudio.com.
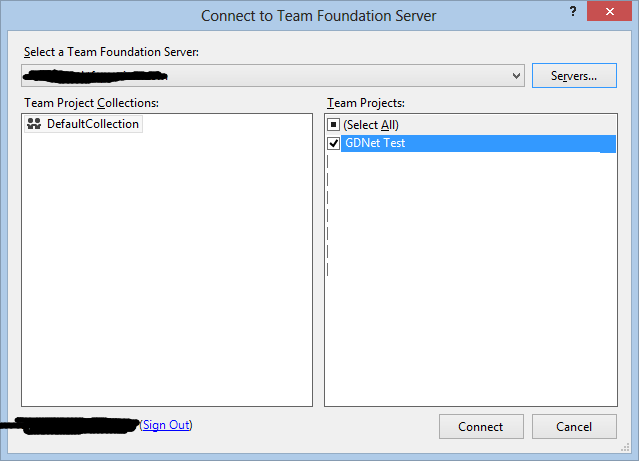
Then you select your project.
![Attached Image: tfs_11.png]()
You'll be asked to create a Workspace. This is a mapping for your TFS Source Control structure to your local folder.
![Attached Image: tfs_12.png]()
For this, map the rooot of your project to a folder somewhere in your working project directory.
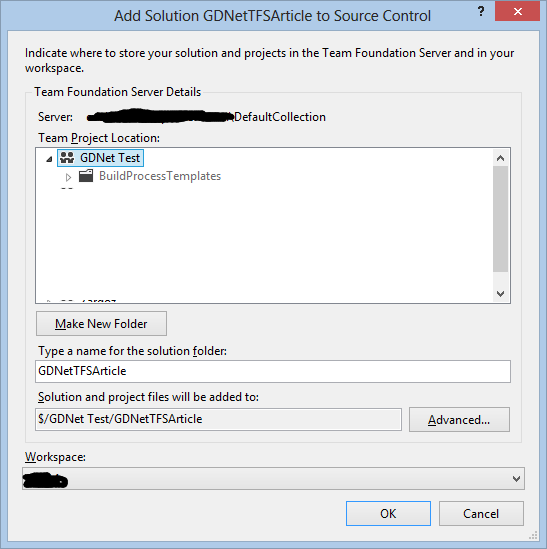
Finally, your project will be added to TFS as a Pending Change.
![Attached Image: tfs_13.png]()
Your first check-in
Right now, your changes are all local and are marked as "Pending". You want to commit your new empty project to source control.
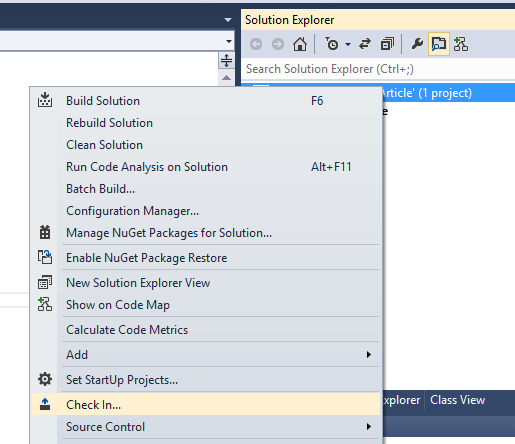
Right click your new solution and select "Check in".
![Attached Image: tfs_14.png]()
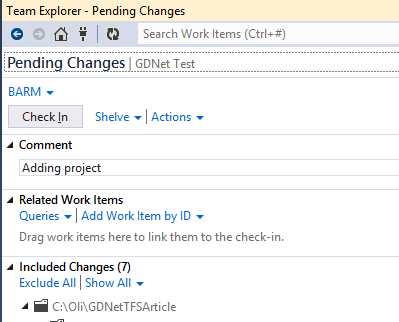
You'll see your Pending changes in Team Explorer
![Attached Image: tfs_15.png]()
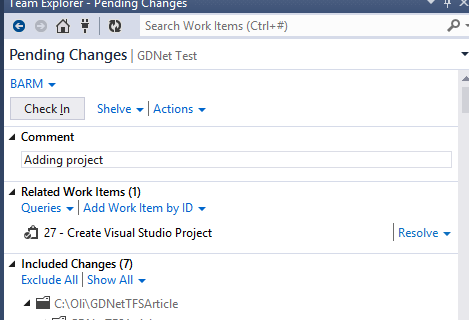
I want to associate my changes with my work item - the Task which said I should create the project. To find the work item, I can run a query. Click on "Work items" and "Work in progress".
![Attached Image: tfs_16.png]()
Drag the task you see onto your new Pending change and click "Check in".
![Attached Image: tfs_17.png]()
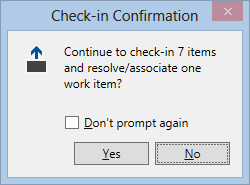
You'll be prompted to confirm.
![Attached Image: tfs_18.png]()
After check in, you can jump back to your scrum board and you'll notice your task has been moved to "Done".
![Attached Image: tfs_19.png]()
And we're done!
In this article, we covered the motivations for using Agile Planning tools, Source Control and Continuous Integration Systems and how these can be met by Microsoft's Team Foundation Service.
We started our journey with a practical demonstration of the service by creating a new project, adding tasks and completing our first task.
In the next article, I'll continue with our work by adding a new Unit Test project, setting up a continuous integration build and implementing our code.
26 Apr 2013: Initial release
This article will demonstrate this with a hands-on demonstration of setting up a Team Foundation Service account, adding a new project, planning some work and completing your first development task.
To follow through this article, you will need a copy of Visual Studio 2012 and a Microsoft Account.
Motivations
Why use Source Control?
When you get started with a project, it's really easy to not concern yourself with things like source control. I mean, if you need a backup of your code, you can just copy it into another folder, right? Or maybe rename a file to ".old" whilst you're trying something new. Or if you're making some big changes, how about taking a copy of the whole source code folder to try out your new feature? Or maybe just zip your current source and drop it into a backup folder, stamped with today's date. And what about if your hard drive crashes - simple, just take a regular copy of the code into Skydrive when you need to. Or if you remember to. What if you need to work on a project with a friend, how do you share your changes in a nice way without copying zip files back and forth?
Trust me, I've done every single one of these things in the past. All of which work to some degree, but things can rapidly fall to pieces.
What if you need to revert some changes, or go back to a specific point in time because that great redesign you planned didn't quite work out? Maybe you need to merge just a couple of the features in your "Test" folder back to your main codebase. Or maybe your harddrive crashes and you have to go back to a backup from a couple of days ago - ah, damn, you forgot to backup last week and just lost 2 weeks of work. What if you needed to find when you made a specific change? That folder of zip files named "ProjectSource_20130426a.zip" doesn't look so good anymore.
Using a source control system helps mitigate all of these things. A good source control system lets you keep track and manage all your changes (or revisions) over time. It lets you take copies (or branches) of important milestones and provides tools to migrate code between them. It lets multiple developers collaborate in the same codebase whilst maintaining a definitive version of the code.
Why use an Agile Planning tool?
When working on a new game project, it's easy to just roll up your sleeves and wade in, cracking open Visual Studio and starting to code. You know what you're building don't you? Surely you'll just do what you need to in order to build it.
Several articles promote the notion of creating an up-front design document, which describes the features of your game and how they'll work together. As a developer you're likely to have a rough idea of how you're going to implement the technical details of the system. You've probably even drawn a diagram on a napkin or in a tool such as Visio.
What's missing is a way of breaking up the features of your game into chunks (or User Stories) and the individual steps (or Tasks) that go into implementing them. You also need a way of helping you prioritise the features (and even tasks), especially if you're working towards a deadline - either self-imposed or one set by a third party. If you're working in a team (or even by yourself), it's important to know which tasks have been completed and what's next to do. If working towards a deadline, it's important to know whether you're on track to hit the dates you've committed to or not and adjust your work (or deadline) to fit your current velocity.
This is where an Agile Planning Tool comes in. A good tool allows you to do all of these things. It helps you store the User Stories and the Tasks that go into completing them. It lets you assign estimates to the Tasks or Stories to give you a good feel for the amount of work you have to do. A good system also links the code you're developing to the tasks you have to do, so by committing code you can mark tasks as "completed". A good system lets you track your current velocity and trace it against your ideal.
Why use a Continuous Integration system?
How many times have you developed software which just refuses to build on another machine other than your main desktop? How do you know if the specific version of the code in your folder even compiles correctly, let alone "works" functionally? In the past I've found myself sat in front of some old code (even a week can be considered "old" sometimes) and not have a clue which bits of the code is functional.
This becomes especially important if you're working with a group of developers. How do you know that the change you've just made hasn't just broken someone else's code? How do you measure the quality of your code? How often have you spent hours on a Friday trying to get everyone's myriad of changes for the week all building so that you can show your progress to a publisher or project manager on Monday?
A Continuous Integration system helps address these concerns by allowing you to regularly build your software whenever a change occurs and on a set schedule (such as every night). It forces you to automate your build process, so that the chap in the corner with rings around his eyes isn't the only one that knows the magic combination of switches to use for building your project. As part of the build process, you can run your Unit Test suite - perhaps even your deployment process and other environment or integration tests. By continously building and testing your code, you can very quickly discover issues that normally bite you late on. What's more, it gives you the ability to know what your last working build was and have access to the version of the code at any time.
Team Foundation Service
Hopefully by now, I've convinced you that you can reap great rewards from using an Agile Planning tool, Source Control and a Continous Integration system. What's more, if you were able to combine all of these features into a single suite, your life would be almost complete - right?
Luckily for you, Microsoft have created Team Foundation Service (or TFS); a cloud-based solution that combines everything we've just talked about.
Features of Team Foundation Service
You can see a full list of the features at the Team Foundation Service website. But in brief, we get:
- Source Control in the Cloud - both TFS native and Git are supported
- IDE integration - TFS integrates with Visual Studio, Eclipse and XCode
- Automatic builds in the cloud - build your source on check-in or on a set schedule
- Automate your tests - run your test suites automatically on build; run different suites for different build types
- Manage your work - store your backlog of User Stories and Tasks, view your tasks, associate them with code check in
- Track bugs - log bugs and track their fix progress
- Collaborate - work with others
Pricing
All this goodness has to cost the earth, right?
Wrong.
Right now, a team of up to 5 developers can access all of this for free. Microsoft detail the pricing here. It is worth noting that some of these features are in "preview", which means they are available for no charge, however they may be limited or chargable in the future.
Getting Started with Team Foundation Service
The first step to using Team Foundation Service is to hop over to the Account Creation page. If you haven't go a Microsoft Account, you'll need to head over and sign up.
Creating your project
The next step is to create a new Project. Right now you can have as many as you want.

You have to choose whether you want to have Team Foundation Version Control (TFVC) or Git Source Control with your project. It's really up to you. If you're inexperienced with version control, it's easy to get started with TFVC.
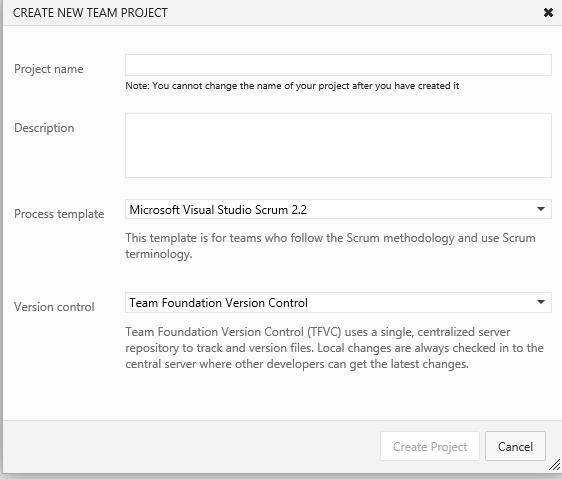
You also have to choose your project template. Again, it's up to you which you want to follow - popular choices are Microsoft Visual Studio Scrum 2.2 or MSF for Agile Software Development 6.2. The project template dicates the type of work items you see, the states they can be in and how to transition between them.
In this example, I'll create a new project called "GDNet Test" using the Microsoft Visual Studio Scrum 2.2 template and TFVC version control system.
When you're ready, your project will be created on the system and you're ready to go...
Adding your first User Story
In this article, we're going to create a "Hello World" application. The first place to start is by creating the user story of the feature we're developing. In this case, it's "Hello World".
Add an item to the backlog and fill out the details.
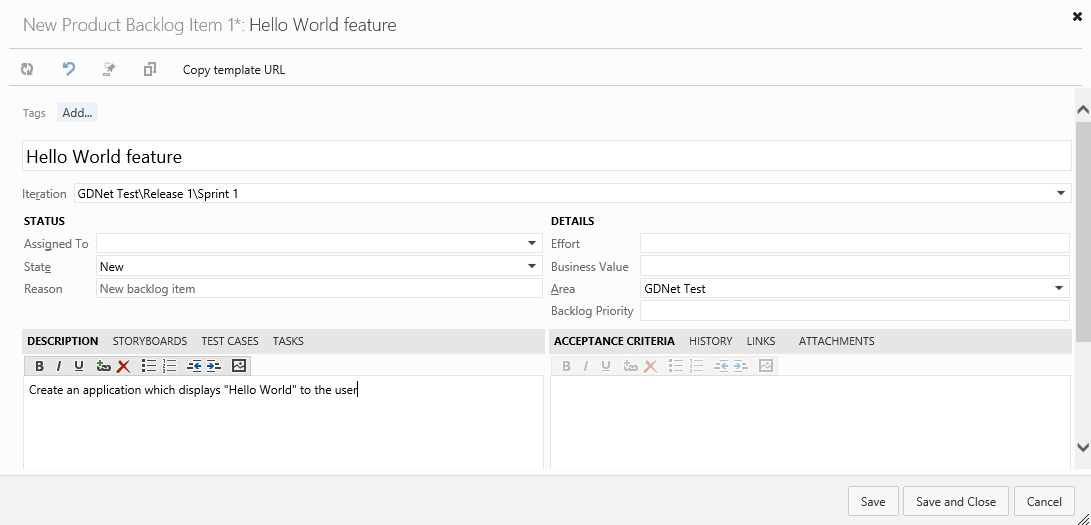
Here, you could go to town and add estimates, acceptance criteria and more detail than I've added.
What we will do, however, is start adding some tasks.
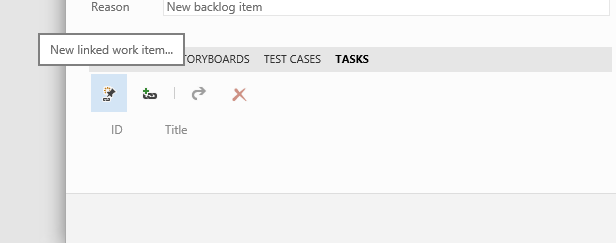
Clicking the New Task button opens up a window for some information.
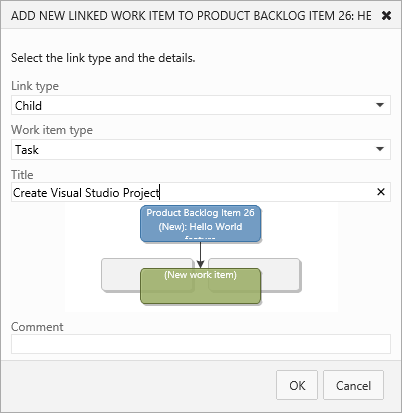
We need to add the following tasks:
- Create the Visual Studio Project
- Create the Unit Test Project
- Set up a continuous Integration build
- Create the Greeting class
- Create the Greeting tests
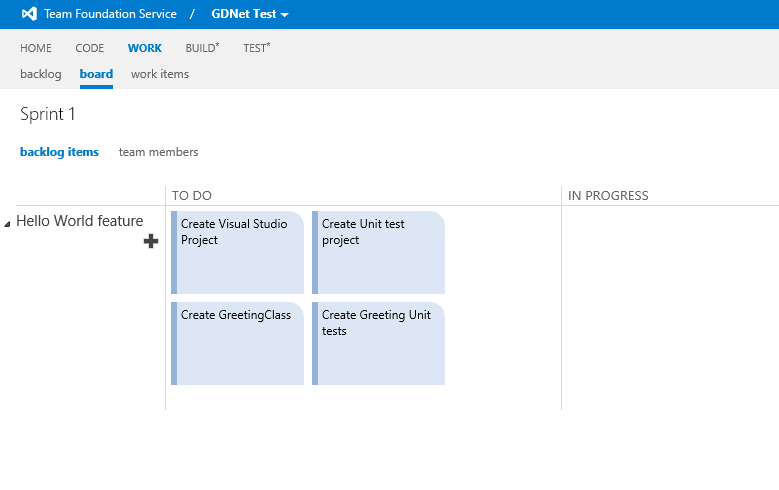
From here, drag the "Create Visual Studio Project" task into "in progress" to denote you're working on it.
Starting work
So the first task we have is to create the Visual Studio solution and add your project.
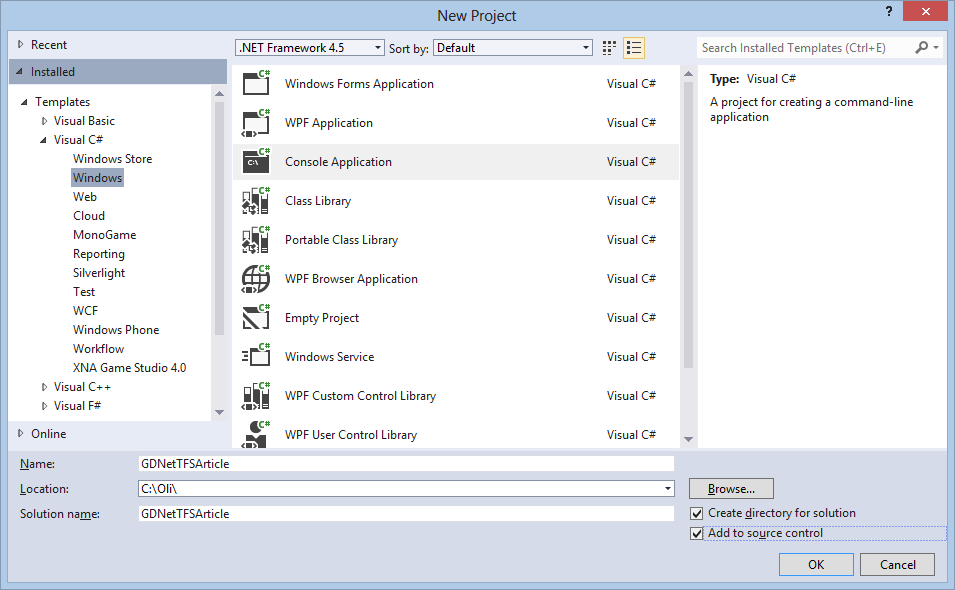
I've checked "Add solution to source control". When you create your project, you'll be prompted to add it to TFS.
Set up your Team Foundation Service in Visual Studio
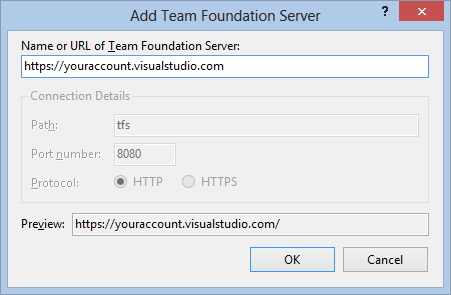
For this, use the url for your account. This will be the [accountname].visualstudio.com.
Then you select your project.
You'll be asked to create a Workspace. This is a mapping for your TFS Source Control structure to your local folder.
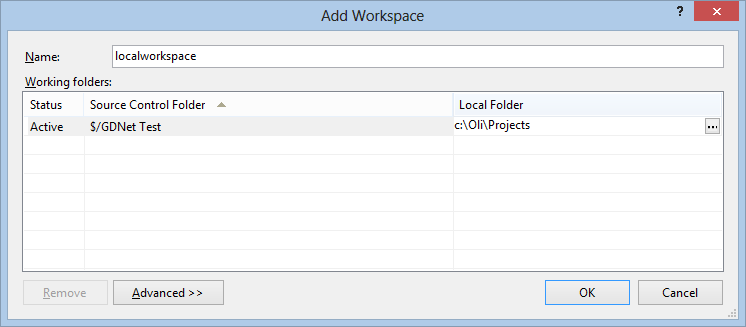
For this, map the rooot of your project to a folder somewhere in your working project directory.
Finally, your project will be added to TFS as a Pending Change.
Your first check-in
Right now, your changes are all local and are marked as "Pending". You want to commit your new empty project to source control.
Right click your new solution and select "Check in".
You'll see your Pending changes in Team Explorer
I want to associate my changes with my work item - the Task which said I should create the project. To find the work item, I can run a query. Click on "Work items" and "Work in progress".

Drag the task you see onto your new Pending change and click "Check in".
You'll be prompted to confirm.
After check in, you can jump back to your scrum board and you'll notice your task has been moved to "Done".
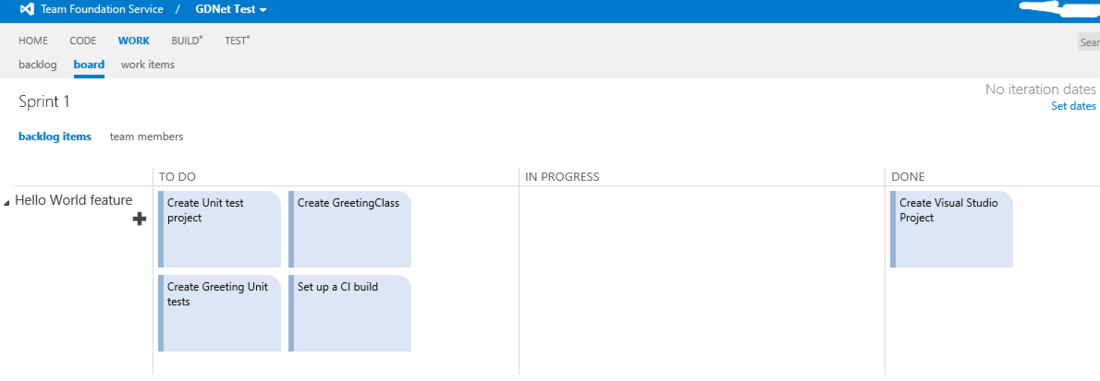
And we're done!
Conclusion
In this article, we covered the motivations for using Agile Planning tools, Source Control and Continuous Integration Systems and how these can be met by Microsoft's Team Foundation Service.
We started our journey with a practical demonstration of the service by creating a new project, adding tasks and completing our first task.
In the next article, I'll continue with our work by adding a new Unit Test project, setting up a continuous integration build and implementing our code.
Article Update Log
26 Apr 2013: Initial release