Quantcast
Channel: GameDev.net
Viewing all 17825 articles
Browse latest View live

Why Games Don't Have to be Good Anymore

$
0
0
When I was 14 my favorite game, Commandos: Behind Enemy Lines, came out. I biked 10 miles to the Big Name Box store and paid $70 for the massive tombstone sized box with my new prized game inside. Nobody even knew about the game and I had to follow community blogs to even know when it was released. To me, this was the golden age of gaming.

I contrast this memory against the current massive ecosystem of games where everybody is more interested in talking about games that suck instead of games they enjoy. I believe it’s because there are a few elements working together which allow for bad games to be released and still make massive sales – and here they are; reasons why games don't have to be good anymore.

Steam Early Access


“If you buy early access, you’re going to have a bad time”

I have nothing against Steam and nothing against people doing this, but it has single-handedly changed my perception with the gaming marketplace. When I was a teenager, it was exciting to find a bug in Pokemon but now it’s just blatant negligence.

I don’t want to throw the baby out with the bathwater, because a ton of amazing games have come out of this program, but I do wish there was more diligence on Steam’s behalf to ensure a level of quality. I’ll lump crowdfunding into this section because it’s the same principle. You’re paying for the idea behind a game rather than the game itself. The potential abuse of the system is evident in the countless refund requests that Steam users open and almost never receive.

Open Source Engines


When I first started marketing games, the only companies to do work for were the major studios or new start ups. Now, the majority of my work are small team projects, often with the development team living in their parent's basement. There’s no problem with this, in fact, I love it! Everyone has the ability to make their own games, but at the same time... everyone has the ability to make their own games. I will confidently say this has lowered the quality of the average title launched through a digital distributor, but there still is an obvious tier of excellence in quality a large portion of games strive for.

unity3d1-300x225.jpg

That being said, I find roughly 90% of games on Steam or bundles have zero interest to me. So many games just reiterate an old concept and the number of studios looking to capitalize on pop genres is disturbing (zombie/survival open worlds). What blows my mind is when I talk to some of the studios who launch these crazy knock off games who have still earned millions in revenue from Steam sales alone.

Game Marketing


It’s only now being openly revealed, but there is large dark side industry around game marketing. The latest revelations about YouTube sponsored videos have become a mainstream tactic that most games include in their launch strategy. It’s obvious that every YouTuber will get access to your game once on the market, but marketers and product managers know they only have to manage the opening reception of a game to acquire the initial onslaught of sales.

youtube-partner-program-268x300.jpg

A game should speak for itself and if you have to curate who showcases your game (because you're paying those people to like it) you’re manipulating the perception of the game. I do think YouTube should be an essential part of any game’s strategy, but only through unbiased means - I wrote about this before.

This issue is further compounded by a copyright holder’s ability to pull a video which doesn’t give a favorable review of their title. Total Biscuit has already exposed the very common occurance of this happening. I won’t pretend that the majority of YouTubers ask for a paid review, but enough of them do. It’s hard to judge though – would you turn down $10,000 to play a game and make a few videos about it?

Massive Publishers


Take a think on your favorite big publisher. EA, Blizzard and Ubisoft are no longer in the business of publishing video games, but instead sequels. Once a game has been well received, the development and monetization team figure out how to milk the property dry. There’s rarely attention given to how the gameplay can experience innovation or advancement and a string of titles and transmedia merchandise burst forth onto the market.

I’ve worked with some of these guys, so I won’t play innocent. The politics of gaming companies has become something fascinating as you see people with a shocking disregard for consumers brought into leadership rather than committed and passionate creative individuals. The saddest part is that the majority of the decisions I saw made while working for bigger studios were based around better earning potential rather than the consumer’s enjoyment.

What This All Means


There is a life cycle in economics where demand and supply enjoy an exciting relationship. With the video game industry entering an age of maturity we’re experiencing the shift from pull marketing to push marketing.

Games used to rely on putting out marketing material like press releases, screenshots, demo disks (remember these in cereal boxes?) and maybe a cinematic.

But now we have Steam sales to push volume, obscene bundles which cannibalize the perceived value of games and social media platforms urging you to join so they can propel marketing material to you. The average game can’t rely on sharing basic trailers and screenshots, but with sales teams and distribution tactics.

I realize that games rely on large investment to make and require huge sale payoffs to be considered successful but the gaming industry is starting to be run by business executives rather than game makers.


GameDev.net Soapbox logo design by Mark "Prinz Eugn" Simpson

How Alias Templates Saved my Sanity

$
0
0

Before we begin...


This article has been reformatted to be more readable on GameDev.net, the original can be found at the following blog.

Are you sitting comfortably?


C++ supports two powerful abstractions, Object Orientation and Generic Programming. Ask any battle-hardened games industry veterans about the two and you’re likely to see an eye twitch with the latter. It’s not that Generic Programming is particularly hard but the errors you get out of the language can be particularly verbose without even getting to the private hell of errors relating solely to that usage...

This article provides example issues with template typedefs and the alternatives that modern C++ provides.

Let’s make a game!


Let’s say you have a simple game where multiple wizards lay the smack down, nerdy-spellcast style! We’ll impose some rules:
  • Each battle arena contains several magic pools, each imbued with a different spell.
  • A wizard casts spells using these pools (maybe their robes soak up the juice?)
  • Over time, these pools lose their power. When the power is lost, spells can no longer be cast.


wizard1.png


Sounds… fun? Let's get into it.

Modelling Spells


Let’s briefly look at two approaches to the modelling of spells. Often a key difference between OO and Generic code is that we may have a reliance on dispatch when identifying "IS-A" relationships with the former, and Type Traits or Duck Typing for the latter.

Your OO code may look something like:

class ISpell abstract

With the concrete specification of two spells:

class MagicMissileSpell : public ISpell
class HealSpell : public ISpell

(Actually, if this gets any more complicated it would be a good idea to take a look at prototype and component patterns at http://gameprogrammingpatterns.com and save yourself a headache).

Your Generic approach on the other hand is likely to be more like:

template<typename T>
class Spell
{
T mSpell;
}

With the implementation provided by individual classes satisfying whatever functionality the spell requires:

class MagicMissile
class Heal

There are benefits and pitfalls to both approaches and in all honesty the two aren't even mutually exclusive. Let's not dwell on exactly why you would pick one implementation over the other (I didn't) but instead focus on how to make the code work well (I had to).

Spell Ownership


It seems like we need some consideration over ownership in this game:

“Over time, these pools lose their power. When the power is lost, spells can no longer be cast.”


Ownership semantics in C++ 11 are supported in one way with smart pointers. We can model this scenario by letting each pool hold a shared pointer to the spell type, with each wizard holding a weak pointer to the same asset as required. As long as we lock that weak pointer whilst we cast, the condition should be fine (we do have a small amount of time where the cast could be using magic no longer in the pool, but we'll pretend Wizards are just down with that).


wizardownership.png


OO Spell Ownership


This looks pretty easy, we'll set up:

class Pool
{
// ...
private:
std::shared_ptr<ISpell> mSpell;
};

class Wizard
{
// ...
public:
bool cast(std::weak_ptr<ISpell> spell);
};

We could choose to define a type for these pointers, making them easily alterable and reducing the amount of typing:

typedef std::shared_ptr<ISpell> SharedSpellPtr;
typedef std::weak_ptr<ISpell> WeakSpellPtr;

Looks OK, we’re actually going to leave the OO approach now as it doesn't suffer from the same plague affecting the Generic approach but feel free to check out the source for a more in-depth comparison.

Generic Spell Ownership


Let’s take a quick step back and look at how our spells are modelled again. The pools in this implementation will want to be imbued in a similar way, so how would that look? As we don’t have the common base we will have to bind to a template on the pool:

template<typename T>
class Pool
{
//... will have mSpell variable, related to T
}

An explicit specialisation of T can be provided as a constructor argument. For example, a magic missile spell:

std::shared_ptr<Spell<MagicMissile>> mMagicMissileSpell;

In the same manner as the OO aproach, we can probably define this as a custom type:

typedef Spell<MagicMissile> MagicMissileSpell;
std::shared_ptr<MagicMissileSpell> magicMissileSpell

Maybe even go further...

typedef std::shared_ptr<MagicMissileSpell> MagicMissileSpellPtr;
MagicMissileSpellPtr magicMissile;

This is especially useful if we were overriding types with allocators etc as we get to avoid writing an essay every time we use the type (which would also be error prone as hell).

The problem here is that we’re going to have to jump through the same hoops to define the weak pointer, and any other structures we wanted further down the line (unique pointers, vectors, maps…). It doesn’t scale too well and needs a lot of boilerplate for every spell.

Template Typedefs


Wouldn’t it be great if we could define a more abstract template type for the above? We can… eventually. Let’s start with a more general shared spell shared pointer:

template<typename T>
typedef std::shared_ptr<Spell<T>> SpellSharedPtr;

This looks innocuous enough… but try to compile and *gasp*

error C2823: a typedef template is illegal


ILLEGAL??? That’s not ideal... and sure enough, this is a well trodden restriction of olden times C++.

The common workaround is to take advantage of the fact that classes can be templated, and can contain typedef:

template < typename T >
class SpellType
{
public:
typedef std::weak_ptr< T > SpellWeakPtr;
typedef std::shared_ptr< T > SpellSharedPtr;
}

typedef SpellType<MagicMissile> MagicMissileSpellType;

Which now means that we can refer to the various pointers like so:

MagicMissileSpellType::SpellSharedPtr magicMissileSharedPtr;
MagicMissileSpellType::SpellWeakPtr magicMissileWeakPtr;

This is the point where a lot of literature leaves the subject. Sadly it can still get a little worse. Disappointment comes whenever we want to use that type definition (e.g. if we set up a magic pool like so):

template<typename T>
class Pool final
{
public:
explicit Pool(SpellType<T>::SpellSharedPtr spellPtr)
: mSpellPtr(std::move(spellPtr))
{
}
private:
SpellType<T>::SpellSharedPtr mSpellPtr;
};

On compilation of the above, we’re again greeted with a nice compilation error:

warning C4346: 'SpellType<t>::SpellSharedPtr' : dependent name is not a type. prefix with 'typename' to indicate a type


This one is pretty obviously fixable, we just need to rephrase that declaration every time we see it:

typename SpellType<T>::SpellSharedPtr

We’ve got a workable solution, there’s one last consideration here though...

What if our spells were referenced in a large amount of places? Maybe we’re not so sure whether the pool should be the sole owner anymore, shared ownership might be fine but the model holds well together… for now. Let’s define an alias (remember that name for later). We reserve the right to change type later and it’s going to be a single point of change (with some hopefully minor fiddling with locks etc, dependant on functionality):

template<typename T>
class SpellTypePointer
{
typedef typename SpellType<T>::SpellSharedPtr Type;
};
SpellTypePointer<MagicMissile>::Type spellPtr;

Notice the typename again, you'll probably forget to type it every time. There was a point where every code review I ever took for this pattern had someone arguing against that keyword too. The technique works well enough but when you've had to defend your code for the fiftieth time, you really wish there was an alternative...

Type Alias, Alias Template


In the C++ 11 standard, type alias and alias templates fill this hole in functionality. For Visual Studio this means upgrading to 2013 but it’s worth the wait. Remember when we couldn’t even define this type:

template<typename T>
typedef std::shared_ptr<Spell<T>> SpellSharedPtr;

The syntax for Alias Templates make this all possible by propagating the template binding:

template<typename T>
using SpellSharedPtr = std::shared_ptr<Spell<T>>;

This feels much cleaner, the same technique can be applied to all the above examples as well.

So here are the details:
  • A type alias declaration introduces a name which can be used as a synonym. This is essentially the new typedef.
  • An alias template is a template which allows substitution of the template arguments from the alias template. The new functionality allowing us to define aliases on templates like we never could before.

Math for Game Developers: Graphs and Pathfinding

$
0
0
Math for Game Developers is exactly what it sounds like - a weekly instructional YouTube series wherein I show you how to use math to make your games. Every Thursday we'll learn how to implement one game design, starting from the underlying mathematical concept and ending with its C++ implementation. The videos will teach you everything you need to know, all you need is a basic understanding of algebra and trigonometry. If you want to follow along with the code sections, it will help to know a bit of programming already, but it's not necessary. You can download the source code that I'm using from GitHub, from the description of each video. If you have questions about the topics covered or requests for future topics, I would love to hear them! Leave a comment, or ask me on my Twitter, @VinoBS

Note:  
This series is ongoing - check back every Thursday for new content!


Note:  
The video below contains the playlist for all the videos in this series, which can be accessed via the playlist icon at the top of the embedded video frame. The first video in the series is loaded automatically


Graphs and Pathfinding


Using Varadic Templates for a Signals and Slots Implementation in C++

$
0
0

Abstract


Connecting object instances to each other in a type-safe manner is a well-solved problem in C++ and many good implementations of signals and slots systems exist. However, prior to the new varadic templates introduced in C++0x, accomplishing this has traditionally been complex and required some awkward repetition of code and limitations.

Varadic templates allow for this system to be implemented in a far more elegant and concise manner and a signals/slots system is a good example of how the power of varadic templates can be used to simplify generic systems that were previously difficult to express.

This system is limited to connecting non-static class methods between object instances in order to keep the article focused and to meet the requirements for which the code was originally designed. Connecting signals to static or non-member functions is an extension not discussed here. Events in this system also have no return type as returning values from a signal potentially connected to many slots is a non-trivial problem conceptually and would distract from the central concept here.

The final product of this implementation is a single, fairly short header file that can be dropped into any C++0x project.

Because I work with QtCreator, I chose to name this system as Events and Delegates rather than signals and slots as QtCreator treats certain words as reserved due to Qt's own signals/slots system. This is purely cosmetic and irrelevant to the article.

A detailed discussion of varadic templates is beyond the scope of this article and will be discussed purely in relation to this specific example.

Code is tested with GCC 4.7.2 but should be valid for any C++0x compliant compiler implementing varadic templates

Overview


The system provides two main classes - Event which represents a signal that can be sent from an object, and Delegate which is used to connect external signals to internal member functions.

Representing the connections as members allows for modelling of the connections via the object lifetimes so that auto-disconnecting of connections when objects are destroyed can be expressed implicitly with nothing required from the programmer.

Event


Lets start by looking at the Event class as an introduction to the varadic template syntax. We need a class that is templated on any number of parameters of any types to represent a generic signal sent by an object.

template<class... Args> class Event
{
public:
    void operator()(Args... args){ }
}

This is the basics of varadic templates. The class... Args is expanded to a comma-separated list of the types provided when the template is instatiated. For example, under the hood, you can think of the compiler doing something like this:

Event<int, float, const &std::string> event;

template<int, float, const &std::string> Event
{
public:
    void operator()(int, float, const std::string&){ }
};

For simplicity, lets imagine we have a normal function taking these parameters, so we can look at how we call it from within the body of the operator():

void f(int i, float f, const std::string &s)
{
}

template<class... Args> class Event
{
public:
    void operator()(Args... args){ f(args...); }
}

Event<int, float, const std::string&> event;
event(10, 23.12f, "hello");

The args... syntax will be expanded in this case to 10, 23.12f, "hello", which the normal rules of function lookup will resolve to the dummy f method defined above. We could define multiple versions of f taking different parameters and the resolution would then be based on the specific parameters that Event is templated upon, as expected.

Note that the names Args and args are arbitrary like a normal template name. The ellipses is the actual new syntax introduced in C++0x.

So we now have a class to represent an event that can be templated on any combination and number of parameters and we can see how to translate that into a function call to a function with the appropriate signature.

Delegate


The Event class needs to store a list of subscribers to it so that the operator() can be replaced by a method that walks this list and calls the appropriate member of each subscriber. This is where things become slightly more complicated because the subscriber, a Delegate, needs to be templated both on its argument list and also the type of the subscriber object itself. Core to the whole concept of generic signals and slots is that the signal does not need to know the types of the subscriber objects directly, which is what makes the system so flexible.

So we need to use inheritance as a way to abstract out the subscriber type so that the Event class can deal with a representation of the subscriber templated purely on the argument list.

template<class... Args> class AbstractDelegate
{
public:
    virtual ~AbstractDelegate(){ }

    virtual void call(Args... args) = 0;
};

template<class T, class... Args> ConcreteDelegate : public AbstractDelegate
{
public:
    virtual void call(Args... args){ (t->*f)(args...); }

    T *t;
    void(T::*f)(Args...);
};

Note that the varadic template usage is just being combined with the existing pointer-to-member syntax here and nothing new in terms of varadic templates is introduced. Again we are simply using Args... to replace the type list, and args... to replace the parameter list, just like in the simpler Event example above.

So now we can expand Event to maintain a list of AbstractDelegate pointers which will be populated by ConcreteDelegates and the system can translate a call from Event using only the argument list to call to a method of a specific type:

template<class... Args> class Event
{
public:
    void operator()(Args... args){ for(auto i: v) i->call(args...); }

private:
    std::vector<AbstractDelegate<Args...>*> v;
}

Note the use of the for-each loop also introduced in C++0x. This is purely for brevity and not important to the article. If it is unfamiliar, it is just a concise way to express looping across a container that supports begin() and end() iterators.

Connections in this system need to be two-way in that Delegate also needs to track which Events it is connected to. This is so when the Event is destroyed, the Delegate can disconnect itself automatically. Thankfully we can use Event as-is inside AbstractDelegate since it is only templated on the argument list:

template<class... Args> class AbstractDelegate
{
public:
    virtual void call(Args... args) = 0;

private:
    std::vector<Event<Args...>*> v;
};

The final class that we need to look at is motivated by the fact that creating a separate object inside each recieving class to represent each slot is tedious and repetitive, since the recieving object requires both a member function to be called in response to the signal, then an object to represent the connection. The system instead provides a single Delegate object that can represent any number of connections of events to member functions, so a recieving object need only contain a single Delegate instance.

We need therefore to have a way to treat all AbstractDelegates as the same, regardless of their argument lists, so once again we use inheritance to accomplish this:

class BaseDelegate
{
public:
    virtual ~BaseDelegate(){ }
};

template<class... Args> class AbstractDelegate : public BaseDelegate
{
public:
    virtual void call(Args... args) = 0;
};

We can now store a list of BaseDelegates inside the Delegate class that can represent any AbstractDelegate, regardless of its parameter list. We can also provide a connect() method on Delegate to add a new connection, which has the added advantage that the template arguments can then be deduced by the compiler at the point of call, saving us from having to use any specific template types when we actually use this:

class Delegate
{
public:
    template<class T, class... Args> void connect(T *t, void(T::*f)(Args...), Event<Args...> &s){ }
    
private:
    std::vector<BaseDelegate*> v;
};

For example:

class A
{
public:
    Event<int, float> event;
};

class B
{
public:
    B(A *a){ delegate.connect(this, &B::member, a->event); }

private:
    Delegate delegate;

    void member(int i, float f){ }
};

All that really remains now is some boiler-plate code to connect Events and Delegates and to auto-disconnect them when either side is destroyed. A detailed discussion of this is not really related to varadic templates and just requires some familiarity with using the standard library methods.

Fundamentally, ConcreteDelegate should only be constructable with a pointer to a reciever, a member function and an Event. Connecting an Event to an AbstractDelegate should also add the Event to the AbstractDelegate's list of Events.

When an Event goes out of scope, it needs to signal all its Delegates to remove it, and when a Delegate is destroyed, it needs to tell all the Events it is listening to to remove it. Explcit disconnection is not implemented here but could be trivially added if required.

An implementation of this full system just uses the usual std::vector and std::remove methods of the standard library.

Note in this implementation, all classes are defined to be non-copyable as it is hard to come up with a sensible strategy for copying behaviour of both Events and Delegates and for the purposes this is designed for, it is not necessary.

#include <vector>
#include <algorithm>

template<class... Args> class Event;

class BaseDelegate
{
public:
    virtual ~BaseDelegate(){ }
};

template<class... Args> class AbstractDelegate : public BaseDelegate
{
protected:
    virtual ~AbstractDelegate();

    friend class Event<Args...>;

    virtual void add(Event<Args...> *s){ v.push_back(s); }
    virtual void remove(Event<Args...> *s){ v.erase(std::remove(v.begin(), v.end(), s), v.end()); }

    virtual void call(Args... args) = 0;

    std::vector<Event<Args...>*> v;
};

template<class T, class... Args> class ConcreteDelegate : public AbstractDelegate<Args...>
{
public:
    ConcreteDelegate(T *t, void(T::*f)(Args...), Event<Args...> &s);

private:
    ConcreteDelegate(const ConcreteDelegate&);
    void operator=(const ConcreteDelegate&);

    friend class Event<Args...>;

    virtual void call(Args... args){ (t->*f)(args...); }

    T *t;
    void(T::*f)(Args...);
};

template<class... Args> class Event
{
public:
    Event(){ }
    ~Event(){ for(auto i: v) i->remove(this); }

    void connect(AbstractDelegate<Args...> &s){ v.push_back(&s); s.add(this); }
    void disconnect(AbstractDelegate<Args...> &s){ v.erase(std::remove(v.begin(), v.end(), &s), v.end()); }

    void operator()(Args... args){ for(auto i: v) i->call(args...); }

private:
    Event(const Event&);
    void operator=(const Event&);

    std::vector<AbstractDelegate<Args...>*> v;
};

template<class... Args> AbstractDelegate<Args...>::~AbstractDelegate()
{
    for(auto i : v) i->disconnect(*this);
}

template<class T, class... Args> ConcreteDelegate<T, Args...>::ConcreteDelegate(T *t, void(T::*f)(Args...), Event<Args...> &s) : t(t), f(f)
{
    s.connect(*this);
}

class Delegate
{
public:
    Delegate(){ }
    ~Delegate(){ for(auto i: v) delete i; }

    template<class T, class... Args> void connect(T *t, void(T::*f)(Args...), Event<Args...> &s){ v.push_back(new ConcreteDelegate<T, Args...>(t, f, s)); }

private:
    Delegate(const Delegate&);
    void operator=(const Delegate&);

    std::vector<BaseDelegate*> v;
};

Examples


Let's look at some concrete examples of this in relation to a game project. Assume we have an Application class that is called when a Windows message is processed. We want to be able to have game objects subscribe to certain events, such as key down, application activated etc.

So we can create an AppEvents class to pass around to initialization code to represent these and trigger these events within the Application message handler:

class AppEvents
{
    Event<bool> activated;
    Event<int> keyDown;
};

class Application
{
public:
    LRESULT wndProc(UINT msg, WPARAM wParam, LPARAM lParam);

private:
    AppEvents events;
};

LRESULT Application::wndProc(UINT msg, WPARAM wParam, LPARAM lParam)
{
    switch(msg)
    {
        case WM_ACTIVATE: events.activated(static_cast<bool>(wParam)); return 0;
        case WM_KEYDOWN : if(!(lParam & 0x40000000)) events.keyDown(wParam); return 0;

        case WM_LBUTTONDOWN: events.mouseDown(Vec2(GET_X_LPARAM(lParam), GET_Y_LPARAM(lParam)), VK_LBUTTON); return 0;
    }

    return DefWindowProc(hw, msg, wParam, lParam);
}

Now when we create a game object, we just make the AppEvents instance available to its constructor:

class Player : public GameItem
{
public:
    Player(AppEvents &events, const Vec3 &pos);

private:
    void appActivated(bool state){ /* ... */ }
    void keyDown(int key){ /* ... */ }

    Delegate delegate;
};

Player::Player(AppEvents &events, const Vec3 &pos) : pos(pos)
{
    delegate.connect(this, &Player::appActivated, events.activated);
    delegate.connect(this, &Player::keyDown, events.keyDown);
}

Player *Application::createPlayer(const Vec3 &pos)
{
    return new Player(events, pos);
}

Another area this is useful is in dealing with dangling pointers to resources that have been removed elsewhere. For example, if we have a Body class that wraps a rigid body in a physics system, and a Physics class that is responsible for adding and removing bodies to the world, we may end up with references to a body that need to be nullified when the body is removed.

It can be useful then to give the Body a destroyed(Body*) event that is called from its destructor.

class Body
{
public:
    ~Body(){ destroyed(this); }
    
    Event<Body*> destroyed;
}

The physics system can then connect to this event when it creates the body and use it to remove the body from the physics world when it is destroyed. This saves having each body storing a reference to the Physics instance and manually calling it from its destructor and means the body removal no longer needs to be part of the public interface of the Physics class.

Body *Physics::createBody()
{
    pRigidBody *b = world->createBody();

    Body *body = new Body();
    body->setRigidBody(b);

    delegate.connect(this, &Physics::bodyDestroyed, body->destroyed);
    
    return body;
}

void Physics::bodyDestroyed(Body *body)
{
    pRigidBody *b = body->getRigidBody();
    world->removeBody(b);
}

In addition, any other class that holds a reference to the body that does not actually own it can choose to subscribe to the destroyed(Body*) event to nullify its own reference:

class Something
{
public:
    Something(Body *ref) : ref(ref) { delegate.connect(this, &Something::refLost, ref->destroyed); }

private:
    void refLost(Body *b){ ref = 0; }

    Body *ref;
};

Now anywhere else in the code, you can just delete the Body instance or maintain it with a smart pointer, and it will be both removed from the Physics world and also any other non-owning references to it get the opportunity to be updated, without the overhead of having to call methods on every possible object that might own such a reference.

Conclusion


Varadic templates are a powerful addition to C++ that make code that was previously verbose and limited far more elegant and flexible. This is only one example of how they allow for systems that have both type-safety and generic features implemented at compile time. The days of dreading the ellipse operator are over, since we can now use it in a type-safe manner and the possiblities are endless.

Making a Game with Blend4Web Part 3: Level Design

$
0
0
This is the third article in the Making a Game series. In this article we'll consider assembling the game scene using the models prepared at the previous stage, setting up the lighting and the environment, and also we'll look in detail at creating the lava effect.

Assembling the game scene


Let's assemble the scene's visual content in the main_scene.blend file. We'll add the previously prepared environment elements from the env_stuff.blend file.

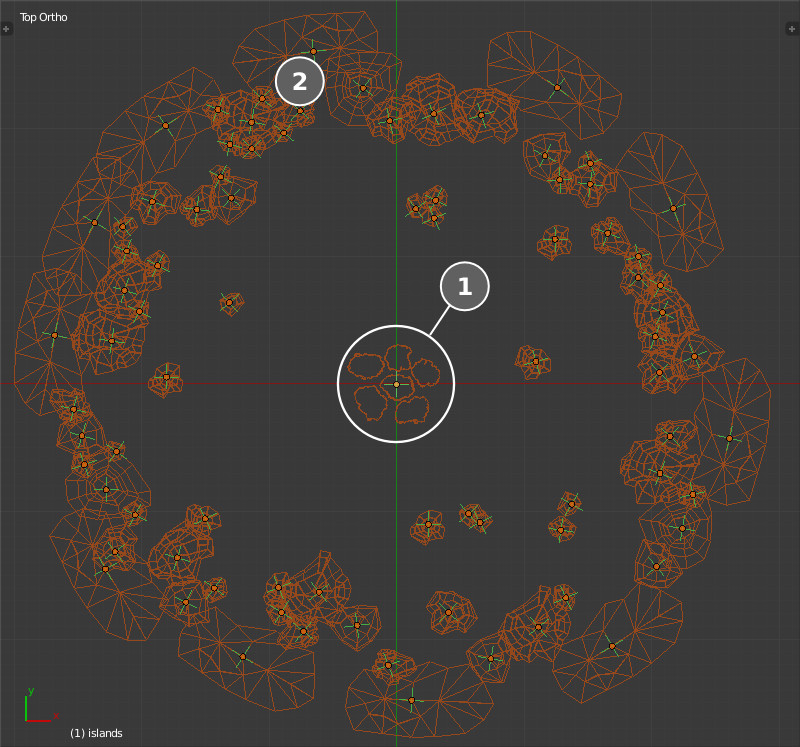
Open the env_stuff.blend file via the File -> Link menu, go to the Group section, add the geometry of the central islands (1) and the background rocks (2) and arrange them on the scene.


ex02_p03_img02.jpg?v=2014080111562320140


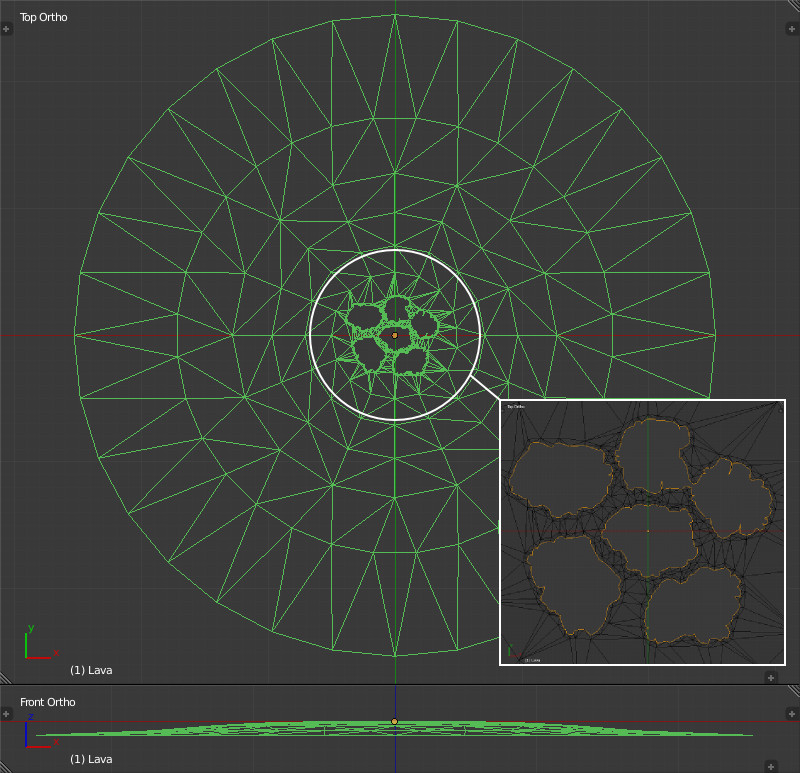
Now we need to create the surface geometry of the future lava. The surface can be inflated a bit to deepen the effect of the horizon receding into the distance. Lets prepare 5 holes copying the outline of the 5 central islands in the center for the vertex mask which we'll introduce later.

We'll also copy this geometry and assign the collision material to it as it is described in the previous article.


ex02_p03_img03.jpg?v=2014080111562320140


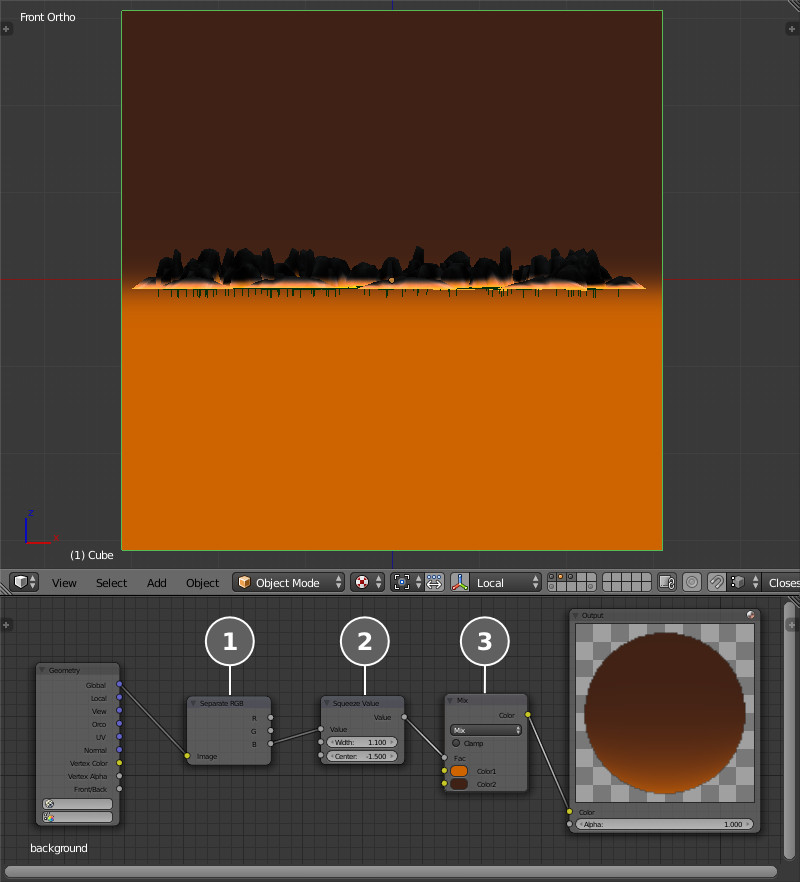
A simple cube will serve us as the environment with its center located at the horizon level for convenience. The cube's normals must be directed inside.

Lets set up a simple node material for it. Get a vertical gradient (1) located on the level of the proposed horizon from the Global socket. After some squeezing and shifting it with the Squeeze Value node (2) we add the color (3). The result is passed directly into the Output node without the use of an intermediate Material node in order to make this object shadeless.


ex02_p03_img04.jpg?v=2014080111562320140


Setting up the environment


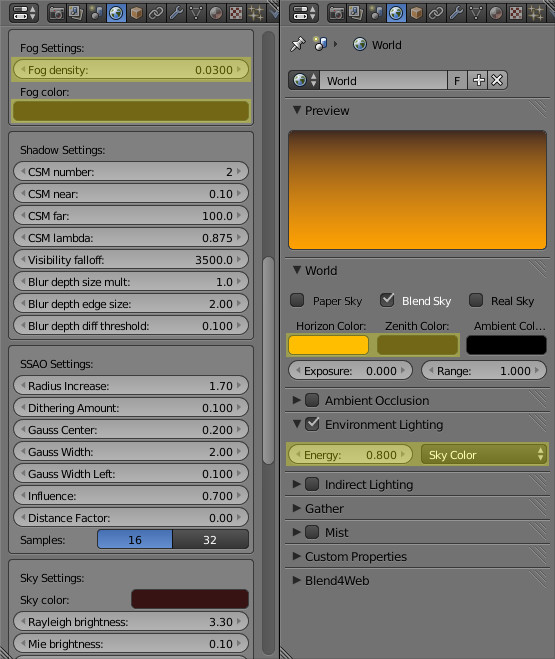
We'll set up the fog under the World tab using the Fog density and Fog color parameters. Let's enable ambient lighting with the Environment Lighting option and setup its intensity (Energy). We'll select the two-color hemispheric lighting model Sky Color and tweak the Zenith Color and Horizon Color.


ex02_p03_img05.jpg?v=2014080111562320140


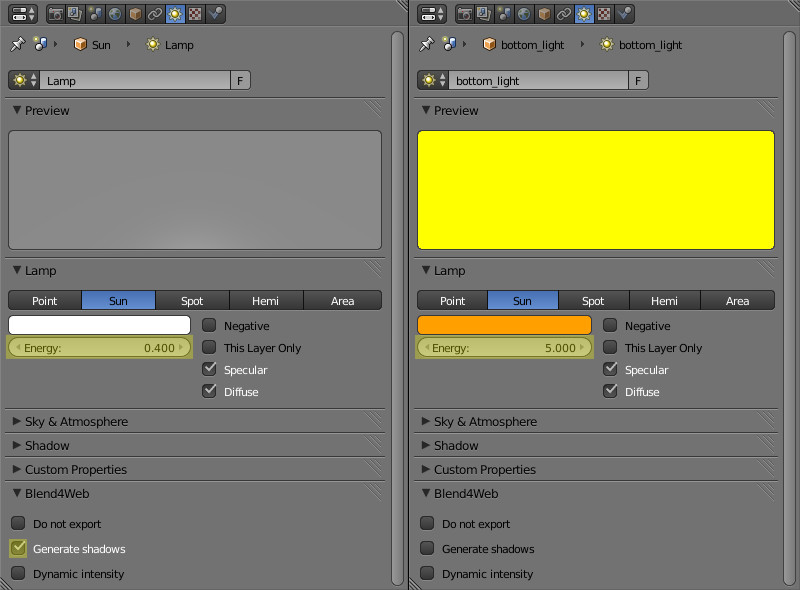
Next place two light sources into the scene. The first one of the Sun type will illuminate the scene from above. Enable the Generate Shadows checkbox for it to be a shadow caster. We'll put the second light source (also Sun) below and direct it vertically upward. This source will imitate the lighting from lava.


ex02_p03_img06.jpg?v=2014080111562320140


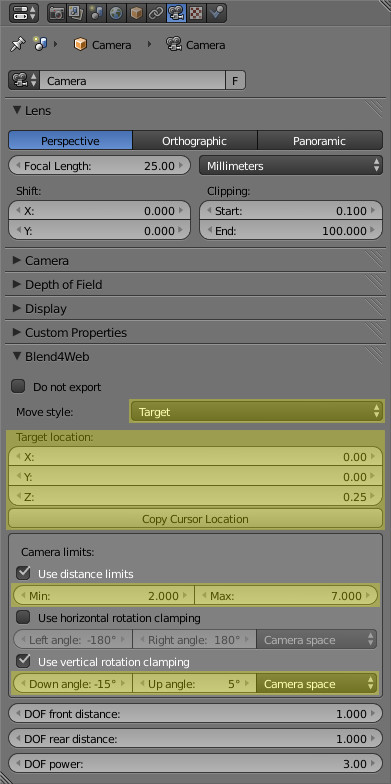
Then add a camera for viewing the exported scene. Make sure that the camera's Move style is Target (look at the camera settings on the Blend4Web panel), i.e. the camera is rotating around a certain pivot. Let's define the position of this pivot on the same panel (Target location).

Also, distance and vertical angle limits can be assigned to the camera for convenient scene observation in the Camera limits section.


ex02_p03_img07.jpg?v=2014080111562320140


Adding the scene to the scene viewer


At this stage a test export of the scene can be performed: File -> Export -> Blend4Web (.json). Let's add the exported scene to the list of the scene viewer external/deploy/assets/assets.json using any text editor, for example:

    {
        "name": "Tutorials",
        "items":[

            ...

            {
                "name": "Game Example",
                "load_file": "../tutorials/examples/example2/main_scene.json"
            },

            ...
        ]
   }   

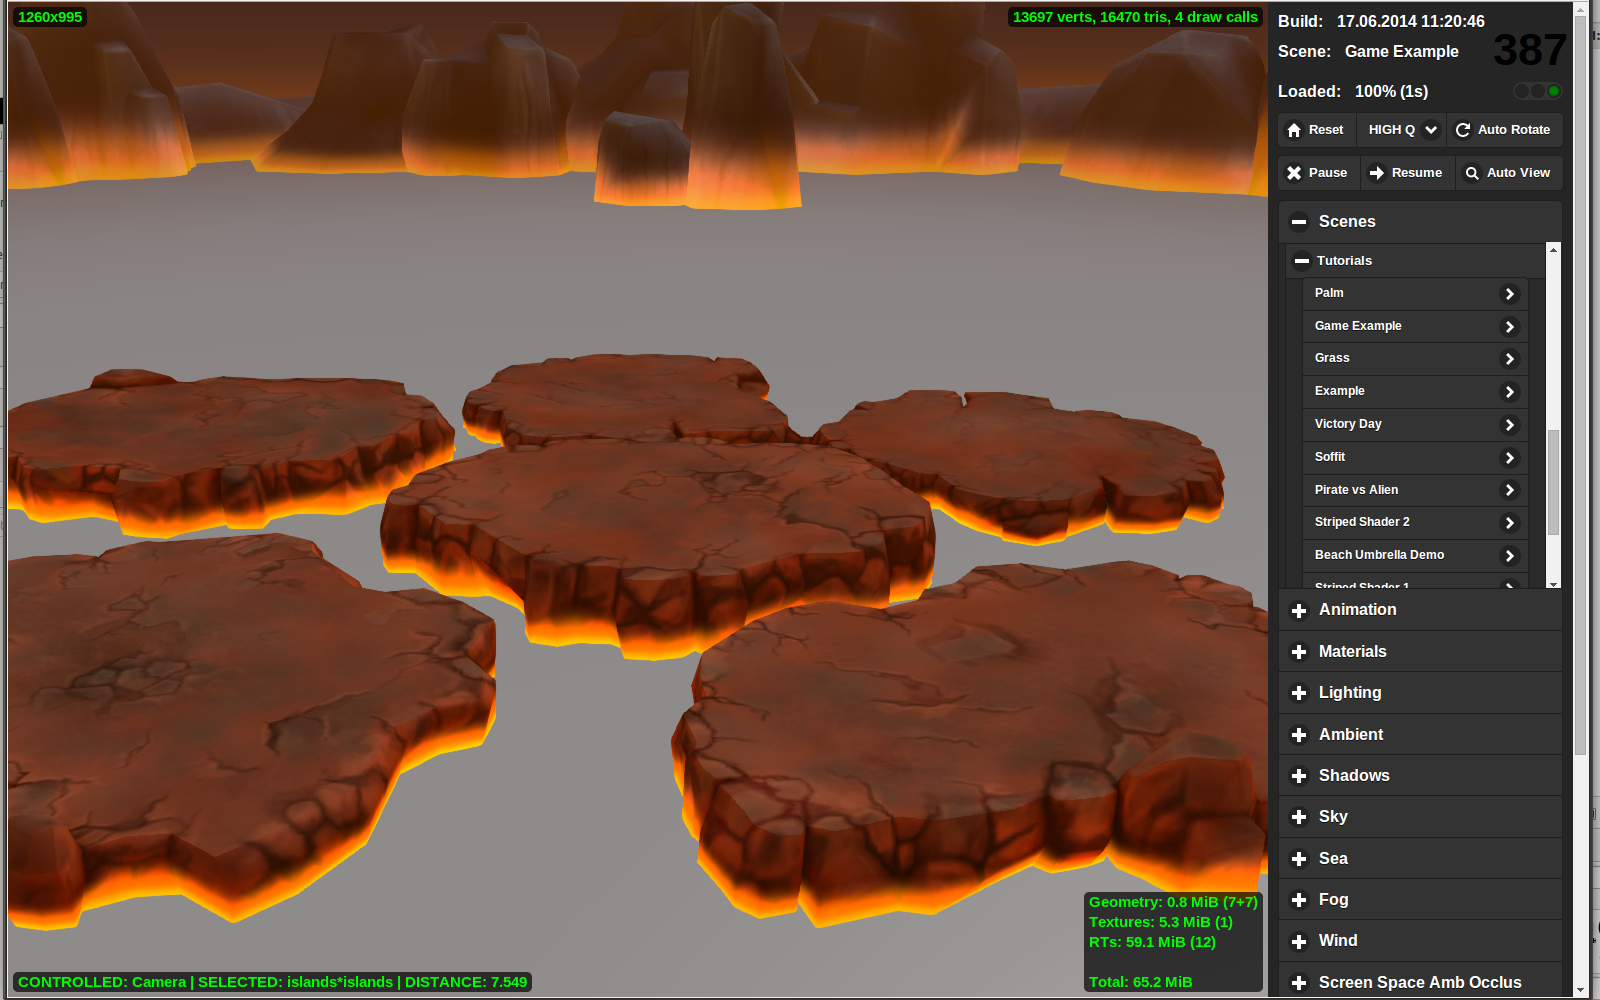
Then we can open the scene viewer apps_dev/viewer/viewer_dev.html with a browser, go to the Scenes panel and select the scene which is added to the Tutorials category.


ex02_p03_img08.jpg?v=2014080111562320140


The tools of the scene viewer are useful for tweaking scene parameters in real time.

Setting up the lava material


We'll prepare two textures by hand for the lava material, one is a repeating seamless diffuse texture and another will be a black and white texture which we'll use as a mask. To reduce video memory consumption the mask is packed into the alpha channel of the diffuse texture.


ex02_p03_img09.jpg?v=2014080111562320140


The material consists of several blocks. The first block (1) constantly shifts the UV coordinates for the black and white mask using the TIME (2) node in order to imitate the lava flow movement.


ex02_p03_img10.jpg?v=2014080111562320140


Note:  
The TIME node is basically a node group with a reserved name. This group is replaced by the time-generating algorithm in the Blend4Web engine. To add this node it's enough to create a node group named TIME which has an output of the Value type. It can be left empty or can have for example a Value node for convenient testing right in Blender's viewport.


In the other two blocks (4 and 5) the modified mask stretches and squeezes the UV in certain places, creating a swirling flow effect for the lava. The results are mixed together in block 6 to imitate the lava flow.

Furthermore, the lava geometry has a vertex mask (3), using which a clean color (7) is added in the end to visualize the lava's burning hot spots.


ex02_p03_img11.jpg?v=2014080111562320140


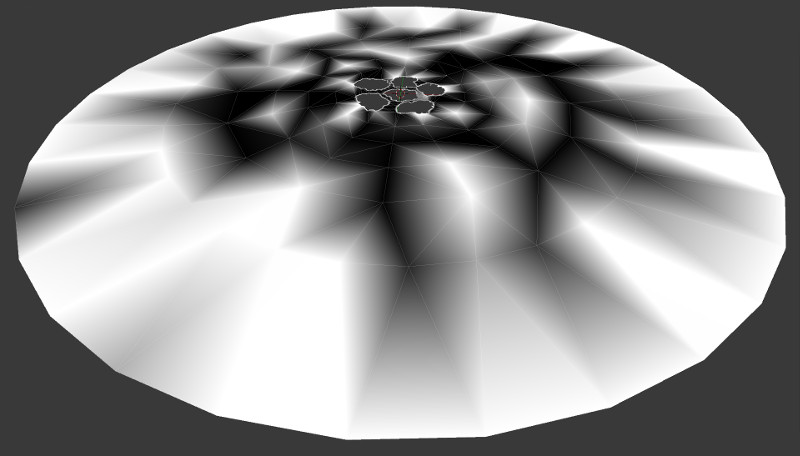
To simulate the lava glow the black and white mask (8) is passed to the Emit socket. The mask itself is derived from the modified lava texture and from a special procedural mask (9), which reduces the glow effect with distance.

Conclusion


This is where the assembling of the game scene is finished. The result can be exported and viewed in the engine. In one of the upcoming articles we'll show the process of modeling and texturing the visual content for the character and preparing it for the Blend4Web engine.


ex02_p03_img12.jpg?v=2014080111562320140


Link to the standalone application

The source files of the application and the scene are part of the free Blend4Web SDK distribution.

Introduction to Software Optimization

$
0
0

As a software/game developer, you usually want more and more... of everything actually! More pixels, more triangles, more FPS, more objects on the screen, bots, monsters. Unfortunately you don't have endless resources and you end up with some compromises. The optimization process can help in the reduction of performance bottlenecks and it may free some available powers hidden in the code.


Optimization shouldn't be based on random guesses: "oh, I think, if I rewrite this code to SIMD, the game will run a bit faster". How do you know that "this code" makes some real performance problems? Is investing there a good option? Will it pay off? It would be nice to have some clear guide, a direction.


In order to get some better understanding on what to improve, you need to detect a base line of the system/game. In other words, you need to measure the current state of the system and find hot spots and bottlenecks. Then think about factors you would like to improve... and then... start optimizing the code! Such a process might not be perfect, but at least you will minimize potential errors and maximize the outcome.


Of course, the process will not be finished with only one iteration. Every time you make a change, the process starts from the beginning. Do one small step at a time. Iteratively.


At the end your game/app should still work (without new bugs, hopefully) and it should run X times faster. The factor X, can be even measured accurately, if you do the optimization right.


The Software Optimization Process


According to this and this book, the process should look like this:


  1. Benchmark
  2. Find hot spots and bottlenecks
  3. Improve
  4. Test
  5. Go back

optprocess.png

The whole process should not start after the whole implementation (when usually there is no time to do it), but should be executed during the project's time. In case of our particle system I tried to think about possible improvements up front.


1. The benchmark


Having a good benchmark is a crucial thing. If you do it wrong then the whole optimization process can be even a waste of time.


From The Software Optimization Cookbook book:


The benchmark is the program or process used to:
  • Objectively evaluate the performance of an application
  • Provide repeatable application behavior for use with performance analysis tools.


The core and required attributes:

  • Repeatable - gives the same results every time you run it.
  • Representative - uses large portion of the main application's use cases. It would be pointless if you focus only on a small part of it. For a game such a benchmark could include the most common scene or scene with maximum triangles/objects (that way simpler scenes will also work faster).
  • Easy to run - you don't want to spend hours setting up and running the benchmark. A benchmark is definitely harder to make than a unit test, but it would be nice if it runs as fast as possible. Another point is that it should produce easy to read output: for instance FPS report, timing report, simple logs... but not hundreds of lines of messages from internal subsystems.
  • Verifiable - make sure the benchmark produces valid and meaningful results.

2. Find hot spots and bottlenecks


search2.png

When you run your benchmark you will get some output. You can also run profiling tools and get more detailed results of how the application is performing.


But, having data is one, but actually, it is more important to understand it, analyze and have good conclusion. You need to find a problem that blocks the application from running at full speed.


Just to summarize:

  • bottleneck - place in the system that makes the whole application slower. Like the weakest element of a chain. For instance, you can have a powerful GPU, but without fast memory bandwidth you will not be able to feed this GPU monster with the data - it will wait.
  • hot spot - place in the system that does crucial, intensive job. If you optimize such a module then the whole system should work faster. For instance, if CPU is too hot then maybe offload some work to GPU (if it has some free compute resources available).

This part may be the hardest. In a simple system it is easy to see a problem, but in large-scale software it can be quite tough. Sometimes it can be only one small function, or the whole design, or some algorithm used.


Usually it is better to use a top-down approach. For example:


Your framerate is too low. Measure your CPU/GPU utilization. Then go to CPU or GPU side. If CPU: think about your main subsystems: is this a animation module, AI, physics? Or maybe your driver cannot process so many draw calls? If GPU: vertex or fragment bound... Go down to the details.


3. Improve


tools_bw.png

Now the fun part! Improve something and the application should work better :)


What you can improve:

  • at system level - look at utilization of your whole app. Are any resources idle? (CPU or GPU waiting?) Do you use all the cores?
  • at algorithmic level - do you use proper data structures/algorithms? Maybe instead of O(n) solution you can reduce it to O(log n) ?
  • at micro level - the 'funniest' part, but do it only when the first two levels are satisfied. If you are sure, that nothing more can be designed better, you need to use some dirty code tricks to make things faster.

One note: Instead of rewriting everything to Assembler use your tools first. Today's compilers are powerful optimizers as well. Another issue here is portability: one trick might not work on another platform.


4. Test


After you make a change test how the system behaves. Did you get 50% of the speed increase? Or maybe it is even slower?


Beside performance testing, please make sure you are not breaking anything! I know that making systems 10% faster is nice, but your boss will not be happy if, thanks to this improvement, you introduce several hard-to-find bugs!


5. Go back


reload_bw192.png

After you are sure everything works even better than before... just run your bechmark and repeat the process. It is better if you make a small, simple change, rather than big, but complex. With smaller moves it is harder to make a mistake. Additionally, it is easy to revert the changes.


Profiling Tools


Main methods:

  • custom timers/counters - you can create a separate configuration (based on Release mode) and enable a set of counters or timers. For instance, you can place it in every function in a critical subsystem. You can generate call hierarchy and analyse it further on.
  • instrumentation - tool adds special fragments of code to your executable so that it can measure the execution process.
  • interception - tool intercepts API calls (for instance OpenGL - glIntercept, or DirectX) and later on analyses such register.
  • sampling - tool stops the application at specific intervals and analyses the function stack. This method is usually much lighter than instrumentation.

Below is a list of professional tools that can help:

  • Intel® VTune™ Amplifier
  • Visual Studio Profiler
  • AMD CodeXL - FREE. AMD created a good, easy to use, profiling tool for CPU and GPU as well. Does the best job when you have also AMD CPU (that I don't have ;/) but for Intel CPU's it will give you at least timing reports.
  • ValGrind - runs your app on a virtual machine and can detect various problems: from memory leaks to performance issues.
  • GProf - Unix, uses a hybrid of sampling and instrumentation.
  • Lots of others... here on wikipedia

Something more


Automate


I probably do not need to write this... but the more you automate the easier your job will be.


This rule applies, nowadays, to almost everything: testing, setup of application, running the application, etc.


Have Fun!


The above process sounds very 'professional' and 'boring'. There is also another factor that plays an important role when optimizing the code: just have fun!


You want to make mistakes, you want to guess what to optimize and you want to learn new things. In the end, you will still get some new experience (even if you optimized a wrong method).


You might not have enough time for this at your day job, but what about some hobby project?


The more experience with the optimization process you have, the faster your code can run.


References


Article Update Log


17th August 2014: Initial version, based on post from Code and Graphics blog

Basic sound manager for your project

$
0
0
I have always been sort of terrified when adding sound to my games. I have even considered to make the game without sounds and ran a poll about it. Results were approximately 60:40 for sound. Bottom line, you should have your games with sound.

While working with sound, obviously, you have to make sure that sound will play together with the main loop and will be correctly synced. For this, threads will probably be your first thought. Hovewer, you can go without them as well, but it will have some disadvantages (will be mentioned later).

First important question is: "What library to use?" There are many libraries around and only some of them are free. I was also looking for a universal library, that will run on a desktop and on a mobile device as well. After some googling, I have found OpenAL. It's supported by iOS and by desktop (Windows, Linux, Mac) as well. OpenAL is a C library with an API similar to the one used by OpenGL. In OpenGL, all functions start with a gl prefix, in OpenAL there is an al prefix. If you read some other articles, you may come across the "alut“ library. That is something similar to "glut", but I am not going to use it.

For Windows OpenAL, you have to use a forked version of the library. OpenAL was created by Creative. For now it is an outdated library and no longer updated by Creative (latest API version is 1.1 from 2005). Luckily, there is an OpenAL Soft implementation (fork of the original OpenAL), that uses the same API as the original OpenAL. You can find source and windows precompiled libraries here.

On Apple devices running iOS, there is a far better situation. OpenAL is directly supported by Apple, you don't need to install anything, just add references to your project from Apple's libraries. See Apple manual.

One of OpenAL's biggest disadvantages is there is no direct support for Android. Android is using OpenSL (or something like that :-)). With a little digging, you can find "ports“ of OpenAL for Android. What they are doing, is to map an OpenAL function call to an OpenSL call, so it is basically a wrapper. One of them can be found here (GitHub). It uses previously mentioned OpenAL Soft, only built with different flags. Hovewer, I have never tested this, so I don't know if and how it works.

After library selection, you have to choose supported sound formats you want to play. Favorite MP3 is not the best choice, the decoder is a little messy and there are some patents laying around. OGG is a better choice. Decoder is easy to use, open and OGG files often have smaller size than MP3 with the same settings. It is also a good decision to support uncompressed WAV.

Sound engine design


Lets start with sound engine design and what exactly you need to get it working.

As I mentioned before, you will need the OpenAL library. OpenAL is a C library. I want to add some object oriented wrapper for easier manipulation. I have used C++, but a similar design can be used in other languages as well (of course, you will need an OpenAL library bridge from C to your language).

Apart from OpenAL, you will also need thread support. I have used the pthread library (Windows version). If you are targeting C++11, you can also go with native thread support.

For OGG decompression, you will need the OGG Vorbis library (download parts libogg and libvorbis).

WAV files aren't use very often, more for debugging, but it's good to have a support for that format too. Simple WAV decompression is easy to write from scratch, so I have used this solution, instead of a 3rd party library.

My design is created from two basic classes, one interface (pure virtual class) and then one class for every supported audio format (OGG, WAV…).
  • SoundManager – main class, using the singleton pattern. Singleton is a good choice here, since you probably have only one instance of an OpenAL initiated. This class is used for controlling and updating all sounds. References to all SoundObjects are held there.
  • SoundObject – our main sound, that will be accessible and has methods such as: Play, Pause, Rewind, Update…
  • ISoundFileWrapper – interface (pure virtual class) for different file formats, declaring methods for decompression, filling buffers etc.
  • Wrapper_OGG – class that implements ISoundFIleWrapper. For decompression of OGG files
  • Wrapper_WAV – class that implements ISoundFIleWrapper. For decompression of WAV files

OpenAL Initialization


Code described in this section can be found in class SoundManager. Full source with header is in the article attachment. We start with a code snippet for an OpenAL initialization.

alGetError();

ALCdevice * deviceAL = alcOpenDevice(NULL);

if (deviceAL == NULL)
{
	LogError("Failed to init OpenAL device.");
	return;
}

ALCcontext * contextAL = alcCreateContext(deviceAL, NULL);
AL_CHECK( alcMakeContextCurrent(contextAL) );

Once initiated, we won't need device and context variables any more, only in the destruction phase. OpenAL holds it's initiated state internally.

You may see AL_CHECK around the alcMakeContextCurrent function. This is a macro I am using to check for an OpenAL errors in debug mode. You can see its code in the following snippet

const char * GetOpenALErrorString(int errID)
{	
	if (errID == AL_NO_ERROR) return "";
	if (errID == AL_INVALID_NAME) return "Invalid name";
    if (errID == AL_INVALID_ENUM) return " Invalid enum ";
    if (errID == AL_INVALID_VALUE) return " Invalid value ";
    if (errID == AL_INVALID_OPERATION) return " Invalid operation ";
    if (errID == AL_OUT_OF_MEMORY) return " Out of memory like! ";
    
    return " Don't know ";	
}

inline void CheckOpenALError(const char* stmt, const char* fname, int line)
{
	
	ALenum err = alGetError();
    if (err != AL_NO_ERROR)
    {		
		LogError("OpenAL error %08x, (%s) at %s:%i - for %s", err, GetOpenALErrorString(err), fname, line, stmt);       
    }
};

#ifndef AL_CHECK
#ifdef _DEBUG
       #define AL_CHECK(stmt) do { \
            stmt; \
            CheckOpenALError(#stmt, __FILE__, __LINE__); \
        } while (0);
#else
    #define AL_CHECK(stmt) stmt
#endif
#endif

I am using this same macro for every OpenAL call everywhere in my code.

Next thing you need to initialize are sources and buffers. You can create those later, when they are really needed. I have created some of them now and if more will be needed, they can always be added later.

Buffers are what you probably think – they hold uncompressed data, that are played by OpenAL. The source is basically the sound that is played. It is loading a sound from buffers associated to it. There are certain limits to the number of buffers and sources. Exact value depends on your system. I have chosen to pregenerate 512 buffers and 16 sources (that means I can play 16 sounds at once).

for (int i = 0; i < 512; i++)
{
	SoundBuffer buffer;
	AL_CHECK( alGenBuffers((ALuint)1, &buffer.refID) );
	this->buffers.push_back(buffer);
}

for (int i = 0; i < 16; i++)
{
	SoundSource source;
	AL_CHECK( alGenSources((ALuint)1, &source.refID)) ;
	this->sources.push_back(source);
}

You may notice, that alGen* function has a second parameter pointer to an unsigned int, which is the id of the created buffer or sound. I have wrapped this into a simple struct, that has the id and boolean indicator, if it is free or used by a sound.

I have created a list of all sources and buffers. Apart from this list, I have a second one, that holds only those resources that are free (not connected to any sound).

for (uint32 i = 0; i < this->buffers.size(); i++)
{
	this->freeBuffers.push_back(&this->buffers[i]);
}

for (uint32 i = 0; i < this->sources.size(); i++)
{
	this->freeSources.push_back(&this->sources[i]);
}

If you are using threads, you will also need to initialize them as well. Code for this can be found in source attached to this article.

Now, you have prepared all you need to start adding some sounds to your engine.

Sound playback logic


Before we start with some details and code, it is important to understand how sounds are managed and played. There are two solutions in how to play sounds.

In the first one, you will load the whole sound data into a single buffer and just play them. It's an easy and a fast way to listen to something. As usual, with simple solutions there is a problem. The uncompressed files are way bigger than the compressed ones. Imagine, you will have more than one sound. The size of all buffers can easily be bigger than your free memory. What now?

Luckily, there is a second approach. Load only small portion of a file into a single buffer, play it, than load another portion. It sounds good, right? Well, actually it is not. If you do it this way, you may hear pauses at the end of buffer playback, just before the buffer is filled again and played. We solve this by having more than one buffer filled at a time. Fill more buffers (I am using three), play the first one and if its content is played, we will play the second one immedietaly and in the "same" time, fill the finished buffer with the new data. We cycle this, until we reach the end of the sound.

The number of used buffers may vary, depending your needs. If your sound engine is updated from a separate thread, the count is not such a problem. You may choose almost any number of buffers and it will be just fine. Hovewer, if you use update together with your main engine loop (no threads involved), you may have problems with a low count of buffers. Why? Imagine you have a Windows application. Now, you drag the window around your desktop. On Windows (I have not tested it on other systems), this will cause the main thread to be suspended and wait. Sound will play (because OpenAL itself has its own thread to play sounds), but only until you have buffers in a queue, that can be played. If you exhaust all of them, sound will stop. This is because your main thread is blocked and buffers are not updated any more.

Each buffer has its byte size (we will set its size during sound creation, see next section). To compute duration of a sound in a buffer, you can use this equation:

duration = BUFFER_SIZE / (sound.freqency * sound.channels * sound.bitsPerChannel / 8) (eq. 1)

Note: If you want to calculate the current playback duration, you have to take the buffers in mind, but its not that straightforward. We will take a look at this in one of the later sectionss.

Ok, enough of theory, let's see some real code and how to do it. All the interesting stuff can be found in class SoundObject. This class is responsible for a single sound management (play, update, pause, stop, rewind etc.).

Creating sound


Before we can play anything, we need to initialize the sound. For now, I will skip the sound decompression part and just use ISoundFileWrapper interface methods, without background knowledge.

First of all, we obtain free buffers from our SoundManager (notice that we are using a singleton call on SoundManager to get its instance). We need to get as many free buffers as we want to have preloaded. Those free buffers are put into the array in our sound object.

#define PRELOAD_BUFFERS_COUNT 3
....
for (uint32 i = 0; i < PRELOAD_BUFFERS_COUNT; i++)
{
	SoundBuffer * buf = SoundManager::GetInstance()->GetFreeBuffer();
	if (buf == NULL)
	{
		MyUtils::Logger::LogWarning("Not enought free sound-buffers");
		continue;
	}
	this->buffers[i] = buf;
}

We need to get the sound info from our file (or memory, depending where your sound is stored). In that information, we need to have at least:

struct SoundInfo 
{
	int freqency; //sound frequency (eg. 44100 Hz)
	int channels; //nunber of channels (eg. Stereo = 2)
	int bitrate; //sound bitrate
	int bitsPerChannel; //number of bits per channel (eg. 16 for 2 channel stereo)

};

As a next step, we fill those buffers with initial data. We could do this later as well, but it must always be before we start playing sound.

Now, do you remember how we generated buffers in the initialization section? They had no size set. It will change now.

We decompress data from an input file/memory, using ISoundFileWrapper interface methods. Single buffer size is passed to the constructor and used in the DecompressStream method.

The flag setting: loop is used to enable/disable continuous playback. If we enable looping, after the end of the file is reached the rest of the buffer is filled with a content of a file that has been reset to the initial position.

bool SoundObject::PreloadBuffer(int bufferID)
{ 
    std::vector<char> decompressBuffer;
    this->soundFileWrapper->DecompressStream(decompressBuffer, this->settings.loop);

    if (decompressBuffer.size() == 0)
    {
      	//nothing more to read
        return false;
	}
	

	//now we fill loaded data to our buffer
	AL_CHECK( alBufferData(bufferID, this->sound.format, &decompressBuffer[0], static_cast<ALsizei>(decompressBuffer.size()), this->sound.freqency) );
		
	return true;
}

Playing the sound


Once we have prepared everything, we can finaly play our sound.

Each sound has three states - PLAYING, PAUSED, and STOPPED. In a STOPPED state, sound is reset to the default configuration. Next time we play this sound, it will start from the beginning.

Before we can actually play the sound, we need to obtain a free source from our SoundManager.

this->source = SoundManager::GetInstance()->GetFreeSource(); 

If there is no free source, we can't play the sound. It is important to release the source from the sound once the sound has stopped or finished playing. Do not release the source from a paused sound, or you will loose the progress and the settings.

Next, we set some additional properties for the source. We need to do this everytime after the source is bound to the sound, because a single source can be attached to a different sound after it has been released and that sound can have different settings.

I am using these properties, but you can set some other informations as well. For the complete list of possibilities, see OpenAL guiode (page 8).

AL_CHECK( alSourcef(this->source->refID, AL_PITCH, this->settings.pitch)) ;	
AL_CHECK( alSourcef(this->source->refID, AL_GAIN, this->settings.gain) );	
AL_CHECK( alSource3f(this->source->refID, AL_POSITION, this->settings.pos.X, this->settings.pos.X, this->settings.pos.X) );	
AL_CHECK( alSource3f(this->source->refID, AL_VELOCITY, this->settings.velocity.X, this->settings.velocity.Y, this->settings.velocity.Z) );	

There is an important thing: We have to set AL_LOOPING to false. If we set this flag to be true, we will end up with looping of a single buffer. Since we are using multiple buffers, we are managing loops by ourselves.

AL_CHECK( alSourcei(this->source->refID, AL_LOOPING, false) );

Before we actually start playback, buffers need to be set to the source buffer's queue. This queue is processed and played during playback.

this->remainBuffers = 0;
for (int i = 0; i < PRELOAD_BUFFERS_COUNT; i++)
{		
	if (this->buffers[i] == NULL)
	{
		continue; //buffer not used, do not add it to the queue
	}
	AL_CHECK( alSourceQueueBuffers(this->source->refID, 1, &this->buffers[i]->refID) );
this->remainBuffers++;
}

Finally, we can start the sound playback:

AL_CHECK( alSourcePlay(this->source->refID) );
this->state = PLAYING;

For now, our sound should be playing, and we should hear something (if not, it seems, there may be a problem :-)). If we do nothing more, our sound will end after some time, depending on the size of our buffer. We can calculate the length of a playback with the equation given earlier and multiply this time by our buffer count.

To ensure continuous playback, we have to update our buffers manually. OpenAL won't do this for us automatically. This is where the threads or main engine loop comes to the game. Update code is called from this separate thread or from main engine loop in every turn. This is probably one of the most important parts of the code.

void SoundObject::Update()
{
		
	if (this->state != PLAYING)
	{
		//sound is not playing ÃÃÃÃâ PAUSED / STOPPED ÃÃÃÃâ do not update
		return;
	}	
	
	int buffersProcessed = 0;
	AL_CHECK( alGetSourcei(this->source->refID, AL_BUFFERS_PROCESSED, &buffersProcessed) );
	
	// check to see if we have a buffer to deQ
	if (buffersProcessed > 0) 
	{
		if (buffersProcessed > 1)
		{
			//we have processed more than 1 buffer since last call of Update method
			//we should probably reload more buffers than just the one ÃÃÃÃâ not supported yet
			MyUtils::Logger::LogInfo("Processed more than 1 buffer since last Update");
		}

				
		// remove the buffer form the source
uint32 bufferID;

		AL_CHECK(alSourceUnqueueBuffers(this->source->refID, 1, &bufferID) );
		
		// fill the buffer up and reQ! 
		// if we cant fill it up then we are finished
		// in which case we dont need to re-Q
		// return NO if we dont have more buffers to Q
		
		if (this->state == STOPPED)
		{
			//put it back ÃÃÃÃâ sound is not playing anymore
			AL_CHECK( alSourceQueueBuffers(this->source->refID, 1, &bufferID) );				
			return;
		}

		//call method to load data to buffer
		//see method in section ÃÃÃÃâCreating soundÃÃÃÃâ
		if (this->PreloadBuffer(bufferID) == false)
		{
			this->remainBuffers--;
		}

		//put the newly filled buffer back (at the end of the queue)
		AL_CHECK( alSourceQueueBuffers(this->source->refID, 1, &bufferID) );
	}

	if (this->remainBuffers <= 0)
	{
//no more buffers remain ÃÃÃÃâ stop sound automatically
		this->Stop();
	}

}

Last thing that needs to be said, is stopping the sound playback. If the sound is stopped, we need to release its source and reset everything to the default configuration (preload buffers with the beginning of the sound data again).

I had a problem here. If I just removed buffers from the source's queue, refill them and put them back to the queue in next playback, there was an annoying glitch at the beginning of the sound. I have solved this by releasing buffers from sound and acquiring them again.

AL_CHECK( alSourceStop(this->source->refID) );
	
//Remove buffers from queue
for (int i = 0; i < PRELOAD_BUFFERS_COUNT; i++)
{		
	if (this->buffers[i] == NULL)
	{
		continue;
	}
	AL_CHECK( alSourceUnqueueBuffers(this->source->refID, 1, &this->buffers[i]->refID) );
}

//Free the source
SoundManager::GetInstance()->FreeSource(this->source);

this->soundFileWrapper->ResetStream();
	
       
//solving the ÃÃÃÃâglitchÃÃÃÃâ in the sound ÃÃÃÃâ release buffers and aquire them again
for (uint32 i = 0; i < PRELOAD_BUFFERS_COUNT; i++)
{
    SoundManager::GetInstance()->FreeBuffer(this->buffers[i]);
     
	SoundBuffer * buf = SoundManager::GetInstance()->GetFreeBuffer();
	if (buf == NULL)
	{
		MyUtils::Logger::LogWarning("Not enought free sound-buffers");
		continue;
	}
	this->buffers[i] = buf;
}
    
//Preload data again
...

Inside the SoundManager::GetInstance()->FreeBuffer method, I am deleting and regenerating the buffer to avoid a glitch in the sound. Maybe it's not a correct solution, but it was the only one that worked for me.

AL_CHECK( alDeleteBuffers(1, &buffer->refID) );
AL_CHECK( alGenBuffers(1, &buffer->refID) );

Additional sound info


During playback we often need some other information. The most important of them is probably the playback time. OpenAL doesn't have any solution for this kind of task (at least not directly and not with more than one buffer at play).

We have to calculate the time by ourselves. For this, we need OpenAL and file information as well. Since we are using buffers, this is a little problematic. Position in the file doesn't correspond directly with a currently playing sound. "File time" is not in synchronization with the "playback time". Second problem is caused by looping. At some point, "file time" is again at the beginning (eg. 00:00), but the playback time is somewhere at the end of the sound (eg. 16:20 from total length of 16:30).

We have take in mind all of this. First of all, we need to get time of the remaining buffers (that is a sum of all of the buffers that hasn't been played yet). From a sound file, we get the current time (for an uncompressed sound, it is a pointer into the file indicating current position). This time is, hovewer, not correct. It is a time containing all preloaded buffers, even the ones that haven't been played yet (and that is our problem). We subtract buffered time from file time. It will give us "correct" time, at least, in most of the cases.

As always, there are some "special cases" (very often called problems or any other not suitable words), that can cause some headache. I have already mentioned one of them – looping sound. If you are playing sound in a loop, you are listening to sound from a buffer that contains data from the end of a file, but a pointer in the data may already be at the beginning. This will give you negative time. You can solve this by taking the duration of an entire sound and subtract the absolute value of a negative time from it.

Second headache may be caused if a file is not looping or is short enough, to be kept in buffers only. For this, you take the duration of an entire sound and subrtact prebuffered time from it.

The time we have calculated so far, is not the final one yet. It is a time of a currently playing buffer's start.

To get current time, we have to add a current buffer time offset. For this, we have to use OpenAL to get buffer offset. Let's see, if we wouldn't use multiple buffers and have the whole sound in a big one, this would give us a correct time of a playback and no other tricks would be needed.

As always, you can review what has been written in code snippets to get a better understanding of the problem (or if you don't understant exactly my attempt to explain the problem :-)). Total time of the sound is obtained from an opened sound file via ISoundFileWrapper interface method.

//Get duration of remaining buffer
float preBufferTime = this->GetBufferedTime(this->remainBuffers);

//get current time of file stream
//this stream is "in future" because of buffered data
//duration of buffer MUST be removed from time
float time = this->soundFileWrapper->GetTime() - preBufferTime;


if (this->remainBuffers < PRELOAD_BUFFERS_COUNT)
{
	//file has already been read all
	//we are currently "playing" sound from cache only
	//and there is no loop active
	time = this->soundFileWrapper->GetTotalTime() - preBufferTime;
}

if (time < 0)
{
	//file has already been read all
	//we are currently "playing" sound from last loop cycle
	//but file stream is already in next loop
	//because of the cache delay

    //Sign of "+" => "- abs(time)" rewritten to "+ time"
	time = this->soundFileWrapper->GetTotalTime() + time;
}


//add current buffer play time to time from file stream
float result;
AL_CHECK(alGetSourcef(this->source->refID, AL_SEC_OFFSET, &result));

time += result; //time in seconds

Sound file formats


Now it seems to be a good time to look at actual sound files. I have used OGG and WAV. I have also added support for RAW data, which is basically the same as WAV without headers. WAV and RAW data are helpful during debugging, or if you have some external decompressor, that gives you uncompressed RAW data instead of compressed ones.

OGG

Decompression of OGG files is straightforward with a vorbis library. You just have to use their functions providing full functionality for you. You can find the whole code in the class WrapperOGG.

The most interessting part of this code is the main part for filling OpenAL buffers. We have an OGG_BUFFER_SIZE variable. I have used a size of 2048 bytes. Beware, this value is not the same as OpenAL buffer size! This value indicates how many bytes do we read in a single call from the ogg file. Those buffers are then appended to our OpenAL buffer. The size of our OpenAL buffer is stored in variable minDecompressLengthAtOnce. If we reach or overflow (should not happen) this value, we stop reading and return back.

minDecompressLengthAtOnce % OGG_BUFFER_SIZE must be 0! 

Otherwise, there will be a problem, because we read more data than the buffer can hold and our sound would be skipping some parts. Of course, we can update pointers or move them "back" to read missing data again, but why? Simple solution with modulo test is enough and produce cleaner code. There is no need to have some crazy buffer sizes, like for example 757 or 11243 bytes.

int endian = 0;   // 0 for Little-Endian, 1 for Big-Endian
int bitStream;
long bytes;	
	

do
{
	do 	{				
        // Read up to a buffer's worth of decoded sound data		
        bytes = ov_read(this->ov, this->bufArray, OGG_BUFFER_SIZE, endian, 2, 1, &bitStream);        
        if(bytes < 0)        
        {        	
            MyUtils::Logger::LogError("OGG stream ov_read error - returned %i", bytes);  
            continue;        
        }            		
        // Append data to the end of buffer		
        decompressBuffer.insert(decompressBuffer.end(), this->bufArray, this->bufArray + bytes);		
        if (static_cast<int>(decompressBuffer.size()) >= this->minDecompressLengthAtOnce)		
        {			
            //buffer has been filled			
            return;		
        }			
	} while (bytes > 0);

	if (inLoop)
	{
		//we are in look ÃÃÃÃâ we have reached end of the file ÃÃÃÃâ go back to the beginning
		this->ResetStream();
	}
	
	if (this->minDecompressLengthAtOnce == INT_MAX)
	{
		//read entire file in a single call
		return;
	}

} while(inLoop); 

WAV

Processing a WAV file by yourself may be seen as useless by many people ("I can download library somewhere“). In some ways it is and they are correct. On the other hand, doing this you will get a little better understanding of how things work under the hood. In the future, you can use this knowledge to write streaming of any kind of uncompressed data. Solution should be very similar to this one.

First, you have to calculate duration of your sound, using the equation we have already seen.

duration = RAW_FILE_SIZE / (sound.freqency * sound.channels * sound.bitsPerChannel / 8) (eq. 1)
RAW_SILE_SIZE = WAV_FILE_SIZE ÃÃÃÃâ WAV_HEADERS_SIZE

In a code snippet below, you can see the same functionality as in the OGG section sample. Again, we use modulo for RAW_BUFFER_SIZE (this time, hovewer, it is possible to avoid this, but why to use a different approach?).

bool eof = false;int curBufSize = 0;	
do{	
    do	
    {		
        curBufSize = 0;		
        while (curBufSize < WAV_BUFFER_SIZE)		
        {							
            uint64 remainToRead = WAV_BUFFER_SIZE - curBufSize;							
            if (this->curChunk.size <= 0)			
            {				
                //need load chunk info				
                this->ReadData(&this->curChunk, sizeof(WAV_CHUNK));
			}

			// Check for .WAV data chunk
			if (
				(this->curChunk.id[0] == 'd') && (this->curChunk.id[1] == 'a') &&
				(this->curChunk.id[2] == 't') && (this->curChunk.id[3] == 'a')
			   )
			{
				

				uint64 readSize = std::min(this->curChunk.size, remainToRead); //how many data can we read in current chunk									
                this->ReadData(this->bufArray + curBufSize, readSize);
					
				curBufSize += readSize; //buffer filled from (0...curBufSize)
				this->curChunk.size -= readSize;//in current chunk, remain to read			
            }			
            else				
            {				//not a "data" chunk - advance stream				
                this->Seek(this->curChunk.size, SEEK_POS::CURRENT);				
            }								
            if (this->t.processedSize >= this->t.fileSize)				
            {					
                eof = true;					
                break;				
            }			
        }			// Append to end of buffer			
        decompressBuffer.insert(decompressBuffer.end(), this->bufArray, this->bufArray + curBufSize);					
        if (static_cast<int>(decompressBuffer.size()) >= this->minProcesssLengthAtOnce)			
        {				
            return;			
        }					
    } while (!eof);	
    
    if (inLoop)		
    {			
        this->ResetStream();		
    }				
    
    if (this->minProcesssLengthAtOnce == INT_MAX)		
    {			
        return;		
    }
    
} while (inLoop);

Conclusion and Attached Code Info


The code in the attachement can not be used directly (download – build – run and use). In my engine, I am using VFS (virtual file system) to handle file manipulation. I left it in the code, because it's built around it. Removing would have required some changes I don´t have time for :-)

On some places, you may found some math structures, functions (eg. Vector3, Clamp) or utilities (Logging system). All of these are easy to understand from a function or a structure name.

I am also using my own implementation of String (MyStringAnsi), but yet again, method names or usage is easy to understand from the code.

Without the knowledge of the mentioned files, you can study and use code to learn some tricks. It is not difficult to update or rewrtite the code to suit your needs. If you have any problems, you can leave me info in the article discussion, or contact me directly via email: info (at) perry.cz.

Article Update Log


Keep a running log of any updates that you make to the article. e.g.

19 Aug 2014: Initial release

Noise Generation

$
0
0
Any time you need to procedurally generate some content or assets in a game, you're going to want to use an algorithm to create something that has both form and variation. The naive approach is to use purely random numbers. This certainly meets the noise requirement but has no form since it is just static noise. What we want is some technique for generating controllable randomness which isn't too different from nearby random values (ie, not static). Pretty much any time you have this requirement, the go-to solution is almost always "Use Perlin noise - end of discussion".

Easier said than done. If you've tried to build your own version based off of Perlin's C++ code implementation or Hugo Elias' follow up article on it, you're probably going to be lost and confused. Let's break the problem down into something simple and easy to implement quickly.

Terminology


Noise is a set of random values over some fixed interval.
Example:
Let X be the interval;
Let Y be the noise value;
Noise = {(0,6),(1,3),(2,4),(3,8),(4,2),(5,1),(6,5),(6,6),(7,4),(8,2),(9,5)}

Static Noise is a type of noise where there is no continuity between values. In the example above, there is no smooth variation in Y values between X values.

Smoothed Noise is a type of noise where there is continuity between values. This continuity is accomplished by using an interpolation between values. The most common interpolation function to use is Linear Interpolation. A slightly better function to use is Cosine Interpolation at a slight cost in CPU.

Attached Image: Lerp.png

Attached Image: Cos_Lerp.png

Amplitude is the maximum amount of vertical variation in your noise values (think of Sine waves).

Frequency is the periodicity of your noise values along your scale. In the example above, the frequency is 1.0 because a new noise value is generated at every X integer. If we changed the period to 0.5f, our frequency would double.

Concept on how it works


Note:  There is a semantic distinction between Perlin's noise implementation and the common implementation. Perlin doesn't add layers together (he uses gradients). The end result is pretty much the same.


The core idea behind the layered summation approach to noise generation is that we first generate a very rough layer by generating noise with low frequency and high amplitude. Let's call this "Layer 0". Then, we create another layer with half the amplitude and double the frequency. Let's call this "Layer 1". We keep creating additional layers, with each layer having half the amplitude and double the frequency.

When all of our layers have been created, we merge all of the layers together to get a final result. Layer 0 tends to give the final output noise its general contours (think of mountains and valleys). Each successive layer adds a bit of variation to the contours (think of the roughness of the mountains and valleys, all the way down to pebbles).

Here is an example of 3 additive noise layers in 1 dimension:

Attached Image: Layer0_1D.png

Attached Image: Layer1_1D.png

Attached Image: Layer2_1D.png

Attached Image: Final1D.png

When it comes to 2D, the underlying principle is the same:

Attached Image: 2D_Layers.png
(click for large version)

Noise generation


There are four distinct parts to generating the final noise texture.

1) Generate a set of random numbers for each layer, with the range being a function of amplitude, and the quantity being a function of the layer resolution.
2) Determine which interpolation method you want to use for smoothing (linear, cubic, etc)
3) For each point in the output, create interpolated noise values for all X, Y values which fall between noise intervals
4) Sum all interpolated noise layers together to get the final product

In the code below, I've heavily commented and explained each step of the process to generate 2D noise with as much simplicity as possible.

/// <summary>
/// Entry point: Call this to create a 2D noise texture
/// </summary>
public void Noise2D()
{
	//Set the size of our noise texture
	int size = 256;

	//This will contain sum of all noise layers added together.
	float[] NoiseSummation = new float[size * size];

	//Let's create our layers of noise. Take careful note that the noise layers do not care about the dimensions of our output texture.
	float[][,] noiseLayers = GenerateLayers(8, 8);

	//Now, we have to merge our layers of noise into a summed product. This is when the size of our result becomes important.
	Smooth_and_Merge(noiseLayers, ref NoiseSummation, size);

	//Now, we have a summation of noise values. We need to normalize them so that they are between 0.0 -> 1.0
	//this is necessary for generating our RGB values correctly and working in a known space of ranged values.
	float max = NoiseSummation.Max();
	for (int a = 0; a < NoiseSummation.Length; a++) NoiseSummation[a] /= max;

	//At this point, we're done. Everything else is just for using/displaying the generated noise product.
    //I've added the following for illustration purposes:

	//Create a block of color data to be used for building our texture. 
	Color[] vals = new Color[size * size];

	//Convert the noise data into color information. Note that I'm generating a grayscale image by putting the same noise data in each
	//color channel. If you wanted, you could create three noise values and put them in seperate color channels. The Red channel could
	//store terrain height map information. The green channel could contain vegetation maps. The blue channel could store anything else.
	for (int a = 0; a < NoiseSummation.Length; a++) vals[a] = new Color(NoiseSummation[a], NoiseSummation[a], NoiseSummation[a]);

	//Create the output texture and copy the color data into it. The texture is ready for drawing on screen.
	TextureResult = new Texture2D(BaseSettings.Graphics, size, size);
	TextureResult.SetData(vals);
}

/// <summary>
/// Takes the layers of noise data and generates a block of noise data at the given resolution
/// </summary>
/// <param name="noiseData">Layers of noise data to merge into the final result</param>
/// <param name="finalResult">The resulting output of merging layers of noise</param>
/// <param name="resolution">The size resolution of the output texture</param>
private void Smooth_and_Merge(float[][,] noiseData, ref float[] finalResult, int resolution)
{
	//This takes all of the layers of noise and creates a region of interpolated values
	//using bilinear interpolation. http://en.wikipedia.org/wiki/Bilinear_interpolation
	int totalLayers = noiseData.Length;

	for (int layer = 0; layer < totalLayers; layer++)
	{
		//to figure out the length of our square, we just sqrt our array length. It's guaranteed
		//to be an integer square root. ie, 25 = 5x5.
		int squareSize = (int)Math.Sqrt(noiseData[layer].Length);

		//This is our step size between noise data points for this layer.
		//as we go into higher resolution layers, this value gets smaller.
		int gridWidth = resolution / (squareSize - 1);

		//Go through every X/Y coordinate in the resolution
		for (int y = 0; y < resolution; y++)
		{
			for (int x = 0; x < resolution; x++)
			{
				//map each X/Y coordinate to the nearest noise data point
				int gridY = (int)Math.Floor(y / (float)gridWidth);
				int gridX = (int)Math.Floor(x / (float)gridWidth);
			   
				//define the four corners on the unit square
				float x1 = gridX * gridWidth;
				float x2 = x1 + gridWidth;
				float y1 = gridY * gridWidth;
				float y2 = y1 + gridWidth;

				//BILINEAR INTERPOLATION: (see wikipedia article)
				//perform our linear interpolations on the X-axis 
				float R1 = ((x2 - x) / gridWidth) * noiseData[layer][gridX, gridY] + ((x - x1) / gridWidth) * noiseData[layer][gridX + 1, gridY];
				float R2 = ((x2 - x) / gridWidth) * noiseData[layer][gridX, gridY + 1] + ((x - x1) / gridWidth) * noiseData[layer][gridX + 1, gridY + 1];

				//Now, finish by interpolating on the Y-axis to get our final value
				float final = ((y2 - y) / gridWidth) * R1 + ((y - y1) / gridWidth) * R2;

				//Summation step: Add the interpolated result to our existing noise data.
				finalResult[y * resolution + x] += final;
			}
		}
	}
}

/// <summary>
/// Creates a series of layers with STATIC noise data in each layer.
/// </summary>
/// <param name="amplitude">The maximum variation in noise</param>
/// <param name="layerCount">The number of layers you want to generate. Each layer has 2^x more data!</param>
/// <returns>A jagged array of floats which contain the noise data points per each layer</returns>
private float[][,] GenerateLayers(float amplitude, int layerCount)
{
	/*
	 Note that we do not care about period or frequency here. We're still resolution independent.
	 */
	float[][,] ret = new float[layerCount][,];

	//A seeded pseudo random number generator. Use different fixed seeds to generate different noise maps.
	Random r = new Random(5);

	//we want to generate noise points for each layer
	for (int layer = 0; layer < layerCount; layer++)
	{
		//The number of noise points we need per layer is a function of the layer resolution (implied by the layer ID)
		//At each successive layer, we halve our amplitude and double our frequency. This becomes important.
		//At the lowest resolution, 0, we need at least a 3x3 grid of points. (2+1)
		//At resolution 1, we need at least a 5x5 grid of noise points. (4+1)
		//At resolution 2, we need at least a 9x9 grid of noise points, etc. (8+1)
		//We can generalize this to F(x) = 2^(x+1) + 1;
		//where X is the layer resolution.
		int arraySize = (int)Math.Pow(2, layer+1) + 1;

		ret[layer] = new float[arraySize, arraySize];

		//For each X/Y point in the noise grid for our current layer, let's generate a random number
		//which is a function of our amplitude.
		for (int y = 0; y < arraySize; y++)
		{
			for (int x = 0; x < arraySize; x++)
			{
				ret[layer][x, y] = (float)(r.NextDouble() * amplitude);
			}
		}

		//Now, we halve our amplitude and repeat for the next layer.
		amplitude /= 2.0f;
	}

	return ret;
}

Usage and Examples


Terrain: I am using the noise technique to procedurally generate the height maps for terrain. My terrain uses GeoMipMapping for calculating Level of Detail (LOD). Although I haven't tried to implement it yet, I could use the various noise layers as a natural LOD for terrain. As the camera gets closer and closer to the terrain, the number of layers being merged into the final noise product causes the terrain detail to increase automatically.


Attached Image: Terrain.png


Clouds: Clouds can be very easily created with 2D noise.
Option 1: If you switch to 3D noise and let the Z axis represent time, you can create the illusion of clouds changing shape over time.
Option 2: If you pre-generate a bunch of cloud textures with low opacity levels, you can layer them on top of each other and let the layers create an illusion of a change in cloud shape.

Distribution patterns: You can also use noise to procedurally figure out distribution patterns for things such as trees, grass, shrubs, etc. Since your noise is continuous and ranges from 0.0 -> 1.0, you can arbitrarily decide "All values between 0.25 and 0.35 indicate where on the terrain shrubs shall be positioned".

Density maps: You can also use noise maps to determine the density of "stuff", whatever that happens to be. Height maps are actually just a type of density map, where it describes the density of dirt above sea-level.

Texturing: You can tweak various values of the final noise map to procedurally generate some very interesting textures (marble, wood, fire, etc).

See also


While we've talked about Perlin Noise being a very good algorithm for creating noise with continuity, other alternatives exist:
1) Fractals - Fractals are a viable alternative to noise algorithms for solving particular problems. The challenge is finding a suitable fractal and tweaking its values to generate the desired results.
2) Simplex Noise - It looks so complicated, I'm not even going to touch it. It's worth mentioning since it's supposedly better in terms of CPU and memory performance.

References


(1) Ken Perlins noise (1988)
(2) Hugo Elias variation on Perlin noise
(3) Riemers version (HLSL)
(4) DigitalErr0r GPU version
(5) Bilinear Interpolation

Procedural Level Generation for a 2D Platformer

$
0
0
Jack Benoit is my latest mobile game, a not-so-original 2D platformer for Android. My goal was to make a fast, responsive game for mobiles, with the best possible controls, and to have complete procedural generation for the levels. By complete, I mean not based on manually crafted level pieces, assembled randomly, but truly randomized to the tile granularity, something that is often advised against. But hey, it was fun to try and the results are not that bad. I’ll describe the whole process in this article.

Description of the game


You control a character able to jump and climb ladders, and your goal is to simply reach the exit of a level, which are made of various sets of platforms, ladders, and hazard zones (spikes). Jack Benoit uses 4 layered tile maps:
  • The parrallax background,
  • The platforms,
  • The ladders,
  • The sprites (collectable items, decorations, etc).
All of the layers are constructed procedurally. The background is simply made out of Perlin noise, filtered and smoothed using transition tiles, I won’t talk about it, the subject has been covered to death by better authors than me. This article will focus the architecture (platforms, blocks, and ladders).

Step 1. Generating a level layout


Levels are composed by a random set of discretely connected “rooms” (rectangles of 20×16 tiles). Each room can have up to 3 “walls”, at its own edges. Two rooms are connected if their shared edge doesn’t contain a wall. The structure becomes quite clear when you see a whole level. This one is made of 15 rooms:


Attached Image: 10-levelexample.png


The first step is to create this random path of rooms. The goal is to get a data structure describing something like this:


Attached Image: 10-layout.png


We simply represent this using a 2D array of Room objects. The algorithm is a simple recursive graph exploration, with backtracking.

function findPath(x, y, minDistance):
    if (x,y is goal and minDistance == 0) return true
    if (x,y not open) return false
    mark x,y as part of layout path
    switch(random number 1 out of 4):
        case 1: if (findPath(North of x,y, minDistance - 1) == true) return true
        case 2: if (findPath(East of x,y, minDistance - 1) == true) return true
        case 3: if (findPath(South of x,y, minDistance - 1) == true) return true
        case 4: if (findPath(West of x,y, minDistance - 1) == true) return true
    unmark x,y as part of solution path
    return false

Once this is done, we make sure the structure is easily iterable, and each Room knows about the location of next and the previous ones.

Step 2. Generating a solution path


The second step is the most critical to ensure the correctness. It’s very easy, if you’re not careful, to produce impossible levels! In our example, the player must always be able to navigate through all these rooms, to reach the last one. Given that the player movement is constrained by physics (he can jump 4-5 tiles high), we had to make sure that the vertical parts (two or more rooms vertically connected) were always in reach.

That part proved to be tricky. I finally chose to create a solution path, i.e. a set of platforms and ladders that leads the player directly to the level exit, without interruption.


Attached Image: 10-layout2.png


At first, it may seem too straightfoward, but once the generation is complete, this path is “hidden” in the middle of the other platforms, and is not evident at all to the player. In fact, it is so camouflaged that I had to put sign posts indicating the direction to follow. The player often gets off the path, finding alternative ones, but at least a solution is guaranteed to exist (no impossible levels).

The process is quite simple. Generate a random position in each room, then connect all of them using one ladder, and one platform.

for each room in the layout:
    select a random point P1(X1,Y1) in the room
    select a random point P2(X2,Y2) in the next room of the layout
    set cursor C(Xc, Yc) to P1
    while P2 is not reached by cursor:
        if (selectionFunction):
            create a platform between (Xc, Yc) and (X2, Yc)
            move cursor to (X2, Yc)
        else:
            create a ladder between (Xc, Yc) and (Xc, Y2)
    move cursor to (Xc, Y2)

The selectionFunction is used to determine if we start by a ladder or a platform. It’s randomized, however in order to generate well-designed levels, it will also take some heuristics into account, like the minimum length of a ladder or a platform.

Step 3. Fill the rooms with platforms


Now that the path is secured, we must actually fill the rooms. I tried some top-down approaches (generating perlin noise to spread platforms homogenously) but the simplest ones (pure randomness guided with some ad-hoc heuristics) often produced the best results.

I simply iterate on each empty tile of the room, starting in the top-left corner, and for each empty tile (in the platforms layer), there is a chance to generate a platform of some random length. We also make sure that this platform, if generated, does not completely block the level (horizontally or vertically).

Step 4. Generate ladders


On each the generated platforms, we place a ladder top at a random X position on the platform. We then “grow” them (like a plant, which is fortunate, because some of the ladders are actually plants) downward until it reaches a platform below, or the ground.


Attached Image: 10-ladders.png


As you can see, while the solution path is quite clear before this step, it is eventually neatly disguised.

Conclusion


This simple method produces a lot of variability, which is nice, yet the gameplay remains relatively consistent. After some runs, the player learns to “guess” what the solution path is. It has some drawbacks though: some (rare) platforms remain sometimes unreachable, because putting a ladder on 100% of all the platform produces too many of them.

A more complex graph exploration, based on the physical characteristics of the player would be necessary to detect and correct these cases, but it is costly, and felt unecessary given the frequency and the gravity of the problem.

Thanks a lot for reading this. If you have any questions, feel free to ask!


Note: This post was originally published on Fabien's blog and is republished here with kind permission.

Communication is a Game Development Skill

$
0
0
This subject is an incredibly important one that gets a lot less attention than it should. Most videogame development guides and tutorials fail to acknowledge that communication is a game development skill.

Knowing how to speak and write effectively is right up there alongside knowing how to program, use Photoshop, follow design process, build levels, compose music, or prepare sounds. As with any of those skills there are techniques to learn, concepts to master, and practice to be done before someone’s prepared to bring communication as a valuable skill to a team.

Game Developers Especially


Surely, everyone in the world needs to communicate, and could benefit from doing it better. Why pick out game developers in particular?

“…sometimes when people are fighting against your point, they’re not really disagreeing with what you said. They’re disagreeing with how you said it!”


I don’t meant to claim that only game developers have communications issues. But after spending much of the past ten years around hundreds of computer science students, indie developers, and professional software engineers, I can say that there are particular patterns to the types of communication issues most common among the game developers that I’ve met. This is also an issue of particular interest to us because it’s not just a matter of making the day go smoother; our ability to communicate well has a real impact on the level of work that we’re able to accomplish, collaboratively and even independently. Game developers often get excited about our work, for good reason, but whether a handful of desirable features don’t make it in because of technical limitations or because of communication limitations, either way the game suffers for it the same.

Whose Job is It?


If programmers program, designers design, artists make art, and audio specialists make audio, is there a communication role in the same way?

There absolutely is. There are several, even.

The Producer. Even though on small hobby or student teams this is often wrapped into one of the other roles, the producer focuses on communication between team members, and between team members and the outside world. Sometimes this work gets misunderstood as just scheduling, but for that schedule to get planned and adjusted sensibly requires a great deal of conversations and e-mails, followed by ongoing communications to keep everyone on the same page and on track.

The Designer(s). One way to think about the designer’s role in game development is to communicate with the player through the game. Indicating what’s the goal, what will cause harm or benefit, where the player should or shouldn’t try to go next, expressing the right amount of internal state information – these are matters of a game’s design more so than its programming. Depending on a game team’s skill makeup, in some cases the designer’s only direct work with the game is in level layouts or value tuning, making it even more critical that within the team a designer can communicate well with programmers, artists, and others on the team when and where the work intersects. On a small team when the person mostly responsible for the design is also filling one or more other roles (often the programming) communication then becomes integral to keeping others involved in how the game takes shape.

The Leads. On a team large enough to have leads, which is common for a professional team, the Lead Programmer, Lead Designer, or Lead Artist also have to bring top notch communication skills to the table. Those people aren’t necessarily the lead on account of being the best programmer, designer, or artist – though of course they do need to be skilled – they’re in that position because they can also lead others effectively, which involves a ton of communication in all directions: to the people they lead, from the people they lead, even mediating communications between people they lead or the people they lead and others.

Some of the most talented programmers, designers, artists and composers that I’ve met have been quiet people. This isn’t an arbitrary personality difference though. In practice it limits their work – when they don’t speak up with their input it can cost their game, team, or company.


The Writer. Not every game genre involves a writer, but for those that do, communication becomes even more important. Similar to the designer that isn’t also helping as a programmer, a team’s writer typically isn’t directly creating much of the content or functionality, aside perhaps from actual dialog or other in-game and interstitial text. It’s not enough to write some things down and call it a day, the writer and content creators need to be in frequent communication to ensure that satisfactory compromises can be found between implementation realities and the world as ideally envisioned.

Non-Development Roles. And all that’s only thinking about the internal communications on a team during development. Learning how to communicate better with testers, players, or if you’ve got a commercial project your customers and potential new hires (even ignoring investors and finance professionals), is a whole other world of challenges that at a large enough scale get dealt with by separate HCI (Human-Computer Interaction) specialists, marketing experts, PR (public relations) people and HR (Human Resources) employees. If you’re a hobby, student, solo, or indie developer, you’ve got to wear all of these hats, too!

There are two main varieties of communication issues that we tend to encounter. Although they may seem like polar opposites, in reality they’re a lot closer than they appear. In certain circumstances one can even evolve from the other.

Challenge 1: Shyness


The first of these issues is that some of us can be a little too shy. Some of the most talented programmers, designers, artists and composers that I’ve met have been quiet people. This isn’t an arbitrary personality difference though. In practice it limits their work – when they don’t speak up with their input it can cost their game, team, or company.

It’s unfortunately very easy to rationalize shyness. After all, maybe the reason a talented, quiet person was able to develop their talent is because they’ve made an effort to stay out of what they perceive as bickering. Unfortunately this line of thinking is unproductive in helping them and the team benefit more from what they know. Conversation between team members serves a real function in the game’s development, and if it’s going to affect what gets made and how it can’t be dismissed as just banter. Sometimes work needs to get done in 3D Studio Max, and sometimes it needs to get done around a table.

Another factor I’ve found underlying shyness is that a person’s awareness of what’s great in their field can leave their self-confidence with a ding, since they can always see how much improvement their work still needs just to meet their own high expectations. Ira Glass has a great bit on this:


It doesn’t matter though where an individual stands in the whole world of people within their discipline, all that matters is that developers on the project know different things than one another. That’s inevitably always the case since everyone’s strengths, interests, and backgrounds are different.

Challenge 2: Abrasiveness


Sometimes shyness seems to evolve as an overcompensation for unsuccessful past interactions. Someone tried to speak up, to share their idea or input, just to add to someone else’s point and yet it somehow wound up in hurt feelings and no difference in results. Entering into the discussion got people riled up, one too many times, so after one last time throwing hands into the air out of frustration, a developer decides to just stop trying. Maybe they feel that their input wasn’t properly received, or even if it was it simply wasn’t worth the trouble involved.

As one of my mentors in my undergraduate years pointed out to me: “Chris, sometimes when people are fighting against your point, they’re not really disagreeing with what you said. They’re disagreeing with how you said it! If you made the same point differently they might get behind it.”

He was absolutely right. Once I heard that idea, in addition to catching myself doing it, I began to notice it everywhere from others as well. It causes tension in meetings, collaborative classroom projects, even just everyday conversations between people. Well-meaning folks with no intention of being combative, indeed in total overall agreement about both goals and general means, often wind up in counterproductive, circular scuffles arising from an escalation of unintended hostility.

There are causes and patterns of behavior that lead to this problem. After 10 years of working on it, I’ve gotten better about this, but it still happens on occasion, and it’s still something that I have to actively keep ahead of.

It’s understandable how someone could run through this pattern only so many times before feeling like their engaging with the group is the cause of the trouble. This is in turn followed by backing off, toning down their level of personal investment in the dialog, and (often bitterly) following orders from the action items that remain after others get done with the discussion.

In either case – shyness or abrasiveness – and in any role on a team, nobody gains from having one less voice of experience, skill, and genuine concern involved. Simply tuning out isn’t doing that person, their team, the game, or the players any real benefit. The issue isn’t the person or their ideas, the issue is just how the communication is performed, and just as with any other skill a person can improve how they communicate.

Failing to figure out a way to overcome these communications challenges can cause the team and developer much more trouble later, since not dealing with a few small problems early on when they’re still small can cause them to grow and erupt later beyond all proportion.

Listening and Taking to Heart


You’ve heard this all your life. You’ll no doubt hear it again. Hopefully every time communication comes up this gets mentioned too, first or prominently.

Listening well, meaning not just hearing what they have to say or giving them an outlet but trying to work with them to get at underlying meaning or concerns and adapting accordingly, is way harder than it sounds, or at least more unnatural than we’d like to think. You can benefit from practicing better listening. I can say that without knowing anything about you, because everyone – presidents and interns, parents and kids, students and teachers – can always listen better.

There’s a tendency, even though we rationally know it’s out of touch with reality, to think of oneself as the protagonist, and others like NPCs. Part of listening is consciously working to get past that. The goal isn’t to get others to adopt your ideas, but rather it’s to figure out a way forward that gains from the multiple backgrounds and perspectives available, in a positive way that people can feel good about being involved with.

Don’t Care Who Wins, Everyone Wins


There’s no winner in a conversation.

This one also probably sounds obvious, but it’s an important one that enough people run into that it isn’t pointed out nearly enough. Development discussion doesn’t need to be a debate. Even to the extent that creative tension will inevitably present certain situations in which incompatible ideas are vying for limited development attention on a schedule, debate isn’t the right way to approach the matter.

In one model for how a dialog exchange proceeds, two people with different ideas enter, and at the end of the exchange, one person won, one person lost. I don’t think (hope?) that anyone consciously thinks about dialog this way, but rather it may emerge as a default from the kinds of exchanges we hear on television from political talking heads, movie portrayals of exchanges to establish relative status between characters, or even just our instinctive fight or flight sense of turf.

Rather than thinking in terms of who the spectators (note: though avoid spectators when possible, as it can often pollute an otherwise civil exchange with defensive, ego-protecting posturing) or an impartial judge might declare a winner, consider which positions the two people involved would likely take in separate future arguments.

If all of your prior references have led you to believe strongly about a particular direction, you only do that rhetorical position (and the team/project!) a disservice by creating opponents of it. Whenever we come across as unlikeable, especially in matters like design, art, or business where a number of directions may be equally viable, then it doesn’t matter what theoretical support an option has if people associate it with a negative, hostile feeling or person.

It doesn’t matter what theoretical support an option has if people associate it with a negative, hostile feeling.


Be friendly about it. Worry first about understanding the merits and considerations of their point, then about your own perspective being understood for consideration. Notice that neither of those is about “convincing” them, or showing them the “right” way, it’s about trying to understand one another because without that the rest of discussion just amounts to barking and battling over imagined differences.

You Might Just be Wrong


Speaking of understanding one another: don’t ever be afraid to back down from a point after figuring out what’s going on, and realizing that there’s another approach that’ll work just as well or better. There’s a misplaced macho sense of identity attached to sticking to our guns over standing up for our ideas – especially when the ideas aren’t necessarily thoroughly developed and aren’t exactly noble or golden anyhow.

A smart person is open to changing their mind when new information or considerations come to light. You’re not playing on Red team competing against Blue team. You’re all on the same team, trying to get the ball to go the same direction, and maybe your teammate has a good point about which direction the actual goal is in.

The other side of this is to give the other person a way out. Presenting new information or concerns may make it easier for them to change their mind, even if that particular information or concern isn’t actually why they change their mind, simply because it can feel more appropriate to respond to new information then to appear to have been uncertain in the first place. Acknowledging the advantages in the position they’re holding doesn’t make your position seem weaker by comparison, it makes them feel listened to, acknowledged, and like there’s a better chance you’re considering not just your own initial thoughts but theirs too. When a point gets settled, whichever way things go, let the difference go instead of forming an impression of who’s with or against you. (Such feelings have a way of being self-fulfilling. In practice, reasonable people are for or against particular points that come up, not for or against people.)

When an idea inevitably gets compromised or thrown out, being a skilled communicator means not getting bitter or caught up in that. Don’t take it personally. It’s in the best interests of the team, and therefore the team’s members (yourself included), that not every idea raised makes it into implementation or remains in the final game.

Benefit of the Doubt, Assume the Best


A straw man argument is when we disagree with or attempt to disprove a simplified opposition position. In informal, heated arguments over differences in politics or religious/cultural beliefs, these are frequently found in the form of disagreeing with the most extreme, irrational, or obviously troubled members of the group, rather than dealing with the more moderate, rational, and competent justifications of their most thoughtful adherents. This leads to deadlock, since both sides feel as though they’re advancing an argument against the other, yet neither side feels as though their own points have been addressed.

When the goal is to make a more successful collaboration, rather than to just make ourselves temporarily feel good, the right thing to do is often the opposite of setting up a straw man argument. Assume that the other person is coming from a rational, informed, well-intentioned place with their position, and if that’s not what you’re seeing from what has been communicated so far, then seek to further understand. Alternatively, even help them further develop their idea by looking for additional merit to identify in it beyond what they might have originally had in mind – maybe from where you’re coming from it has possible benefits that they didn’t realize mattered to you.

If the idea you may be holding is different than what someone else is proposing, welcome your idea really being put to the test by measuring it against as well put-together an alternative as the two of you can conceive. If it gets replaced by a better proposal that you arrived at through real discussion and consideration, or working together to identify a path that seems more likely to pan out well for both of you, all the better.

Your Frustration is With Yourself


This is one of those little life lessons that I learned from my wrestling coach which has stayed with me well after I finished participating in athletic competitions. Most of the time when people are upset or frustrated or disappointed, they’re upset or frustrated or disappointed mostly with themselves, and directing that at somebody else through blame isn’t ever going to diffuse it.

Even if this isn’t 100% completely and totally true in every situation – sure, sometimes people can be very inconsiderate, selfish, or irresponsible and there may be good reason to be upset with them – I find that it’s an incredibly useful way to frame thinking about our emotional state because it takes it from being something the outside world has control over and changes to focus to what we can do about it.

Disappointed with someone violating our trust? Our disappointment may be with our failing to recognize we should not have trusted them. Upset with someone for doing something wrong? We may be upset with ourselves for not making the directions or expectations more clear. Frustrated with someone that doesn’t understand something that you find obvious? Your frustration well may lie in your feeling of present inability to coherently and productively articulate to that person exactly what it is you think they’re not understanding.

If your point isn’t well understood or received but you believe it has value that isn’t being rightly considered, rather than assuming the other person is incapable of understanding it, put the onus on yourself to make a clearer case for it. Maybe they don’t follow your reference, or could better get what you’re trying to say if you captured it in a simple visual like a diagram or flow chart. Maybe they understand what you’re saying but don’t see why you think it needs to be said, or they get what you mean but don’t see the connection you have in mind for what changes you think it should lead to.

If your point isn’t well understood or received but you believe it has value that isn’t being rightly considered, rather than assuming the other person is incapable of understanding it, put the onus on yourself to make a clearer case for it.


Clarify. Edit it down to summary highlights (people often have trouble absorbing details of an argument until they first already understand the high level). Explain it another way to triangulate. Provide a demonstration case or example. If there’s a point you already made which you think was important to understanding it but that point didn’t seem to stick, find a way to revisit it in a new way that leads with it instead of burying it among other phrases that were perhaps too disorganized at the time to properly set up or support it.

Mistaking Tentative for Definitive


Decisions can change. When they’re in rough draft or first-pass, they’re likely to – that’s why we do them in rough form first! It’s easier to fix and change things when they’re just a plan, an idea, or a prototype, and the more they get built out into detail or stick around such that later decisions get made based on them, then the more cemented those decisions tend to become.

There are two types of miscommunication that can come from this sort of misunderstanding: mistaking your own tentative ideas for being definitive, or mistaking someone else’s tentative ideas for being definitive. During development, and as more people get involved, projects can change and evolve a bit to reflect what’s working or what isn’t, or to take better advantage of the strengths and interests of team members.

If there was an idea you pushed for earlier in a project and people seemed onboard with it then, it’s possible that discoveries during development or compromises being made for time and resource constraints have caused it to appear in a modified or reduced form. It might even be cut entirely, if not explicitly then maybe just lost in the shuffle. Before raising a case for it, it’s worth rethinking how the project may have changed since the time the idea was initially formed, to determine whether it would need to be updated to still make sense for the direction the team and game has gone in.

Sometimes the value of ideas during development is to give us focus and direction, and whether the idea survives in its originally intended form is secondary to whether the team and players are happy with the software that results. It may turn out to be worth revisiting and bringing back up, possibly in a slightly updated form, as maybe last time was at a phase in development when it wasn’t as applicable as it might be now. Or it may be worth letting go as having been useful at the time, but perhaps not as useful now, a stepping stone to other ideas and realizations the team has made in the time that has passed.

People get optimistic, people make planning mistakes, and people cannot predict the future – but it’s important to not confuse those perfectly human imperfections with knowingly lying or failing to keep a promise.


The other side to this is to make the same mistake in thinking about someone else’s ideas: thinking they are definitive when they are necessarily tentative. This happens perhaps because of how far off the idea relates to the future, and how much will be discovered or answered between now and then that is unknown at the time of the initial conception and discussion. If a project recruits people with the intention of supporting a dozen types of cars, but during development reality sinks in and only three different vehicles make sense in favor of putting that energy into other development necessity, those things happen. People get optimistic, people make planning mistakes, and people cannot predict the future – but it’s important to not confuse those perfectly human imperfections with knowingly lying or failing to keep a promise. If early in a project someone is trying to spell out a vision for what the project may look like later, don’t take that too literally or think of it as a contract, look at it as a direction they see things headed in. Implementation realities have a way of requiring compromise along the way.

Soften That Certainty Away


A common source of fighting on teams is from a misplaced sense of certainty in an observation or statement which reflects value priorities that someone else on the team doesn’t necessarily share, or especially when the confidently made statement steamrolls value priorities of someone else on team.

Acknowledge with some humility that you only have visibility on part of all that’s going on, and that the best you can offer is a clarification of how things look for where you’re coming from or the angle you have on things. Leave wiggle room for disagreement. Little opening phrases like “As best as I can tell…” or “It looks to me like…” or “I of course can’t speak for everyone, but at least based on the games that I’ve played in this genre…” may just seem like filler, but in practice they can be the difference between tying the team in a knot or opening up valuable discussion about different viewpoints.

Consultant’s Frustration


School surrounds people with other people that think and work in similar patterns, with similar values, often of the same generation. Outside the classroom, whether collaborating on a hobby game project, joining a company, or doing basically anything else in the world besides taking Your Field 101, that isn’t typically how things work. Often if your skills are in visual art, you have to work with people that don’t know as much about visual art as you. If your skills are in design, you’ll have to work with a lot of non-designers. If you have technical talents, you will be dealing with a lot of non-technical people.

That is why you are there. Because you know things they don’t know. You can spot concerns that they can’t spot. You understand what’s necessary to do things that they don’t know how to do. If someone else on the team or company completely understood everything that you understand and in the same way, they wouldn’t really need you to be involved. Your objective in this position is to help them understand, not to think poorly of them for knowing different things than you do. Help them see what you see. Teach a little bit.

That is why you are there. Because you know things they don’t know… Your objective in this position is to help them understand, not to think poorly of them for knowing different things than you do. Help them see what you see.


I refer to this as the consultant’s frustration because that’s a case that draws particular emphasis to it: a company with no understanding of sales calls in a sales (or design, or IT, or whatever) consultant, because they have no understanding of that and that’s why they made the call. A naive, inexperienced, unprepared consultant’s reaction to these situations is one of horror and frustration – how on Earth are these people so unaware of the basic things that they need to know? The consultant is there to spot that gap and help them bridge it, not to look down on them for it. Meanwhile they’re doing plenty of things right the specialist likely doesn’t see or fully understand, because that’s not the discipline or problem type that they’re trained and experienced in being able to spot, assess, or repair.

When you see something that concerns you, share that with the team. That is part of how you add value. You may see things that others on the team do not.

Values Are Different Per Role


The other side to the above-mentioned point is appreciating that other factors and issues less visible to your own vantage point may have to be balanced against this point, or in some cases may even override it.

Frustration can arise from an exaggerated form of the consultant’s frustration: a programmer may instinctively think of other roles on the team as second-rate programmers, or the designer may perceive everyone else on the team as second-rate designers, etc. This is not a productive way to think, because it’s not just that they are less-well suited to doing your position, but you’re also less-well suited to doing theirs. A position goes beyond what skills someone brings to move a project forward, it also brings with them an identity and responsibility on the team to uphold certain aspects of the project, a trained eye to keep watch for certain kinds of issues. The programmer may not be worried about the color scheme, the artist may not be worried about how the code is organized, the designer may not care about either as long as the gameplay works.

…a programmer may instinctively think of other roles on the team as second-rate programmers…


That’s one of the benefits of having multiple people filling specialized roles, even if it’s people that are individually capable of wearing multiple hats or doing solo projects if they had to.

In the intersection of these concerns, compromises inevitably have to get made. The artist may be annoyed by a certain anomaly in how the graphics render, but the engineer may have a solid case for why that’s the best the team’s going to get out for the given style of the technology they have available. The musician or sound designer may feel that certain advanced scoring and dynamic adjustment methods could benefit the game’s sounds cape, but the gameplay and/or level designer may have complications they’re close to about user experience, stage length, or input scheme that place some tricky limits on the applicability of those approaches.

One of the reasons why producers (on very small student/hobby/indie teams this is often also either the lead programmer or lead designer) get a bad rap sometimes, as the “manager” that just doesn’t get it, is because their particular accountability is to ensure that the game makes forward progress until it’s done and released in a timely manner. So the compromise justification that they often have to counter with is, “…but we have to keep this game on schedule” which is a short-term version of “…but this game has to get done.” If someone isn’t fighting that fight for the project, it doesn’t get done.

Be glad that other people on a team, when you have the privilege of working with a good and well-balanced team, are looking out for where you have blind spots. Push yourself to be a better communicator so that you can help do the same for them.

Too Much Emphasis on Role


After that whole section on role, I feel the need to clarify that especially for small team development (i.e. I can total understand military-like hierarchy and clarity for 200+ person companies) role shouldn’t pigeonhole someone’s ability to be involved in discussions and considerations.

While it’s true that the person drawing the visual art is likely to have final say on how the art needs to be done (not only as a matter of aesthetic preference, but as a side effect of working within their own capabilities, strengths, and limitations), that does not mean that others from the team shouldn’t be able to offer some feedback or input in terms of what style they feel better about working with, what best plays to their own strengths and limitations (ex. just because an artist can generate a certain visual style doesn’t mean the programmer’s going to be able to support it in real-time), and what they like just as fellow fans of games and media.

Does one team member know more about animation than others on the project? Then for goodness sake, of course that person needs to be involved in discussions affecting the implementation or scheduling of animation. But even if you’re not an animator, that you’ve accumulated a different set of media examples to draw upon, and have an idea for how that work may intersect with technical, design, or other complications, there’s still often value in being a part of that discussion (though of course still leaving much of the decision with whoever it affects most, and whoever has the most related experience).

It’s unhelpful to hide behind your role, thinking either “Well, I’m not the artist so that isn’t my problem” or “Well, I’m the designer, so this isn’t your problem to worry about.” The quality of the game affects everyone who got involved with making it. You make a point of surrounding yourself with capable people that are coming from different backgrounds and have different points of view to offer. Find ways to make the most of that.

A related distinction to these notes about role is the concept of servant-leadership. Rather than a producer, director, or lead designer feeling like the boss of other people who are supposed to do what they say, it can be healthy and constructive for them to approach the development as another collaborator on the team, just with particular responsibilities to look out for and different types of experience to draw from. They’re having to balance their own ideas with facilitating those of others to grow a shared vision, they’re trying to keep the team happy and on track, that’s their version of the compiler or Photoshop.


Attached Image: boss-leader.jpg


Handling Critique Productively


When critique comes up – whether of your game after it’s done or of a small subpoint in a disagreement – separate yourself personally from the point discussed. When people give feedback on work you’re doing, whether it’s on your programming, art, audio, or otherwise, the feedback is about the work you’re doing, it’s not feedback about you (even if, and let’s be fair here, we could all honestly benefit from a little more feedback about ourselves as a work-in-progress, too!).

Feedback is almost always in the interest of making the work better, to point out perceived issues within a smaller setting before it’s too late to fix the work in time for affecting more people, or before getting too far into the project to easily backtrack on it. Sometimes the feedback comes too late to fix them in this case, in which case rather than disagree with it accept that’s the case and keep it in mind to improve future efforts (this isn’t the last game or idea you’re ever going to work on, right?).

Defensiveness, of the sort mentioned in the recent playtesting entry, is often counterproductive, or at lease a waste of limited time and energy.

Systems and Regular Channels


Forms and routine one-on-one check-in meetings can feel like a bureaucratic chore, but in proper balance and moderation they can serve an important function. People need to have an outlet to have their concerns and thoughts heard. People need to be in semi-regular contact with the people who they might need to raise their concerns with, before there is a concern to be raised, so that there’s some history of trust and prior interaction to build upon in those cases and it doesn’t seem like a weirdly hostile exception just to bring up something small.

In one of the game development groups I’ve been involved with recently we were trying to narrow down possible directions for going forward from an early stage when little had been set into action yet. From just an open discussion, three of the dozen or so ideas on the whiteboard got boxed as seeming to be in the lead. When we paused to get a show of hands to see how many people were interested in each of the ideas on the board, we discovered that one of the boxed items had only a few supporters – those few just happened to be some of the more vocal people in the room. Even introducing just a tiny bit of structure can be important in giving more of an outlet to the less outspoken people involved with a project, who have ideas and considerations that are likely just as good and, as mentioned earlier, probably weighing different sets of concerns and priorities.

Practice, Make Mistakes to Learn From


Seek out opportunities to get more practice communicating. In all roles, and at all scales. As part of a crowd. In front of a crowd. In formal and informal settings. Out with a few people. Out with a lot of people.

Now, for personal context: I don’t drink. I don’t go to bars or clubs. I’ve admittedly never been one for parties. This weekend I have no plans to watch the Super Bowl. I’m not saying you should force yourself to do things that you don’t want to do. What I am saying is to look for (or create) situations where you can comfortably exercise your communication abilities. Whatever form that may take for you.

Given a choice to work alone or work with a group, welcome the opportunity to deal with the challenges of working with a group. Attend a meetup. Find some clubs to participate in. When a team you’re on needs to present an update, volunteer to be the one presenting that update.

Communication is a game development skill. As with any other game development skill, you’ll find the biggest gains in ability through continued and consistent practice.

Recommended Reading


A few books that I’ve found helpful on this subject include:


Note: This article was originally published in 2 parts (Part 1, Part 2) on Chris DeLeon's blog "HobbyGameDev.com". Chris kindly gives permission to reproduce his content.

Making a Game with Blend4Web Part 4: Mobile Devices

$
0
0
This is the fourth part of the Blend4Web gamedev tutorial. Today we'll add mobile devices support and program the touch controls. Before reading this article, please look at the first part of this series, in which the keyboard controls are implemented. We will use the Android and iOS 8 platforms for testing.

Detecting mobile devices


In general, mobile devices are not as good in performance as desktops and so we'll lower the rendering quality. We'll detect a mobile device with the following function:

function detect_mobile() {
    if( navigator.userAgent.match(/Android/i)
     || navigator.userAgent.match(/webOS/i)
     || navigator.userAgent.match(/iPhone/i)
     || navigator.userAgent.match(/iPad/i)
     || navigator.userAgent.match(/iPod/i)
     || navigator.userAgent.match(/BlackBerry/i)
     || navigator.userAgent.match(/Windows Phone/i)) {
        return true;
    } else {
        return false;
    }
}

The init function now looks like this:

exports.init = function() {

    if(detect_mobile())
        var quality = m_cfg.P_LOW;
    else
        var quality = m_cfg.P_HIGH;

    m_app.init({
        canvas_container_id: "canvas3d",
        callback: init_cb,
        physics_enabled: true,
        quality: quality,
        show_fps: true,
        alpha: false,
        physics_uranium_path: "uranium.js"
    });
}

As we can see, a new initialization parameter - quality - has been added. In the P_LOW profile there are no shadows and post-processing effects. This will allow us to dramatically increase the performance on mobile devices.

Controls elements on the HTML page


Lets add the following elements to the HTML file:

<!DOCTYPE html>
<body>
    <div id="canvas3d"></div>

    <div id="controls">
        <div id ="control_circle"></div>
        <div id ="control_tap"></div>
        <div id ="control_jump"></div>
    </div>
</body>

  1. control_circle element will appear when the screen is touched, and will be used for directing the character.
  2. The control_tap element is a small marker, following the finger.
  3. The control_jump element is a jump button located in the bottom right corner of the screen.

By default all these elements are hidden (visibility property). They will become visible after the scene is loaded.

The styles for these elements can be found in the game_example.css file.

Processing the touch events


Let's look at the callback which is executed at scene load:

function load_cb(root) {
    _character = m_scs.get_first_character();
    _character_body = m_scs.get_object_by_empty_name("character",
                                                         "character_body");

    var right_arrow = m_ctl.create_custom_sensor(0);
    var left_arrow  = m_ctl.create_custom_sensor(0);
    var up_arrow    = m_ctl.create_custom_sensor(0);
    var down_arrow  = m_ctl.create_custom_sensor(0);
    var touch_jump  = m_ctl.create_custom_sensor(0);

    if(detect_mobile()) {
        document.getElementById("control_jump").style.visibility = "visible";
        setup_control_events(right_arrow, up_arrow,
                             left_arrow, down_arrow, touch_jump);
    }

    setup_movement(up_arrow, down_arrow);
    setup_rotation(right_arrow, left_arrow);

    setup_jumping(touch_jump);

    setup_camera();
}

The new things here are the 5 sensors created with the controls.create_custom_sensor() method. We will change their values when the corresponding touch events are fired.

If the detect_mobile() function returns true, the control_jump element is shown up and the setup_control_events() function is called to set up the values for these new sensors (passed as arguments). This function is quite large and we'll look at it step-by-step.

var touch_start_pos = new Float32Array(2);

var move_touch_idx;
var jump_touch_idx;

var tap_elem = document.getElementById("control_tap");
var control_elem = document.getElementById("control_circle");
var tap_elem_offset = tap_elem.clientWidth / 2;
var ctrl_elem_offset = control_elem.clientWidth / 2;

First of all the variables are declared for saving the touch point and the touch indices, which correspond to the character's moving and jumping. The tap_elem and control_elem HTML elements are required in several callbacks.

The touch_start_cb() callback


In this function the beginning of a touch event is processed.

function touch_start_cb(event) {
    event.preventDefault();

    var h = window.innerHeight;
    var w = window.innerWidth;

    var touches = event.changedTouches;

    for (var i = 0; i < touches.length; i++) {
        var touch = touches[i];
        var x = touch.clientX;
        var y = touch.clientY;

        if (x > w / 2) // right side of the screen
            break;

        touch_start_pos[0] = x;
        touch_start_pos[1] = y;
        move_touch_idx = touch.identifier;

        tap_elem.style.visibility = "visible";
        tap_elem.style.left = x - tap_elem_offset + "px";
        tap_elem.style.top  = y - tap_elem_offset + "px";

        control_elem.style.visibility = "visible";
        control_elem.style.left = x - ctrl_elem_offset + "px";
        control_elem.style.top  = y - ctrl_elem_offset + "px";
    }
}

Here we iterate through all the changed touches of the event (event.changedTouches) and discard the touches from the right half of the screen:

    if (x > w / 2) // right side of the screen
        break;

If this condition is met, we save the touch point touch_start_pos and the index of this touch move_touch_idx. After that we'll render 2 elements in the touch point: control_tap and control_circle. This will look on the device screen as follows:


gm04_img01.jpg?v=20140827183625201406251


The touch_jump_cb() callback


function touch_jump_cb (event) {
    event.preventDefault();

    var touches = event.changedTouches;

    for (var i = 0; i < touches.length; i++) {
        var touch = touches[i];
        m_ctl.set_custom_sensor(jump, 1);
        jump_touch_idx = touch.identifier;
    }
}

This callback is called when the control_jump button is touched


gm04_img02.jpg?v=20140827183625201406251


It just sets the jump sensor value to 1 and saves the corresponding touch index.

The touch_move_cb() callback


This function is very similar to the touch_start_cb() function. It processes finger movements on the screen.

    function touch_move_cb(event) {
        event.preventDefault();

        m_ctl.set_custom_sensor(up_arrow, 0);
        m_ctl.set_custom_sensor(down_arrow, 0);
        m_ctl.set_custom_sensor(left_arrow, 0);
        m_ctl.set_custom_sensor(right_arrow, 0);

        var h = window.innerHeight;
        var w = window.innerWidth;

        var touches = event.changedTouches;

        for (var i=0; i < touches.length; i++) {
            var touch = touches[i];
            var x = touch.clientX;
            var y = touch.clientY;

            if (x > w / 2) // right side of the screen
                break;

            tap_elem.style.left = x - tap_elem_offset + "px";
            tap_elem.style.top  = y - tap_elem_offset + "px";

            var d_x = x - touch_start_pos[0];
            var d_y = y - touch_start_pos[1];

            var r = Math.sqrt(d_x * d_x + d_y * d_y);

            if (r < 16) // don't move if control is too close to the center
                break;

            var cos = d_x / r;
            var sin = -d_y / r;

            if (cos > Math.cos(3 * Math.PI / 8))
                m_ctl.set_custom_sensor(right_arrow, 1);
            else if (cos < -Math.cos(3 * Math.PI / 8))
                m_ctl.set_custom_sensor(left_arrow, 1);

            if (sin > Math.sin(Math.PI / 8))
                m_ctl.set_custom_sensor(up_arrow, 1);
            else if (sin < -Math.sin(Math.PI / 8))
                m_ctl.set_custom_sensor(down_arrow, 1);
        }
    }

The values of d_x and d_y denote by how much the marker is shifted relative to the point in which the touch started. From these increments the distance to this point is calculated, as well as the cosine and sine of the direction angle. This data fully defines the required behavior depending on the finger position by means of simple trigonometric transformations.

As a result the ring is divided into 8 parts, for which their own sets of sensors are assigned: right_arrow, left_arrow, up_arrow, down_arrow.

The touch_end_cb() callback


This callback resets the sensors' values and the saved touch indices.

    function touch_end_cb(event) {
        event.preventDefault();

        var touches = event.changedTouches;

        for (var i=0; i < touches.length; i++) {

            if (touches[i].identifier == move_touch_idx) {
                m_ctl.set_custom_sensor(up_arrow, 0);
                m_ctl.set_custom_sensor(down_arrow, 0);
                m_ctl.set_custom_sensor(left_arrow, 0);
                m_ctl.set_custom_sensor(right_arrow, 0);
                move_touch_idx = null;
                tap_elem.style.visibility = "hidden";
                control_elem.style.visibility = "hidden";

            } else if (touches[i].identifier == jump_touch_idx) {
                m_ctl.set_custom_sensor(jump, 0);
                jump_touch_idx = null;
            }
        }
    }

Also for the move event the corresponding control elements become hidden:

    tap_elem.style.visibility = "hidden";
    control_elem.style.visibility = "hidden";


gm04_img04.jpg?v=20140827183625201406251


Setting up the callbacks for the touch events


And the last thing happening in the setup_control_events() function is setting up the callbacks for the corresponding touch events:

    document.getElementById("canvas3d").addEventListener("touchstart", touch_start_cb, false);
    document.getElementById("control_jump").addEventListener("touchstart", touch_jump_cb, false);

    document.getElementById("canvas3d").addEventListener("touchmove", touch_move_cb, false);

    document.getElementById("canvas3d").addEventListener("touchend", touch_end_cb, false);
    document.getElementById("controls").addEventListener("touchend", touch_end_cb, false);

Please note that the touchend event is listened for two HTML elements. That is because the user can release his/her finger both inside and outside of the controls element.

Now we have finished working with events.

Including the touch sensors into the system of controls


Now we only have to add the created sensors to the existing system of controls. Let's check out the changes using the setup_movement() function as an example.

function setup_movement(up_arrow, down_arrow) {
    var key_w     = m_ctl.create_keyboard_sensor(m_ctl.KEY_W);
    var key_s     = m_ctl.create_keyboard_sensor(m_ctl.KEY_S);
    var key_up    = m_ctl.create_keyboard_sensor(m_ctl.KEY_UP);
    var key_down  = m_ctl.create_keyboard_sensor(m_ctl.KEY_DOWN);

    var move_array = [
        key_w, key_up, up_arrow,
        key_s, key_down, down_arrow
    ];

    var forward_logic  = function(s){return (s[0] || s[1] || s[2])};
    var backward_logic = function(s){return (s[3] || s[4] || s[5])};

    function move_cb(obj, id, pulse) {
        if (pulse == 1) {
            switch(id) {
            case "FORWARD":
                var move_dir = 1;
                m_anim.apply(_character_body, "character_run_B4W_BAKED");
                break;
            case "BACKWARD":
                var move_dir = -1;
                m_anim.apply(_character_body, "character_run_B4W_BAKED");
                break;
            }
        } else {
            var move_dir = 0;
            m_anim.apply(_character_body, "character_idle_01_B4W_BAKED");
        }

        m_phy.set_character_move_dir(obj, move_dir, 0);

        m_anim.play(_character_body);
        m_anim.set_behavior(_character_body, m_anim.AB_CYCLIC);
    };

    m_ctl.create_sensor_manifold(_character, "FORWARD", m_ctl.CT_TRIGGER,
        move_array, forward_logic, move_cb);
    m_ctl.create_sensor_manifold(_character, "BACKWARD", m_ctl.CT_TRIGGER,
        move_array, backward_logic, move_cb);

    m_anim.apply(_character_body, "character_idle_01_B4W_BAKED");
    m_anim.play(_character_body);
    m_anim.set_behavior(_character_body, m_anim.AB_CYCLIC);
}

As we can see, the only changed things are the set of sensors in the move_array and inside the forward_logic() and backward_logic() logic functions, which now depend on the touch sensors as well.

The setup_rotation() and setup_jumping() functions have changed in a similar way. They are listed below:

function setup_rotation(right_arrow, left_arrow) {
    var key_a     = m_ctl.create_keyboard_sensor(m_ctl.KEY_A);
    var key_d     = m_ctl.create_keyboard_sensor(m_ctl.KEY_D);
    var key_left  = m_ctl.create_keyboard_sensor(m_ctl.KEY_LEFT);
    var key_right = m_ctl.create_keyboard_sensor(m_ctl.KEY_RIGHT);

    var elapsed_sensor = m_ctl.create_elapsed_sensor();

    var rotate_array = [
        key_a, key_left, left_arrow,
        key_d, key_right, right_arrow,
        elapsed_sensor,
    ];

    var left_logic  = function(s){return (s[0] || s[1] || s[2])};
    var right_logic = function(s){return (s[3] || s[4] || s[5])};

    function rotate_cb(obj, id, pulse) {

        var elapsed = m_ctl.get_sensor_value(obj, "LEFT", 6);

        if (pulse == 1) {
            switch(id) {
            case "LEFT":
                m_phy.character_rotation_inc(obj, elapsed * ROT_SPEED, 0);
                break;
            case "RIGHT":
                m_phy.character_rotation_inc(obj, -elapsed * ROT_SPEED, 0);
                break;
            }
        }
    }

    m_ctl.create_sensor_manifold(_character, "LEFT", m_ctl.CT_CONTINUOUS,
        rotate_array, left_logic, rotate_cb);
    m_ctl.create_sensor_manifold(_character, "RIGHT", m_ctl.CT_CONTINUOUS,
        rotate_array, right_logic, rotate_cb);
}

function setup_jumping(touch_jump) {
    var key_space = m_ctl.create_keyboard_sensor(m_ctl.KEY_SPACE);

    var jump_cb = function(obj, id, pulse) {
        if (pulse == 1) {
            m_phy.character_jump(obj);
        }
    }

    m_ctl.create_sensor_manifold(_character, "JUMP", m_ctl.CT_TRIGGER,
        [key_space, touch_jump], function(s){return s[0] || s[1]}, jump_cb);
}

And the camera again


In the end let's return to the camera. Keeping in mind the community feedback, we've introduced the possibility to tweak the stiffness of the camera constraint. Now this function call is as follows:

    m_cons.append_semi_soft_cam(camera, _character, CAM_OFFSET, CAM_SOFTNESS);

The CAM_SOFTNESS constant is defined in the beginning of the file and its value is 0.2.

Conclusion


At this stage, programming the controls for mobile devices is finished. In the next tutorials we'll implement the gameplay and look at some other features of the Blend4Web physics engine.

Link to the standalone application

The source files of the application and the scene are part of the free Blend4Web SDK distribution.

Distilling Game Design

$
0
0
I have always hated chemistry, I despised the time I spent in my school's chemistry lab, watching the hours tick by and thinking about my Nintendo 64 waiting for me back home. Needless to say, I’m awful at chemistry.

That is why I was so surprised that a simple chemistry concept would so harmoniously and flawlessly apply to Game Design. In this article you will learn what is Distilled Game Design and how should a Game Designer apply it to the Game Designing process.

Always Start With the Feels


In order to design a game, I believe that the key question you must ask yourself is: "What is it that I want my player to feel when he's playing my game?" Do you want their hands to tremble in fear? Do you want them to feel frustrated? Do you want them to feel morally challenged?

I don’t think that Ron Gilbert's intention when he created Monkey Island was to make his players feel scared, or that FlukeDude intended his players to feel relaxed when he came up with The Impossible Game (Even the name is frustrating, stressful and challenging!).

Before figuring out the nuts and bolts of your game, before thinking of a cool and complex apocalyptic story, even before creating that first prototype, write down what your gamer needs to feel when playing your game. This will act as an objective item against which you will be able to measure your game in all of its development stages.

Oh but if only it was that simple! Emotions are one of the most complex areas of human behavior, we are always feeling something, even when we don't know that we're feeling it ourselves. Most of the times we are feeling things that we attribute to the wrong causes; actually, feeling misattribution is a very important part of how game designers make players feel what they want their players to feel.

Stanley Schachter and Jerome E. Singer developed what is called the two-factor theory of emotion, which states that every emotion is based on two factors: a physiological arousal and a cognitive label. This means that when someone feels an emotion, a physiological reaction occurs (their heart-rate may rise, their palms may sweat) - and most basic feelings share the same physiological reaction. The difference between feeling in love and feeling fear is in the context, so based on the situation that is happening around us, our brain associates the physiological arousal to a particular cognitive label.

If your heart is racing and your palms are sweating and you're trapped in a cage in front of an angry and hungry tiger, you associate the physiological reaction to fear, but if you have the same reaction while dining with your significant other, your brain tells you that what you are feeling is love.

Based on the two-factor theory of emotion, what you need to do to make your player feel how you want them to feel is provide them with the correct challenge (physical, moral or mental) and set your game in the correct environment to give them context.

One of the game designer’s toughest jobs is to understand how human emotions work and how to manipulate them at will. I recommend reading Tynan Sylvester's book "Designing Games: a Guide to Engineering Experience" to understand more about emotions and how can you manipulate them as Game Designers.

What is Distilled Game Design?


The emotion that you want your players to feel will serve as the base for the design of your complete game, so after knowing what this emotion is, distilled Game Design comes into action. Distilled game design is nothing else but the very essence of our game. It’s the one (or two or three) things you can't take away without risking producing the emotion that you need to make the player feel.

For instance, if you want to make your player feel frustrated, you may be able to take away cutting edge graphics and sounds, keeping only well-balanced mechanics and their progression, and you'd still be making your players feel frustrated. If you want your player to feel hilarity, you may be able to take away some challenging mechanics, but you wouldn't take away your hilarious graphics, SFX or humorous context story.

Let's also remember that there is a gamer for every game, and the core of your game needs to maintain the player's interest in your game. For more on this subject, I recommend reading about Mihály Csikszentmihály's theory of flow in his book Flow: The Psychology of Optimal Experience and in Alexandre Mandryka's article "Fun and Uncertainty".

As game designers, before designing your game, you must go in your chemistry lab, set up a distillation process, and develop a prototype with a balanced amount of core mechanics, great story, cutting-edge sound and/or amazing graphics that when stirred up causes the emotions that you need the player to experience. This will be your game's purest state.

Early-Stage Feedback


The next step is feedback and iteration on your distilled game and mechanics. You need to give this distilled prototype to your players to taste and get from them key answers about the taste of your game. Does it taste like frustration, like fear, like happiness, like anger?

You need to observe them react to the flavor of your game instead of asking them. If you see anyone taste very spicy food, you will see their face turning red, and they will ask for more water, you don’t need to ask them if it was spicy to know that it actually was.

If your players do not obviously react with the emotions you need to bestow upon them, you need to re-balance or re-make your game prototype until you get them to feel what you need them to feel in an obvious way. Remember, this is your game distilled, it's the purest flavor of your game, and it needs to be strong before adding any other component.

A word of caution my designer friend, you must choose wisely who your testers are going to be. You can read Richard Bartle's essay "Hearts, Clubs, Diamonds, Spades: Players Who Suit MUDs" and Bart Stewart's article "Personality and Play Styles: A Unified Model", to learn more about gamer types and make sure that your tester gamer type matches your target gamer type. Know thy gamers, but don't know them too well, if you test your game with your mom or your life buddy, you may guess what they are feeling in a deeper, non-obvious level. Remember, you need the emotions to show in your tester's faces and reactions.

What comes now?


After nailing your distilled game design, you can add some minerals. If, for instance, your distilled game design tastes like fear, you can now add other ingredients that enhance this flavor.

Do not make the mistake of adding ingredients that make the flavor get corrupted. If, for instance, you are making a cake and you’d like it to be sweet, adding a bit of salt may be OK, but adding too much (or a little more than a bit) may ruin the flavor you had intended, making it salty instead of sweet.

If you are designing a horror game and you’d like to add humor into the game, don’t lose sight of your distilled game design: your game needs to scare your player, this is why it's being brought into the world. So maybe you should add very subtle humor, but if you make a cartoon dressed like a clown singing kid songs walk on the screen in an abandoned city where your player is expecting gruesome zombies to come out of the darkness any second now, I have a feeling that you might ruin the mood.

This was an obvious example, but don't underestimate the power of trade-offs. Deciding to put a cartoony clown singing or making the environment too dark or too bright may result in sacrificing the flavor of your game. Trade-offs can result in good games and they are an important part of the game making process, just be sure that the flavor is not sacrificed. In fact, one of the most obvious signs to stop adding features is when your game starts tasting differently than your distilled game.

After making your game (and during the development process), you need to give your testers a bottle of your game and a bottle of your initially distilled game, and they need to taste the same. If your player feels the exact same basic emotion as he felt when tasting your distilled game, you've managed to enhance the emotion for which your game was born and you most probably have achieved making a great game.

Conclusions

  • Know what you want your player to feel when they play your game.
  • Develop a distilled prototype that makes them feel that way, and iterate until the emotions are obvious in your player's reactions.
  • Choose your player wisely, don't just test your distilled prototype on anyone.
  • Add more elements into your game that enhance the emotions that the player is feeling.
  • Give your game more testing sessions and make sure that it tastes the same as your distilled game.

References


Tynan Sylvester. Designing Games: A Guide to Engineering experiences.
Alexandre Mandryka. Fun and Uncertainty.
Bart Stewart. Personality and Play Stiles: A Unified Model.
Richard Bartle: "Hearts, Clubs, Diamonds, Spades: Players Who Suit MUDs"
Mihaly Csikszentmihalyi, Flow: The Psychology of Optimal Experience

How to Record High Quality Video of Your Game using a Slow Computer

$
0
0
I wanted to make a game play trailer for my original arcade puzzle game Futile Tiles (http://www.futiletiles.com). The game is very fast and I needed to achieve high framerate and quality for the video, which is challenging using a slow computer. Low recording frame rate can also distract controlling the game actions.

This article teaches recording game play videos with maximum resolution and framerate. The solutions presented are quite easy to code, but not very obvious at first thought.

Solution A


Do not use external recording software. Instead make the video using your own code. At the end of each completed frame take a screenshot and save it to an image file (for example from 000.png to 999.png). You can later combine these images into a complete video by using FFMPEG or some commercial video editing software. Remember to make the game actions proceed the right amount of time between the frames, such as 1/30 of a second, depending on your target video framerate.

Problems with solution A


You are able to capture the video with full resolution, but the framerate can be too low while recording. If you need to interact with the game, the video can look unnatural. Also you are unable to record the sounds.

Solution B


Do not take a screenshot at the end of each frame. Instead, save directions how to draw each frame to a file. It is much faster to save this data than to take the screenshots. You should save the rotation, the scale, the transparency and all the other relevant parameters of each object on the screen to the file. After you are finished recording the data of your whole movie clip, you can finally load the data and replay it on the screen. During the replay session, take the screenshots at the end of each frame.

The Problem with solution B


You are able to record the video with full framerate. However, you are unable to record the sounds. You could manually add the sounds in correct locations by using some video editor, however there exists a better solution.

Solution C


To solve the problem with the sounds, you need to use some software that supports adding a combination of sounds to a video clip via scripting or command line. I used Adobe After Effects scripting for this purpose. You might be able to achieve the same with the combination of Audacity and FFMPEG. When a sound is played during game play, save the type of sound clip and the time since start of recording. Make a script based on the collected information and save it to a file. Finally combine the sounds to the video with the help of the script.

Result


These methods were used for the trailer of my game Futile Tiles (http://www.futiletiles.com). When the trailer was recorded, Youtube did not support 60 fps video. However, it seems that the support is currently being added. If you are making a similar fast-paced game, the video quality could be greatly improved with 60 fps.

What do you think about the offered solutions? If you have a better way to achieve similar results, please, share it.

Please, follow me on Twitter for more awesome tutorials and games: https://twitter.com/IndiumIndeed

Article Update Log


8 Sep 2014: Revised language
2 Sep 2014: Initial release

Real Time Cloth Simulation with B-spline Surfaces

$
0
0
To achieve high visual fidelity in cloth simulation often requires the use of large amounts of springs and particles which can have devastating effects on performance in real time. Luckily there exists a workaround using B-splines and hardware tessellation. I have, in my approach, used a grid of only 10x10 control points to produce believable and fast results. CPU is tasked only with collision detection and integration of control points which is computed fast considering that there are only 100 of those and that it can easily run on a separate thread. All of B-spline computation is done on GPU or, to be more specific, in the domain shader of the tessellation pipeline. Since GPU code is the only part of this implementation involving B-spline computation, all code that follows is written in HLSL.

B-Splines


I will not go into details about B-splines but some basics should be mentioned. So here is the spline definition
(note that there are actually n+1 control points, not n)

Attached Image: M_0.gif

(eq. 1)


N - basis functions
B - control points
d - degree
u - input parameter Attached Image: M_7.gif

The degree of the curve d is a natural number that must be so that 1 <= d <= n. Degree + 1 is equal to a number of control points influencing the shape of a curve segment. Meaning if we would choose d to be 1 that number would be 2 and we would end up with linear interpolation between two control points. Experimenting with different values for d I have found that the best balance between performance and visual quality is when d=2.

Attached Image: B-spline_curve.svg.png
Figure 1. B-spline curve


The extension from curves to surfaces is simple and is given by

Attached Image: M_8.gif

(eq. 2)


Basis function values for each, u and v parameter, are computed separately and usually stored in some array before they are used in this formula. These function values are used to determine how much every control point is influencing the end result for certain input parameter u (or u and v for surfaces). The definition for basis functions are where things get tricky.

Attached Image: M_2.gif

(eq. 3)


This recursion ends when j reaches zero:

Attached Image: M_3.gif


Where Attached Image: M_4.gif is a knot in a knot vector - a nondecreasing sequence of scalars. Open (nonperiodic) and uniformly spaced knot vector is used here. Also Attached Image: M_4.gif Attached Image: M_7.gif for every i. As stated before, n + 1 is the actual number of control points (according to definition), but this is inconvenient for our code. This is why, in code, the denominator is subtracted by 1. Here is the definition and code implementation:

Attached Image: M_5.gif


float GetKnot(int i, int n)
{	// Calcuate a knot form an open uniform knot vector
	return saturate((float)(i - D) / (float)(n - D));
}

This recursive dependencies can be put into table and it can easily be seen that for a given u only one basis function N in the bottom row is not zero.

Attached Image: M_1.png
Figure 2. Recursive dependencies of a basis functions (n=4, d=2).
For a certain u the only non zero values are in the rectangles.


This is the motivation behind De Boor's algorithm which optimizes the one based on mathematical definition. Further optimization is also possible like the one from the book by David H. Eberly. I have modified David's algorithm slightly so that it can run on the GPU and added some code for normal and tangent computation. So how do we get the right i so that Attached Image: M_6.gif for given u? Well considering that knot vector is uniformly spaced it can be easily calculated. One thing to note though, since uAttached Image: M_7.gif when u=1 we will end up with incorrect values. This can be fixed by making sure a vertex with a texture coordinate (either u or v) equal to 1 is never processed, which is inconvenient. The simpler way is used here, as we simply multiply the u parameter by a number that is "almost" 1.

int GetKey(float u, int n)
{
	return D + (int)floor((n  - D) * u*0.9999f);
}

The last thing we need before any of this code will work is our constant buffer and pre-processor definitions. Although control points array is allocated to its maximum size, smaller sizes are possible by passing values to gNU and gNV. Variable gCenter will be discussed later, but besides that all variables should be familiar by now.

#define MAX_N 10				// maximum number of control points in either direction (U or V)
#define D 2						// degree of the curve
#define EPSILON 0.00002f		// used for normal and tangent calculation

cbuffer cbPerObject
{
	// B-Spline
	int gNU;					// gNU actual number of control points in U direction
	int gNV;					// gNV actual number of control points in V direction
	float4 gCP[MAX_N * MAX_N];	// control points
    float3 gCenter;				// arithmetic mean of control points
	
    // ... other variables
};

The function tasked with computing B-spline inputs just texture coordinates (u and v) and uses it to compute position, normal and tangent. We will add the Coordinates u and v a small epsilon value to produce an offset in coordinate space. These new values are named u_pdu and v_pdv in code and here is how they are used to produce tangent and normal:

Attached Image: M_9.gif

(eq. 4)


Now, as mentioned earlier, basis function values are computed and stored in separate arrays for u and v parameter, but since we have additional two parameters u_pdu and v_pdv a total of four basis functions (arrays) will be needed. These are named basisU, basisV, basisU_pdu, basisV_pdv in code. GetKey() function is also used here to calculate the i so that Attached Image: M_6.gif for given u as stated before and separately one i for given v. One might think that we also need separate i for u_pdu and v_pdv. That would be correct according to definition, but the inaccuracy we get from u_pdu and v_pdv potentially not having the correct i and thus having inacurate basis function values array is too small to take into account.

void ComputePosNormalTangent(in float2 texCoord, out float3 pos, out float3 normal, out float3 tan)
{
	float u = texCoord.x;
	float v = texCoord.y;
	float u_pdu = texCoord.x + EPSILON;
	float v_pdv = texCoord.y + EPSILON;
	int iU = GetKey(u, gNU);
	int iV = GetKey(v, gNV);

	// create and set basis
	float basisU[D + 1][MAX_N + D];
	float basisV[D + 1][MAX_N + D];
	float basisU_pdu[D + 1][MAX_N + D];
	float basisV_pdv[D + 1][MAX_N + D];
	basisU[0][iU] = basisV[0][iV] = basisU_pdu[0][iU] = basisV_pdv[0][iV] = 1.0f;
    
    // ... the rest of the function code

Now for the actual basis function computation. If you look at figure 2. you can see that non zero values form a triangle. Values of the left diagonal and right vertical edge are computed first since each value depends only on one previous value. The interior values are then computed using eq. 3. Every remaining value of the basis functions array is simply left untouched. Their value is zero but even if it would be some unwanted value it doesn't matter as will be seen later.

    // ... the rest of the function code

	// evaluate triangle edges
	[unroll]
	for (int j = 1; j <= D; ++j)
	{
		float gKI;
		float gKI1;
		float gKIJ;
		float gKIJ1;

		// U
		gKI = GetKnot(iU, gNU);
		gKI1 = GetKnot(iU + 1, gNU);
		gKIJ = GetKnot(iU + j, gNU);
		gKIJ1 = GetKnot(iU - j + 1, gNU);
		float c0U = (u - gKI) / (gKIJ - gKI);
		float c1U = (gKI1 - u) / (gKI1 - gKIJ1);
		basisU[j][iU] = c0U * basisU[j - 1][iU];
		basisU[j][iU - j] = c1U * basisU[j - 1][iU - j + 1];
		float c0U_pdu = (u_pdu - gKI) / (gKIJ - gKI);
		float c1U_pdu = (gKI1 - u_pdu) / (gKI1 - gKIJ1);
		basisU_pdu[j][iU] = c0U_pdu * basisU_pdu[j - 1][iU];
		basisU_pdu[j][iU - j] = c1U_pdu * basisU_pdu[j - 1][iU - j + 1];

		// V
		gKI = GetKnot(iV, gNV);
		gKI1 = GetKnot(iV + 1, gNV);
		gKIJ = GetKnot(iV + j, gNV);
		gKIJ1 = GetKnot(iV - j + 1, gNV);
		float c0V = (v - gKI) / (gKIJ - gKI);
		float c1V = (gKI1 - v) / (gKI1 - gKIJ1);
		basisV[j][iV] = c0V * basisV[j - 1][iV];
		basisV[j][iV - j] = c1V * basisV[j - 1][iV - j + 1];
		float c0V_pdv = (v_pdv - gKI) / (gKIJ - gKI);
		float c1V_pdv = (gKI1 - v_pdv) / (gKI1 - gKIJ1);
		basisV_pdv[j][iV] = c0V_pdv * basisV_pdv[j - 1][iV];
		basisV_pdv[j][iV - j] = c1V_pdv * basisV_pdv[j - 1][iV - j + 1];
	}

	// evaluate triangle interior
	[unroll]
	for (j = 2; j <= D; ++j)
	{
		// U
		[unroll(j - 1)]
		for (int k = iU - j + 1; k < iU; ++k)
		{
			float gKK = GetKnot(k, gNU);
			float gKK1 = GetKnot(k + 1, gNU);
			float gKKJ = GetKnot(k + j, gNU);
			float gKKJ1 = GetKnot(k + j + 1, gNU);
			float c0U = (u - gKK) / (gKKJ - gKK);
			float c1U = (gKKJ1 - u) / (gKKJ1 - gKK1);
			basisU[j][k] = c0U * basisU[j - 1][k] + c1U * basisU[j - 1][k + 1];
			float c0U_pdu = (u_pdu - gKK) / (gKKJ - gKK);
			float c1U_pdu = (gKKJ1 - u_pdu) / (gKKJ1 - gKK1);
			basisU_pdu[j][k] = c0U_pdu * basisU_pdu[j - 1][k] + c1U_pdu * basisU_pdu[j - 1][k + 1];
		}

		// V
		[unroll(j - 1)]
		for (k = iV - j + 1; k < iV; ++k)
		{
			float gKK = GetKnot(k, gNV);
			float gKK1 = GetKnot(k + 1, gNV);
			float gKKJ = GetKnot(k + j, gNV);
			float gKKJ1 = GetKnot(k + j + 1, gNV);
			float c0V = (v - gKK) / (gKKJ - gKK);
			float c1V = (gKKJ1 - v) / (gKKJ1 - gKK1);
			basisV[j][k] = c0V * basisV[j - 1][k] + c1V * basisV[j - 1][k + 1];
			float c0V_pdv = (v_pdv - gKK) / (gKKJ - gKK);
			float c1V_pdv = (gKKJ1 - v_pdv) / (gKKJ1 - gKK1);
			basisV_pdv[j][k] = c0V_pdv * basisV_pdv[j - 1][k] + c1V_pdv * basisV_pdv[j - 1][k + 1];
		}
	}
    
    // ... the rest of the function code


And finally, with basis function values computed and saved in arrays we are finally ready to use eq. 1. But before that there is one particular thing that should be discussed here. If you know how float numbers work (IEEE 754) then you know that if you add a very small number (like our EPSILON) and a very big one you could end up losing data. This is exactly what happens if control points are relatively far from world's coordinate system origin and vectors like pos_pdu and pos that should be different by a small amount end up being equal. To prevent this all control points are translated more towards center with the gCenter variable. This variable is a simple arithmetic mean of all the control points.

	// ... the rest of the function code
	float3 pos_pdu, pos_pdv;
	pos.x = pos_pdu.x = pos_pdv.x = 0.0f;
	pos.y = pos_pdu.y = pos_pdv.y = 0.0f;
	pos.z = pos_pdu.z = pos_pdv.z = 0.0f;

	[unroll(D + 1)]
	for (int jU = iU - D; jU <= iU; ++jU)
	{
		[unroll(D + 1)]
		for (int jV = iV - D; jV <= iV; ++jV)
		{
			pos += basisU[D][jU] * basisV[D][jV] * (gCP[jU + jV * gNU].xyz - gCenter);
			pos_pdu += basisU_pdu[D][jU] * basisV[D][jV] * (gCP[jU + jV * gNU].xyz - gCenter);
			pos_pdv += basisU[D][jU] * basisV_pdv[D][jV] * (gCP[jU + jV * gNU].xyz - gCenter);
		}
	}
	
	tan = normalize(pos_pdu - pos);
	float3 bTan = normalize(pos_pdv - pos);
	normal = normalize(cross(tan, bTan));
	pos += gCenter;
}

Hardware tessellation and geometry shader


Still with me? Awesome, since it is mostly downhill from this point. It was probably easy to guess that a mesh in form of a grid will be needed here, made so that its texture coordinates stretch from 0 to 1. An algorithm for this should be easy to implement and I will leave it out. It is useless to have position values of vertices in the vertex structure since that data is passed through control points (gCP). This is what vertex input structure and vertex shader needs to be like:

struct V_TexCoord
{
	float2 TexCoord		: TEXCOORD;
};

V_TexCoord VS(V_TexCoord vin)
{	// Just a pass through shader
	V_TexCoord vout;
	vout.TexCoord = vin.TexCoord;
	return vout;
}

The tessellation stages start with a hull shader. Tessellation factors are calculated in constant hull shader ConstantHS() while control hull shader HS() is again, like VS(), a passthrough shader. Although at first I experimented and created per-triangle tessellation, it was cleaner, faster and easier to implement per-object tessellation, so that approach is presented here.

struct PatchTess
{
	float EdgeTess[3]   : SV_TessFactor;
	float InsideTess	: SV_InsideTessFactor;
};

PatchTess ConstantHS(InputPatch<V_TexCoord, 3> patch, uint patchID : SV_PrimitiveID)
{
	PatchTess pt;
	
	// Uniformly tessellate the patch.
	float tess = CalcTessFactor(gCenter);
	pt.EdgeTess[0] = tess;
	pt.EdgeTess[1] = tess;
	pt.EdgeTess[2] = tess;
	pt.InsideTess = tess;

	return pt;
}

[domain("tri")]
[partitioning("fractional_odd")]
[outputtopology("triangle_cw")]
[outputcontrolpoints(3)]
[patchconstantfunc("ConstantHS")]
[maxtessfactor(64.0f)]
V_TexCoord HS(InputPatch<V_TexCoord, 3> p, uint i : SV_OutputControlPointID, uint patchId : SV_PrimitiveID)
{	// Just a pass through shader
	V_TexCoord hout;
	hout.TexCoord = p[i].TexCoord;
	return hout;
}

Also a method for calculating tessellation and a supplement for our constant buffer cbPerObject. Since control points are already in world space, only view and projection matrices are needed and here they are supplied already multiplied as gViewProj. Variable gEyePosW is a simple camera position vector and all variables under the "Tessellation" comment should be self-explanatory. CalcTessFactor() gets us the required tessellation factor used in HS() by a distance based function. You can alter the way this factor changes with distance by setting different exponents of the base s.

cbuffer cbPerObject
{
	// ... other variables
    
    // Camera
	float4x4 gViewProj;
	float3 gEyePosW; 
    
    // Tessellation
	float gMaxTessDistance;
	float gMinTessDistance;
	float gMinTessFactor;
	float gMaxTessFactor;
};

float CalcTessFactor(float3 p)
{
	float d = distance(p, gEyePosW);
	float s = saturate((d - gMinTessDistance) / (gMaxTessDistance - gMinTessDistance));
	return lerp(gMinTessFactor, gMaxTessFactor, pow(s, 1.5f));
}

Now in domain shader we get to use all that B-spline goodness. New structure is also given, as here we introduce position, normals and tangents. Barycentric interpolation is used to acquire the texture coordinates from a generated vertex and then used as u and v parameters for our ComputePosNormalTangent() function.

struct V_PosW_NormalW_TanW_TexCoord
{
	float3 PosW			: POSTION;
	float3 NormalW		: NORMAL;
    float3 TanW			: TANGENT;
	float2 TexCoord		: TEXCOORD;
};

[domain("tri")]
V_PosW_NormalW_TanW_TexCoord DS(PatchTess patchTess,
                                float3 bary : SV_DomainLocation,
                                const OutputPatch<V_TexCoord, 3> tri)
{
	float2 texCoord = bary.x*tri[0].TexCoord + bary.y*tri[1].TexCoord + bary.z*tri[2].TexCoord;
	V_PosW_NormalW_TanW_TexCoord dout;
	ComputePosNormalTangent(texCoord, dout.PosW, dout.NormalW, dout.TanW);
	dout.TexCoord = texCoord;

	return dout;
}

And now the final part before passing vertex data to pixel shader. The geometry shader. Why? Well because cloth is visible from both sides, DUH! Triangles in DirectX graphics pipeline are not however and even if we disable backface culling, the normals would still have opposite values on the back face of a triangle. This is where GS() comes in. We input three vertices at once from DS() (one triangle) and copy them to the output stream. Additionally, three more vertices are added with only difference in normal. Another thing worth mentioning is that PosW is transformed to homogeneous clip space (projection space) and saved to PosH. This is the reason for this new structure:

struct V_PosH_NormalW_TanW_TexCoord
{
	float4 PosH			: SV_POSITION;
	float3 NormalW		: NORMAL;
    float3 TanW			: TANGENT;
	float2 TexCoord		: TEXCOORD;
};

[maxvertexcount(6)]
void GS(triangle V_PosW_NormalW_TanW_TexCoord gin[3],
        inout TriangleStream<V_PosH_NormalW_TanW_TexCoord> triStream)
{
	V_PosH_NormalW_TanW_TexCoord gout[6];

	[unroll] // just copy pasti'n
	for (int i = 0; i < 3; ++i)
	{
		float3 posW = gin[i].PosW;
		gout[i].PosH = mul(float4(posW, 1.0f), gViewProj);
		gout[i].NormalW = gin[i].NormalW;
        gout[i].TanW = gin[i].TanW;
		gout[i].TexCoord = gin[i].TexCoord;
	}

	[unroll] // create the other side
	for (i = 3; i < 6; ++i)
	{
		float3 posW = gin[i-3].PosW;
		gout[i].PosH = mul(float4(posW, 1.0f), gViewProj);
		gout[i].NormalW = -gin[i-3].NormalW;
        gout[i].TanW = gin[i-3].TanW;
		gout[i].TexCoord = gin[i-3].TexCoord;
	}

	triStream.Append(gout[0]);
	triStream.Append(gout[1]);
	triStream.Append(gout[2]);
	triStream.RestartStrip();

	triStream.Append(gout[3]);
	triStream.Append(gout[5]);
	triStream.Append(gout[4]);
}

I will leave it to the reader to decide what to do in pixel shader. With normals, tangents and texture coordinates there should be everything needed to create all kinds of visual magic. Good luck!

float4 PS(V_PosH_NormalW_TanW_TexCoord pin) : SV_Target
{
	// ... now what?! XD
}

technique11 BSplineDraw
{
	pass P0
	{
		SetVertexShader(CompileShader(vs_5_0, VS()));
		SetHullShader(CompileShader(hs_5_0, HS()));
		SetDomainShader(CompileShader(ds_5_0, DS()));
		SetGeometryShader(CompileShader(gs_5_0, GS()));
		SetPixelShader(CompileShader(ps_5_0, PS()));
	}
}

Conclusion


Although this is not a complete shader and the work being done on the CPU is not covered at all, I think this article will give a good start to anybody wanting to have fast and pleasant looking cloth simulation in their engines. Here is a file that contains all the written code in orderly fashion and should be free from bugs and errors. Attached File  shader.txt   7.71KB   23 downloads


Also, you can follow me on Twitter and check out this youtube video which demonstrates explained methods in action. Hope you like it!


Article Update Log


September 11, 2014: Initial release

Making a Game with Blend4Web Part 5: Dangerous World

$
0
0
We continue the exciting process of creating a mini Blend4Web game. Now we'll introduce some gameplay elements: red-hot rocks which fall from the sky and damage the character.

New objects in the Blender scene


Let's prepare new game objects in the blend/lava_rock.blend file:

  1. There are 3 sorts of falling rocks: rock_01, rock_02, rock_03.
  2. Smoke tails for these rocks - 3 identical particle system emitters, parented to the rock objects: smoke_emitter_01, smoke_emitter_02, smoke_emitter_03.
  3. Particle systems for the rock explosions: burst_emitter_01, burst_emitter_02, burst_emitter_03.
  4. Markers that appear under the falling rocks: mark_01, mark_02, mark_03.


gm05_img04.jpg?v=20140909103920201407111


We'll describe the creation of these objects in one of the next articles.

For convenience, let's put all these objects into a single group lava_rock and link this group to the main file game_example.blend. Then we double the number of all the objects on the scene - by copying the empty object with the duplication group. As a result we obtain a pool of 6 falling rocks, which we'll access by the names of the two empty objects - lava_rock and lava_rock.001.

Health bar


Let's add four HTML elements to render the health bar.

<div id="life_bar">
    <div id="life_bar_main"></div>
    <div id="life_bar_green"></div>
    <div id="life_bar_red"></div>
    <div id="life_bar_mid"></div>
</div>


gm05_img02.jpg?v=20140909103920201407111


These elements will move when our character receives damage. The corresponding style descriptions have been added to the game_example.css file.

Constants and variables


First of all lets initialize some new constants for gameplay tweaking and also a global variable for character hit points:

var ROCK_SPEED = 2;
var ROCK_DAMAGE = 20;
var ROCK_DAMAGE_RADIUS = 0.75;
var ROCK_RAY_LENGTH = 10;
var ROCK_FALL_DELAY = 0.5;

var LAVA_DAMAGE_INTERVAL = 0.01;

var MAX_CHAR_HP = 100;

var _character_hp;

var _vec3_tmp = new Float32Array(3);

The _vec3_tmp typed array is created for storing intermediate calculation results in order to reduce the JavaScript garbage collector load.

Let's set the _character_hp value to MAX_CHAR_HP in the load_cb() function - our character is in full health when the game starts.

_character_hp = MAX_CHAR_HP;

Falling rocks - initialization


The stack of function calls now looks like this:

var elapsed_sensor = m_ctl.create_elapsed_sensor();

setup_movement(up_arrow, down_arrow);
setup_rotation(right_arrow, left_arrow, elapsed_sensor);
setup_jumping(touch_jump);

setup_falling_rocks(elapsed_sensor);
setup_lava(elapsed_sensor);

setup_camera();

For performance reasons, elapsed_sensor is initialized only once and passed as argument to the functions.

Let's look at the new function for setting up the rock falling:

function setup_falling_rocks(elapsed_sensor) {

    var ROCK_EMPTIES = ["lava_rock","lava_rock.001"];
    var ROCK_NAMES = ["rock_01", "rock_02", "rock_03"];

    var BURST_EMITTERS_NAMES = ["burst_emitter_01", "burst_emitter_02",
                                "burst_emitter_03"];

    var MARK_NAMES = ["mark_01", "mark_02", "mark_03"];

    var falling_time = {};

    ...
}

The first thing we see is the population of arrays with names of falling rocks and related objects. The falling_time dictionary serves for tracking the time passed after every rock had started falling.

Falling rocks - sensors


Let's set up sensors to describe the behavior of each falling rock within the double loop:

for (var i = 0; i < ROCK_EMPTIES.length; i++) {

    var dupli_name = ROCK_EMPTIES[i];

    for (var j = 0; j < ROCK_NAMES.length; j++) {
        
        var rock_name  = ROCK_NAMES[j];
        var burst_name = BURST_EMITTER_NAMES[j];
        var mark_name  = MARK_NAMES[j];

        var rock  = m_scs.get_object_by_dupli_name(dupli_name, rock_name);
        var burst = m_scs.get_object_by_dupli_name(dupli_name, burst_name);
        var mark  = m_scs.get_object_by_dupli_name(dupli_name, mark_name);

        var coll_sens_lava = m_ctl.create_collision_sensor(rock, "LAVA", true);
        var coll_sens_island = m_ctl.create_collision_sensor(rock, "ISLAND", true);

        var ray_sens = m_ctl.create_ray_sensor(rock, [0, 0, 0],
                                    [0, -ROCK_RAY_LENGTH, 0], false, null);

        m_ctl.create_sensor_manifold(rock, "ROCK_FALL", m_ctl.CT_CONTINUOUS,
                                     [elapsed_sensor], null, rock_fall_cb);

        m_ctl.create_sensor_manifold(rock, "ROCK_CRASH", m_ctl.CT_SHOT,
                                     [coll_sens_island, coll_sens_lava],
                function(s){return s[0] || s[1]}, rock_crash_cb, burst);

        m_ctl.create_sensor_manifold(rock, "MARK_POS", m_ctl.CT_CONTINUOUS,
                                    [ray_sens], null, mark_pos_cb, mark);

        set_random_position(rock);
        var rock_name = m_scs.get_object_name(rock);
        falling_time[rock_name] = 0;
    }
}

The external loop iterates through dupli-groups (remember - there are just two of them). The inner loop processes the rock objects, explosion particle systems (burst) and markers. It's not required to process the smoke tail particle systems because they are parented to the falling rocks and follow them automatically.

The coll_sens_lava and coll_sens_island sensors detect collisions of the rocks with the lava surface and the ground. The third create_collision_sensor() function argument means that we want to receive the collision point coordinates inside the callback.

The ray_sens sensor detects the distance between the falling rock and the object under it, and is used to place the marker. The created ray starts at the [0,0,0] object coordinates and ends 10 meters beneath it. The last argument - null - means that collisions will be detected with any objects regardless of their collision_id.

Falling rocks - sensor manifolds


Then we use the sensor model that we learned in the prevoius articles. Three sensor manifolds are formed with the just created sensors: ROCK_FALL is responsible for rock falling, ROCK_CRASH processes impacts with the ground and the lava, and MARK_POS places the marker under the rock.

Also let's randomly position the rock at some height with the set_random_position() function:

function set_random_position(obj) {
    var pos = _vec3_tmp;
    pos[0] = 8 * Math.random() - 4;
    pos[1] = 4 * Math.random() + 2;
    pos[2] = 8 * Math.random() - 4;
    m_trans.set_translation_v(obj, pos);
}

Last but not least - the time for tracking the rock falling is initialized to zero in the falling_time dictionary:

falling_time[rock_name] = 0;

The rock names are used as keys in this object. These names are unique despite the fact that several identical objects are present in the scene. The thing is that in Blend4Web the resulting name of an object, which is linked using a duplication group, is composed from the group name and the original name of the object, e.g. lava_rock.001*rock_03.

Callback for the falling time


The rock_fall_cb() callback is as follows:

function rock_fall_cb(obj, id, pulse) {
    var elapsed = m_ctl.get_sensor_value(obj, id, 0);
    var obj_name = m_scs.get_object_name(obj);
    falling_time[obj_name] += elapsed;

    if (falling_time[obj_name] <= ROCK_FALL_DELAY)
        return;

    var rock_pos = _vec3_tmp;
    m_trans.get_translation(obj, rock_pos);
    rock_pos[1] -= ROCK_SPEED * elapsed;
    m_trans.set_translation_v(obj, rock_pos);
}

The falling time is incremented by elapsed value which has been retrieved from the current value of the elapsed time sensor. There is a small delay before the rock starts falling (ROCK_FALL_DELAY). This delay allows the physics engine - which runs asynchronously in an independent Web Worker - to correctly detect the height of the object when it starts falling. Later it will help us to place the marker nicely below the rock.

The current rock coordinates are saved into the rock_pos variable. Then its Y coordinate is changed by the ROCK_SPEED * elapsed value, and the object is set into a new position. To make things easier we used a linear motion model (without gravity acceleration).

Callback for impacts


The following callback is executed for rock impacts:

function rock_crash_cb(obj, id, pulse, burst_emitter) {
    var char_pos = _vec3_tmp;

    m_trans.get_translation(_character, char_pos);

    var sensor_id = m_ctl.get_sensor_value(obj, id, 0)? 0: 1;

    var collision_pt = m_ctl.get_sensor_payload(obj, id, sensor_id);
    var dist_to_rock = m_vec3.distance(char_pos, collision_pt);

    m_trans.set_translation_v(burst_emitter, collision_pt);
    m_anim.set_current_frame_float(burst_emitter, 0);
    m_anim.play(burst_emitter);

    set_random_position(obj);

    if (dist_to_rock < ROCK_DAMAGE_RADIUS)
        reduce_char_hp(ROCK_DAMAGE);

    var obj_name = m_scs.get_object_name(obj);
    falling_time[obj_name] = 0;
}

In this function the last parameter burst_emitter is a particle system object which we passed upon registration of the sensor manifolds.

Using the sensor_id value we detect the exact sensor which triggered the callback execution. The 0 value corresponds to collisions with the ground while the 1 value with the lava surface. The collision point coordinates can be obtained with the following method:

var collision_pt = m_ctl.get_sensor_payload(obj, id, sensor_id);

The explosion particle system emitter (burst_emitter) is placed into the collision point and then its animation is started.


gm05_img05.jpg?v=20140909103920201407111


After that the stone is randomly positioned at some height to be ready for a new voyage.

With respect to the new character position (char_pos) we calculate the distance to the collision point - dist_to_rock. If the character is near enough to the collision point, its life points decrease:

if (dist_to_rock < ROCK_DAMAGE_RADIUS)
    reduce_char_hp(ROCK_DAMAGE);

We'll look at the function for decreasing life points a bit later. Now we end by zeroing the falling time for this rock, just to guarantee the next falling iteration:

falling_time[obj_name] = 0;

Callback for the marker under the rock


To help the player avoid the falling rocks we'll place special markers on the surface for them. Let's look at the callback code:

function mark_pos_cb(obj, id, pulse, mark) {
    var mark_pos = _vec3_tmp;
    var ray_dist = m_ctl.get_sensor_payload(obj, id, 0);
    var obj_name = m_scs.get_object_name(obj);

    if (falling_time[obj_name] <= ROCK_FALL_DELAY) {
        m_trans.get_translation(obj, mark_pos);
        mark_pos[1] -= ray_dist * ROCK_RAY_LENGTH - 0.01;
        m_trans.set_translation_v(mark, mark_pos);
    }

    m_trans.set_scale(mark, 1 - ray_dist);
}

We save the distance to the ground in the ray_dist variable. The marker is positioned before the rock had started its motion (ROCK_FALL_DELAY seconds). Please note how the marker moves relative to the rock:

mark_pos[1] -= ray_dist * ROCK_RAY_LENGTH - 0.01;

The ROCK_RAY_LENGTH multiplier is required here, because ray_dist is a relative length of the ray segment (from 0 to 1), while its real length is 10 meters. In order to lift the marker a bit above the ground surface, 0.01 is subtracted.

While the stone is falling the marker increases in size linearly. The last line of the callback is responsible for it:

m_trans.set_scale(mark, 1 - ray_dist);

As a result we observe the falling of red-hot rocks:


gm05_img03.jpg?v=20140909103920201407111


Damage from lava


If the character touches the lava its life point will decrease with time. The setup_lava() function is compact enough for its code to be listed in whole:

function setup_lava(elapsed_sensor) {
    var time_in_lava = 0;

    function lava_cb(obj, id, pulse, param) {
        if (pulse == 1) {

            var elapsed = m_ctl.get_sensor_value(obj, id, 1);
            time_in_lava += elapsed;

            if (time_in_lava >= LAVA_DAMAGE_INTERVAL) {

                if (elapsed < LAVA_DAMAGE_INTERVAL)
                    var damage = 1;
                else
                    var damage = Math.floor(elapsed/LAVA_DAMAGE_INTERVAL);

                reduce_char_hp(damage);
                time_in_lava = 0;
            }
        } else {
            time_in_lava = 0;
        }
    }

    var lava_ray = m_ctl.create_ray_sensor(_character, [0, 0, 0], [0, -0.25, 0],
                                           false, "LAVA");

    m_ctl.create_sensor_manifold(_character, "LAVA_COLLISION",
        m_ctl.CT_CONTINUOUS, [lava_ray, elapsed_sensor],
        function(s) {return s[0]}, lava_cb);

}

The lava_ray sensor is a ray with a length of 0.25 (a bit bigger than half of the character's height), which is directed down from the character center. The LAVA_COLLISION sensor manifold is created based on it and elapsed_sensor. We calculate whether to decrease the character life points based on the time it has spent in the lava (time_in_lava). The rate of hit points decreasing can be tweaked with the LAVA_DAMAGE_INTERVAL constant. If the character remains in the lava for this period of time, it loses 1 HP. If, on the other hand, the delay between frames is larger than the specified interval, the damage is calculated as follows:

var damage = Math.floor(elapsed/LAVA_DAMAGE_INTERVAL);

The in-lava time is reset in two cases: if the character receives damage from the lava or if it gets out of it. Then it accumulates again until the LAVA_DAMAGE_INTERVAL value is reached.

Hit points


When we processed the rocks and the lava we used the reduce_char_hp() function. Now lets look at what it is:

function reduce_char_hp(amount) {

    if (_character_hp <= 0)
        return;

    _character_hp -= amount;

    var green_elem = document.getElementById("life_bar_green");
    var red_elem = document.getElementById("life_bar_red");
    var mid_elem = document.getElementById("life_bar_mid");

    var hp_px_ratio = 192 / MAX_CHAR_HP;
    var green_width = Math.max(_character_hp * hp_px_ratio, 0);
    var red_width = Math.min((MAX_CHAR_HP - _character_hp) * hp_px_ratio, 192);

    green_elem.style.width =  green_width + "px";
    red_elem.style.width =  red_width + "px";
    mid_elem.style.left = green_width + 19 + "px";

    if (_character_hp <= 0)
        kill_character();
}

First of all this function reduces the _character_hp global variable value. Second, the health bar HTML elements are changed: for the life_bar_green element its width is decreased, for the life_bar_red element - increased, and the life_bar_mid element is placed between them.

If the hit points reach zero the kill_character() function is called:

function kill_character() {
    m_anim.apply(_character_body, "character_death");
    m_anim.play(_character_body);
    m_anim.set_behavior(_character_body, m_anim.AB_FINISH_STOP);
    m_phy.set_character_move_dir(_character, 0, 0);
    m_ctl.remove_sensor_manifolds(_character);
}

The death of the character is accompanied by the "character_death" animation which is played back in the m_anim.AB_FINISH_STOP mode - i.e. the animation is not looped. Then we stop the character and remove all its existing sensor manifolds.


gm05_img06.jpg?v=20140909103920201407111


Conclusion


Now we have something which really resembles a game! You can always make the game more complicated by adding more rocks or increasing their speed and damage.

In one of the next articles we will take a closer look at the models and materials used for this tutorial.

Link to the standalone application

The source files of the application and the scene are included to the free Blend4Web SDK distribution.</center></center>

Growing Projects - An Odyssey into Complex Code

$
0
0
Working on any project at all is barely an undertaking that is immune to chaos. Split up a file that grew beyond a point, naming of objects and functions, files ... "chaos awaits". In this article I'm going to introduce you to a few concepts of not losing the mind within growing projects... as inspiration to improve your coding - to help wherever it may.

To Grow or Not to Grow


The Yielding of Error


In the beginning we have an ambition, a goal, a demand - be as logical, clean and efficient as it gets, but nobody is free of making mistakes. Mistakes come in many ways and design errors are amongst the worse mistakes that can happen. Once having settled on a pool of code that is supposed to function to the desired end it may happen that the entire project becomes useless; That dependend on the amount of people working on the project. The key term is: When it grows beyond the 'local brain-capacity' a deligently established structure upon the structure is a must have.

It is of course in the responsibility of the projects leader to get the group organized and the more organized a venture does get, the less important is all of this to the individual because he/she will mostly work on a select portion of the whole. There are no grey areas to the one who is designated a certain job and minor clinches here and there will possibly always be a part to anything ever.
The bigger the venture is, the less space there is for going out of the way to experiment on a certain idea and that is mostly up to the captain to decide who in turn has other tools and ways, like first of all the blackboard and most importantly the many people sitting around providing active feedback - where nothing happens until it can be set into stone.

"You take note, sit down and write your code" - vidi, veni, vici. But while the code director of a large group has many minds to rely upon, that is a luxury not all can efford. Here structural errors are more dangerous, but not the inevitable failure.
Bugs are an example to cast some more light into this scenario. Bugs mostly are either just programming errors - those don't matter to us here - or they are the quirks of 'brave code' that hasn't been thought through as strong as possibly intended. The problem resides within human reason. To the human mind string + string is a legitimate thing, so is number + number and whatever solution is required to solve the problem is the goal. But while the immediate difference isn't large to our brain, it is large to the work-flow of a program. Parsing through text may be a neat example or implementing a sorting algorithm while the little man knows or would think that it may also work without. Trying to get complex operations done in one go and the first time writing it requires preparation, and to be really precise this preparation has to be done in consideration of all the things that are influenced.

If the one day you produced a value through a formula that you needed somewhere, then re-arranged the formula and the value got forgotten - then we got what we might call 'broken code' or: Find the needle in the hay-stack. In such cases it is often a nice idea not to look for the problem in the code, but within the concept, the approach, the development attitude - well - all what is not 'in code'.

//mainfile.cpp

#include	"dafuq.h"
//#include	"DaFuq.h"
    #include	"DaFinFuq.h"
#include	"da_fuzk.h"
#include	"da_definite_one.h"
#include	"fuzz2.h"

The Yielding of Rules


Rules, no matter how many hate them, provide order, order provides structure - nothing new. Thus every project "should" begin with that on mind, or else the lack of structure will become the structure - and if someone wants to do it for the kick or whatever ... well.

+- Base Dir
        
    base.cpp
    
...
+- MyCommons Directory
        
    commons.h
    + units.h
...

This is what things could look like in the start. Here we have two locations - one is the private library called commons and the other is the newly setup project - old school. What matters for a good commons pool is not different to what matters for a good external library like lets say OpenGL: Structure.

Structure in this case is to be relied upon. Everything that can be relied upon is great. Everything that is currently under construction can't be relied upon, but, that means that it is bad - and that isn't good - and that ... is obvious.

In order to really begin with anything solid and complex one has to setup rules, something to rely upon, but here is where the issue within development begins. The target is clear: Make everything that is new as reliable as possible. That way the project may grow more and more complicated - it won't matter if everything does what it is supposed to do.
Easier said than done, sometimes however, where here once again the problems reside within the gap between human mind and virtual reality. In essence the provided structure wherein "the thing" is to be worked out depends on the human grasp and furthermore intention/ambition. One can begin simple, most simple, most essential, bare-bones and basic, or one can right away proceed to laying everything out. Like there is a corelation between mass and energy, there is a corelation between quality and quantity. If you write a complex structure you are most likely lacking behind in content, while if you write simple structures you are most likely lacking in applicable wealth. Bridging the gap towards the respective pit is the challenge - especially once you stumble upon that one extra feature that offers itself to be implemented while you basically should take care of stuffing some holes.
But here its not all the meats fault. One must though admire those brave men of old that had to resort to monochrome text-mode editors to get their s*t together.

I can't tell you though how well you would handle such situations, we humans sometimes do in general lack in depth information how much other people fail - not for our entertainment but for allowing us to be a little bit more hostile towards our inner coward. That is one reason why we like to stick to rules - unwritten ones maybe - things however that we know are 'real'. We always get to hear that making mistakes is normal, but when we look into our past I'm sure that most of us see how those that actually made them for others to see yielded flak for it - rather than respect. And I know that I should keep my ego out of an objective article, but [finding some excuse].

A nice workaround is to convert weaknesses into strengths, or, covering flaws within styles. Its pretty much like baking bread. There is dough, theres the oven, then there is bread. One doesn't sort the baked bread back to the dough, or the fresh dough under the baked bread.

Saying, something like:

  1. All sophisticated classes have practical, bold, capital names (i.e. VERTEX_3D)
  2. All project specific 'finite' classes begin and end with one Underscore and are capsed
  3. All project specific 'finite' namespaces begin and end with two underscores and are capsed

(Or however you like it be) - which may not provide itself very useful in a lot of cases but it does add one thing though: You don't have to remove old code while it is still somehow used here and there. This proves itself helpful because when really wanting to dig the greater possible outcome you can barely get along without helper classes or temporary constructs of a feeble human intellect trying desperately to justify an existence that is without meaning or purpose ... until ... you get the magic going.

Inside and Outside in Harmony - the Yin and Yang of code Layout


Naturally every project grows into an individual systematic layout. Even if for the beginning one file would do, soon it isn't just the files that matter but the synopsis. Multiple elements need to be grouped, then includes and definition hierarchy must be regarded, class definition and function body have to be organized - and it is critical to understand that the different components within a project can follow individual ideas of structure.

I for instance like to picture things as they take hold within Memory/RAM, which yields that there are three different types of classes:

  1. 'Memory Units' (main class, primary cells, ...)
  2. '"Sub-Memory" Units' (memory handles, buffer operation classes, 'Handy structs', ...)
  3. 'Component Units' (Everything else that is basically in use by the upper)

Abstract to this organization is the approach of looking at the memory-'operations' hierarchy. Here one begins with the 'base class' at all, therein most likely one will have everything that produces the rest.

In example of a Map Generator

Map Generator, Map Virtual Structure and Map File Data Structure go together. This taps into the Map File Data Components, definitions and advanced feats (if any). This again will base into the 'main class' at some point, next to sub-classes, map-components that are engine driven, etc.. At first it is easy to:

#include "Map.FileData.h"
class MapVirtualClass { public:

	...
        
	bool GenerateDefault (int default_value);
                       
};

"Quick Start" - which is best to get started to work on the idea. Components are created when needed. But now we would realize that our Map Generator might work better if sorted into its own class - thus holding potential to be operated as independent unit; Yielding greater flexibility on utilizing buffer memory, holding generation-specific data within the class and not littering the "main class"; Or we may find that File Data and Generator work much better in tandem than this. What now matters is that we would realize these changes within whatever form of organization we got started with. Soon all will be contained and included within 'map.h' or something and once having not thought everything through properly enough all sorts of crap will float around within folders of "anonymous meaning" like 'core' or 'engine'.

core may be anything that is required to initialize before the engine can just make use of things ... any idea a potential mistake. But mistakes are what we wanted.

Once we see how the thing takes shape and we want to 'finally' use it, we would begin to re-write it. This is complicated 'Zen' stuff - philosophy about when what is ready - but it's best to say that when you know it's ready, it's ready.

Thereby I much prefer to put files into folders. Hereby the rule is that all folders that are located within the base folder are visible at first glance, no confusing nesting, if done properly. So I try to wrap the thing up within an identifier that is comprehensive to me within the filesystem as it is within code, so:

base_dir/zen/MapVirtualClass.cpp

base_dir/_MAP_/...
base_dir/_MAP_.IntegrationClass.H

base_dir/main.cpp

So that I know: "Uhu, _MAP_!!!" and therein needs to be all that I need 'for' it, or more specifically, all that flows into the 'Integration Class' (If I called it: _MAP_MEMORY_HANDLE_ to work on _MAP_, then I call the file '_MAP_.MemoryHandle.H' or something). I locate it within the Base Folder because at this point it sticks out.

Conclusion


The less people and the more complex the code the more 'Zen' is required by the coder because when laxing back the one or the other thing 'more' comes to mind, while otherwise the one or the other more 'tedious' thing is ignored - temporarily or infinitely. Quickly hacking some working code together is a skill, having the peace to know what to hack together is a virtue.

I hope that this odysee yielded some useful info for you - things that have not much to do with the valuable coding 1x1 and maybe therefore elude our attention from time to time.

Article Update Log


19 Septh 2014: General Overhaul 1
12 Sept 2014: Initial Draft

Building an Open-Source, Cross-Platform 3D Game with C++, OpenGL and GLSL, from the Ground Up

$
0
0
If this is the first time you hear from me, please note that, instead of writing this article, I could have written the tenth part in a series of blog posts, reporting on the progress of a project which has lasted for more than a year now. I have decided to postpone producing that document however. I thought that it might be a better idea to write on gamedev.net, summarising everything I have been doing so far. Things have reached a point at which I think that my work can assist beginners in learning the basics of 3D game programming with OpenGL and C++, without using a ready-made game engine, a lot faster than I had to.

Indeed I have been educating myself in making cross-platform (Windows & Linux) 3D games with C++ and OpenGL and, since I am taking the time, I have decided to try to help others do the same, by open-sourcing the code, documenting it and providing detailed instructions on how to set up the project on Windows and Linux. In this article, I will be presenting my motivation for following this self-made course and, also, introduce you to the existing code base and let you know how I think you should use it to learn 3D game programming with C++ and modern OpenGL with GLSL shaders, while also maintaining a certain level of backwards compatibility.

The Concept


In case it is not blatantly obvious, note that I am no recognised authority on the subject. By now I can say that I have had a pretty long career in traditional software development, building client/server applications, invoicing systems, content management systems, document management systems, that sort of thing. So, even though a lot of indie developers will understand my desire to make my own games, one may be wondering how someone with this sort of background can hope that others will learn from his work. Already, an enormous collection of books, tutorials, courses and tools exists, provided by experts, who specialise on every aspect of video game development. I am using this material myself as I go along.

The advantage of my “product”, the niche it covers so to speak, is actually a consequence of my own lack of expertise, together with my lack of time to devote to learning everything that is needed. If you are like me, you have probably dabbled a bit with game development in college (or high school) before deciding that it was not the best basket to put your eggs in when planning your career. In my case, this led to just focusing on getting my degree, getting a job, getting a better job, spending a lot of energy on the learning requirements for those jobs and realising at some point that, even though I did take math for some semesters, my professional programming activities never required anything more than basic arithmetic, so I would be lucky if I could still remember how to integrate a simple function or figure out the length of the hypotenuse of a right triangle, should the need ever arise.

This is not my first effort to produce something playable. I have tried many times in the past and it was not because of the lack of available information that I have given up but, rather, because of the size of it. As an indie developer, especially as a hobbyist, you do not get to work as part of a team. This means that you will have to do everything yourself, art, 3D models, animation, rendering, game logic, collision detection, sound, menus and, finally, packaging. The problem that poses itself, as you can probably imagine or have experienced, is that this can seem to be an impossible task. Sure you can buy a 1000-page book on OpenGL but when do you read it and experiment with what you have learned? Would you be doing that at the same time as you are learning Blender or should the latter wait until you can render a rotating object on the screen, using code? What libraries should you use?

One way out is to limit one’s aspirations. You could settle for making 2D Javascript games for example. Actually I have made one of those at some point but that did not help me get rid of my wish to go 3D. Another way to go would have been to just find a ready-made game engine and learn how to use that, instead of trying to build everything on my own. As a matter of fact, many comments I have been receiving over the past year were suggesting exactly that, also noting that this is the way many pros do it today anyway. This way I could just focus on my 3D modelling skills, download some sounds, throw everything in the engine and tell it what I want it to do, almost in plain English. Somehow though, I thought that that would be missing the point.

Were one to decide to quit his or her day job and try to make money out of game programming I would say sure, go for it. Take all the shortcuts you possibly can. Limit the scope of your project to the absolute necessary for releasing your first production as soon as possible, before your funds run out. Buy all the tools you can afford that will help you work faster and produce as much as possible with what you already know. Anyway, is that not what we do in more traditional sectors of the software industry, when clients are pressuring us and our budget is limited?

On the other hand, suppose that you are not ready to take that step. Many will tell you that doing so out of the blue is a very bad idea and I tend to agree. In that event there are benefits to providing oneself with a more, let us say “classical” education. Programming in C++, making your program compile on different platforms, using the OpenGL API and writing your own shaders will help you understand everything much better. Sure you can just start by using a tool that will help you spit out one game for mobile devices per week but you know what? Tools change. Platforms change too, as we have witnessed in the last few years with the advent of mobile devices. When that happens, I think that we have two choices: We either adapt to the new environment, or we join a tribe of technology X version Y developers who spend more time arguing about why their own IDE will outlive that of the rivalling camp than on furthering their knowledge and skills.

The “classical” path yields therefore the advantage of being more future-proof. The more you learn things bottom-up, the more you can be sure that your knowledge does not have an expiry date and, for the part of it that does, you can be sure that the rest will help you absorb anything new that is coming much faster. As an example, math and physics skills practically never expire. Of course science is always advancing but a very good part of the kind of calculations we need to do for games has been around for centuries. OpenGL is much newer of course, it competes with DirectX and who knows? Maybe both will be replaced by something else someday. In the meantime however, whenever we want to simplify our development process and opt for ready-made rendering engines or simpler technologies, we are always using them, under the hood. Finally, to my understanding, a lot of the higher-level languages have compilers and/or run on virtual machines developed in the likes of C or C++. The way I see it, when one of our high-level tools loses popularity or a new platform comes along, the new tools are closer to these foundations in the beginning and it is the people who are familiar with the foundations that can make the switch fast (for understanding WebGL or OpenGL ES for example, having worked on GLSL shaders with OpenGL 2.0 helps a lot, as far as I have been able to find out).

As hobbyists or aspiring indie developers with regular jobs, even if we are faced with a lack of time, I believe that the time that we do have is better spent teaching ourselves timeless principles than releasing a smart phone app next week. In addition to the benefits mentioned above, this path is also cheap (lots of open-source stuff available) and, should you need to interrupt it because of other work or family priorities, it will wait for you. It will not matter if a new mobile device has been released or if the company producing a game development IDE has released a new version or has shut down.

Having said that, please note that I am grateful that all of these tools exist and I admire the hard work and dedication people have put into developing them. I have used them myself and probably will do so again someday. On the other hand, being able to write my own 3D games without relying on them 100% will help me understand them better and get more out of them if I ever decide to work on a larger project.

For the time being however, I have chosen to go “low-level” and, as far as I have seen, it is not as hard as it seems. The tough part, and the one I hope I am able to help others with, is navigating through the process. Learning by doing is in a way the only way to learn but, in order to do something, you need to have learned a bit of theory to begin with. When do you put down the math and OpenGL book and code a bit? When do you give Blender a go? And then, when do you go back to coding? It is these questions and my not answering them correctly all of the time that have taken me such a long time. Hopefully, using the source code and a couple of my tips, you can get to this point a lot faster than I did.

So what do we have right now? That would be a goat spinning over a prairie and moving its legs:


Don’t laugh! There is a reason I have decided to write this article at this point and not at the end of the project. I’m not done yet as far as the project is concerned but I do consider myself capable of making a 3D game already.

You see, a few years ago, I developed the exact same game I am developing right now, only in 2D and Javascript. It looked like this:


Attached Image: AvoidTheBug2D.png


Actually I still have it online on my website, in case you would like to try it out. The source code is also available.

The learning challenges posed by that thing were quite modest. Draw the background, draw the goat, draw the bug, animate the goat, do some minor collision detection, have the bug chase the goat, create the game menu and… presto! You’re done. It took me about a week to finish.

For my C++ & OpenGL version however, things were different. For 70% of the past year I have been setting up the project, gathering the necessary libraries and then working out a way to have everything consistently compile and run on Windows (with OpenGL 3.3) and on clean installations of Linux (Fedora, Debian and Ubuntu, using OpenGL 2.1).

Then I got into the rendering stuff. Come to think of it now, one just needs to take the time to read a couple of chapters from “Game Coding Complete”, this great tutorial I have found on line, the “Red Book” [2] and try things out at the same time. Math also helps so I would suggest “Essential Mathematics for Games & Interactive Applications” [3]. If that is too much, maybe try “3D Math Primer for Graphics and Game Development” [4]. The authors are very good at not only explaining the theory, but also describing what all the math does for the game, in layman’s terms. Try to read the first chapter of [3] at some point though. It will give you a very good sense of what can happen to your vertices and collisions if you don’t pay attention at how you handle floats in your program.

You may be thinking, “What are you telling me now Dimitri? You say that it is not so hard to do and now I have to study all of these books?”

Boring no? One of the same. Actually, that is not what I am saying at all. Before you get to studying, I would suggest that you download my source code and compile and run it on your machine. I have tagged it on GitHub in the state in which it is now, in case it gets too advanced in the future (I seriously doubt that but, anyway). I have also uploaded that version to gamedev.net and it is accompanying this article. Then start trying to change some things here and there. Make the goat rotate in the opposite direction, make it fly, that sort of thing.

As far as the books are concerned, you don’t need to study them cover to cover. As a matter of fact you probably do not need to have access to each and every one. The best way to learn depends on each person so I would just pick a couple of resources that I believe will answer my own questions (including many excellent articles from gamedev.net), helping me get a hold of the “knot” that is game development from one of its threads and then follow up from there. The good thing is that, if you use my code to experiment, that will save you hours of trying to figure out how each element fits within a game. If you are learning about shaders, play with modifying my shaders. If you are learning how to model, just export your models as Wavefront files and try to load them into the program to see what they look like.

Using the Code


Downloading the code and following the instructions should give you the following development stack to get you started:

Attached Image: DevelopmentStack.png


I am using CMake, which produces a Visual Studio 2010 project in Windows. In Linux you have a choice between various kinds of setups, but in the instructions I describe how to set up a standard make project, an Eclipse project or a CodeBlocks project. They all work great.

I am also using the Boost libraries and, at times, I prefer them over the STL, even if many of their features have been standardised in it by now. The reason is that not all compilers offer support for the latest standard C++ features (sometimes gcc will not be able to compile something on Debian that VS can and vice-versa) so I have decided to play it safe.

The Boost library also offers some pretty nice unit-testing capabilities. The project includes some unit tests but I am testing only part of the code. I am not aiming for enterprise-grade code coverage neither do I think that it is necessary to have every little detail unit-tested.

OpenGL is used for rendering of course and it sits very nicely on top of SDL. The latter makes the program run on both Linux and Windows with almost no changes to windowing logic. That is very useful because cross-compiling can pose quite a few challenges on its own, so it is good to be able to eliminate the windowing stuff out of the equation.

Finally Doxygen can produce html documentation of the code at any time, based on the comments written therein. And Valgrind is an excellent free tool for profiling. It only runs on Linux as far as I know, but if you correct your code there while using it, most of the benefits will be carried over to Windows as well. It has recently helped me realise that using the Boost Tokenizer for string parsing content from model files was a bit too costly resource-wise and that it was better that I write the parsing code myself. Make sure you check out Kcachegrind too. It does a great job of visualising Valgrind information.

As far as the structure of the program itself is concerned, it is minimalistic on purpose:

Attached Image: ClassDiagram.png


Basically, GameLogic decides what happens in the game (it is empty for the moment but that is the plan for the immediate future). It then should use PlayerView, which in turn renders the various WorldObjects (goat, tree, bug) on the screen, using the Renderer. Each world object contains one or more Models (meshes exported in Wavefront format from Blender), depending on whether it is an animated object (like the goat) or a non-animated one (like a tree). An image object is used to load images from png files (using the libpng library), either to be used as textures for the Models or for other purposes, such as background (sky and ground). The Configuration class is used by all objects in the game, providing services to them, such as figuring out which hard disk path the game is running from and where to find the various resources needed. The GameLog class allows for logging to be performed, as the name implies and, finally, GameException is the exception thrown when something goes wrong and it contains information about the relevant error.

That’s it. Admittedly the diagrams are missing some information, like the fact that I am also using the GLEW to discover the supported OpenGL features on each platform, but there is no need to get into this much detail in this article. A lot can be discovered by using and reading through the code.

By the way, even though it has taken me a long time to set up the project and write the program, I never hesitate to get rid of things that are no longer needed and I always think twice before using new features from the libraries or adding functionality that is not necessary. That is what I believe will make the code easy for me to go back to and possibly reuse, and also what I think will help you try things out as you begin your own learning adventure!

Feel free to copy paste anything you would like. Also, if you have any ideas about improvements and you make a pull request on GitHub, I will review and possibly integrate it into the code.

Creating the Models


I have left out Blender haven’t I? Learning Blender can be fun if you start small and work your way up, step by step. Modelling a bug or bee for example should be quite trivial (you can even export the default cube that sits in the middle of the scene when you load the software). There are many good books on Blender too. I have been using “Blender Foundations” [5] for example and I was very happy with it. I have to admit, as is the case with all my sources, I did not get to read it from start to finish. I might someday, once I have “digested” enough of the information I am currently absorbing, but we will see how it goes.

Wrapping Everything Up


In case you are wondering where the rest of the game is, as I have mentioned, I thought that it was an ideal time to post this article now before it is completed. After all this time of slow progress, I have noticed that I am getting as productive as I was when I was developing the Javascript version. Figuring out how to create the game controls is not such a big deal with SDL (I am already using the Esc key to exit the demo). It is now just a simple matter of hooking that up with some reasonable moving around of the goat, designing a little bug in Blender and adding it to the scene.

The bug’s AI should not pose that much of a challenge either. Check out the source code of the 2D version and add another dimension to its “thinking” and moving. Perhaps the most challenging task left is implementing collision detection, so that a round of the game can end when the bug touches the goat and so that both the bug and the goat do not walk or fly through the tree. Oh yes, the tree. Well we can also skip the tree. Or we can model and add it to the scene, but after the goat and bug, that should not be too difficult.

It is not shown in the video, but note that I have also developed a function to render TrueType fonts on the screen. That should help with developing menus and messages to the user. You might need to improve the positioning and sizing logic though.

Of course, if finishing someone else's game is not your idea of fun, it might be an even better approach to modify the source code, in order to implement something completely different. In the meantime, I will be completing development, as initially planned. Once I have finished the game, I will post another article and the source code, completed with that "final 10%".

References


[1] Mike McShaffry, David “Rez” Graham, 2013, “Game Coding Complete”, Fourth Edition, Course Technology, Cengage Learning, ISBN-13: 978-1133776574
[2] Dave Shreiner, Graham Sellers, John M. Kessenich, Bill M. Licea-Kane, 2013, “OpenGL Programming Guide”, 8th Edition, Addison-Wesley Professional, ISBN-13: 978-0321773036
[3] James M. Van Verth's, Lars M. Bishop, 2008, “Essential Mathematics for Games & Interactive Applications”, 2nd Edition, Morgan Kaufman, ISBN-13: 978-0123742971
[4] Fletcher Dunn, Ian Parberry, 2002, "3D Math Primer For Graphics And Game Development (Wordware Game Math Library)", 1st Edition, Jones & Bartlett Learning, ISBN-13: 978-1556229114
[5] Roland Hess, 2010, “Blender Foundations - The Essential Guide to Learning Blender 2.6”, Elsevier, ISBN: 978-0-240-81430-8

5 Premium Currency Pricing Trends and Tricks used by Mobile Free-To-Play Games

$
0
0
Most free-to-play games on mobile sell some sort of premium currency: gems in Clash of Clans, donuts in Simpsons Tapped Out, gold in Game of War and so on. I spent some time analysing how 32 games on the App Store sell their premium currency, and some interesting trends and tricks emerged.

The Games


Before we proceed, meet my data set. The 32 games analyzed are:

8 Ball Pool, Angry Birds Go!, Boom Beach, CastleVille Legends, Clash of Clans, Clumsy Ninja, CSR Racing, Disco Zoo, Dungeon Keeper, Empire, Farm Heroes Saga, Game of War, Hay Day, Hobbit: KoM, Jelly Splash, Juice Cubes, Kingdoms at War, Kingdoms of Camelot, Knights & Dragons, Modern War, Monster World, Moshi Monsters Village, Papa Pear Saga, Pocket Village, Puzzle & Dragons, Real Racing, Royal Revolt 2, Samurai Siege, Simpsons Tapped Out, Smurf’s Village, Subway Surfers, Top Eleven.


My method for selecting games was pretty unscientific… just a mix of games I had played, wanted to play, or were in the AppStore top grossing. Perhaps I’ll expand on the list some day.

Trends & Tricks


1) There is not much variety in pricing

Attached Image: pricing_trends.jpg

A lot of games offer the same 5 price points: £2.99, £6.99, £13.99, £34.99, £69.99. Those are the 5 big bubbles you see in the diagram above.

(That’s $4.99, $9.99, $19.99, $49.99, $99.99 for American readers).

The most popular thing to do is to offer those 5 price points exactly with no changes, as is done in Supercell’s Boom Beach for example.

Attached Image: boombeachprices.jpg

This exact price progression accounts for 1/5th of all games surveyed.

If you also count price progressions that are within 1 price of the most popular (meaning they can be reached by either adding, modifying or subtracting just 1 price from the progression), you’ve got over 3/5ths covered.

Extend it again to count price progressions within 2 prices and almost all games are accounted for.

Attached Image: price_progression_similarity.jpg

Very few games deviate from this formula… Moshi Monsters Village and Empire are tied for the most unique price points award, with each offering 4 unique prices that no other game does. It’s nice to see someone trying something a little different, it will be interesting to see if their pricing catches on.

2) Players agree on a minimum price, publishers don’t

The only price that games seem to disagree on is the minimum to charge.

Attached Image: cheapest_price.jpg

I wanted to know: is it worth offering a minimum price cheaper than £2.99? The App Store most popular purchase ranking reveals some interesting information.

  1. In 100% of cases where £2.99 is the cheapest price, it is also the most popular purchase.
  2. 17 games had both a starting price cheaper than £2.99, as well as a price point at £2.99.
  3. For the majority (70%) of those 17 games, £2.99 was still the most popular price point.


The same information visualized:

Attached Image: popularpurchases_299.jpg

It appears that even if you offer players a minimum price point cheaper than £2.99, chances are they will probably still prefer to buy the £2.99 option. But some questions remain…

a) When £2.99 is the cheapest option, how many sales are lost from players only willing to pay less than £2.99?
b) And how much revenue is gained from players that would have preferred a cheaper option but paid £2.99 anyways because there was no cheaper option?
c) And most importantly, which is greater? A or B?


Unfortunately I don’t have enough data to answer it. But it did make me think back to a talk I watched long ago in which a publisher claimed “you’d be surprised how many people who are willing to pay a dollar for something, will also be willing to pay 5 dollars“. He goes on to express regret for setting the price too low.

If it was up to me, I would probably start pricing at £2.99 and then lower the price later through special starter pack offers if need be. It’s always easier to lower a price than it is to raise it!

3) Buying more is not always a better deal for the player

I assumed that by buying a larger currency pack, I would always get more currency per dollar spent. This is not always the case. The most significant example of this I came across was in Angry Birds Go:

Attached Image: angrybirdspricepergem.jpg

Pay 2.5 times as much, but only get 2.1 times as many gems. If you want 2,500 gems, you can save money by buying 2 x 1,200 gems + 1 x 100 gems for a total cost of £29.97 – a whole £5 cheaper than the 2,500 gems priced at £34.99. Those are savings you could use to buy another 300 gems.

It’s hardly an isolated incident. 70% of the games surveyed do this kind of thing.

Sometimes, you see the same thing happening in the US store.

Attached Image: angrybirdsgo_us_price.jpg

Other times I think it has to do with price localization. When something is priced at $4.99 in the US it is typically sold for £2.99 in the UK. But for some reason $9.99 (double 4.99) becomes £6.99 (more than double £2.99) whereas it really should be £5.99. Take Hay Day for example.

Attached Image: hayday_usuk_pricecomparison.jpg

Not sure how or why this practice originated, but I didn’t see any games adjust the premium currency given as a result so sometimes we end up getting less currency per £1 than you would get per $1.

4) ‘Most popular’ doesn’t have to mean most popular

As a player, don’t trust everything publishers tell you. In only 1 out of 8 games that prominently displayed a “Most Popular” badge next to a currency pack, was that also the actual most popular purchase in the App Store ranking.

Angry Birds Go, the only one to correctly label the “Most Popular” offer:

Attached Image: angrybirdsgomostpopular.jpg

Does this mean everybody else is lying? I guess if at some point in the past or in a different territory the offer tagged as “Most Popular” was actually most popular, then you could say it’s just out of date.

In any case, it wouldn’t be in any publisher’s best interest because in all 7 cases where the “Most Popular” was mislabeled, a cheaper offer was the most popular and who would want to encourage players to buy a cheaper pack? Apparently only Rovio is honest enough.

5) There’s more than 1 way to calculate a bonus

A few games like to tell players exactly how much of a better deal the larger currency packs are. There are different ways of calculating this which can make the discount sound more or less impressive.

Attached Image: bonuscalculation_hobbit.jpg

This first example is from Kabam’s Hobbit game.

The lowest amount of gems per £1 is found in the £6.99 pack: 100 / 6.99 = 14.3 currency per £1.
At this exchange rate, for £13.99 you should get 13.99 x 14.3 = 200 currency.
But they give you 240 for £13.99 instead of 200.
240 / 200 = 1.2, thus you are getting 120%, ie 20% more than you should get.


The numbers have been arranged so as to maximize how impressive the bonus sounds while remaining 100% truthful. Not everybody calculates it the same way.

Here’s a different example from flare’s Royal Revolt 2.

Attached Image: bonuscalculation_rr2.jpg

Like Hobbit, they use the lowest exchange rate which again is from the £6.99 pack.
At that rate, you should get 5,256 currency for £34.99 but instead they give you 7,500.
This is where the method diverges from Hobbit.
The extra amount of currency being given is 7,500 – 5,256 = 2,244.
2,244 / 7,500 = 0.299, so we can say that of the 7,500 currency you are being given 29% for free.


First off, they could easily have rounded 29.9% up to 30%. More significantly, using Hobbit’s method you could say that 7,500 / 5,256 = 1.43, therefore it is equally honest to say that you are getting 43% extra.

Another interesting example is Monster World.

Attached Image: bonuscalculation_monsterworld.jpg

If you try to calculate the bonus using any sane method, it just doesn’t make sense. It had me stumped for a little while. Then I checked the US AppStore pricing and it all fell into place.

Attached Image: mopnsterworld_USprices.jpg

If you use the US prices, the bonuses make perfect sense using the same method as Hobbit. So it appears that when the prices were localized, the bonuses were not. In reality, the bonuses in the UK AppStore are far less generous than their US counterparts (eg 7% UK instead of 25% US for 100 potions and 70% UK instead of 100% US for 4,000 potions).

Final Words


I hope this information helps anyone working on (or simply curious about) f2p game premium currency pricing. There’s certainly a lot more going on with the prices than is obvious at first glance. The more I looked, the more I found.

Still not satisfied? Try my spreadsheet. It’s full of extra figures and graphs I didn’t consider important enough to single out. And if you find something in the data I missed, let us know!

Attached Image: spreadsheet.jpg


Note: This post was originally published on Wolfgang's blog AllWorkAllPlay, and is republished with Wolfgang's kind permission.

Math for Game Developers: Calculus

$
0
0
Math for Game Developers is exactly what it sounds like - a weekly instructional YouTube series wherein I show you how to use math to make your games. Every Thursday we'll learn how to implement one game design, starting from the underlying mathematical concept and ending with its C++ implementation. The videos will teach you everything you need to know, all you need is a basic understanding of algebra and trigonometry. If you want to follow along with the code sections, it will help to know a bit of programming already, but it's not necessary. You can download the source code that I'm using from GitHub, from the description of each video. If you have questions about the topics covered or requests for future topics, I would love to hear them! Leave a comment, or ask me on my Twitter, @VinoBS

Note:  
This series is ongoing - check back every Thursday for new content!


Note:  
The video below contains the playlist for all the videos in this series, which can be accessed via the playlist icon at the top of the embedded video frame. The first video in the series is loaded automatically


Calculus


Naming An Indie Game

$
0
0
Prismata is the gaming love of my life. My obsession with Prismata is so great that I literally dropped out of school to work on it. In this article, at long last, I’m going to address a question that I’ve received countless times, but have never spoken publicly about:


Why is the game called "Prismata?"


Honestly, there is no short answer. Naming Prismata was probably the hardest decision we ever had to make. I imagine that it might feel similar to naming a first child, except there are lawyers involved.


LOGOS.jpg
I’m pretty embarassed to post this; it was a doodle I made in MS Paint (mostly for comic relief purposes) during one of many stressful “name the game” meetings with other devs. I was really hoping something would just “feel right”. Nothing did. That red one in the middle was close, though.


It took us almost 4 years to name our game. The process had me adding the US Patent and Trademark Search to my browser bar, and murmuring awful name ideas like “Savant Horizon” in my sleep. I don’t know the optimal way to name a video game, or how to decide which of the million options suck the least, but these are the steps that led us to choose the name “Prismata”:

Step 1. Admit that you have a problem


Shit guys! We need a name!


Back in 2010 when we used to play Prismata using slips of cardboard, long before we knew we would withdraw from the PhD program at MIT to pursue game development full-time, we weren’t remotely concerned with branding our game. After all, we were the only ones playing it. We took to calling it “MCDS”, an acronym for Magic, Chess, Dominion and Starcraft—four of the games that most inspired us to design Prismata. By any standard, it was an awful name. As Alex pointed out, it reminded us a bit of McDonald’s.

The first ever computer version of Prismata was coded by David Rhee in 2010. The software was named “Breach” in honour of the term used to describe the process of overrunning your opponent’s defenses—a key turning point in many games of Prismata. Originally, we thought that perhaps Breach could become the official name for the game, but the idea was quickly scrapped when we discovered an existing FPS game that had the same name.


censored-2-.png


The first version of David Rhee’s “Breach” client for Prismata, which he coded in GameMaker while spending hours procrastinating on his master’s thesis.


With no suitable substitute, the name MCDS stuck for a while—years, to be exact. To this day, it readily comes to mind when I’m thinking about Prismata. After making plans last year to quit school and work on the game full time, we set a deadline of September 2013 to think of a new name. It was well into March 2014 before we actually picked one. A major factor in why it took so long, even though we all knew that “MCDS” was a terrible name, was that familiarity bias made the existing name tolerable. Our neural pathways were so well-worn that we became complacent and indecisive.

Step 2. Grind bad ideas for months


Eventually, we reached a point where we became overwhelmingly aware that we needed an actual name. We wanted to eventually take our game to the masses, and there came a point where we simply wouldn’t be able to proceed as a company without a product name. We set harder deadlines: on a certain day, we were supposed to have a hard list of candidate names, and a month later we’d have a shortlist. This went on for a while, with the list being constantly updated and the deadlines repeatedly being pushed back. Our consistent circling-back was unproductive, so we developed a plan to generate a final list of name ideas.

A key first step: we sorted all of our ideas into 4 main classes of names:

1. Actual words (e.g. Destiny, Bastion): Our only real contender in this category was “Breach.” There are at least three issues with these types of names:
  • It’s hard to register a good domain name, since names like destiny.com are already taken.
  • It’s hard to rank well in Google search results if you’re a small company, as larger things with the same name will outrank you.
  • It’s a trademark minefield. As with the name Breach, many of these names infringed upon trademarks, and would be impossible for us to trademark ourselves.


Our top ideas:

Breach
Fringe
Zenith


2. Made up words (e.g. Metroid): Making up our own name, as we ultimately did, solved most of the issues associated with using actual words. However, made-up names lack rigid connotative meaning and are more open to intepretation, so we had to take efforts to shape our own new meanings and word associations.


Our top ideas:

Prismata
Kemta
Magnoia


3. Phrases (e.g. League of Legends): Our exploration of phrases was probably what ate up most of our time, because we often tinkered with incorporating our “actual word” ideas into them. Our list of phrases included some of the best and worst ideas (Will, for example, was obsessed with the name “Cosmic Harvest” for a while). Another problem with using phrases was that the number of words proportionally increased the difficulty of ensuring we wouldn’t be infringing on any trademarks.

Many of our phrase ideas incorporated key game concepts. “Swarm Wielder,” for example, was a phrase we thought we might use to describe the commanders of armies in Prismata — our own variation of “Pokemon trainer.”


Our top ideas:

Swarm Wielder
Tidal Key
Starlight Frontier


4. Portmanteaus (e.g. Skyrim): Protmanteaus are names created by mixing or combining two separate words and blending them together. These types of names are often very memorable, and we were drawn to many of them because they evoke familiar connotations, but in a new context. At the height of our indecision regarding names, Shalev suggested that we try coming up with “template” names that used the following structure: [a one syllable noun relating to space] followed by [a one syllable abstract noun]. The template was solid because it allowed us to rapidly iterate new ideas, and to experiment with endless combinations.


Our top ideas:

Dawnshaper
Parallapse
Psynapse
Heliofringe


Step 3. Refine the list of names by doing actual work


There’s a famous company called Lexicon Branding that specializes in exactly what we were trying to do: creating a name that didn’t suck (except they call it “creating a name with strategic impact”). They’re the ones who thought up names like Swiffer and BlackBerry. Eventually, we gave up on naming Prismata, and decided to hire the naming experts.

Just kidding! Although it would have been cool to work with them, it probably would have cost us more than all of the art in Prismata, so it wasn’t going to happen. Instead, we tried to replicate their naming process by using linguistics and sound symbolism to identify words (or word fragments) that users would associate positively with our brand and intended marketing message (a cool strategy game).

Below is just a small fraction of the 7-page word cloud we generated. Highlights include “ADD MORE” and “help me.":

wordcloud.png

We brainstormed words relating to mythology, mathematics and science fiction, but also generated some rather odd lists, like the list of “badass latin words” in the image above. Analyzing these words, we generated a bunch promising “morphemes”—prefixes, suffixes, and whole words that we could use in the construction of other names.

Lexicon says that they measure “the effects of sound and spelling patterns,” for both semantic meaning and aesthetic value. We obsessed over these types of details, and frequently had discussions on topics like trochee fixation and the Bouba/Kiki effect. Here is a real conversation that occurred on our message boards at the end of March:


> Shalev: I think “Starlight Frontier” is too long and hard to say. Actually, I think the reason people like “Prismata” has a lot to do with how easy it is to say. try saying the following sentences:
“Bob, do you want to play Starcraft?”
“Bob, do you want to play Starlight Frontier?”
“Bob, do you want to play Hearthstone?”
“Bob, do you want to play Swarmwielder?”
> Mike: I can picture a guy named “Bob” playing a game named “Starlight Frontier,” beating a boss, and being instructed by his CRT monitor to switch from CD-ROM 2 of 5 to CD-ROM 4 of 5.


The name Prismata rolls off the tongue quite nicely, and has a crisp, angular sound association that goes well with concepts of aggression and outer space. As for its semantic value, the “prism-” morpheme has a lot of conscious and subconscious associations. It looks like “prize,” sounds a bit like “orgasm,” makes you think of interesting objects, and connotes concrete function mixed with elegance. Prismata is easy to say and relatively easy to spell, which were also important qualities. It passes the “Bob, do you want to play Prismata?” test.

But Prismata wasn’t our only candidate name.

Step 4. Cry because all the good names are taken


After Step 3, we had a sizable list of name candidates. We just needed to pick one. Unfortunately, many of them were doomed never to work out.


Trademark.jpg


If you’ve ever encountered this type of seemingly random string before, I’m guessing you’ve experienced the painstaking pressure of coming up with an awesome game title that doesn’t invite lawsuits. In case you’re wondering, these search terms will return all the gaming-related trademarks that involve the word “edge”—a word we didn’t want to touch with a ten-foot pole in fear of some pretty serious trademark disputes.

For every name that drummed up any serious level of interest, I performed trademark and domain name searches online. Most people start these types of searches by typing potential domain names into domain name registrars like GoDaddy to check for availability. NEVER DO THIS. Many domain registrars engage in domain parking and will steal your domain name ideas and register them for themselves if they detect that the name is in demand.

Instead, it’s possible to search potential domains on pureWhois, a safe domain searching program that can easily tell you which URLs are available. Quite often, domains we wanted were parked or for sale. Thankfully, we didn’t have to buy a domain. If we did, we would have followed standard domain-buying advice: impersonate someone trying to make a small blog, not a company trying to make their major website.

Prismata.com was unfortunately taken, but prismata.net was still available (we figured that if Hearthstone could do alright without a .com domain, then so could we). We also registered playprismata.com and prismatagame.com, but decided to use prismata.net for our main site to reduce URL lengths as much as possible. We might use playprismata.com in the future, but we’re not sure yet.

Finding an appropriate domain name was only one of the two major hurdles required for a name to be suitable. The other one—trademarking—was much scarier. If we screwed it up, it could cost us a lot in legal fees. Or worse.

To do a search for US trademarks (which, like I said, I used to do compulsively), you can simply go here and search for live trademarks that contain relevant words, in the relevant industry. For example, I used the query (live)[LD] AND (prismata)[COMB] AND (game OR software) to search for all trademarks that are still valid, contain “prismata” in the name, and contain “game” or “software” somewhere in the paragraph description of the product or service.

Step 5. Cross off the crappiest names until one remains


Eventually, we produced a “shortlist” containing the best names that had decent URLs available and didn’t infringe on any trademarks. Prismata was actually a relatively late addition to the list. We held a vote to determine the best candidates using Google Drive spreadsheets. All the voting was done blind—we would highlight the voting columns in black so that it was impossible to see what other people voted easily. We then computed some averages and established a shorter list of names.

The first time we did this in September 2013, about a year ago. This was our list:

Affinity. Scores: 8 4 6 3 4, z=0.37, a=3/5Beacon. Scores: 8 5 6 6 5, z=1.03, a=4/5Bliss. Scores: 7 4 6 4 5, z=0.52, a=4/5
Breach. Scores: 7 10 5 6 6, z=1.51, a=5/5Codex. Scores: 3 7 5 4 6, z=0.45, a=4/5Emissary. Scores: 4 3 6 5 7, z=0.46, a=3/5
Flux. Scores: 6 4 4 4 6, z=0.15, a=4/5Fringe. Scores: 6 3 6 3 7, z=0.38, a=3/5Kismata. Scores: 4 7 7 3 8, z=1.02, a=3/5
Lapse. Scores: 6 4 4 4 8, z=0.38, a=4/5Magnoia. Scores: 7 3 6 4 8, z=0.73, a=4/5Swarm Wielder. Scores: 7 3 6 4 8, z=0.73, a=4/5
Synapse. Scores: 5 5 5 4 8, z=0.60, a=5/5

Prismata wasn’t on the list, and most of the names that were on there sucked. A close relative, Kismata, was doing decently.

The way that we thought up the name Prismata was a bit serendipitous. Namely, we combined unrelated existing names and ideas. “Prismatic Reactor” was an early unit in 2010-era Prismata, which converted resources into other types. The unit description was something like “Pay one green resource and get one of each of the other two resources”. We’ve long scrapped the unit (some variation of it will probably appear in an expansion a bit later), but the notion of something being “prismatic” struck a chord with me in our efforts to name the game.

The word “prismatic” came up again when we began designing the metagame, and thinking about the concept of ladder and leveling up. Alex thought to use the word prismatic to indicate the highest level of play—for example, we could have a bronze league, followed by silver, gold, platinum and prismatic. The “-mata” suffix arose from some other name ideas we had generated in step 3: “automata” and “automaton.” Originally, we thought that units in Prismata might be called something special like automata (or just “mata”), but we abandoned that idea because players found it too confusing.

Eventually by the end of April 2014, we had a final shortlist of 4 names:


ss.png
Some toy logos of a few of our final name candidates.


We developed toy logos for all the names we were serious about, mostly just to gauge their visual appeal and believability as names for a top strategy game. Friends and family were consulted repeatedly for opinions and knee-jerk reactions, and eventually we had a near-unanimous decision. Our new strategy game would be called “Prismata.”

Step 6. “OK Guys, it’s Prismata now!”


There was only one final step. We hired a lawyer to file the Prismata trademark for us. We figured that screwing up the trademark filing could be very costly, so we were perfectly happy to hire a lawyer to do it for us. The total cost of trademark in the US and Canada came to CAD $1,486.97. Money well spent.


prismata_footer-2.png

Viewing all 17825 articles
Browse latest View live


<script src="https://jsc.adskeeper.com/r/s/rssing.com.1596347.js" async> </script>