Quantcast
Channel: GameDev.net
Viewing all 17825 articles
Browse latest View live

How to Pitch Angry Birds, If It Were an Unknown Indie Game

$
0
0
It’s hard to imagine, but at some point Angry Birds had 0 downloads. It was released by the Rovio game studio in December of 2009 as the company’s 52nd game. Since then, it has been downloaded over 1 billion times. At the Red Fox Clan, we thought it would be fun to pretend that Angry Birds was still an unknown indie game as a template for how you can promote your game (aka the next Angry Birds). We’re specifically going to write a pitch that would be emailed to reporters online. If done well, this can be a high impact, low cost solution for getting your game out there.

*This first blog post covers how to write your subject line. If you're interested in the full white paper, visit the www.redfoxclan.com/resources

Type of Game

We’re going to stay as simple as possible and call it a puzzle game. For your game, I would also simplify it as much as possible. Is it a board game, racing game, sports game? (HINT: If you get stumped, visit the app store to find similar apps and use the categories they are listed under.)

< 3 Word Descriptor

We often describe other games as Angry Birds type games, but starting from scratch we have to determine what makes Angry Birds different than a “word game” puzzle or a “brain teaser” puzzle. Using our hint from before, we see that Rovio considered Angry Birds an arcade puzzle in the app store, but to get a little bit more descriptive and fun, we’ll call it a Slingshot Puzzle.

The unique benefit in < 10 Words

The unique benefit is all about storytelling. We have to get across why your game is different than the other puzzle games on their phones, and give them enough interesting details to have them open the email. This took us a while to come up with, but because we have already identified it as a slingshot puzzle, we can decide to give more details about the characters involved and the fun we’re trying to get across. We landed upon "Topples towers filled w/ greedy pigs to wreak havoc".

The finished subject line of our email is now, “Slingshot Puzzle 'Angry Birds', Topples towers filled w/ greedy pigs to wreak havoc.” By providing this, we’re letting the reporter known what type of game they’re about to learn about, its name, and what makes it different from the thousands of other games they have come into their email.

My GDC virginity: Of indie loserdom, hope and friendship.

$
0
0
Indie developer Peter Cardwell-Gardner details his experiences of his maiden pilgrimage to game dev Mecca, otherwise known as the Game Developer’s Conference (GDC) which takes place over five days in San Francisco. A tale of woe trying to pimp a failing Kickstarter for the music game, Cadence – and finding loving friendships in unexpected places.

As an indie developer, there is a single event each year which gradually assimilates my Twitter feed, stoking fears of missing out and doing nothing for my imposter syndrome. There is huge pressure to attend GDC, as it seems that anyone and everyone who matters is there, but the financial implications of doing so can be hard to stomach. Travelling halfway across the globe on a weak third world currency and an indie budget is insanely expensive. I resisted for a long time, but promised myself that I’d make the voyage once I had a game I thought warranted the trouble of emptying my bank account.

Enter Cadence, a musical playground of beautiful puzzles! It’s been a long, and sometimes rough journey, but it feels worth it when I see how the game is shaping up. The visuals are beautiful, the gameplay is almost there, and we’re close to pulling of something not many games do – putting music at the front and centre of the experience. Six months ago attending GDC simply wasn’t an option as I’d completely run out of money, and I was forced to take a hiatus from the game to engage with some good old fashioned contract work.

Even though it felt grim at the time, it turns out taking a break was a huge blessing. A few months away from Cadence really allowed me to remember what was special about it, and rejuvenate my excitement for the project, not to mention fund upcoming travels. Eying the calendar, GDC seemed to be the perfect stepping stone to launch our Kickstarter campaign and come out all guns blazing. And then out of the clear blue we got a SXSW Gamer’s Voice nomination, and selected for the Rezzed Leftfield collection. All fantastic promotion to aid our cause. It seemed the stars were aligning.

By the time we launched I was absolutely broken. My brain wasn’t capable of thinking a single thought that didn’t begin with Cadence. But it seemed like our hard work was paying off! The launch started with just the bang we were hoping for. Our friends and family rallied behind us in incredible fashion. I got so many notifications that my phone at one point stopped working. Less than 48 hours later I dragged my exhausted body to the airport to make the lengthy trip to SF and finally enjoy some sleep. GDC abound!

The first thing that will blow your mind about GDC is the sheer scale of it. The Moscone Centre is a massive venue spread across three buildings. In every direction there are literally thousands of devs walking around, denoted by their lanyard name badges. If you're somehow used to game dev being regarded as a backwater non-profession, GDC certainly proves it's anything but. Of course, as any attendees will tell you: it's not so much the talks, expo or any of the other trappings that you're actually there for, it's the people!

If you're an indie developer, there's no better place to meet other indies than by staying at the indie hostel (The SF downtown hostel). Literally every single room gets booked out by indie devs from all over the world. Simply by hanging out in the common room you'll meet and connect with loads of developers, from people just starting out to those names you've read about in the press for years. But that’s just one of many crazy things that could only happen during GDC. “Food katamaris” are a unique phenomenon where one or two devs start a mission and by the time they get to a restaurant they entire place is literally overflowing with indies.


Attached Image: indie-hostel.jpg


Something I radically underestimated was the toll that GDC would take on your body. The dreaded conference flu is something that regulars seem hyper aware of avoiding (lots of hand sanitizer abound) but even so there is plenty enough to exhaust your body. You will be walking miles each day, having literally hundreds of conversations and then that’s before you even attend any of the wall-to-wall parties that are taking place, having even more conversations where you need to fight to be heard. Not surprisingly, my voice died several times during the week, including a throat infection I picked up towards the end.

Of course, with so many devs in the mix, there’s bound to be some big name personalities around. Some of them may even be personal heroes that you respect and admire, who have unknowingly shaped the games you choose to make. But fame is an odd thing that does weird things to (other) people. Often I felt like a reality distortion field would exist around the “famous” indies, with others hanging on to every word that they say, desperate for any scraps of validation their fame might bestow upon them.

Often I’d have to catch myself, and remember famous people are quite ordinary, but for the fact they made or did a thing a lot of people happen to care about. Even so, I had to admit I could still feel the pull of their fame, and cared a lot more about their opinion simply because I knew who they were. Furthermore, I was here to promote a video game! People with a following can be valuable allies, so time and again I’d throw myself into the breach and make myself known to strangers who had no idea who I was. I remember thinking to myself this felt like speaking to the prettiest girl in the room. Mostly you’re just happy when you don’t embarrass yourself, but when you don't get the outcome you were hoping for it can really sting.

Often I’d have to remind myself that I have no rights to others people’s attention. I can’t know what their emotional state is, and to realise that if everyone was constantly vying for my attention I’d probably be very selective about whom I choose to give it to. The theory goes that repeated exposure makes you tougher, but after a few days of repeatedly making myself vulnerable I just felt emotionally drained. In fact I had a silly fantasy about just locking myself away in a room to play with kittens.

There was elephant in the room I haven’t mentioned yet – it’s normal for Kickstarters to experience a slowdown, but ours had come to a screeching halt. In fact, there was one day we didn’t get a single backer. This was definitely a low point. Even though I’d made some amazing connections and impressed a lot of people, without riding the campaign for everything it was worth there was just no traction. It was hard not to feel like running a crowdfunding campaign during GDC was a really dumb idea.

But I hung in there, and I’m really glad I did. Lost Levels is one of those cultural phenomena that exist beyond the official roster, but seems to be an integral part of the GDC experience. It’s billed as an “unconference”, where anyone can speak about any topic for a period of 5 minutes, and everything about it is unconventional. Even getting there was an adventure! Following a marching tuba player, hundreds of indies marched in procession to the designated venue. On arrival we were introduced to one of the most comprehensive safe spaces policies I’ve ever encountered.


Attached Image: lost-levels.jpg


Chaos and frenzy reigned supreme, but such is the calling card of unbridled creative expression. It was wonderful to scan the audience and see humans of every single shape and form. Beyond the diversity, I was struck by how these were what I lovingly came to refer to as the Indie Proletariat. They’re probably working on games you’ve never heard of and they probably don’t make nearly enough money from those games, but that doesn’t dampen the boundless enthusiasm and passion they have for making games. They’re not going to let anybody tell them what they can’t do and absolutely everyone is welcome. If ever you’ve wondered about the spirit of what it means to be indie, it can be found here.

This is in stark contrast to the main conference, where your lot in life is dictated by how much money you can afford (for reference, an all-access pass started at $1495). But remember, it’s about the people! Some of best things happened once I stopped speaking with preconceived outcomes in mind. It’s hard to describe the sense of liberty I felt knowing that you can start a conversation with practically anyone and safely assume that you will find common ground. However, a caveat, I’m glad for the identity capital of working on Cadence, as one of the most common questions is “what are you working on?” I sensed this question causing a lot of imposter syndrome in others.

What was my biggest takeaway from GDC? It’s a fundamental truth of human nature that I consider critical understanding if you hope to be a successful game developer. It affects so much: making friends, getting press, recruiting powerful allies to your cause, getting people to back your Kickstarter and getting people to buy your damn game. It’s the simple fact that people form an emotional attachment to what they know. And the only way people get to know you is by being around and having your face seen and your voice heard. It’s the reason 26,000+ developers travel from every corner of the globe despite living in the most connected era of human history.

By the end of the week there was change so subtle I almost didn’t catch it. Not only was I feeling far more comfortable in my own skin, but friendships were starting to germinate - people were taking an interest in who I was and my story (as I had in turn become interested in theirs). This meant that instead of hounding people to play my game, they were asking me if they could play Cadence. Some of them were even those personal heroes I had tried so hard to impress before. And impressed they were! I got a level of laser-focused feedback that I’d struggle to find elsewhere.

If ever you’re asking yourself if attending GDC is worth it, I think the cost is just something you need to build into the expense of making a video game. Even though it didn’t do much for our Kickstarter, I’ve made scores of friends that will certainly come to my aid in ways that I can’t even imagine yet, and probably at a time that I least expect it. The only thing I can say for certain is that if I wasn’t here, none of that would have happened!

Speaking of the Kickstarter, we’re not done yet. We still have SXSW and a few other tricks up our sleeve. But I know now that failure is simply feedback (even if I’m not sure how to interpret it yet). As time comes to pass, I’m certain I’ll be glad for the experience.

Substance Painter Review

$
0
0
There are two ways to add details to a 3D model. For one, you can increase the number of polygons in a model to add expressive details. The popular modeling packages ZBrush and Mudbox are excellent at this, allowing users to sculpt exquisite models. But, this detail comes at a cost. Ultra high-res models, like those that are sculpted, are hard to animate and don't work very well in even the most advanced game engines.

This brings us to the second way to add detail to a 3D model - with textures. An advanced set of textures can make even a simple sphere look incredible and with the use of normal maps, you can even simulate the sculpted effects of a model. The downside to textures is that they are hard to paint and apply to models. The typical workflow includes painting a texture and applying it to the model and then tweaking the mapping to make the texture fit the model and then return to touch up the texture, then rinse and repeat. This is a cumbersome process that takes a lot of time to get just right.

This is where Substance Painter enters the scene. Substance Painter lets you paint directly on the 3D model with materials. All the major 3D packages include features that let you paint directly on the models, but they only let you paint with a single color or with a brightness value. Substance Painter lets you paint with complete defined materials and the paint strokes update all the required texture maps at once including diffuse color, brightness, specular, metal, etc. This is a huge benefit, allowing artists to paint a texture in a single package all at once without the whiplash of moving back and forth between various packages.

Streamlined Workflow


Once a model is loaded into the Painter interface, all its current textures are automatically identified and loaded with it. These can include normal maps, ambient occlusion maps, lighting passes, etc. You then specify the specific channels that you want to include. The options include the usual suspects such as Base Color, Height, Specular, Opacity, Roughness, and Metallic, but you can also include Emissive, Displacement, Glossiness, Anisotropic, Transmissive, Reflection, Ior and several user-defined channels. For each channel, you can specify the format to use when the texture is saved.

After the channels are set up, you can then choose a material and begin painting. Each separate channel gets updated as you paint. You can also switch to solo mode to view and work with a single channel by itself.

Once the texture is completed, you can export all the various channels with a single command. Each channel will share the project name and will have its channel name added on. Since you can view and verify the results directly within the Painter interface, there isn't any need to return to the originating modeling package. The files exported out of Painter can be loaded and used directly in the game engine.

Advanced PBR Viewport


Substance Painter isn't just a nice extension to your current 3d software (see Figure 1), it is a full-blown texturing package with its own interface, tools and an advanced viewport that can view realistic textures (PBR).


Attached Image: Figure 1 - Substance Interface.jpg
Figure 1: The Substance Painter interface includes moveable panels of presets and tools along with an advanced viewport for viewing realistic (PBR) materials.


The viewport gives you controls for adjusting the background environment map, the environment opacity and exposure.

Using Substance Materials


Substance Painter naturally uses the Substance Materials (Figure 2). Substance Painter comes with a large assortment of materials pre-installed and ready to use or you can purchase and add several additional material libraries. The software also lets you import and use any custom GLSL shaders that you've created.


Attached Image: Figure 2 - Substance Materials.jpg
Figure 2: The default Substance materials included with the software offer a wide array of options.


The nicest thing about the Substance Materials is that they are gorgeous. These shaders are built by material experts and they hold up really well under all kinds of lighting and environments.

In addition to materials, the interface Shelf also includes a large assortment of brushes, decals and tools. These are alpha channel stencils that let you quickly add material details include bullet holes, zippers, frost, fur, bolts and rivets.

Painting Tools


The available painting tools include Paint, Eraser, Projection and Geometry Decals. Each tool can be customized and tweaked with a large assortment of controls including Size, Flow, Spacing, Angle, Jitter, Shape and Hardness. There is also a real-time interactive preview window that shows the results of the current settings. This is great for double checking your brush settings before you start to paint. There is also a Symmetry mode for applying paint equally on either side of a designated axis.

Painting with Particles


One of the coolest available features in Painter are the new particle brushes. Using these brushes, you can apply paint using thousands of tiny particles and these particles react to physical forces like gravity and wind so that weathering a model is easy with realistic results. Figure 3 shows a simple sphere painted with several different materials using the Physical Brush tool. Notice the complexity of the results.


Attached Image: Figure 3 - Physical Brush.jpg
Figure 3: The ability to paint with particles is an amazing feature only available in Substance Painter.


You can also choose the size, shape and effect of the particles. Some of the defaults include broken glass, burn, laser impact, leaking, fracture and veins. Each of these options moves the particles over the surface of the model in different ways and patterns. For example, if you choose the rain particle, then particles will fall from above the object and slowly drip down its side after impact painting the selected material as it flows.

Painter includes several unique particle brushes, but it also includes an editor called Popcorn FX that can be used to create your own unique particles and effects.

Post Effects


Substance Painter uses the Yebis 2 middleware, developed by Silicon Studio, to enable post effects within the viewport. The available post effects include antialiasing, color correction, depth of field, tone mapping, glare, vignette and lens distortion. This lets you create your beauty passes directly in the software without having to export it and reload it in your modeling software.

Exporting to Game Engines


Once you are through with the texturing workflow, the completed bitmap textures can be exported to several different game engines including CryEngine 3, Unity and Unreal Engine 4. You also have the option to export the textures as PBR, PSD files or as any of the standard bitmap formats.

Summary


Substance Painter is a revolutionary new product that takes a lot of the busy work out of creating realistic textures and the new ability to paint with particles offers something that no other package has. The results are both stunning and easy to create. The one downside of this package is the weak set of included help files, but these are bolstered with a large set of youtube videos that you can access.

Substance Painter is available in both Indie and Pro licensing options. A trial version is also available and can be downloaded from the Allegorithmic web site at http://www.allegorithmic.com.

How to check that a player's PC meets your requirements

$
0
0

Introduction


Generally, when you write your game, very little thought will initially be given to system specifications. The usual train of thought might be "well it runs on my system, so i'll publish this as the minimum or recommended specs in a readme file, or on my website".

However, what will your game do if the player's PC fails to meet your expectations? This article will outline what sort of things you should be checking for, and when.

There is a decidedly windows and DirectX slant to this article as these are my platforms of choice. The concepts are transferable to other platforms and frameworks, however, the source code i give here is not.

Why should i even attempt to detect system specifications?


It gives a good impression


Checking for the user's system specification will ensure that all users who can run your game will run it without issue, and those who cannot run it will be presented with something useful. A game which crashes or even worse, takes down the player's system when they try to start it, with no reason or rhyme as to why will discourage them from trying again, and what's worse they might even go onto Twitter and disparage your game's name. One player spreading bad news about your game is enough to deter many other potential players.

It cuts down on support issues


If the player receives a well thought out and instructive error message in the event of a failure, they will know who to contact, and how. The error message could even advise them on what they need to do next before they call you, e.g. to purchase a better graphics card, or delete some programs to free up space, or even to change their display resolution. If they aren't told this beforehand, they will have to contact someone. That someone might be you, and this is your time they will take up which is better spend producing more games.

It helps with system stability


Checking for the correct capaibilities beforehand will cut down on the amount of crashes that a player might encounter if their machine isn't quite up to par. As outlined above, a game which crashes is a bad thing, but worse than that, a complete system crash (e.g. by switching to full screen mode with no easy way out) might risk other data on the user's machine, causing damage as well as annoyance.

How and when should i detect system specifications?


You should attempt to detect system specifications whenever your game starts. This should preferably be done before any systems are properly initialised, so that windows is still in a state where the user can properly click any error messages away and get back to what they were doing before trying to run your game.

In my own game, I have split system specifications detection into several classes, each of which is responsibile for detecting the state of one subsystem. Each is called in turn, with the simplest checks done first as some depend on others for success.

It is best to leave the code which checks for system specifications till last in your game, as you won't know what specifications your game needs until this point and are likely to go back and change it repeatedly, otherwise.

Important subsystems to check are:

  • System RAM - is there enough to run the game?
  • CPU speed - is the CPU fast enough? Is it multi-core?
  • Hard disk space - is there enough for save game files and other data you might put there?
  • Hard disk speed - will your game fall over when streaming assets from disk?
  • GPU speed and video RAM - Is the graphical performance of the machine sufficient?
  • Network connectivity - Is there a network connection? Is the internet reachable, e.g. to look for updates?
  • Windows version - Is the version of windows up to date enough to do what you need to do?

I will cover a subset of these checks here, and recommend where you can find code for the others, as to cover every possible thing you might want to check is beyond the scope of this article as many things are system specific.


Checking system RAM size


You can check the system RAM size on windows using the GlobalMemoryStatusEx() function, which will tell you amongst other things the amount of free and total RAM, and the amount of free and total pagefile:

  const ONE_GIG = 1073741824;
  MEMORYSTATUSEX status;
  ZeroMemory(&status);
  status.dwLength = sizeof(status);
  GlobalMemoryStatusEx(&status);
  if (status.ullTotalPhys < ONE_GIG) {
    MessageBox(0, "You don't have enough RAM, 1GB is needed", "Epic Fail", MB_OK);
    exit(0);
  }

Checking video RAM size


You can check the video RAM size using DXGI, and then based upon this you could load lower resolution textures to cut down on memory usage, or you could outright tell the player to get a new graphics card. I prefer the first of these two options wherever possible, as it gives a more friendly experience. Only once you have exhausted all possibilities should you give up. The code to detect video RAM is relatively simple:

#include <iostream>
#include <string>
#include <d3d11.h>

int main()
{
	HRESULT hr;
	D3D_FEATURE_LEVEL FeatureLevel;	

	// Create DXGI factory to enumerate adapters
	CComPtr<IDXGIFactory1> DXGIFactory;

	hr = CreateDXGIFactory1(__uuidof(IDXGIFactory1), (void**)&DXGIFactory);	
	if(SUCCEEDED(hr))
	{
		CComPtr<IDXGIAdapter1> Adapter;

		hr = DXGIFactory->EnumAdapters1(0, &Adapter);
		if(SUCCEEDED(hr))
		{
			CComPtr<ID3D11Device> Device;
			CComPtr<ID3D11DeviceContext> Context;

			hr = D3D11CreateDevice(Adapter, D3D_DRIVER_TYPE_UNKNOWN, nullptr, D3D11_CREATE_DEVICE_BGRA_SUPPORT, nullptr, 0, D3D11_SDK_VERSION, &Device, &FeatureLevel, &Context);

			if(SUCCEEDED(hr))
			{
				DXGI_ADAPTER_DESC adapterDesc;
				Adapter->GetDesc(&adapterDesc);

				std::wstring Description = adapterDesc.Description;
				INT64 VideoRam = adapterDesc.DedicatedVideoMemory;
				INT64 SystemRam = adapterDesc.DedicatedSystemMemory;
				INT64 SharedRam = adapterDesc.SharedSystemMemory;

				std::wcout << L"***************** GRAPHICS ADAPTER DETAILS ***********************";
				std::wcout << L"Adapter Description: " << Description;
				std::wcout << L"Dedicated Video RAM: " << VideoRam;
				std::wcout << L"Dedicated System RAM: " << SystemRam;
				std::wcout << L"Shared System RAM: " << SharedRam;
				std::wcout << L"PCI ID: " << Description;
				std::wcout << L"Feature Level: " << FeatureLevel;
			}
		}
	}
}

The FeatureLevel variable is also useful here, as it will show you which of the graphics card features the PC actually supports.

Detecting the windows version


Detecting the windows version may be important if you only wish to support certain types of installation. For example, you might not want the user to run your game on a server, or you might want to ensure, before your game even tries to access DirectX, that they are not running windows XP or earlier if this will have an impact on your game.

Detecting the version information of windows is very simple and should be done using the GetVersionEx win32 function:

WindowsVersion::WindowsVersion() : Checkable("windows/version")
{
	OSVERSIONINFOEX vi;
	ZeroMemory(&vi, sizeof(OSVERSIONINFOEX));
	vi.dwOSVersionInfoSize = sizeof(vi);
	GetVersionEx((LPOSVERSIONINFO)&vi);

	vMajor = vi.dwMajorVersion;
	vMinor = vi.dwMinorVersion;
	spMajor = vi.wServicePackMajor;
	spMinor = vi.wServicePackMinor;

	Build = vi.dwBuildNumber;
	Platform = vi.dwPlatformId;
	ProductType = vi.wProductType;
}

bool WindowsVersion::IsServer()
{
	return (ProductType == VER_NT_DOMAIN_CONTROLLER || ProductType == VER_NT_SERVER);
}

bool WindowsVersion::IsGreaterThanXP()
{
	return (Platform == VER_PLATFORM_WIN32_NT && vMajor >= 6);
}

Please note, however, that there is an important gotcha to this function call. You cannot use it to detect if the user is running windows 8.1, only version 8.0. This is because the call will only return the newer version number if your executable embeds the correct manifest. If you want to detect this, you should use the newer Version helper API from the Windows 8.1 SDK instead. If all you want to do is detect XP, or anything older than windows 8.0, then GetVersionEx will do fine.

Detecting hard disk space


Detecting hard disk space is relatively simple, and can be done via the GetDiskFreeSpaceEx function. You should always avoid the simpler GetDiskFreeSpace function, which operates in number of clusters rather than number of free bytes, taking more work to get a simple answer rather than just returning a simple 64 bit value you can check.

Using this function is very simple:

  INT64 userbytes;
  INT64 totalbytes;
  INT64 systembytes;
  BOOL res = GetDiskFreeSpaceEx(L".", (PULARGE_INTEGER)&userbytes, (PULARGE_INTEGER)&totalbytes, (PULARGE_INTEGER)&systembytes);
  std::cout << "Your disk has " << userbytes << " bytes available for use.";

Note the difference between userbytes and systembytes in the example above. The userbytes value is the amount of disk space available to the current user, as the disk might be limited by a quota. The systembytes is the total space ignoring quotas, available to all users. Therefore, you should usually check the first result field.

Detecting CPU speed


There are many ways to detect the CPU speed. Some of the more common ones are:

  • Using WMI to read the Win32_Processor information - my personally preferred method
  • Using the machine code CPUID instruction via inline assembly - less portable, but accurate
  • Using a busy loop to calculate CPU - mostly deprecated as this is extremely hard to get right on multi-tasking operating systems, and not recommended outside of kernel level code

On most modern systems, you are more likely to run into problems with lack of RAM, or lack of a good graphics card before you encounter problems with CPU performance. Your mileage may vary but in my own experience, less time needs to be spent on detecting the CPU speed and more time on other factors as CPU speed is greatly affected by what else is running at the time and how much swapping the system might need to do.

Conclusion


The advice above should help you detect your player's specifications effectively. This is of course just the tip of a very big iceberg, and once you start detecting various metrics from a player's system, you will keep thinking of other things you really should check. Don't get carried away though, as it is easy to get distracted trying to detect potential edge cases, rather than just carrying on with the game.

Article Update Log


17 Mar 2014: Initial release

Doom3 is the proof that "keep it simple" works.

$
0
0
If you search on the web for the best C++ source code. The Doom3 source code is mentioned many times, with testimonials  like this one.
I spent a bit of time going through the Doom3 source code. It's probably the cleanest and nicest looking code I've ever seen.

Doom 3 is a video game developed by id Software and published by Activision.The game was a  commercial success for id Software; with more than 3.5 million copies of the game were sold.

On November 23, 2011 id Software maintained the tradition and it released the source code of their previous engine. This source code was reviewed by many developers, here's as example the feedback from fabien (orginal source):

Doom 3 BFG is written in C++, a language so vast that it can be used to generate great code but also abominations that will make your eyes bleed. Fortunately id Software settled for a C++ subset close to "C with Classes" which flows down the brain with little resistance:


  • No exceptions.
  • No References (use pointers).
  • Minimal usage of templates.
  • Const everywhere.
  • Classes.
  • Polymorphism.
  • Inheritance.

Many C++ experts don't recommend any more the "C with classes" approach. However, Doom3 was developed between 2000 and 2004, what could explain  the no use of modern C++ mechanisms.

Let's go inside its source code using CppDepend and discover what makes it so special.

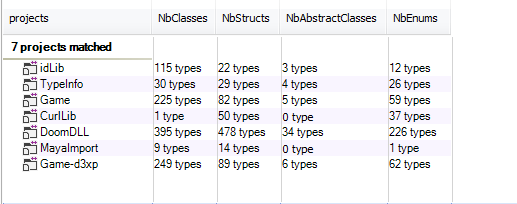
Doom3 is modularized using few projects, here’s the list of its projects, and some statistics about their types:

doom5.png

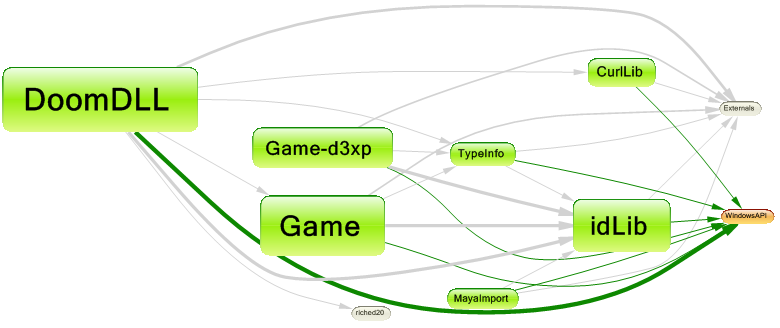
And here's the dependency graph to show the relation between them:

doom2.png


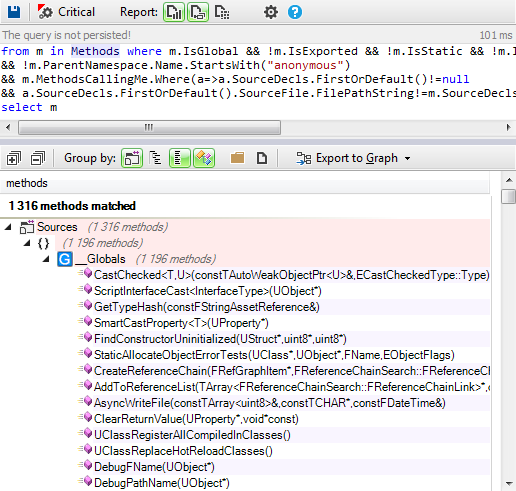
Doom3 defines many global functions. However, most of the treatments are implemented in classes.

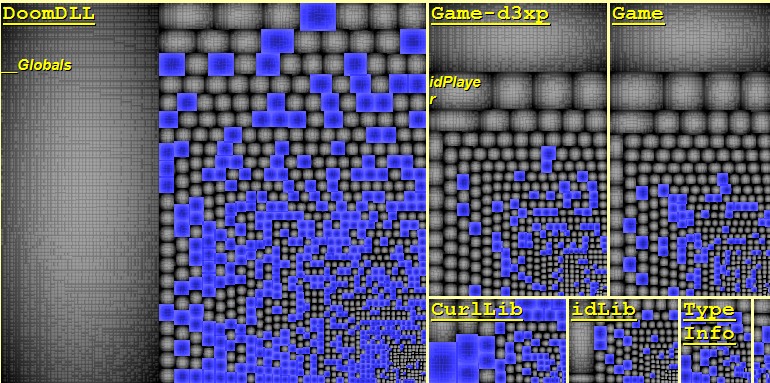
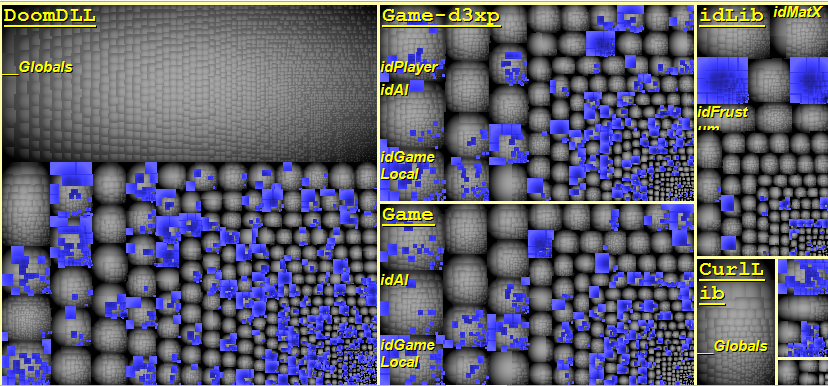
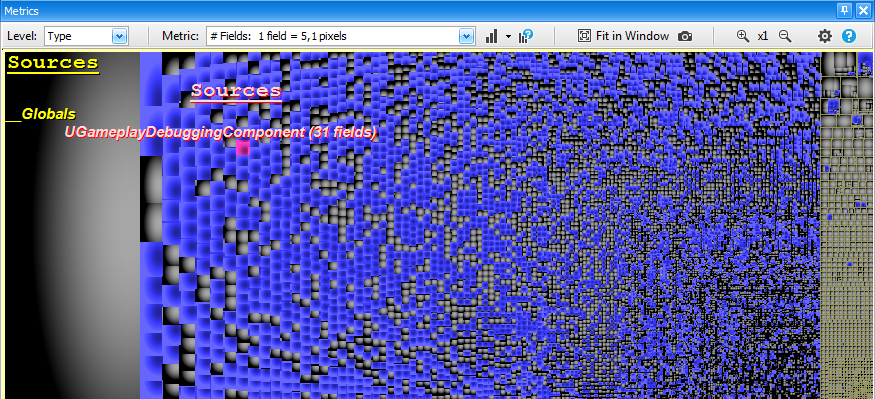
The data model is defined using structs. To have a concrete idea of using structs in the source code, the metric view above shows them as blue rectangles.

In the Metric View, the code base is represented through a Treemap. Treemapping is a method for displaying tree-structured data by using nested rectangles. The tree structure used  is the usual code hierarchy:


  • Project contains namespaces.
  • Namespace contains types.
  • Type contains methods and fields.

doom13.png


As we can observe many structs are defined, for example  more than 40% of DoomDLL types are structs. They are systematically used to define the data model. This practice is adopted by many projects,  this approach has a big drawback in case of multithreaded applications. Indeed, structs with public fields are not immutable.


There is one important argument in favor of using immutable objects: It dramatically simplifies concurrent programming. Think about it, why does writing proper multithreaded programming is a hard task? Because it is hard to synchronize threads access to resources (objects or others OS resources). Why it is hard to synchronize these accesses? Because it is hard to guarantee that there won’t be race conditions between the multiple write accesses and read accesses done by multiple threads on multiple objects. What if there are no more write accesses? In other words, what if the state of the objects accessed by threads, doesn’t change? There is no more need for synchronization!

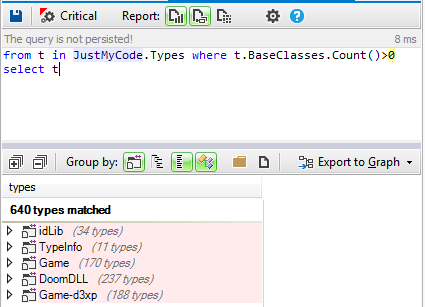
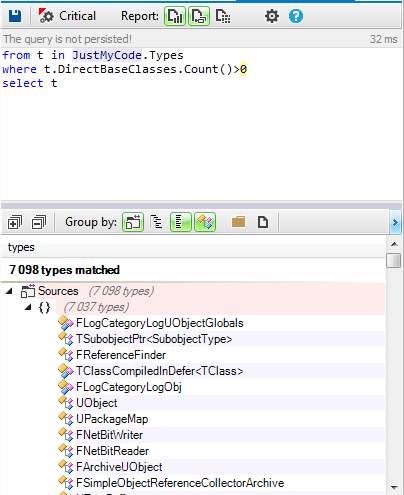
Let's search for classes having at least one base class:

doom6.png

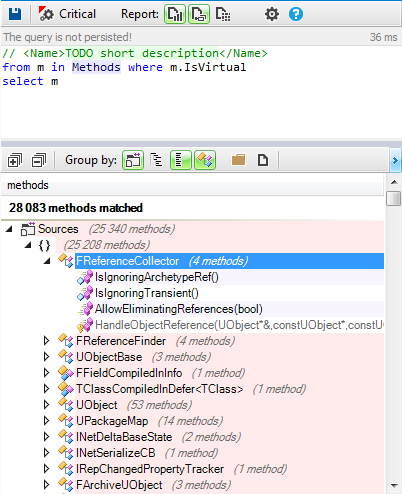
Almost 40% of stucts and classes have a base class. And generally in OOP one of the benefits of inheritance is the polymorphism, here are in blue the virtual methods defined in the source code:

doom7.png

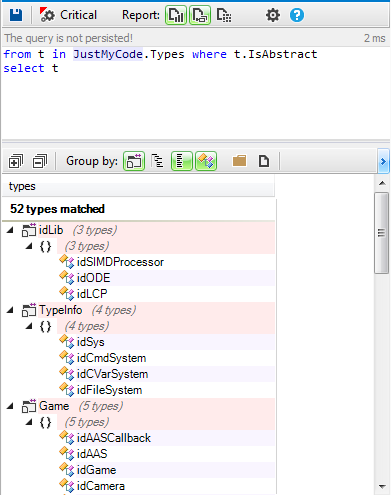
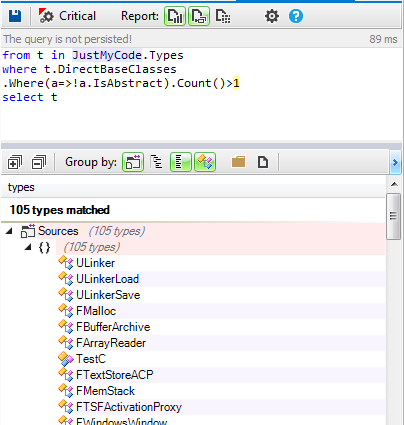
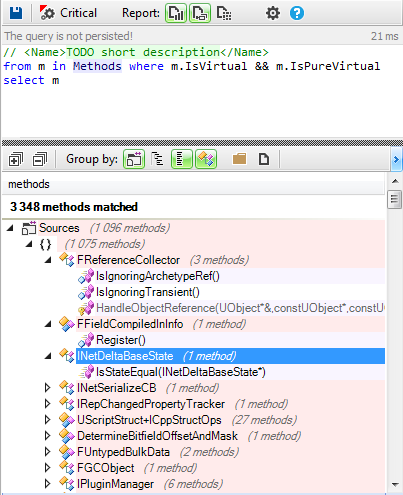
More than 30% of methods are virtual. Few of them are virtual pure and here's the list of all abstract classes defined:

doom9.png

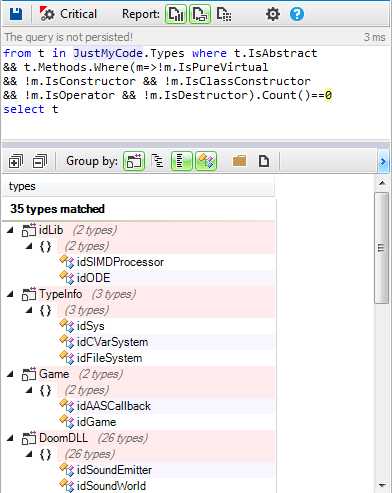
Only 52 are defined abstract classes, 35 of them are defined as pure interfaces,i.e. all their virtual methods are pure.

doom8.png

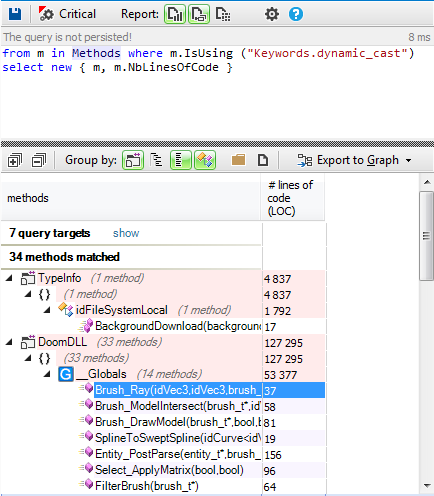
Let's search for methods using RTTI

doom17.png

Only very few methods use RTTI.

To resume  only basic concepts of OOP are used, no advanced design patterns used, no overuse of interfaces and abstract classes, limited use of RTTI and data are defined as structs.

Until now nothing special differentiate this code from many others using "C with Classes" and criticized by many C++ developers.

Here are some interesting choices of their developers to help us understand its secret:

1 - Provides a common base class with useful services.

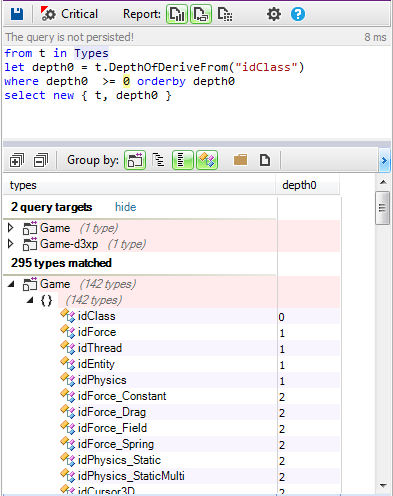
Many classes inherits from the idClass:

doom10.png

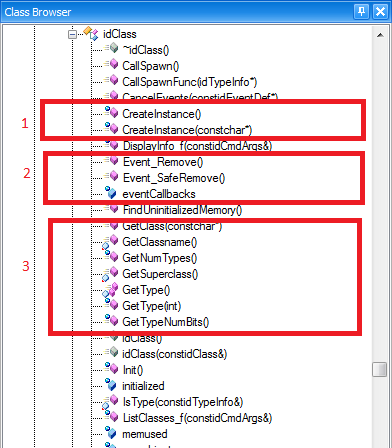
The idClass  provides the following services:
  1. Instance creation.
  2. Type info management.
  3. Event management.
doom11.png


2- Make easy the string manipulation

Generally the string is the most used type in a project, many treatments are done using them, and we need functions to manipulate them.

Doom3 defines the idstr class which contains almost all useful methods to manipulate strings, no need to define your own method as the case of many string classes provided by other frameworks.

3- The source code is highly decoupled with the GUI framework (MFC)

In many projects using MFC, the code is highly coupled with their types, and you can find types from MFC everywhere in the code.

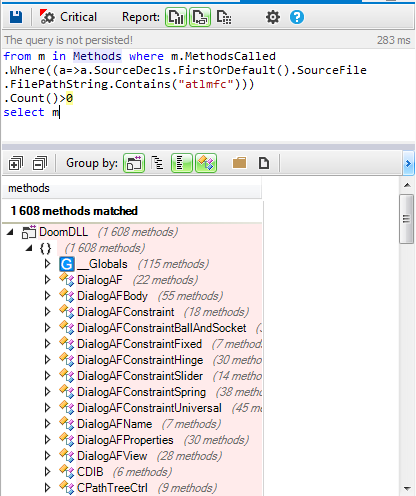
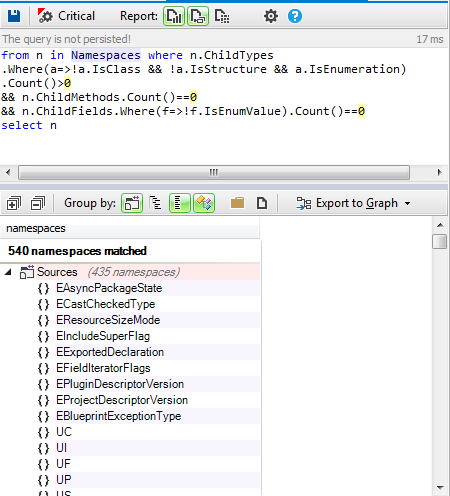
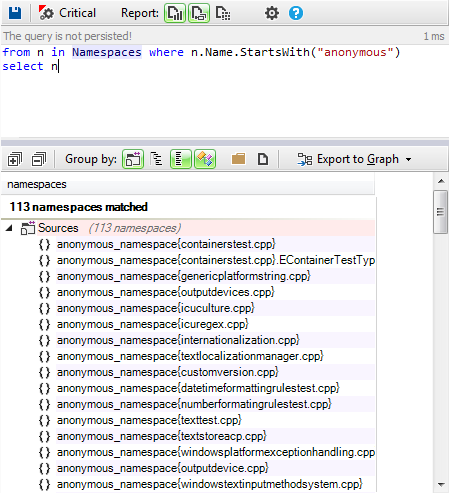
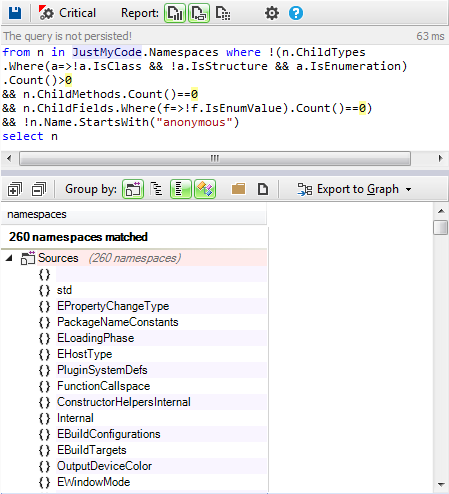
In Doom3, The code is highly decoupled with MFC, only GUI classes has direct dependency with it. As shown by this following CQLinq query:

doom3.png


This choice has a big impact on the productivity. Indeed, only the Gui developers must care about the MFC framework, and for the other developers it's not mandatory to waste time with MFC.

4- It provides a very good utility library (idlib)

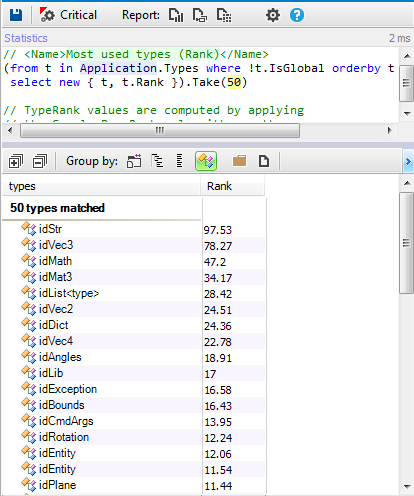
In almost all projects the most used types are utility classes, as shown by the result of this following query:

doom4.png

As we can observe the most used are utilities ones. If  C++ developers don't use a good framework for utilities, they spend most of their developement time to fight with the technical layer.

idlib provides useful classes with all needed methods to treat string, containers, and memory. Which facilitate the work of developers and let them focus more on the game logic.

5- The implementation is very easy to understand

Doom3 implements a hard coded compiler, and as known by C++ developers, it's not an easy task to develop parsers and compilers. However, the implementation of the Doom3 is very easy to understand and its code is very clean.

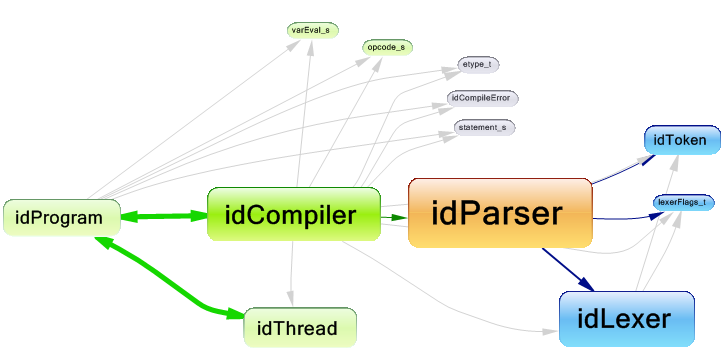
Here's the dependency graph of the classes used by the compiler:

doom16.png


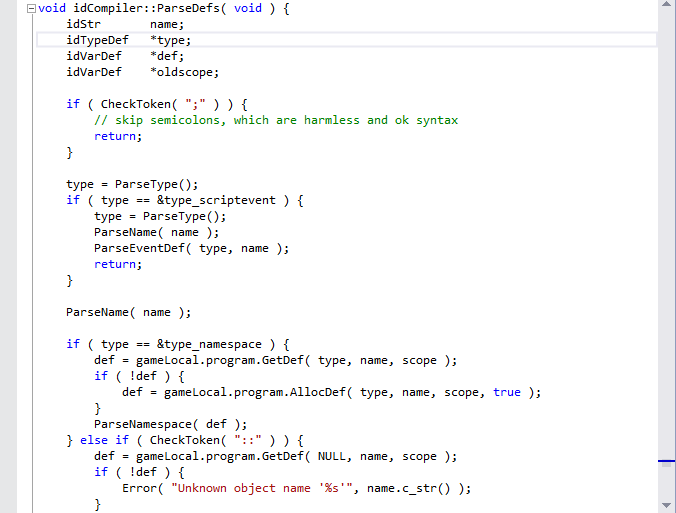
And here's a code snippet from the compiler source code:

doom15.png

We already study the code source of many parsers and compiler. But it's the first time we discover a compiler with a source code very easy to be understood, it's the same for the whole Doom3 source code. It's magic. When we explore the Doom3 source code, we can't say: WOW it's beautiful!

Summary

Even if the Doom3  design choices are very basic, but its designers make many decisions to let developers focus more on the game logic, and facilitate all the technical layer stuff. Which increase a lot the productivity.

However when using "C with Classes", you have to know exactly what you are doing. You have to be expert like Doom3 developers. It's not recommended for a beginner to take risk and ignore the Modern C++ recommendations.

Creating a Movement Component for an RTS in UE4

$
0
0
My name is Dmitry and I'm a programmer at Snowforged Entertainment. Our team is currently working on Starfall Tactics – an upcoming online RTS game based on the Unreal Engine 4. I’ve just finished refactoring a movement component for spaceships. This component had to be rewritten three times, going back all the way to the start of development on the game to working on the current alpha version.

During this period of time, a lot of mistakes were made and painful lessons learned. In this article, I’d like to share my experience with you and talk about Navigation Volumes, Movement component, AIController and Pawn.

Objective: implement spaceship movement on a given plane.

Things to consider:
  • Spaceships in Starfall Tactics have a maximum speed, rotational speed and a rate of acceleration. These parameters directly influence the ship’s movement.
  • You have to rely on Navigation Volume to automatically search for obstacles and decide on the safest path.
  • There shouldn’t be continuous synchronization of position coordinates across the network.
  • Spaceships can start moving from different speed states.
  • Everything must be done natively with regards to the architecture of Unreal Engine 4.
For the sake of simplicity, I've decided to break up the task into two sub-tasks: searching for the safest/optimal path and moving to the end point (located under the cursor).

Task 1 - Searching for the optimal path


First, let’s consider the elements involved in finding an optimal path via Unreal Engine 4. UShipMovementComponent is a movement component inherited from UPawnMovementComponent, due to the end unit (in this case, our spaceship) being derived from APawn.
UPawnMovementComponent is originated from UNavMovementComponent, which contains the FNavProperties field. These are navigational parameters that describe the shape of a given APawn that is also used by the AIController when searching for pathways.
Suppose we have a level that contains a spaceship, some static objects and Navigation Volume. We decide to send this spaceship from one point of the map to another. This is what happens inside UE4:


scheme41.jpg


1) APawn finds within itself the ShipAIController (in our case, it's just the class that was derived from AIController, having just a single method) and calls the method for seeking pathways.

2) In this method we first prepare a request to the navigation system. Then, after sending the request, we receive movement control points.

TArray<FVector> AShipAIController::SearchPath(const FVector& location)
{
    FPathFindingQuery Query;

    const bool bValidQuery = PreparePathfinding(Query, location, NULL);
    UNavigationSystem* NavSys = UNavigationSystem::GetCurrent(GetWorld());
    FPathFindingResult PathResult;
    TArray<FVector> Result;

    if(NavSys)
    {
        PathResult = NavSys->FindPathSync(Query);

        if(PathResult.Result != ENavigationQueryResult::Error)
        {
            if(PathResult.IsSuccessful() && PathResult.Path.IsValid())
            {
                for(FNavPathPoint point : PathResult.Path->GetPathPoints())
                {
                    Result.Add(point.Location);
                }
            }
        }
        else
        {
            DumpToLog("Pathfinding failed.", true, true, FColor::Red);
        }
    }
    else
    {
        DumpToLog("Can't find navigation system.", true, true, FColor::Red);
    }

    return Result;
}

3) These points are then returned as an array to APawn, in a format that is convenient for us (FVector). Finally, the movement begins.
In a nutshell: APawn contains a ShipAIController, which at the time of the calling of PreparePathfinding() refers to APawn and receives the UShipMovementComponent, containing FNavProperties that address the navigation system in order to find the optimal path.

Task 2 - Implementing movement to the end point


So, we’ve just received a list of movement control points. The first point is always the spaceship’s current position, the latter - our destination. In this case, the place on the game map where we clicked with the cursor.

I should probably tell you a little bit about how we plan to interface with the network. For the sake of simplicity, let’s break up the process into several steps and describe each one:

1) We call the function responsible for starting the movement - AShip::CommandMoveTo():

UCLASS()
class STARFALL_API AShip : public APawn, public ITeamInterface
{
...
    UFUNCTION(BlueprintCallable, Server, Reliable, WithValidation, Category = "Ship")
    void CommandMoveTo(const FVector& location);
    void CommandMoveTo_Implementation(const FVector& location);
    bool CommandMoveTo_Validate(const FVector& location);
...
}

Pay close attention. On the client’s side, all Pawns are missing an AIController, which exists only on the server. So when the client calls the function to send the ship to a new location, all calculations should be done server-side. In other words, the server is responsible for seeking the optimal path for each spaceship because it is the AIController that works with the navigation system.

2) After we’ve found a list of control points inside the CommandMoveTo() method, we call the next one to start moving the selected spaceship. This method should be called on all clients.

UCLASS()
class STARFALL_API AShip : public APawn, public ITeamInterface
{
...
    UFUNCTION(BlueprintCallable, Reliable, NetMulticast, Category = "Ship")
    void StartNavMoveFrom(const FVector& location);
    virtual void StartNavMoveFrom_Implementation(const FVector& location);
...
}

In this method, a client that does not have any control points adds the fist received coordinate to the list of control points and “starts the engine”, moving the ship into motion. Using timers, we activate the process of sending the remaining intermediate and end points for this particular journey on the server:

void AShip::CommandMoveTo(const FVector& location)
{
...
	GetWorldTimerManager().SetTimer(timerHandler,
                                    FTimerDelegate::CreateUObject(this, &AShip::SendNextPathPoint),
                                    0.1f, true);
...

}

UCLASS()
class STARFALL_API AShip : public APawn, public ITeamInterface
{
...
    FTimerHandle timerHandler;
    
    UFUNCTION(BlueprintCallable, Reliable, NetMulticast, Category = "Ship")
    void SendPathPoint(const FVector& location);
    virtual void SendPathPoint_Implementation(const FVector& location);
...
}

On the client’s side, while the ship starts to accelerate and move to the first control point, it gradually receives the remaining control points and adds them to an array. This takes some load off the network and allows us to stretch the time it takes to send data, thus distributing the load.

Alright, enough with the supplementary info. Let’s get back to business ;) Our current task – make the ship move towards the nearest control point. Keep in mind that our ship has rotational speed, as well as a speed of acceleration.

When you send the spaceship to a new destination, it could be flying at full speed, staying still, accelerating or be in the process of turning in that particular moment. Therefore, we have to act depending on current speed characteristics and destination.

We have identified three types of spaceship behavior:


scheme3.png


  1. The vessel can fly to the end point at full speed and fall back on rotational speed to arrive at its destination.
  2. The spaceship’s current speed might be too fast, so it will try to align with its destination using average speed. When the ship directly faces its destination, it will accelerate and try to reach the target at maximum speed.
  3. If the other pathways takes more time than simply rotating on the spot and flying to the target in a straight line, the vessel will proceed to do so.

Before the ship starts moving to a control point, we need to decide on the speed parameters to be used. To achieve this, we’ve implemented a function for simulating a flight. I’d rather skip explaining the code in this article, but if you need more information on this, just drop me a message.

The principles are quite simple - using the current DeltaTime, we keep moving the vector of our position and rotate the forward vector, simulating the vessel’s rotation. It’s quite a simple operation that utilizes vectors and FRotator.

I should probably mention that in each iteration of the ship’s rotation, we should track and accumulate the angle of rotation. If it’s more than 180 degrees, it means that the spaceship has started moving in circles around the end point, so we should probably try the next set of speed parameters.

At first, the spaceship tries to fly at full speed and then at reduced speed (we are currently using average speed). If none of these solutions work – the ship simply needs to rotate in order to align with its destination and fly towards it.

Please keep in mind that all of the logic in the assessment of the situation and the movement processes should be implemented in AShip. This is due to the AIController missing on the client’s side, as well as UShipMovementComponent playing a different role (which I’ll talk about soon). So to make sure that our spaceships can move on their own, without constantly synchronizing coordinates with the server, we need to realize the movement logic within AShip.

Now, let’s talk about the most important part of the whole process - our movement component UShipMovementComponent. You should keep in mind that components of this type are just like engines. Their function is moving the object forward and rotating it when necessary, without worrying about what kind of logic should the object rely on for movement or what state it is in. Once again, they are only responsible for the actual movement of the said subject.

The gist of using UMovementComponent and its derived classes is as follows: we use a given Tick() to make all mathematical calculations related to our component’s parameters (speed, maximum speed, rotational speed). We then set the UMovementComponent::Velocity parameter to a value that is relevant to the spaceship’s transposition at this time tick. Then, we call UMovementComponent::MoveUpdatedComponent(), where the actual transposition and rotation of the spaceship occurs.

void UShipMovementComponent::TickComponent(float DeltaTime, enum ELevelTick TickType,
                                                 FActorComponentTickFunction* ThisTickFunction)
{
    Super::TickComponent(DeltaTime, TickType, ThisTickFunction);

    if(!PawnOwner || !UpdatedComponent || ShouldSkipUpdate(DeltaTime))
    {
        return;
    }

    if (CheckState(EShipMovementState::Accelerating))
    {
        if (CurrentSpeed < CurrentMaxSpeed)
        {
            CurrentSpeed += Acceleration;
            AccelerationPath += CurrentSpeed*DeltaTime;
        }
        else
        {
            CurrentSpeed = CurrentMaxSpeed;
            RemoveState(EShipMovementState::Accelerating);
        }
    }
    else
    if (CheckState(EShipMovementState::Braking))
    {
        if (CurrentSpeed > 0.0f)
        {
            CurrentSpeed -= Acceleration;
            DeaccelerationPath += CurrentSpeed*DeltaTime;
        }
        else
        {
            CurrentSpeed = 0.0f;
            CurrentMaxSpeed = MaxSpeed;

            RemoveState(EShipMovementState::Braking);
            RemoveState(EShipMovementState::Moving);
        }
    }
    else
    if (CheckState(EShipMovementState::SpeedDecreasing))
    {
        if (CurrentSpeed > CurrentMaxSpeed)
        {
            CurrentSpeed -= Acceleration;
            DeaccelerationPath += CurrentSpeed*DeltaTime;
        }
        else
        {
            CurrentSpeed = CurrentMaxSpeed;

            RemoveState(EShipMovementState::SpeedDecreasing);
        }
    }

    if (CheckState(EShipMovementState::Moving) || CheckState(EShipMovementState::Turning))
    {
        MoveForwardWithCurrentSpeed(DeltaTime);
    }
}

...

void UShipMovementComponent::MoveForwardWithCurrentSpeed(float DeltaTime)
{
    Velocity = UpdatedComponent->GetForwardVector() * CurrentSpeed * DeltaTime;

    MoveUpdatedComponent(Velocity, AcceptedRotator, false);
    UpdateComponentVelocity();
}

A few words about the states that appear in this article. They are needed to combine the various processes related to movement. For example, when reducing speed (to have enough space for maneuvering, we need to move at average speed) and rotating towards a new destination.

In the movement component, states are used only for evaluation purposes: should we continue accelerating or should we decrease momentum, etc.

All of the logic related to the transition from one state of motion to another is done via AShip. For example, the spaceship is flying at full speed and the final destination has changed, so we need to lower the vessel’s speed to its average value.

And a quick word about AcceptedRotator. It's the ship’s rotation at the current time tick. In the AShip time tick we call the following method of the UShipMovementComponent:

bool UShipMovementComponent::AcceptTurnToRotator(const FRotator& RotateTo)
{
    if(FMath::Abs(RotateTo.Yaw - UpdatedComponent->GetComponentRotation().Yaw) < 0.1f)
    {
        return true;
    }

    FRotator tmpRot = FMath::RInterpConstantTo(UpdatedComponent->GetComponentRotation(),
                                               RotateTo, GetWorld()->GetDeltaSeconds(),
                                               AngularSpeed);
    AcceptedRotator = tmpRot;

    return false;
}

RotateTo = (GoalLocation - ShipLocation).Rotation() - ie this is a rotator that denotes what rotation value the vessel should be at in order for it to face the end point.

In this method, we evaluate whether the spaceship is already looking at the destination. In that case, this result is returned and the vessel will not rotate. In its assessment of the situation, AShip will reset the state EShipMovementState::Turning - and UShipMovementComponent will no longer attempt to rotate. Otherwise, we use the rotation and interpret based on DeltaTime and the spaceship’s rotational speed. Then apply this rotation to the current time tick, when calling UMovementComponent::MoveUpdatedComponent().

Future Prospects


In my humble opinion, this particular version of UShipMovementComponent takes into account all of the problems our team faced during the prototyping stage of Starfall Tactics. As an added bonus, the solution turned out to be quite scalable and there is an opportunity to improve it further.

Take, for example, the moment when the spaceship is turning: if we simply rotate the ship, it looks dull, as if the vessel is attached to a piece of string. However, allowing the spaceship to dip slightly in the direction of the turn results in an attractive and fluid action.

Also, the synchronization of intermediate spaceship positions is realized on a workable level. As soon as the object reaches its destination, the data is synchronized with the server. So far, the difference in the vessel's final position on the server and the client is fairly small. However, if miscalculations start occurring more frequently, I have a lot of ideas on how to improve synchronization without spaceships performing sudden “jumps”. I guess we’ll talk about them another time.

Rendering with the NVIDIA Quadro K5200

$
0
0
NVIDIA gave me a chance to review the Quadro K5000 graphics board back in 2011 and now here, a short three years later, they've come up with the Quadro K5200 board. Initially, this seemed like a short little jump from the previous board with only a simple 2 tacked on, but after taking this board for a spin, I'm even happier than before.

First, a little follow up on the previous board. I've been using the Quadro K5000 board in my machine since writing the review and it works so well that I don't notice it is even there, except when I render a seriously complex scene. When it cranks up to full steam, I can hear its fan kick on and start spinning. Needless to say, it kicks on quite a lot. The Quadro board has literally saved me hundreds of hours or render time that I've taken for granted.

A good example of this is a realistic Earth rendering project that I recently worked on. The scene used high-res maps of the Earth surface along with two layers of cloud data. The textures for the scene were almost 3GB in size. When I rendered this complex scene it took some time to load all the textures into memory, but once loaded, I could render the Earth from any viewpoint in under 5 minutes per frame. As a result of the Quadro board, I was able to complete an animated project of 300 frames in one evening instead of weeks.

I have noticed that occasionally the board will hiccup and reset itself, but all I see when this happens is that the screen will flicker for a split second and then come back with a simple warning dialog box that basically says, "I had some trouble, but I'm okay now." The hiccups never interrupted my workflow or halted my rendering.

The Installation


When you first pull this graphics card out of the box, it really is a thing of beauty (see Figure 1). It is a hefty board filling two slots with its own fan and a sleek design that lets you know that it really means business. The board was a monster to fit into my computer and I had to remove the hard drive to even get it installed, but once it was installed, I made a quick visit to the NVIDIA website for the latest driver. Once the driver was installed, it found and set my display to use my same previous settings. The entire installation process took less than an hour and I'm productive once again.


Attached Image: fig1.png
Figure 1: The NVIDIA Quadro K5200 graphics board looks like a self-contained system itself. Image provided by NVIDIA.


First Impressions


The first thing I tried once the card was up and running was to load a heavy scene provided by NVIDIA for the last review. The scene was a high-res model of a Bugatti Veyron car complete with detailed materials. I rendered the scene using 3ds Max's iray renderer with 500 iterations and it screamed through the job.

I used the exact same file with the same settings so I could compare the results to the previous graphics card. When this image (see Figure 2) was rendered with the Quadro K5000 graphics card, the image at 1300 by 900 was rendered in just over 5 minutes. The same scene was rendered again with the Quadro K5200 graphics card in just 3 minutes and 31 seconds.


Attached Image: fig2.png
Figure 2: This beautiful model of a Bugatti Veyron was rendered using the NVIDIA Quadro K5200 graphics card in just 3 minutes and 31 seconds.


Some of the credit needs to go to the software. The development teams behind 3ds Max and iray have also been busy updating their rendering pipeline and make the software more efficient. The software has also been designed to take advantage of the incredible hardware found in this graphics card.

Upgrade Details


Within the Technical Details document, the extent of the upgrade for this new board is explained. The first big difference is that the number of CUDA Cores has increased from 1536 for the K5000 board to 2304 for the K5200. The Memory Size has doubled from 4GB to 8GB and the Memory Bandwidth has also increased from 173 GB/s to 192 GB/s. This allows data to be pumped to the board faster. The Single Precision Computer Performance as measured against standardized benchmarks has increased from 2.2 TFLOPS to 3.0 TFLOPS. The only other difference is that the K5200 card consumed more power at 150W verses 122W for the K5000 card.

Each Quadro graphics board can be connected to up to four monitors per GPU. This gives you ample real-estate to keep everything with your project organized. The direct outputs from the board include two Display Ports, one Dual-Link DVI-I and one Dual-Link DVI-D. The Quadro K5200, like its predecessor, also supports Quadro Sync, which allows up to four K5200 boards to work together to synchronize 16 monitors simultaneously (see Figure 3). This requires a separate Quadro Sync card.


Attached Image: fig3.png
Figure 3: Several Quadro graphics boards that can synchronized to create a "power wall" of monitors. Image provided by NVIDA.


The Quadro 5000 board also supports OpenGL 4.4, Shader Model 5.0 and DirectX 11.

Summary


In summary, several years ago, I was blown away with the speed and power of the Quadro K5000 graphics board and the new Quadro K5200 graphics board improves on the original. I found installation and setup to be simple and quick and the graphics board has worked seamlessly with all my 3d modeling, animation and rendering packages.

You can find more information on 3ds Max and NVIDIA iray at the www.autodesk.com web site and more information on the Quadro line of professional graphics cards is available at www.nvidia.com/quadro.

Cache And How To Work For It

$
0
0

Why Cache Matters


Simply put, Cache is a small amount of memory located on your CPU that is used to reduce latencies to main memory (RAM). We have no control over the cache, but programming and storing data in a cache-friendly manner is imperative to performance improvements and, in turn, a reduction in power consumption. Without realising it, you may have already used a form of Cache before when reading files from a HDD where you have loaded the file into RAM and then manipulated it there before writing back the changes, you’ve cached the file on the RAM. Although this example is slightly different and technically a buffer, the similarities are present.

How Cache Works


When your CPU requests a piece of memory it’ll go out to the RAM to fetch it. During that time the CPU is waiting while the request goes through the Memory Controller, off the CPU chip to the RAM to be served and returned. This is a waste of possible compute time and therefore a reduction in power efficiency. Cache sits between this line of communication and listens in on the requests to RAM; if it has the memory already it’ll stop the request and respond with what it has, this is referred to a Cache Hit and if it’s unable to serve the request because it doesn’t have the requested memory then it’s a Cache Miss.

There are systems in place to assure that when writing to memory, both the Cache and memory are updated, but I’ll save those for another article, as they are more important when working with a multithreaded application.

The part that we can assist


The Cache is always trying to guess what memory you’ll need to have before you request it, this prediction is called Cache Prefetching. This is why when working on an array it’s best to go through in sequential order instead of randomly jumping through, as the Cache Prefetcher will be able to guess what you’re using and have it ready before you need it. Cache loads things in groups of 64 bytes. The size is CPU-dependant and can be checked under your CPU’s specification under Cache Line size, although it’s typically 64 bytes. This means that if you have an array of integers and you grab 1 of those integers, the cache has also grabbed the Cache Line that it sits on. Grabbing the next integer stored next to it will be a Cache Hit and subsequently extremely fast. The alignment of the Cache Line will always be a multiple of the Cache Line's size, meaning that if you fetch memory at 0x00 (0) then what will be cached is everything between 0x00 (0) and 0x40 (64) and if you fetch something at 0x4F (79) then you’ll get everything between 0x40 (64) and 0x80 (128).

Use Case


Arrays store their data sequentially, so they’re ideal for accessing in a cache-friendly way. In this example we access data going across the row before going to the next row and then in the second loop, we go across the column first and then move to the next column. Each dimensions in the array is 10,000 integers.

for (unsigned x = 0; x < ARRAY_SIZE; ++x)
	for (unsigned y = 0; y < ARRAY_SIZE; ++y)
 		total += array_[ y ][ x ];
for (unsigned x = 0; x < ARRAY_SIZE; ++x) 
	for (unsigned y = 0; y < ARRAY_SIZE; ++y)
 		total += array_[ x ][ y ];

The only difference between these loops is the array_[x][y] and [y][x], but the results between the two are extreme. On my AMD 8150, the first loop finished in 1,501ms while the second only took 281ms which is a ~5x speed increase! Simply because of the Prefetcher friendly access, although the first loop may look sequential, it’s actually extremely fragmented in its accesses. A 2D array stores its data in one large block with each row next to each other and after each row it is the next row (Row-Major order). In the diagram below we have the access patterns of the two loops showing the order of their access and the values returned. The first loop accesses its data in a predictable way, but not a way that the Prefetcher is able to prefetch for. While the second loop accesses its memory sequentially which allows the CPU to prefetch.

Example source: https://gist.github.com/Joshhua5/c0fe80d67d3990c528e7

(Access) 1 2 3 4 5 6 7 8 9
(Loop 1) 1 4 7 2 5 8 3 6 9
(Loop 2) 1 2 3 4 5 6 7 8 9


One more example of an optimisation is the layout of a class, assuming that your compiler doesn’t optimise this for you.

struct Foo{
 bool value1;
 char data[64];
 bool value2;
}

Let’s say we want to check value1 and value2 before accessing any data inside the array. Let’s also assume that Foo is stored at 0x00 for simplicity. When we access value1, we’ll have a Cache Miss as it's our first time accessing this piece of memory, but now we’ve got that line stored for us. We then check value2, which will also result in a Cache Miss, because data has polluted our Cache Line and pushed value2 into the next line meaning we now have to wait twice. An alternative would be to store value1 and value2 next to each other so that we only have the first Cache Miss and a Cache Hit for the second. Assuming we don’t access data[62] and upwards then we won’t have to deal with another Cache Miss. Optimally we could store value1 and value2 in the same byte because we only need one bit to store a Boolean and could technically fit eight Booleans into a single byte. If we performed this optimisation and used bitwise shifting to access each byte we could squeeze another byte of the array into out cache line.

Example source: https://gist.github.com/Joshhua5/83da475070174f309ff2

From this on the AMD 8150 we recieved 47ms for the first loop and 31ms for the second loop which is a 1.5x performance increase. Notice that we have to times the array access by * 2 to break up sequential access, because there would be no performance difference between the two loops. If we always fetch 64 bytes then we're bound to fetch more than needed for value2 and therefor cache the next object in the array unintentionally. Another interesting behaviour which shows the function of the prefetcher is if we accessed the array sequentially so the CPU could prefetch it would only take 15ms to go through the entire array instead of 31ms to go through half the array 'randomly'.

Summary

  • Optimally, you want objects to be as small as possible to fit as many in a Cache Line as possible. You can fit two shorts in an integer and therefore 16 integers in a cache line or 32 if you use shorts.
  • Consider a pointer, first to fetch that pointer from memory is a Cache Miss and then fetching that object is a second Cache Miss is a worst case scenario.
  • Keep objects smaller than the Cache Line or divisible by it to prevent a single object spreading over two Cache Lines.
  • C++14 added the alignas keyword that will make sure that these objects are aligned in memory to the value passed which can be beneficial in stopping an object being placed in two Cache Lines.

Conclusion


Cache is more important than ever with the extreme speeds of CPU and relatively slow RAM, great speed improvements or power efficiency can be observed from utilising it correctly which is always welcome in the world of game creation.

Article Update Log


23 March 2015: Initial release
7 April 2015 : Added source examples

Arcade Machines and Gaming Library Pigaco - Devlog #0: Introduction & Architecture

$
0
0
The very first arcade consoles had only a single game on each machine. Later, as the hardware evolved, software grew alongside the better machines and different games on the same screen became possible. During this development, programmers needed to solve tough challenges like making games compatible for different processors than what they have been designed to run on, or sharing processor time between the running programs. With Linux, the groundwork for these problems is done and we (luckily) do not think about processor instructions very often anymore when creating games, and instead focus more on the games themselves.

With the rise of home gaming consoles, arcade machines quickly began to fade out and the arcade shops slowly got rarer and rarer. Developers made games for the new platforms and the money definitely was in the PC and console market. This still holds true to this day, but there has not been any new development with public arcade machines and the required software to create such a machine. Big projects like EmulationStation aim for a replacement of bulky machines to make arcade gaming more suitable for home use and to combine multiple emulators into a single, good-looking UI. Projects like OUYA want to create a new home console like the PlayStation or XBox systems, but cannot be used to host a real arcade machine in a store in your neighboorhood. This goal needs a project on its own.

Enter Pigaco


The pigaco project (short for Raspberry Pi Gaming Console) wants to create software to make building arcade style games on real arcade machines easier and to streamline setting up machines in public places. The Raspberry Pi in the name is a remnant of the past and no longer applies to the project, it was only chosen becaue a Raspberry Pi was used to develop its networked input system.

Libraries and Tools


  • libpiga: C++ library to make interfacing with pigaco and its components easy. (C++) (Already working)
  • pigaco: Application which lists games and applications on the console and provides shared objects (C++/SDL2) (Already working)
  • networked client: Minimal application to send inputs over the network to the console (C++) (Already working)
  • pihud: GUI-Library which has been integrated with arcade control options in mind. (C++/SDL2) (Already working, but with only a small widget collection)
  • consolemgr: Manager interface to control multiple consoles with a simple, graphical UI. (Qt/QML) (Recently started)
  • Smartphone App: Based on consolemgr - used to control consoles and send arcade inputs to a console (more players) (Qt/QML) (not started yet)
  • BomberPi: Sample game (bomberman clone), which uses the piga library to get its inputs. (C++/SDL2)(Already playable)
  • Hosts (Raspberry Pi GPIO, PC-keyboard, ...): Sources of inputs to process (C++/Anything than can receive inputs) (RPi GPIO and keyboard already working)

Repository and Resources


The repository can be found on github. A daily generated online version of the documentation can be found here. I advise against using the APIs in their current form for serious development because they may (and most likely will) change in the near future. Any contribution, pointer or comment which brings us closer to this far fetched goal of easier arcade machines is welcome though and I am looking forward to see some of you in my messages.

Architecture


The project is structured into 3 parts:

  1. C++ library to communicate between the programs over shared memory and the network (libpiga)
  2. Host program to handle inputs, platform-specific code, and start other applications (pigaco)
  3. Input-hosts which get linked dynamically by pigaco or connect themselves to pigaco over the network to read inputs from buttons and joysticks, and to send commands to pigaco

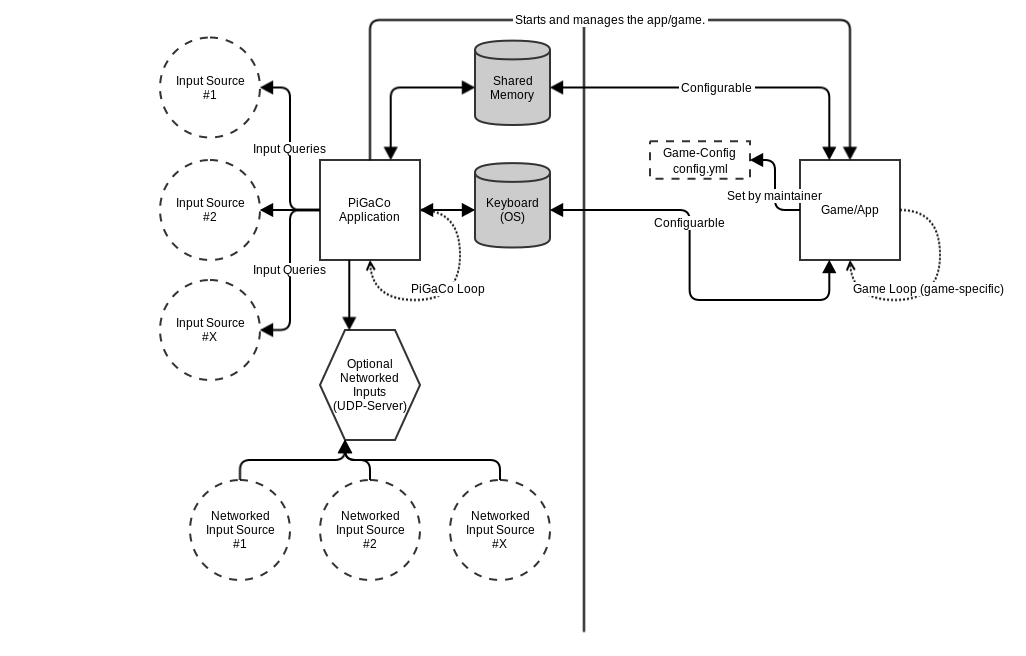
To get a better understanding of how the system is built, look at the following image. It illustrates how the parts work together in a better structure than I can express in the text. (taken from the architecture documentation page)

piga_architecture.png

Libpiga


The library handles communication between games/applications and the host program pigaco. This works using shared memory (boost interprocess), the event system of the host computer (keyboard simulation), and the network (over enet; to communicate with external input sources).

The library is built with C++ and should be usable from any C++-compatible engine. If the engine is not compatible with the language, or the developers do not want to modify their product to fit into the pigaco system, the arcade machine maintainer can specify keyboard-mappings (and soon mouse-mappings too) to be mapped to the game inputs sent from the shared library. This can be accomplished with configuration files in the Yaml format in the game's directory, which are looking similar to the one from BomberPi.

The documentation of the library is not yet finished, the most complete one can be found with the BomberPi game. Also, the class which is used to integrate a game directly over shared memory with pigaco is piga::Interface, which is already documented a bit.

Pigaco


Pigaco manages games, shows a game chooser dialog, runs games, receives inputs from its input hosts and processes possible packets coming from the network. To save ressources, it shuts down its own rendering when a game is running and resumes it afterwards. The GUI is selfmade to fit to the multi-user approach of the input system, which requirements are not really met by other UI-frameworks. The program uses SDL2 for the graphics and is not very pretty yet, but it already works well and the moving background is better than nothing.

If you want to see a screenshot of how it looks, you can look at the following picture. If you don't care about the looks and also think that they will get better once the backend is working fine, just ignore the graphical horror contained within it.

pigaco-mainwindowshot13q81.png

Most of the managing stuff is done in piga::Host, but the documentation for this class still has a long way to go before becoming anything useful.

Input Hosts and Networked Clients


Input hosts are shared libraries with a common interface (a few functions defined in the host header file), which are loaded by pigaco. It then loops through each loaded host and checks for new inputs for every player, which will then be sent to the running game/application.

Networked clients on the other side are controlling the console over the network from a remote location. Maintainers of arcade machines can specify if a console can be accessed by this network protocol and with what password. They can also state that they want to make networked inputs without passwords possible, so that players can play games with more people in one single game using their smartphones as inputs for the console.

The smartphone app and the manager application are not implemented yet (sadly), but networked inputs are working perfectly well already. The networked client is the best example of a working implementation for this.

Motivation and Future Goals


My motivation to start this project is explained easily: I always wanted to build games and tools which can be enjoyed by other people. I alredy created smaller projects which were liked by my friends and collegues and the next step for me was to create something bigger. The piga library can be used by everyone who has fun in experimenting with new projects and the console which I'm building by myself currently will surely be fun for my friends and me too. With the upcoming port of my old game SFML-Sidescroller, more piga-compatible games will follow too.

In the near future, I like to finish building my own arcade machine and to improve the documentation of piga. Also, the manager application consolemgr should be ready in the next few weeks, so I can control the console from my laptop or phone and develop games on my machine in a better way. Once the whole system works a little bit better, I would like to post a video on YouTube about the console and some footage of people playing games on the machine.

A far fetched goal will be its own networked service with gamer authentication and multiplayer gameplay over the network (this project would then be called Pine - like the tree, but as abbreviation of Pigaco Network), but this sounds way too ambitious to be archieved someday. It's just good to always have something even greater and harder to accomplish, so that I can work towards it and learn new things along the way. Do not count on that feature, this is just a goal way down on the roadmap.

Along the way I want to write some articles about the development of the libraries and about the methods used to write the backend for the console here on gamedev.net. I found some articles here before, but now I feel like I can share my findings here too, instead of just silently pushing my work onto github and do not tell anybody else from the outside world. I hope somebody will find some useful information in these articles or even become interested in the project and want to collaborate or make arcade games!

Tips for Designing and Developing Free-to-Play Games

$
0
0
Free-to-play games, or F2Ps, are one of the types of video games that is currently generating the most business. They’re games that are offered free at first to an ever larger audience. These games monetize primarily via advertising, the purchase of virtual goods or powerups within the game itself, or with a combination of both.

The way to conceive and plan the design of a free-to-play game is quite different than for other game models, like pay-to-play (or P2P) games for example, which are bought and downloaded with all their content and functionalities already activated. In the case of the F2P games, it’s very important to hook the player from the first instant, since the monetization of the game largely depends on how capable we are of making a game attractive enough so that the player will want to repeat the experience many times.

Tips


At WiMi5, we’d like to offer the following tips on how to make your HTML5 games attractive so you can monetize them.

Make short game loops

One of the most important parts of a game is the game loop. Basically, this means that all the important game stuff should happen inside that loop. Most of the time, it’s everything that is the game itself, excluding other parts of the game, such as menus, optional screens, etc. When we recommend short loops, we mean that you should try to keep each match short, especially at the beginning of the game. This allows the player to quickly see what the game is about, and what types of challenges and rewards they can get. A great example of a short game loop, in this case a super-short loop, is the extremely well-known Flappy Bird.


promotional_image_1400x560-1024x410.jpg


Make the game fun

It seems pretty basic, doesn’t it? But sometimes you can forget that the game should be about having fun. Each player has their own way of having a good time; for example, some people like to be scared to have good time. For others, having a good time means solving complex mental puzzles. However, in casual games, you usually tend to make the game fun as a formula to make the player have a good time. This fun is in itself a kind of reward so that the player feels more attracted to the game. For example, Matt Coombe differentiates between several types of fun that we can find in a game like this. So, jumping to catch coins could be fun, but so is finishing a game level, or scoring more points than your friends.


screenshot4_1280x720-1024x576.jpg


Make the game never end

Many games are organized by levels, so that the player keeps going up levels that tend to get more complex or that demand the player already have acquired certain skills. There is always the possibility of adding more levels as the players start finishing them off. On occasion, the players may get different scores (normally stars) in the levels depending on whether they played well or poorly. This encourages the player to repeat levels to get better scores. The more time someone is playing your game, the more possibilities there are of your game generating income. Does anyone know how Clash of Clans or Candy Crush end?


Design your game for both the players who want to pay and the players who don’t

The players who don’t pay are just as important as those who do. They provide many things, and are essential for creating a community where both types of players can exist. What’s more, they’ll talk about your game, participate in the rankings, and make up the largest part of your game’s player community. Therefore, your game should be attractive both to those players who will never spend a cent and to those who pay €100 a month.


portada_1024x576-1024x576.png


Make games for everybody

Try to make your game for all audiences. Look for simple mechanics that are apt for less experienced players but which also hook the more demanding players at the same time. Your game should be able to be played by very different audiences who have different gaming experiences. In this respect, it’s very important to carefully choose your platform; try to use as many as possible. Thanks to HTML5, this is possible, since it allows your game to be on several platforms, such as mobiles, tablets, PCs, laptops, consoles, or even smartTVs.


Make great graphics

And if you don’t know how to, and neither does anyone on your team, collaborate with a professional or subcontract an experienced illustrator. Graphics in casual games are everything. They are essential to get people to fall in love at first sight. They make up the first hook that will draw in players and show them the game’s basic concept directly and immediately. A simple and intuitive design that is accessible to anyone eliminates any entry barriers there might be to playing, such as not knowing how to play, for instance. A tricky design or an interface that isn’t clear and which doesn’t instantaneously clarify the game’s mechanics adds barriers instead of eliminating them.

Conclusion


These are some of our recommendations, but there are many great tips on the Internet. Here are some interesting links:

An analysis of game loops
An infograph about the science behind addictive video games (like Candy Crush)
An analysis of the fun we can find in a game
On the psychology behind addictive video games and this
Tips for creating casual games

Automated Deployment of Your Game

$
0
0

Introduction


Most of the time, when creating a game as a hobby or in an indie setting, creating the installer and making it available on your website is a last minute decision or an afterthought, once the game is finished and ready for release. It is normal to bundle the game and its assets within a simple zip file, or worse, a "WinRAR" file, requiring the player to possibly install extra third party software to even start to play your game.

Generally, this is acceptable during initial testing, but as the game becomes more popular, or you just want to appeal to a wider audience, wrapping your game in a friendly installer can make the difference between a download or a drive-by visitor.

In this short article we will go into the detail of how to package your game into an installer, correctly sign your game's code, and get it to your website in an automated fashion. I will be using the windows tool "Inno Setup" as it is very user-friendly, completely free to use, simple to set up and can be run from the command line very effectively. There are many other programs out there, some free and some paid, such as NSIS (Nullsoft install system), and WISE Installation Studio. Each of these also has their individual advantages and disadvantages.

I will also be using some free open source tools such as "SCP", and the free Windows 8 SDK tools such as "SignTool".

Advantages of automating your releases

  • It's faster - you just run a batch file, walk away and have some coffee.
  • There's less margain for error - If it's right the first time, chances are it'll always be right
  • It allows you to put out releases more often - If you can do it faster, there's no reason to put off a release until you're not busy, you can leave your PC doing it whilst you continue to code.
  • It presents a more professional appearance to your game - Games which are nicely packaged, digitally signed and available quickly are always a plus.

When might I NOT automate my release in this way?


This guide assumes you are self-hosting your game on your own website, with your own resources. If you are hosting your game through steam, desura, or other such service, or if it is not a windows game, many of these steps will likely not apply. For the purposes of this article I will assume that you are self-hosting your own windows game on your own website and not via any form of third party distributor, who might perform a lot of these steps for you.

Prerequisites


Download the required programs


Firstly, you need to download and install the required install file building tools to your hard disk. To do this visit the inno setup download page, then download and install the isetup-5.5.5.exe (or later) package.

Once this is done, you will have the various utilities avaialble for bundling your game into an installer. For this article's example scripts, I will assume you have installed it to its default location, "C:\program Files (x86)\Inno Setup 5". If you are not using this location, please adjust my example paths accordingly for your own needs.

The install script


Inno setup functions much like most install packages in that you must write a simple script to tell its compiler what files belong where within your game. It will then use this to compress the content into a self extracting executable file.

The simple script below will work well for any simple games which do not have external dependencies. This example is taken from my game, please feel free to re-use and adapt it as you wish.

As you can see below, most of the configuration is made up of a set of #define macros at the top of the file which indicate the BuildDir (where to write the completed installer exe which you will upload to your website), the MyAppName to specify the name of the game, and various other meta-data.

Within this is an AppId value which is a GUID (globally unique identifier) which must be unique to every application, game or otherwise, installed within windows. The one I provide here is simply a humorous but valid example - you should change it using a GUID generator to be one unique to each new program you release.

Something else important to note here is the MinVersion directive. Here, I have set this to "0,6.0.6000" which means my program will only install on Windows Vista or later. This may or may not be something you require, and if you do not require it you should comment the line out or remove it.

#define BuildDir "."
#define MyAppName "Firework Factory"
#define MyAppVersion "1.0.1"
#define MyAppPublisher "Brainbox.cc"
#define MyAppURL "http://brainbox.cc/fireworkfactory"
#define MyAppExeName "dx11fireworks.exe"

[Setup]
AppId={{C0CAC01A-DEAD-BEEF-CAFE-E0B1ABEEFC0B}
AppName={#MyAppName}
AppVersion={#MyAppVersion}
AppPublisher={#MyAppPublisher}
AppPublisherURL={#MyAppURL}
AppSupportURL={#MyAppURL}
AppUpdatesURL={#MyAppURL}
DefaultDirName={pf}\{#MyAppName}
DefaultGroupName={#MyAppName}
AllowNoIcons=true
OutputBaseFilename=fwf-earlyaccess
Compression=lzma/ultra64
SolidCompression=true
OutputDir={#BuildDir}
InternalCompressLevel=ultra64
SourceDir=..\Release
MinVersion=0,6.0.6000

[Languages]
Name: english; MessagesFile: compiler:Default.isl

[Tasks]
Name: desktopicon; Description: {cm:CreateDesktopIcon}; GroupDescription: {cm:AdditionalIcons}; Flags: unchecked

[Files]
Source: {#BuildDir}\dx11fireworks.exe; DestDir: {app}; Flags: ignoreversion
Source: {#BuildDir}\fmod.dll; DestDir: {app}; Flags: ignoreversion
Source: {#BuildDir}\Gamedata.fwf; DestDir: {app}; Flags: ignoreversion
; NOTE: Don't use "Flags: ignoreversion" on any shared system files

[Icons]
Name: {group}\{#MyAppName}; Filename: {app}\{#MyAppExeName}
Name: {group}\{cm:ProgramOnTheWeb,{#MyAppName}}; Filename: {#MyAppURL}
Name: {group}\{cm:UninstallProgram,{#MyAppName}}; Filename: {uninstallexe}
Name: {commondesktop}\{#MyAppName}; Filename: {app}\{#MyAppExeName}; Tasks: desktopicon

[Run]
Filename: {app}\{#MyAppExeName}; Description: {cm:LaunchProgram,{#MyAppName}}; Flags: nowait postinstall skipifsilent

Another important value within this file is the SourceDir value which represents a relative path to where to find the files from which to build the installer. In my instance, I package just three files, as shown within the [Files] section of the configuration file:

{#BuildDir}\dx11fireworks.exe
{#BuildDir}\fmod.dll
{#BuildDir}\Gamedata.fwf


There are many optional flags you can include here to package entire directories, check versions on DLLs etc. If you require these values, they are thoroughly documented within the help file for Inno Setup, or in the help website for the program.

Automating the creation of the installer


Once you have written this script, you can easily create a batch file which can then be used within your deployment process to create the installer:

@echo off
@echo Building installer...
"C:\Program Files (x86)\Inno Setup 5\iscc.exe" fireworkfactory.iss

When run, the batch file with this inside will automatically create the executable file you configured, so it is ready to upload to your website.

Further steps you can take


Once you have generated an installer, you can automatically deploy it to your website. This can be done securely with SCP, SFTP, or insecurely with FTP, or by any other means that you wish to automate. Here is an example of what you can put in your batch file to automatically upload the files via SCP:

@echo Uploading installer...
scp -i J:/private.key ../Release/fwf-earlyaccess.exe webuser@www.mysite.com:/home/webuser/mysite.com/downloads/

There are some important gotchas to note here; Firstly, please be aware that this is only as secure as how and where you store your private key file. The private key file can't be password protected unless you either (A) want to enter it every time you run your deployment process, meaning it can't be fully automated, or (B) you want to use some other facility like PuTTY Pageant, which is advisable, but outside of the scope of this tutorial.

Personally, to secure my private key I store it on a USB flash drive which I only insert into the machine when I want to deploy my game to my website. This way, anybody obtaining access to my machine, source repositories, or anywhere else, has no physical access to the private key and so can do nothing. If you take this approach, remember to remove the USB key once you are done!

The subject of private keys and encryption leads me now conveniently on to the last and final thing you can do to your installer to help you get players...

Extra Polish: Signing your installer


As part of the process, before you upload your file to your web server, you might want to cryptographically sign and timestamp your game's installer to add security and reputation to your installer.

This is a rather advanced subject, and it comes at a financial cost, and takes time as you will have to apply to a certificate authority and submit some forms of personal photo ID (or in the case of a business, forms of business identification) and pay some money up front to obtain a code signing certificate.

In my mind this is more than worth it though, as the price of this has come down drastically over the past few years and the advantage to you as a developer is massive.

Many antivirus products, malware filters, and other programs such as smartscreen filter give a weighted advantage to signed executables, simply because if the application is signed, the reputation and popularity of the executable is determined against the signer's reputation instead of on a per-executable basis, as it would have to be for unknown, unsiged code whose author could not be determined reliably.

For this reason I recommend it, if only to cut down on dealing with and responding to emails about false alarms from your player's antivirus apps, and accusations that your game is a virus, which can harm your reputation no matter how baseless.

Once you have your certificate, you should import it into your registry, marking it as 'not exportable'. You should use the PFX file your certificate authority have provided to you, or you can make such a file from your .crt and .key file using openssl if your certificate authority provided this form of file instead.

You can then add this to your batch file, before the portion which uploads it to your website:

@echo Signing installer...
"C:\Program Files (x86)\Windows Kits\8.0\bin\x64\signtool.exe" sign /d "Firework Factory" /tr http://www.startssl.com/timestamp /a ..\Release\fwf-earlyaccess.exe

Note that this code snippet is very simple. We are telling windows to use the signtool.exe binary which comes with the windows 8 development kit. There will likely be several copies of this executable on your disk and any one of them will do fine for this task.

We specify the "friendly name" of our program using the /d parameter, as shown above, and the /tr parameter specifies a timestamp server. The timestamp server is important for making sure that the signature can still be validated correctly even after it has expired, and you should use the timestamp server provided by your certificate authority within this command.

Specifying the /a parameter to the signtool command simply tells it to use the first valid code signing certificate held within your registry to sign the file.

I store my code signing certificate here as it is generally a secure place to put it, where you don't risk accidentally putting it into your code repository or into your network drives, encrypted or decrypted.

Conclusion


Hopefully, this article will have demonstrated how you can automate your deployment process, and make it more secure at the same time. When you have done this once, you can re-use the scripts you have created from game to game, and will likely need to do much less work each time to fully deploy your games to your website on demand. This should cut down creating a new installer from possibly hours in some complex cases, to mere minutes, and most of that should be waiting for uploads to complete and files to compress.

Article Update Log


2 Apr 2015: Initial release

Crowdin: Localizing Without Pain

$
0
0
Pain-free localization is the dream of everyone who develops software for foreign markets. Interfaces with dense thickets of terms, rendered in many languages, make this dream even stronger. Perhaps it is strongest of all among developers, agile or otherwise, who constantly release updates and with the same regularity must translate… translate… and translate an unending stream of strings.

6cc1c0ca99dbd447fd8931ee0a28cc33cfecf243

These are just a few of the challenges that we at Alconost conquer every day thanks to a tool that makes the localization process almost magic. In medicine, they would call it a panacea. As localizers though, we know it by the name of Crowdin. The Crowdin crowd platform has enabled us to localize apps, sites, and games into 40+ languages for dozens of clients – all at the same time.

Here are the six biggest localization difficulties that Crowdin solves:

1. So. Many. Formats. The variety of file formats to localize is simply astounding: .xml, .strings, .resx, .properties, .po, .yml, .json, .ini, .xliff, .csv, .xlsx and many, many more. As soon as you load a file into Crowdin, it is converted and shown to translators with text only – no code or technical information. This is a big deal, since translators can otherwise get confused or accidentally introduce errors into the functional aspects of your software (imagine the damage that can be caused by a simple encoding error or extra “>”).


af056670c52a4b439c1d260676aa964a.JPG
The variety of file formats in one project


2. Bottlenecks and delays translating into dozens of languages. So you need to translate your product and all of the marketing materials into 20 languages. Remember how difficult it can be just to get the original text correct in English (or whatever your source language may be). Now multiply these difficulties by 20!

With Crowdin, the translation process is transparent and understandable. You are always in control and can monitor how each string is translated into each of the target languages.

For maximum speed you can set up an API-based workflow: Crowdin monitors a particular file on GitHub for updates. When the file is updated, CrowdIn grabs it and your translators and proofreaders are automatically notified. After their work is complete, Crowdin gathers all the strings and returns the updated resource file to your repository.

3. “Show and tell”. Seeing is a hundred times more effective than hearing. So sometimes it would be nice to attach 100-500 screenshots to explain the context to translators. And add a few hundred comments, for good measure, while marking off all the strings that should never ever ever be changed.

Crowdin can do all this! Include as many screenshots as you like. They are available to the entire team of translators and editors, so you don’t have to send copies to everyone individually (yay!). The same goes for comments. Another example: a translator asks a question, you receive a notification, and you provide an answer. And – here’s the awesome part – the entire team sees the answer too, even the translators working with the other languages (as you probably know, most questions are about the source text). Everyone’s time is saved: translators do not have to spend time re-asking their colleagues’ questions and you do not have to repeat yourself.


668cdca9ce71449d9ff74cb1ac15c761.JPG


4. Your product is constantly changing. You are making your product better and better, which means that you are constantly adding new strings. All of these strings need to be commented and translated into 20 languages. Whether you are adding one new string or one hundred, the fact is that when you are translating into many languages, things will always be more complicated than you expect.

At the end of the day, continuous localization is a service, not a problem. At Alconost, we first get budget approval from the client and ask them to upload new strings directly to Crowdin. Then, as soon as the next update comes in, we are immediately notified and start localizing.

5. Centralized translation memory and glossaries. Both these features simplify handling of terminology. Otherwise, you end up needing to explain to each translator that “waterfall approach” isn’t actually referring to a national park trail.

This is even more important for localizations that have been dormant – say, the translator has not worked on the project for three months and is starting to forget project-specific terms. With translation memory and glossaries in Crowdin, it is easy to get up to speed. When bringing a new translator on board, terminology references are invaluable as well.


e04563bcba4943f784c2d1e56a4de312.JPG
Glossary


6. Keeping resource files intact! One part of the dream of pain-free localization is that translators are working only with the text, instead of trying to writing code at the same time. Then the text together with code is converted, via magical dream wand, to its original form.

In Crowdin, you can be sure that nothing will happen to your code. You do not need to leave unwieldy comments or export/copy. Simply upload your files and select the strings to localize. As an Alconost client, you do not even need to spend your time on this – our managers are happy to do this for you.


432e7e5a49f247c38d80414f8b41ae02.JPG
.xml file in Crowdin


So we think that this platform is an all-around win: for developers, for translators, for localization managers, and for editors. And if our experience can save even one developer from localization pains, our article will not have been in vain!

Shader Cross Compilation and Savvy - The Smart Shader Cross Compiler

$
0
0

Introduction


Many computer scientists suggest that the modern use of shaders originated from the RenderMan Interface Specification, Version 3.0, originally published in May, 1988. In the present, shaders have proven their flexibility and usefulness when writing graphics intensive applications such as games and simulations. As the capabilities of Graphics Processing Units (GPUs) keep increasing, so do the number of shader types and shader languages.

While there are many shader languages available to the modern programmer, the most prominent and used ones are the High Level Shading Language for the DirectX graphics API and the OpenGL Shading Language for the OpenGL API.

The Problem


Every modern rendering or game engine supports both APIs in order to provide their users with maximum portability and flexibility. What does this mean to us programmers? It means we either write every single shader program twice or find a way to convert from one language to the other. This is easier said than done. The functionality between HLSL and GLSL doesn't differ that much, however the actual implementation of even the simplest diffuse program is completely different in both languages.

Every developer who has ever done cross platform development has ran into the same problem. Of course the problem has already been partially solved in many different ways, however all of the available tools seem to lack two-way conversion, are completely outdated or completely proprietary.

A Solution


Because of the lack of a general-purpose solution, I thought it would be great to create a flexible free tool, which deals with at least Vertex and Fragment/Pixel shader conversion between modern GLSL 4.5 and HLSL 5.0. That's how the idea for Savvy - The Smart Shader Cross Compiler came to be. The initial idea was to create the tool with support for just the above mentioned languages, however the final implementation can easily be extended to support conversion from and to any language. What this enables is the fact that Savvy is entirely written in C++ and utilizes template classes as well as the latest C++11 advancements.

The solution chosen is far from being the best for the presented problem, however it is a solution, which is worth serious consideration.

Approach


The approach I decided to use is pure text-based parsing and conversion. The way the system works is really simple, but very powerful. The input shader is first ran through a lexical scanner (generated by the great Flex tool), which matches predefined sequences of characters and returns a specific token. Each returned token is then processed through a grammar parser (a simple flat state machine in this case), which determines whether the text is legitimate and should be saved. The saving is performed inside a database structure, which holds all processed information. That information is later used by a shader constructor class, which constructs the output shader.

External Dependencies


The goal of the whole project was to keep the external dependencies as low as possible. The only external software used was flex - the fast lexical analyzer, created by Vern Paxson. It is fast, reliable and great at matching extremely complex character combinations using regular expressions. I absolutely recommend it to anyone looking to do advanced file parsing and token matching. Initially I also wanted to use a third party grammar parser, however after a lot of thought on the subject I decided that syntax checking is not going to be part of the initial release, as the scope would just become overwhelming. This made me use a simple flat state machine which would handle all the grammar. So far so good, now let's see how all of it actually fits together. I'll try to keep things as abstract as possible, without delving too much in implementation details.

Architecture


The image below shows a very basic look of the architecture. The Shader Converter class is the main contact point between the user and the internal components of the tool. All conversion calls are made through it. It owns a list of Lexical Scanners, Grammar Parsers and Shader Constructors. All of them are pure virtual base classes, which are implemented once for each supported language. Each Grammar Parser owns a Database and each Shader Constructor owns a Shader Function Converter. The Shader Function Converter takes care of converting all intrinsic functions, which do not have direct equivalents in the output language. The Database also stores the output language equivalents of all built-in data types and intrinsic functions. This type of architecture makes sure that the tool is easily extendable if support for a new language is added.


YfATfEV.png


Interface and Functionality


The Shader Converter has functions for converting a shader from file to file, file to memory, memory to file and memory to memory. All the conversion functions follow the same pattern. Inside the function, all the input is first validated and then an input stream is opened from the path specified. After that, the Lexical Scanner for the appropriate input language is called until an End of File instruction is reached. Each call of the function GetNextToken returns the next token in the stream. The token corresponds to a predefined set of characters in a sequence. For example, the token SAVVY_DATA_TYPE is returned for every data type use. The returned token and its string are then used as an input to the Parser class' ParseToken function, which determines the state and saves the word to the database if needed. If the input and output shader languages specified are the same, the shader is simply copied over to the specified path without any alterations. Any included files are also parsed in the same fashion, by calling the parsing function recursively.

After the file has been parsed, the input steam is closed and an output stream is opened. Then the Constructor is called and everything saved in the database is output to the stream. The order of construction is:

1. Construct Defines
2. Construct Uniform(Constant) Buffers
3. Construct Samplers(Textures)
4. Construct Input Variables
5. Construct Output Variables
6. Construct Custom User Types(structs)
7. Construct Global Variables
8. Construct Functions


The Function Converter


I feel like I should spend some time explaining what the Function Converter class actually does. Its job is to make sure each intrinsic function of the input language is translated to the appropriate equivalent of the output language. Unfortunately, there are some functions which are absolutely impossible to translate as they refer to very specific graphics API calls. To give an example, consider the HLSL function D3DCOLORtoUBYTE4. The problem here becomes apparent, as there is no UBYTE4 data type in GLSL. Upon reaching a function which cannot be converted to the specified output language, an exception will be thrown (or an error code will be returned if the preprocessor directive SAVVY_NO_EXCEPTIONS is defined) by the tool and conversion will stop.

There are, however, some functions which can be translated, despite the fact that they do not have direct alternatives in other languages. One such function is the arc hyperbolic cosine function in GLSL - acosh (well, technically all hyperbolic functions apply here, as none of them are supported in HLSL). The function itself, given an input value x can easily be defined as the following equation:

log(x + sqrt(x * x - 1));

When functions of this type are encountered, they are substituted by their inline version.

The final type of function conversions which the Function Converter handles are those which do have alternatives, but for some reason the output language implementation takes a different amount of arguments or the argument order is swapped. An example of a function which has the exact same functionality, but is implemented differently in both languages is the arc tangent function – atan. In GLSL, the function has two possible blueprints. One takes one argument (the y over x value) and the other takes the two inputs, x and y, separately. This is a problem, as the HLSL equivalent does not have an overloaded blueprint for two arguments. Instead, it uses a separate function – atan2. To account for this difference the function converter determines the number of arguments a function call has and according to that, outputs the correct type of function call. If the input shader language has a function which takes one argument less than its output language equivalent, a dummy value will be declared on the line above the call and the last argument will be filled by it, in order to preserve the functionality.

An Odd Case


To add one more function example to the last type – the fmod function in HLSL and its "supposed" GLSL equivalent – mod. At first glance everything looks great and both versions of the shader should produce the same results, right? Wrong! The internal equations used by those functions are not the same. The GLSL one, according to the official documentation is:

x - y * floor(x/y)

While the HLSL one is:

x = i * y + f

Both implementations produce the same results if dealing with positive numbers as inputs, however, the moment the input becomes negative, the HLSL version fails to produce the expected results. It also seems like other cross compilers prefer the former direct approach of converting mod to fmod and vice versa, as it is faster when executing the shader. I decided to choose the mathematically correct equation and whenever these functions are encountered in the input shader, the proper inline equation will be constructed in the output shader.

Conversion from File to File


Here is what the declaration of the file to file conversion function looks like:

/*
Converts a shader file from a file to another file.
*/
ResultCode ConvertShaderFromFileToFile(FileConvertOptions& a_Options);

As you can see, the function takes a structure of type FileConvertOptions, which contains all the needed data for the conversion. For example - shader input path, shader output path, entry points and shader type. Here is a sample usage of the file to file conversion:

Savvy::ShaderConverter* converter = new Savvy::ShaderConverter();
Savvy::ResultCode res;
Savvy::FileConvertOptions options;
options.InputPath = L"PathToMyInputFragShader.glsl";
options.OutputPath = L"PathToMyOutputFragShader.hlsl";
options.InputLang = Savvy::GLSL_4_5;
options.OutputLang = Savvy::HLSL_5_0;
options.ShaderType = Savvy::FRAGMENT_SHADER;

res = converter->ConvertShaderFromFileToFile(options);

Conversion from Memory


Another great feature which wasn't initially planned but was implemented at a later stage is conversion of shaders from memory to memory, memory to file and file to memory. In order to make things easier for the user, the Blob class was created, which is very similar to the DirectX 11 one and is just a container for raw data. Its interface is very simple, but effective for the user as it serves for sending raw character strings to the converter and also retrieving the converted ones after the conversion has been done.

The internal conversion is done by constructing a string stream from the Blob and having the scanners and parsers operate on that. A simple example of how one can use the Blob to Blob conversion is the following:

Savvy::ShaderConverter* converter = new Savvy::ShaderConverter();
Savvy::ResultCode res;

// Load file in memory
std::ifstream is("SomeFile.something");
if (!is.is_open())
{
    std::cout << "Error reading file" << std::endl;
}
std::string fileStr(static_cast<std::stringstream const&>(std::stringstream() << is.rdbuf()).str());
is.close();
 
// Create a blob with the loaded file in memory
Savvy::Blob inputBlob(&fileStr[0], fileStr.size());
Savvy::Blob outputBlob;
Savvy::BlobConvertOptions options;
options.InputBlob = &inputBlob;
options.OutputBlob = &outputBlob;
options.InputType = Savvy::HLSL_5_0;
options.OutputType = Savvy::GLSL_4_5;
 
res = converter->ConvertShaderFromBlobToBlob(options);
 
// Output the converted blob to file to verify its integrity
std::ofstream str("BlobToBlobTest.txt");
std::string mystring(options.OutputBlob->GetRawDataPtr(), options.OutputBlob->GetDataSize());
str << mystring;
str.close();

Extending the Tool


While the current implementation only supports conversion of Vertex and Fragment programs between modern GLSL and HLSL shading languages, it is very easy to extend the tool and add support for custom languages and shader types. The supported languages are separated into supported output languages and supported input languages. If the user wishes to extend the tool to support an extra output language, they need to create their own Constructor class by inheriting from the base class. After they have done that, the only thing needed is to call the following function supplying an ID and a default extension for the new output language.

/*
Registers a new custom shader language for output purposes only.
If the ID of this shader type is used as an input, the conversion will fail.
*/
template<typename ConstructorClass>
ResultCode RegisterCustomOutputShaderLang(uint32 a_ID, const wchar* a_DefaultExtension);

In order to add support for a new input language, the user needs to supply custom Lexical Scanner and Parser classes and also register them using the following function:

/*
Registers a new custom shader language for input purposes only.
If the ID of this shader type is used as an output, the conversion will fail.
*/
template<typename ScannerClass, typename ParserClass>
ResultCode RegisterCustomInputShaderLang(uint32 a_ID);

Note that a default extension here is not needed as a shader from this language will never be constructed. Likewise, support for a new shader type (geometry, compute) can also be added.

Current Limitations


Of course no software is without its flaws. Savvy is far from perfect. In this section I'll go in a bit more detail about the current shortcomings of the tool and the chosen approach in general.

Texture Samplers


The thing with GLSL is that the Texture Sampler and Texture objects are joined together in one, while in HLSL you have to explicitly declare a Sampler Object together with the Texture Object. When manually writing a shader you can use one Sampler to sample multiple Textures, however when programatically converting a GLSL shader to an HLSL one, there is no way of knowing how many samplers we might need, as OpenGL keeps Sampler Objects on the C++ side. A lot of people don't even use Samplers in OpenGL yet, as they are quite a new extension there. In order to make sure every texture is going to be properly sampled in HLSL, every declaration inside a GLSL shader produces both a Texture Object and a Sampler Object, which is named: NameofTextureObject + Sampler. For example: DiffuseTextureSampler. This is less than ideal, as we are consuming more Sampler Registers than we need, but unfortunately there is no other way at this point in time, using purely text-based conversion.

The Preprocessor


Another thing which is not 100% foolproof is the preprocessor conversion. Unfortunately there is no way of knowing which variables on global scope will be inside a specific preprocessor block. Because the tool stores everything in a database, there is no way for it to check if a specified variable is active or inactive in the current global scope. There is also no way of guaranteeing how many variables are inside a preprocessor block and of what type they are (inputs, outputs or uniforms/constant buffers). In order to avoid the issues which come with many branching preprocessor directives, I have decided not to support any conditional compilation outside of functions (Global Scope). Defines are still supported and will always be the first thing constructed. Conditional compilation is also supported inside functions without any constraints. This is possible due to the fact that every function is translated line by line and is guaranteed to keep its consistency across multiple languages.

Syntax Checking


Another big constraint of the tool is that it does not support any syntax checking, so if the user feeds it a shader which does not compile as an input, the output shader will not compile either. There are some internal checks in place, to make sure the tool isn't processing complete garbage, but they are far from being a reliable syntax verifier. In truth, syntax checking is possible to implement and might even be considered in the future, but for now it stays in the unsupported category.

Future Development


The current officially supported languages are GLSL 4.5 and HLSL 5.0. I have done some testing with GLSL shaders as far back as version 3.3 and they seem to work nicely, however take my words with a pinch of salt. The officially supported shader types are Fragment/Pixel and Vertex. Savvy is currently in Beta stage and after some proper testing and code documentation will be released, together with the source in the public domain. That way anyone who is interested in the project can contribute or use it as a base to make something else. There are many features planned for the tool, the biggest one of which is to add support for the upcoming intermediate shader language SPIR-V, which was announced at the Game Developer Conference 2015. Adding support for extra shader types like geometry and compute is also something planned for the future. Implementing a legacy GLSL profile is not out of the question either, if there is interest for it.

Conclusion


I must say, developing this tool was a very interesting journey. A lot of hours were put in it and a lot of valuable lessons were learned. I decided to write this article as there aren't many articles dedicated to this particular problem out there. I hope it was useful to anyone interested in shader cross-compilation and cross-platform graphics development in general. Its aim was to explain the solution I chose to overcome the problem of shader cross-compilation and also highlight some positive/negative points about the approach. If I missed anything or you have extra questions, ideas or feedback, please do share them. I love hearing other people's opinions and I'm always open to constructive criticism.

Useful Links


Article Update Log


19 April 2015: Initial version of the article released.

Call Unity3D Methods from Java Plugins using Reflection

$
0
0

Unity is a great game engine to develop mobile games. It brings a lot of functionality with easy to use tools. But as you go deeper in creating Android games with Unity there comes a time when you have to extend Unity by your own Android Java plugins. Unity's documentation is decent enough to get started. Sometimes in your Java code You need to call a Unity method. Unity has a way to do it through UnitySendMessage which is available when you extend UnityPlayerActivity (Or UnityPlayerNativeActivity). But I didn't want to extend UnityPlayerActivity, instead I wanted to write plugins for different jobs and make them useful in other projects too. I wanted to have several plugins for different jobs and seperated from each other so extending UnityPlayerActivity was not a good choice. By the way, you may have 3rd-party plugins that already extend UnityPlayerActivity. In this article you will learn how to do it in this way (not extending UnityPlayerActivity)


NOTE: I suppose you know already how to create a Java plugin for unity. If you don't please see Unity's Documentation.

Unity Part


In Unity you have to prepare a GameObject with a name. In this article I use the default GameObject that you have when you create a new scene in Unity, Main Camera. Rename "Main Camera" to "MainCamera" (We will use this name in Java to call a Unity Method in the future). Then write a script that contains a public method which receives a string as input and returns nothing (void) This is the method that's going to be called. Its name is also important because it is also used in Java code. maybe some method like this:
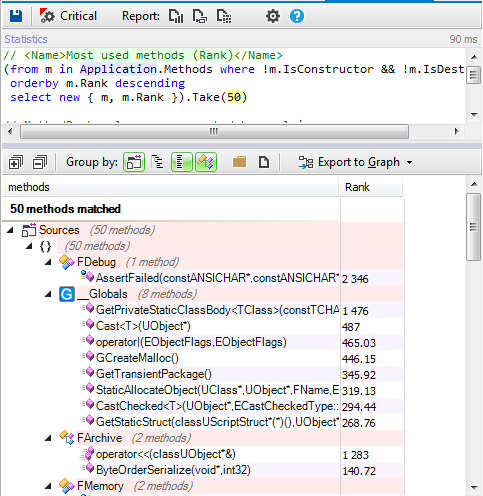
public void OnJavaCall(string message)
{
    Debug.Log(message);
}

I kept it as simple as possible, the method just logs the message. Attach the script that you just wrote to the MainCamera.

The Java Part


In your Java code you can now call the method (OnJavaCall in this example). You have to write out code similar to what's shown below:

public static void CallUnityFunc(Activity activity)
	{
		Log.i(Tag, "Calling unity function");
		
		
		try 
		{
			
			Field UnityPlayer = activity.getClass().getDeclaredField("mUnityPlayer");
			
			UnityPlayer.setAccessible(true);
			
			Method method = UnityPlayer.getType().getDeclaredMethod("UnitySendMessage", String.class,String.class,String.class);
            
			method.setAccessible(true);
			method.invoke(activity, "MainCamera","OnJavaCall","Hello Unity , From Java");

			
		} 
		catch(Exception e)
		{
			Log.e(Tag,e.getClass().toString()+"  "+ e.getMessage());
		}
		
	}

I wrote a static method that takes an Activity as input. We will pass the Unity player to this Method in the future. In the method declaration as you can see I use reflection to call the UnitySendMessage. UnitySendMessage takes three parameters : The GameObject's name (MainCamera in this example), Method's name (OnJavaCall here), and The message that is going to be sent as an arguement to our method (OnJavaCall).

To test it now you have to compile your plugin (which is an Android library project) to generate a .jar file. After that you know of course you have to copy the .jar file to your Unity project.

Back to Unity


Then in Unity, call that static method (CallUnityFunc here) we wrote in Java to see how it works. for example:

AndroidJavaClass classPlayer = new AndroidJavaClass("com.unity3d.player.UnityPlayer");
AndroidJavaObject activity = classPlayer.GetStatic<AndroidJavaObject>("currentActivity");

AndroidJavaClass PluginClass = new AndroidJavaClass("com.helper.bazaarpayment.PluginClass");// put your own package and class name accordingly to your Java plugin

//so let's call it 
PluginClass.CallStatic("CallUnityFunc",activity);

Note that this code will not work untill you actually run it on an Android device. It's good to check for runtime platform through Application.platform.

Note that when you make this call to Java, The MainCamera (containing the script that has OnJavaCall) that we created must be present, otherwise there won't be any GameObject with name MainCamera that has a OnJavaCall method. You may want to use GameObject.DontDestroyOnLoad to ensure you have MainCamera in all places.
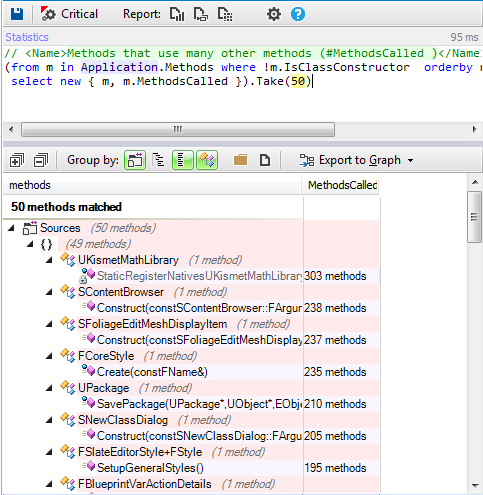
Compile and run to see how it works. You can use the adb interface located at platform-tools folder in your Android sdk folder. With command: adb logcat -s Unity you can see Unity logs.

With this approach you don't have to extend UnityPlayerActivity. You can have self-contained plugins for distinct tasks. You can also leave 3rd-party plugins that extend UnityPlayerActivity to work untouched.

Giving Away $17,000 Worth of Toto Temple Deluxe at Pax East

$
0
0
With Toto Temple Deluxe being almost ready for release (aiming for Summer 2015), we decided it was time for us to attend a real big event like PAX East. It was our very first PAX, with our very first 10' x 10' booth, for our very first console game release!

We thought it’d be a good idea to share our overall experience, especially since we experimented a bit with marketing, as you can see in the title.

Up North Indies


We had our very own booth at the convention, but we were part of a bigger (and brand new) group called Up North Indies. We’re essentially a group of multiple indie developers from Montreal/Quebec getting together to share knowledge, but also to get easier access to events like PAX. We’ve been learning and getting a lot of help from the other studios by being part of this group. We’re definitely lucky!

Attached Image: uni_featured.png
We made the logo for the group with some generous help from design superstar Cory Schmitz


We had a little bit of branding at the event to identify each booth as part of the UNI, but we couldn’t get anything big done in time (a huge hanging banner, for instance). We learned a lot from PAX, which was our first group event, so we’ll definitely have better presence at future events.

Attached Image: 13022_730321100416238_2326181110310472570_n.jpg
Photo by the Parabole crew, check out their game Kona!


Designing our first 10' x 10' booth


The event was in Boston, so about 5 hours drive south of Montreal. We managed to get there by car to save money, but the downside was that our car was pretty small and we couldn’t travel with a lot of equipment. We still managed to get two 7' tall TV stands, two 42” TVs and one 50” TV. Here’s how we did it.

Attached Image: ttd_empty_booth.png
Empty, but not for long!


First thing we took in consideration for the design of our booth is that we were on a corner (still lucky). We took advantage of that and tilted everything diagonally to face both sides simultaneously. We think it played a big role in the success of our booth.

We also wanted to have one main TV station for players, and some higher cloned TVs for spectators. Since a single Toto Temple Deluxe match doesn’t last very long, we didn’t bother with chairs and stuff. Everyone played while standing up and rotation was fast.

As this was our first big event with our first “big” booth, we had literally no equipment. We always managed to get by with borrowed stuff, but this time we had to invest in some new equipment.

Attached Image: tv_stands.png
The monsters.


We got ourselves some pretty tall TV stands from Displays2Go. They’re heavy as hell, but they can support really big TVs up to 7' in the air! Our booth also came with a table, so we had enough to support 3 TVs in total.

Speaking of TVs, we had no room in the car for 3 big TVs, so we simply decided to “rent” them at a nearby Best Buy in Boston. And by rent we mean buying them and taking them back after the event by saying it didn’t fit our needs after all. No questions asked, thanks Best Buy!

How we got noticed


To put things in perspective a bit, we originally designed our PAX demo so that matches would be really quick. That way, we’d have a better flow and more players would try the game. Since matches wouldn’t last long enough for the crowd to feel any major engagement, or for hype to build up, we needed a better way of getting spectators more engaged in the game as they were looking at it.

Attached Image: crowd.jpg
See that crowd? We sort of designed it.


Normally, only the 4 current players would be really engaged in the game. Maybe they were with a friend, and maybe that friend would get engaged and cheer a bit, but we felt like it wouldn’t be enough to build enough engagement / hype overall.

We then heard of a strategy that the guys from Vlambeer were doing at events for Nuclear Throne. They would have hourly challenges where everyone watching would get a free copy of the game if the current player managed to beat the game. That would normally encourage people to stay and look at the game. They would have something to win (or lose), so they should feel engaged.

Attached Image: pax_showdown_banner.png
Yellow warning signs: A pretty good way of getting people’s attention!


We thought it was really clever and it would totally fit our needs, but we decided to push the idea a bit further. Instead of asking players to come back every hour to have a chance of winning a free copy of the game, we decided that every – single – match would be an opportunity to win a copy of the game.

With that in mind, we needed something to link the giveaways to. Ideally, something that wouldn’t happen every match, but only once in a while so we don’t end up giving away 50,000 copies. That’s when we came up with the showdown system.

The Showdown system


If you’ve followed the development of Toto Temple Deluxe a bit, or simply played the game, you know there’s 2 main game modes. The Classic mode, where you fight for an egg-laying goat to make points, and the Bomb mode, where you fight for an explosive goat in order to kill your opponents with the blast.

Attached Image: tutorial_bomb.png
With the showdown system, pretty much all spectators got to see both modes.


Since we needed something to link the giveaways to, we figured we could use the bomb mode for that. Here’s how the system works:

The winner of each match (in Classic mode) would be automatically thrown in a 1 vs 1 bomb showdown against 1 bot (set at hard). If that player manages to kill the bot 2 times, everybody watching would get a free copy of the game. BAM.

It was also a good way of having players experience both modes and discover the game’s content without having to come back to play a match in the other mode.

Attached Image: ttd_goat_hat.png Attached Image: ttd_goat_hat.gif
The goat hat was necessary to participate in a showdown.


To make things more official / exciting / funny, we also crafted goat hats for the winner to wear during the showdown. It had the effect of making the crowd laugh, friends would take pictures (always good), and it made the people passing by wonder what it was.

We also needed people to know that they could win a free copy of the game simply by looking at it, so we designed 2 big signs explaining the rules and hung them over the cloned TVs (which you probably already saw in the pictures above).

Giving away 1,700 keys in 3 days


Every once in a while, a skilled player would win a match AND the following showdown. Here’s what it looked like:


As you can see, the showdown system managed to build hype and engagement from the crowd. It worked really well! Maybe a bit too well.

The amount of showdown victories were reasonable, so we planned them right, but what we didn’t expect what the amount of spectators watching the game!

What happened was that spectators would literally stay and watch until someone eventually won a showdown. The crowd would grow bigger and bigger over time, but it had the weird effect of clearing the whole booth as soon as we handed out the keys after showdown victory. It was funny how empty the booth was after each victory, but a brand new crowd would form really quickly as 4 news players stopped to try the game.

Attached Image: ttd_steamkeys_firstbatch.png
We were handing out printed Steam keys like these.


We started out with 900 keys, and thought it would be enough for the whole event. We were dead wrong.

We actually ran out of keys by the end of the second day, and Steam wouldn’t let us generate more during the weekend, so we had to find a temporary solution on next morning. Actually, Marion kicked us out of our beds really early so we’d have enough time to plan the new solution. Good thing she was there!

Our friend Alex from Tiny Build suggested we use a system similar to theirs. We simply had to generate a QR code that would point to a MailChimp newsletter, so that we can contact everyone later and send them their keys. Brilliant! The only detail we added was a unique string code to each paper, so that one QR code couldn’t be used by multiple people. We had to cross check them manually, which could be automated with a bit of PHP and a database.

Attached Image: ttd_steamkeys_qrcode2.png
The new keys! They are more flexible, so we might end up using that for our next event.


We managed to get 1,000 new keys printed at the on-site Fedex office in the morning, which was super helpful. By the end of the event, we handed out about 1,700 keys, of which about 500 have been redeemed at this date.

1,700 keys. Was it worth it?


It might look like a lot of keys at first, but they probably won’t get all redeemed in the end (fingers crossed for not too many resellers). We also saw a couple players win more than one Steam key. Because why not.

For the attention it got us during PAX, we definitely think it was worth it. We actually saw a lot of people stop by out of curiosity, in part because of the huge crowd, in part because they could get something for free. As they stood there and waited for something to happen, they usually tried to make sense of the gameplay. By the time they would reach the controllers as the crowd rotated, most of them already knew how to play.

In other words, those big “free keys” signs acted as some kind of salesman, stopping players and introducing them to our game. All of that without us having to say a single word!

Attached Image: lt7Pj2kkocvZu.gif Attached Image: t8IKNElbi8PyU.gif


**UPDATE from Reddit**

In terms of how many players saw the game or learned about its existence, it’s a bit hard to estimate. We had at least 4 new players every 7 minutes on average. Considering the game was available to the public for about 8 hours a day, we had around 70 matches / day. 70 matches x 4 players = 280 players / day, so 840 for 3 days. Let’s round it down to 800, so we get rid of players who played multiple times.

We had around 800 players for the whole event. Knowing that we gave away 1700 keys, and that a lot of people watched the game and never got a key, we could estimate that at least 50% of all spectators got a key. It would mean that around 3500 people learned about Toto Temple Deluxe’s existence at PAX.

That doesn’t include people winning a key just by watching and then talking about their experience to their friends. Now we can’t say for sure how much more people the promotion attracted, but we feel like it’s at least twice as much.

Tournament system (elite only)


On top of the showdown system, we also experimented with an “easy” tournament system. We say “easy” because we didn’t want to manage names, lists, finalists, whiteboards, time, etc.

The system we went with was a “ticket” system, where the winner of each match would not only be thrown into a showdown, but would also get a tournament ticket.

Attached Image: tournament_ticket.png
Pretty sure Charlie would have traded his golden ticket for one of these.


A tournament ticket would let you enter the one and only tournament we had each day at 5pm. First-come, first-served! We would then do 4 rounds of 4 players each, and then have the winner of each round play in the final match against all the other winners. So, technically, these 4 last players would be best players of the day. The big winner of the tournament would win a Juicy Beast t-shirt + would end up in the game as an unlockable cameo to replace the goat!

The system worked well, as we only had one tournament each day (no need to check the clock every hour or anything), plus since it was first-come first-served, we didn’t have to deal with name lists and whiteboards. It was a good system for quick and easy tournaments, but we doubt it’d work for anything bigger or more serious.

Expenses


Since it was our first big event, we had to invest in stuff we won’t need to buy twice, like TV stands and promotional banners. It ended up a little bit expensive for the small budget we had, but we’re still pretty happy with the results. Here’s a breakdown of the costs, for a total of about $8,000.

Attached Image: Screenshot-on-3.17.2015-at-9.25.46-AM.png


No, we won’t pay for that.


It’s important to note that, out of the $2,380 for the PAX related fees, there was one specific invoice that could have been avoided. We had a little issue with the company that handles pretty much all the logistics at PAX (Freeman).

Before ordering our TV stands, we called Freeman and explained that it was our very first PAX and that we had no idea how we could get the stands to our booth. We heard that we could have them shipped there, but we didn’t know what the process was, or what were the details.

The person we spoke with told us that we could simply have our equipment shipped at the convention center on a specific date, and they would take care of all the rest (get the stuff to our booth, etc). We were pretty surprised by how simple that was, and they confirmed that it was an included service for all exhibitors. We said “Really?”, they said “Yes”.

Attached Image: 60326895.jpg
We mentioned we had no idea how things work, so they must have told us everything we needed to know!


Well, that was easy! We simply ordered our TV stands online and had them shipped at the convention center. When we arrived at PAX, everything was neatly stacked at our booth. Awesome!

So on the last day of PAX, we receive a nice little invoice from Freeman, listing all the packages they had to carry to our booth. Since the TV stands weigh 175 lbs each, the invoice ramped up to about $900 USD… *spits coffee*

Attached Image: mctmyq9MZNfOw.gif
Wait. What?


The good news is that, after placing some complaints at their office twice, debating over the fact someone on the phone told us the service was included, and demonstrating that paying $900 for $1000 worth of equipment while we came by car from Montreal made no sense at all, we managed to get the invoice dropped to $380. It’s still a lot of money very badly spent, but it’s better than $900.

Next time, we won’t use any of Freeman’s services by default. Heck, even using small rolling carts to move our equipment out after the show was expensive.

What went wrong


Not much actually, but there was still a couple things we’ll do differently next time.
  • 1,000 flyers / buttons weren’t enough, we should have ordered 1,500.
  • We should have printed more free keys from the start (at least 2,000).
  • We had a lot of equipment to handle for just 3 people with a small car.
  • The goat hats were cheap but wouldn’t fit well on everybody. We should make better hats for the next event.
  • Big media appointments didn’t show up because of the snow / flights being canceled.
  • Freeman charging too much for handling the equipment (and lying to us on the phone).

What went right


Overall, pretty much everything went right. We found a couple of new things that we’ll probably try to repeat for next events though, like:
  • AirBnB was way cheaper than hotels.
  • We used a Karma to get really cheap wifi for the whole event.
  • Boston was close to Montreal, so it was possible to go by car and save a lot of money.
  • The 2 TV stands helped a lot and made it easier for everyone to clearly see the game.
  • Giving away keys attracted a LOT of people to our booth.
  • Using the QR code trick for the keys also got us a couple extra emails in our newsletter (over 500 for one day, but could have been more if we would have used it from the start).
  • The tournament system worked well, it was an easy solution for quick and simple tournaments.
  • Being positioned on a corner definitely helped, especially with the crowd we had.
  • Having only one playable station was definitely easier to manage with only 3 people.

So, was PAX East worth it?


Hell yes! We would totally do that again. We’ve never had such an engaged and fun crowd before. We totally connected with players and it felt great!

Hopefully you found something interesting in that super long post. If you have any questions, tips, suggestions or comments regarding our experience or the article, please share them in the comments below!

Attached Image: yowan_stamp.png


Note: This article was originally published on the Juicy Beast blog, and is republished here with kind permission of the author Yowan Langlais.

Dynamic vertex pulling with D3D11

$
0
0

Motivation


The motivation is very simple: regular hardware instancing is suddenly not enough for the current project. The reason for this is the amount of different trees, for which the simple arithmetic works:

  1. 9 base types of trees
  2. 3 growth stages for each tree (a branch, a small tree and a big tree)
  3. 3 health stages for each growth stage for each tree (healthy, sick and dying)
  4. 5 LODs for each health stage for each growth stage for each tree (including impostors)
  5. This creates a serious combinatorial explosion, which makes regular instancing a lot less effective.

Below I suggest a solution that allows one to bypass this problem and to render all these different trees with a single draw call, while having a unique mesh and unique constants per each object.

Main idea


D3D11 and GL4 support [RW]StructuredBuffer (D3D) and ARB_shader_storage_buffer_object (GL), which represent some GPU memory buffer with structured data. A shader can fetch the data from this buffer by an arbitrary index.

I suggest to use 2 global buffers to store vertices and indices and to fetch the data from there in a vertex shader using a vertex ID.

This way we can supply an offset to this buffer as a regular constant and start fetching vertices starting from this offset.

How do we implement this?

Logical and physical buffers


Let us introduce two terms: a physical buffer and a logical buffer.

A physical buffer is a GPU memory buffer which stores all indices and vertices of our geometry. Essentialy it is a sort of a "geometry atlas" - we pack all our mesh data there.

A logical buffer is a data structure that contains physical buffer offset and a data block size.

These two terms are easily illustrated with the following picture:


Attached Image: logicalandphysicalbuffer.png


In C++ this will look like this:

struct DXLogicalMeshBuffer final
{
    uint8_t* data             = nullptr;
    size_t   dataSize         = 0;
    size_t   dataFormatStride = 0;
    size_t   physicalAddress  = 0;
};

The struct fields are used for:
  • data : a pointer to the buffer data
  • dataSize : Buffer data size in bytes
  • dataFormatStride : One buffer element size
  • physicalAddress : Physical buffer offset, by which this buffer data is located. This field is set when physical buffer is updated (see below)
Upon logical buffer creation a physical buffer must know about the logical buffer to create a storage space for it.

Physical buffer class looks like this:

struct DXPhysicalMeshBuffer final
{
    ID3D11Buffer*             physicalBuffer     = nullptr;
    ID3D11ShaderResourceView* physicalBufferView = nullptr;
    size_t                    physicalDataSize   = 0;
    bool                      isDirty            = false;

    typedef DynamicArray<DXLogicalMeshBuffer*> PageArray;
    PageArray allPages;

    DXPhysicalMeshBuffer() = default;
    inline ~DXPhysicalMeshBuffer()
    {
        if (physicalBuffer != nullptr)     physicalBuffer->Release();
        if (physicalBufferView != nullptr) physicalBufferView->Release();
    }

    void allocate(DXLogicalMeshBuffer* logicalBuffer);
    void release(DXLogicalMeshBuffer* logicalBuffer);
    void rebuildPages(); // very expensive operation
}

The class fields are used for:
  • physicalBuffer : An actual buffer with the data
  • physicalBufferView : A shader resource view for shader data access
  • physicalDataSize : Buffer data size in bytes
  • isDirty : A flag that indicates the need for buffer update (it is needed after each logical buffer allocation/deallocation).
  • allPages : All logical buffers allocated inside this physical buffer.
Each time a logical buffer is allocated/deallocated a physical buffer needs to be informed about this. Allocate/release operations are quite trivial:

void DXPhysicalBuffer::allocate(DXLogicalMeshBuffer* logicalBuffer)
{
    allPages.Add(logicalBuffer);
    isDirty = true;
}

void DXPhysicalBuffer::release(DXLogicalMeshBuffer* logicalBuffer)
{
    allPages.Remove(logicalBuffer);
    isDirty = true;
}

rebuildPages() method is much more interesting.

This method must create a physical buffer and fill it with the data from all used logical buffers. A physical buffer must be mappable to RAM and bindable as a structured shader resource.

size_t vfStride = allPages[0]->dataFormatStride; // TODO: right now will not work with different strides
size_t numElements = physicalDataSize / vfStride;

if (physicalBuffer != nullptr)     physicalBuffer->Release();
if (physicalBufferView != nullptr) physicalBufferView->Release();

D3D11_BUFFER_DESC bufferDesc;
bufferDesc.BindFlags           = D3D11_BIND_SHADER_RESOURCE;
bufferDesc.ByteWidth           = physicalDataSize;
bufferDesc.Usage               = D3D11_USAGE_DYNAMIC;
bufferDesc.MiscFlags           = D3D11_RESOURCE_MISC_BUFFER_STRUCTURED;
bufferDesc.StructureByteStride = vfStride;
bufferDesc.CPUAccessFlags      = D3D11_CPU_ACCESS_WRITE;

if (FAILED(g_pd3dDevice->CreateBuffer(&bufferDesc, nullptr, &physicalBuffer))) {
    handleError(...); // handle your error here
    return;
}

Make sure that StructureByteStride is equal to the size of a structure read by the vertex shader. Also, CPU write access is required.

After that we need to create a shader resource view:

D3D11_SHADER_RESOURCE_VIEW_DESC viewDesc;
std::memset(&viewDesc, 0, sizeof(viewDesc));

viewDesc.Format              = DXGI_FORMAT_UNKNOWN;
viewDesc.ViewDimension       = D3D11_SRV_DIMENSION_BUFFER;
viewDesc.Buffer.ElementWidth = numElements;

if (FAILED(g_pd3dDevice->CreateShaderResourceView(physicalBuffer, &viewDesc, &physicalBufferView)))
{
    // TODO: error handling
    return;
}

Whew. Now let us get straight to the physical buffer filling! The algorithm is:

  1. Map the physical buffer to RAM.
  2. for each logical buffer:
  3. Calculate logical buffer offset into the physical buffer (physicalAddress field).
  4. Copy the data from the logical buffer to the mapped memory with the needed offset.
  5. Go to the next logical buffer.
  6. Unmap the physical buffer.

The code is quite simple:

// fill the physical buffer
D3D11_MAPPED_SUBRESOURCE mappedData;
std::memset(&mappedData, 0, sizeof(mappedData));

if (FAILED(g_pImmediateContext->Map(physicalBuffer, 0, D3D11_MAP_WRITE_DISCARD, 0, &mappedData)))
{
    handleError(...); // insert error handling here
    return;
}

uint8_t* dataPtr = reinterpret_cast<uint8_t*>(mappedData.pData);
size_t pageOffset = 0;
for (size_t i = 0; i < allPages.GetSize(); ++i) {
    DXLogicalMeshBuffer* logicalBuffer = allPages[i];
    // copy logical data to the mapped physical data
    std::memcpy(dataPtr + pageOffset, logicalBuffer->data, logicalBuffer->dataSize);
    // calculate physical address
    logicalBuffer->physicalAddress = pageOffset / logicalBuffer->dataFormatStride;
    // calculate offset
    pageOffset += logicalBuffer->dataSize;
}

g_pImmediateContext->Unmap(physicalBuffer, 0);

Note that rebuilding a physical buffer is a very expensive operation, in our case it is around 500ms. This slowness is caused by the high amount of data that is being sent to the GPU (tens of megabytes!). This why it is not recommended to rebuild the physical buffer often.

Full code for rebuildPages() method for reference.

Storing and rendering stuff like that requires a custom constant managing as well.

Managing per-object constants


Traditional constant buffers does not fit here for obvious reasons. That's why there is no other choice then to use one more global buffer, similar to the physical buffer described above.

Apart from usual shader constants this buffer must contain logical buffer information, geometry type (indexed and non-indexed) and vertex count.

Creating this buffer is trivial:

std::memset(&bufferDesc, 0, sizeof(bufferDesc));

bufferDesc.BindFlags           = D3D11_BIND_SHADER_RESOURCE;
bufferDesc.ByteWidth           = dataBufferSize;
bufferDesc.Usage               = D3D11_USAGE_DYNAMIC;
bufferDesc.MiscFlags           = D3D11_RESOURCE_MISC_BUFFER_STRUCTURED;
bufferDesc.StructureByteStride = stride;
bufferDesc.CPUAccessFlags      = D3D11_CPU_ACCESS_WRITE;

if (FAILED(g_pd3dDevice->CreateBuffer(&bufferDesc, nullptr, &dataBuffer))) {
    handleError(...); // handle your error here
    return;
}

D3D11_SHADER_RESOURCE_VIEW_DESC viewDesc;
std::memset(&viewDesc, 0, sizeof(viewDesc));

viewDesc.Format              = DXGI_FORMAT_UNKNOWN;
viewDesc.ViewDimension       = D3D11_SRV_DIMENSION_BUFFER;
viewDesc.Buffer.ElementWidth = numInstances;

if (FAILED(g_pd3dDevice->CreateShaderResourceView(dataBuffer, &viewDesc, &dataView))) {
    handleError(...); // handle your error here
    return;
}

First, four 32-bit registers of this buffer are filled with a shader internal data used for rendering. This data looks like this:

struct InternalData
{
    uint32_t vb;
    uint32_t ib;
    uint32_t drawCallType;
    uint32_t count;
};

After this structure goes the usual constant data used for generic mesh rendering (such as projection matrix).

Now a small digression. I usually don't render anything directly, instead I use an array of DrawCall structures, which also contain constants and all other data needed for a single DIP:

struct DrawCall final
{
    enum Type : uint32_t
    {
        Draw        = 0,
        DrawIndexed = 1
    };

    enum
    {
        ConstantBufferSize = 2048 // TODO: remove hardcode
    };

    enum
    {
        MaxTextures = 8
    };

    uint8_t constantBufferData[ConstantBufferSize];

    DXLogicalMeshBuffer* vertexBuffer;
    DXLogicalMeshBuffer* indexBuffer;

    uint32_t count;
    uint32_t startVertex;
    uint32_t startIndex;
    Type     type;
};

This is simplified to make reading easier.

The application fills an array of these structures and submits them for rendering.

After filling this draw call buffer we need to update the constant buffer, update InternalData and, finally, issue a real DIP to render stuff.

Updating constants is trivial, just loop through the command buffer and copy needed data to the right place:

// update constants
{
    D3D11_MAPPED_SUBRESOURCE mappedData;
    if (FAILED(g_pImmediateContext->Map(psimpl->constantBuffer.dataBuffer, 0, D3D11_MAP_WRITE_DISCARD,
      0, &mappedData))) {
        // TODO: error handling
        return;
    }
    uint8_t* dataPtr = reinterpret_cast<uint8_t*>(mappedData.pData);
    for (size_t i = 0; i < numInstances; ++i) {
        size_t offset = i * internal::DrawCall::ConstantBufferSize;
        const internal::DrawCall& call = queue->getDrawCalls()[i];

        std::memcpy(dataPtr + offset, call.constantBufferData, internal::DrawCall::ConstantBufferSize);

        // fill internal data structure
        InternalData* idata = reinterpret_cast<InternalData*>(dataPtr + offset);

        DXLogicalMeshBuffer* vertexBuffer = static_cast<DXLogicalMeshBuffer*>(call.vertexBuffer.value);
        if (vertexBuffer != nullptr)
            idata->vb = vertexBuffer->physicalAddress;

        DXLogicalMeshBuffer* indexBuffer = static_cast<DXLogicalMeshBuffer*>(call.indexBuffer.value);
        if (indexBuffer != nullptr)
            idata->ib = indexBuffer->physicalAddress;

        idata->drawCallType = call.type;
        idata->count        = call.count;
    }
    g_pImmediateContext->Unmap(psimpl->constantBuffer.dataBuffer, 0);
}

The data is now ready for actual rendering.

Shader and drawing


Time for drawing! To render everything we need to set the buffers and issue DrawInstanced:

ID3D11ShaderResourceView* vbibViews[2] = {
    g_physicalVertexBuffer->physicalBufferView,
    g_physicalIndexBuffer->physicalBufferView
};

g_pImmediateContext->VSSetShaderResources(0, 2, vbibViews);

g_pImmediateContext->VSSetShaderResources(0 + 2, 1, &psimpl->constantBuffer.dataView);
g_pImmediateContext->HSSetShaderResources(0 + 2, 1, &psimpl->constantBuffer.dataView);
g_pImmediateContext->DSSetShaderResources(0 + 2, 1, &psimpl->constantBuffer.dataView);
g_pImmediateContext->GSSetShaderResources(0 + 2, 1, &psimpl->constantBuffer.dataView);
g_pImmediateContext->PSSetShaderResources(0 + 2, 1, &psimpl->constantBuffer.dataView);

g_pImmediateContext->DrawInstanced(maxDrawCallVertexCount, numInstances, 0, 0);

Almost done. A few notes:
  • DrawInstanced needs to be called with a maximum amount of vertices the command buffer has. This is required because we have a single draw call and several meshes. Meshes can have different amount of vertices/indices and this needs to be taken into account. I suggest to render the maximum amount of vertices and dicard redunand vertices by sending them outside the clip plane.</il>
  • This introduces some additional vertex shader overhead, thus you need to carefully watch for the difference between maximum and minimun vertices being within a reasonable range (typically 10% difference is OK). Remember that these wasted vertices add overhead to each rendered instance and it grows insanely fast. Watch for the artists!
  • One DrawInstanced call can handle both indexed and non-indexed geometry, because this is handled in the vertex shader.TriangleStrip, TriangleFan and similar topologies are not supported for obvious reasons. This method supports only *List topologies (TriangleList, PointList, etc.)
The vertex shader is also very simple.

First we need to define all the CPU-side structured (vertex format, constant format, etc.):

// vertex
struct VertexData
{
    float3 position;
    float2 texcoord0;
    float2 texcoord1;
    float3 normal;
};
StructuredBuffer<VertexData> g_VertexBuffer;
StructuredBuffer<uint>       g_IndexBuffer;

// pipeline state
#define DRAW 0
#define DRAW_INDEXED 1
struct ConstantData
{
    uint4    internalData;

    float4x4 World;
    float4x4 View;
    float4x4 Projection;
};
StructuredBuffer<ConstantData> g_ConstantBuffer;

After that goes the code that fetches constant data and processes vertices (pay attention to indexed/non-indexed geometry handling):

uint instanceID = input.instanceID;
uint vertexID   = input.vertexID;

uint vbID      = g_ConstantBuffer[instanceID].internalData[0];
uint ibID      = g_ConstantBuffer[instanceID].internalData[1];
uint drawType  = g_ConstantBuffer[instanceID].internalData[2];
uint drawCount = g_ConstantBuffer[instanceID].internalData[3];

VertexData vdata;
[branch] if (drawType == DRAW_INDEXED) vdata = g_VertexBuffer[vbID + g_IndexBuffer[ibID + vertexID]];
else     if (drawType == DRAW)         vdata = g_VertexBuffer[vbID + vertexID];

[flatten] if (vertexID > drawCount)
    vdata = g_VertexOutsideClipPlane; // discard vertex by moving it outside of the clip plane

As you can see - there is no rocket science. Full shader code for reference.

An attentive reader will notice that I did not cover texturing. The next part is about it.

What shall we do with textures?


This is the biggest con of this method. With this approach it is highly desired to have unique textures per instance, but implementing this with D3D11 is problematic.

Possible solutions:
  • Use one texture atlas. Cons: One atlas cannot hold many textures, so you will need to batch instances by 3 or 4 and render them separately. This negates all the pros of this method.
  • Use texture arrays (Texture2DArray, Sampler2DArray). Cons: better then texture atlas, but still limited to 512 textures per array.
  • Switch to OpenGL 4.3 with bindless textures. Cons: everything will fit, but there is one serious problem called OpenGL.
  • Switch to D3D12/Mantle/Vulkan/etc. Cons: everything will fit, but with limited hardware/OS support.
  • Virtual textures. Cons: virtual textures, anyone?:)
Detailed overview of all these methods goes beyond this article. I will only say that I use texture arrays for D3D11 and native features of D3D12.

Caveats and limitations


All major cons are described above, thus here is a little summary:
  • Wasted vertices overhead.
  • Indirection overhead: vertex and constant access is badly predicted, because it is a random access, thus they are not cached and always calculated dynamically. Indexed rendering is the slowest one because of double indirection.
  • Not all primitive topologies supported.
  • Unique textures per instance are not possible in the general case.
  • Reallocating buffers is expensive and adds video memory fragmentation.
  • Unusual vertex buffers require unusual algorithms for unusual cases, like dynamically generating vertices with compute shader (e.g. water simulation, cloth, etc.).
  • It is required to hold all the logical buffer data in memory, this slightly increasing application memory consumption.

Demo and sources


The main source code for this method is here. There is no binary version at the moment.

Here are some screenshots:


16384 unique cubes, 1.2ms per frame on Intel HD 4400:
Attached Image: dvp_cubes.png

4096 unique instances of grass, 200k triangles:
Attached Image: dvp_grass.png


Further reading


OpenGL Insights, III Bending the Pipeline, Programmable vertex pulling by Daniel Rakos - almost the same method for OpenGL.

Thanks for your attention!

27 April 2015: Initial release

GDC Social Tips

$
0
0
I wrote some tips on meeting people at GDC a while ago. It was the GDC that lead me to my current job (more on this here). Recently, I got some friends asking me for advice on breaking into the game industry, how to present yourself, and how to meet people at GDC. So I decided to write another post about it. This will be a collection of what I learned from the Career Service Center and the career workshops at DigiPen, plus my own experience.

These tips worked for me, but they might not suit everyone. Feel free to disregard any of them at your discretion.

Email, Twitter, Domain Name


Before doing anything else, you should have a professional-looking email address. Don't use random internet names like AwesomeDude7345; that makes your address look unprofessional. Make sure the only thing present in the name part of the address is your name. The email address I share with people is MingLun.Chou[at]gmail.com.

Applying the same rule to your Twitter handle and domain name can help them appear more professional as well. My Twitter handle is TheAllenChou, and my domain name is AllenChou.net. Of course, you can always throw in some variation if that helps express more about yourself, such as JasonGameDev.net or AmysArt.net.

LinkedIn


LinkedIn is a professional social network where you can build online professional connections. You can join groups and follow companies on LinkedIn. Your profile page is the place to show people your professional side; maintain it well. Many recruiters actively look for potential hires on LinkedIn by going through his/her 1st, 2st, and 3rd degree connections. It is important that you build connections with people in the industry on LinkedIn. I constantly receive messages on LinkedIn from recruiters in the game industry and software engineering industry.

You can customize your LinkedIn profile page's URL. Choose one that follows the aforementioned rule for your email address. My LinkedIn profile page URL is linkedin.com/in/MingLunChou.

Business Cards


Always keep a stack of business cards with you, so you are prepared when the time has come for you to exchange contact information, or when you just want to present yourself to others. To make yourself appear more professional, use a card holder. It looks much more professional to pull out business cards from a card holder than from a jeans pocket.

After you give someone your business card and leave, that person might want to write down some notes about you on your business card, so they can still remember you after meeting many other people at GDC. Choosing a material that is easy to write on for your business card would make this process easier, as well as using a light color on the back of your card and leaving some writing space.

Make sure your name is the most noticeable text element on your business card. If you want to, just use a few stand-alone words to describe your profession. Don't try to squeeze a wall of text that describes every positive thing you have to say about yourself. Once I received a card with a wall of text, saying how passionate a designer the person is and his many holy life goals as a designer. I read the first few sentences and put the card away, never bothering finishing it. This is a business card, not a cover letter.

Below is my current business card design. My name is the largest text element and is at the direct center. I put down four of my primary professional skills (Physics, Graphics, Procedural Animation, and Visuals) below my name. My contact information is at the bottom, including my website URL, email address, LinkedIn profile URL, Twitter handle, and Google+ handle.

Attached Image: business card.jpg

Resumes


Most recruiters prefer resumes with only one page, but some recruiters prefer two pages. So I just keep my resume one-page.

If you want to send a resume to a company that you are applying for, always tailor the resume to fit the company. One company, one specific resume. Look for the requirements for the position you are applying for on the company's website, and make sure they are the first things on your resume. Also, do not forget to include an objective line that states the position you intend to apply for.

In addition, prepare a generic version of the resume. This way, you can show it on your website, and present it at the company booths in the expo hall at GDC.

Personal Branding


Personal branding is optional, but it is a powerful tool if done right.
I put down Long Bunny, a little character I designed, on my business cards, resumes, and my website.

Attached Image: long bunny.png

At first, I designed Long Bunny just for fun, because I love bunnies. Then, I thought I could fill it in the extra space on my business cards and resumes. This turned out to be the right thing to do, and Long Bunny became my personal branding.

On a Sucker Punch company day at DigiPen, I gave the recruiter my business card and resume. The next time I talked to her at another company day one year later, she did not recognize me at first. But after I showed her my business card, she instantly remembered me, saying it's because of the Long Bunny. Also, in all my follow-up emails (a separate tip that will be covered later), I start with "Hi, I'm Allen Chou. My business card has a long bunny on it." Most people would remember me because of my personal branding.

The W Hotel Lobby


At GDC, it is well known that many attendees who want to socialize and do not have a party to go to will hang out at the lobby bar of The W Hotel. If you want to meet people from the game industry at GDC and have no party on your list, then The W Hotel is the place to go. My friends and I usually come back from the afternoon GDC activities to our hotel and chill out until 8pm. Then we would head out to The W Hotel's lobby bar. That is where we meet new people from the industry and introduce ourselves. We usually stay there at least until 11pm, and would stay longer if we are in a long conversation.

Starting A Conversation


The hardest part to meeting people is to start a conversation. The first time I went to GDC, I was too shy to walk up to a stranger and start talking. This is a skill you must practice if you want to meet people.

There is really nothing scary about opening a conversation. Almost everyone at The W Hotel's lobby bar during GDC is in the game industry, very laid back, and welcomes conversations. Just pick someone that does not seem to be occupied, say hi, and introduce yourself. I usually start with what I do and then ask what the other person does, and then at some point casually ask for a business card exchange, either by saying "here's my business card" or "hey, do you have a business card?" It's that simple.

If you feel like the conversation needs to be ended, either because the other person appears to be not interested in talking any more, or you are running out of things to say, say "nice meeting/talking to you", "I'm gonna take off", and leave. No hassle.

Follow-Ups


Following up with an email is very important after obtaining contact information. After the person that has given you his/her business card leaves, write down notes about the conversation you had and reminders for sending the person your work or resumes (if asked). Within 48 hours, write an email to re-introduce yourself, make comments on the conversation, and thank the person for talking to you. This shows that you care. Also, be sure to connect with the person on LinkedIn if you can find his/her page.

Tablets


I always bring a tablet with me to GDC, loaded with demo reels. I actively look for opportunity during a conversation to pull out my tablet and demonstrate my work. I also upload the demo reels to my phone, just in case my tablet runs out of battery.

Notepads & Pens


It's convenient to carry a mini notepad and a pen with you at all times. GDC is quite a busy event, and people can quickly run out of business cards. When you give someone your business card and the person is out of cards, you can ask the person to write down contact information on your notepad with your pen.

That's It


I hope these tips will help you prepare for the upcoming GDC this year. Go meet people and have fun!

Everything You Ever Wanted to Know About Authenticode Signing

$
0
0

Introduction


As part of releasing your game to the public, something which is often overlooked is code signing.

Code signing is a cryptographic process whereby your game's executables and/or installer are marked as authentic, so that the person running the executable (or anyone else for that matter) can ensure that:
  • The executable has not been changed since it was signed
  • The executable was created on a specific date at a specific time
  • The executable was signed by a known, trackable entity (company or individual) responsible for the code within
These give some definite advantages (as well as introducing some disadvantages) as shown below:

Advantages of code signing

  • Signing your executables provides tracability of your code, allowing anyone to see who is responsible for the program
  • Signing adds authenticity which makes your game and your company (if there is one) more reputable and trustworthy
  • It will give positive weight to systems such as smartscreen filter and many anti-malware programs, which are more permissive of signed executables than unsigned.

Disadvantages of code signing

  • There is an up-front cost involved in aquiring a certificate for code signing
  • If you do not have the required forms of identification or business documentation, obtaining a certificate can be hard to impossible
  • There is a learning curve to understanding how certificates work (which this article hopes to address)

The steps involved in signing your code


To properly sign your code, you must follow several steps, which must be completed in a strict order. These steps are:

Select a certificate authority


Before you can sign your program code, you first need to select a certificate authority. The cost of object code signing has come down massively in price over the past few years. You will need to search for a certificate authority that will provide you with a type of certificate known as an "object code certificate" or "authenticode certificate".

Here are some possible choices, this list is by no means exhaustive and I encourage you to search for additional sources of certificates before parting with any money:
  • StartSSL - You will need to pay for "StartSSL Verified" at $59.90 per year. Certificates last two years after which they must be renewed.
  • Comodo - This costs $119.95 per year, however if you are a member of Tucows this can be reduced to $75 per year simply by purchasing through Tucows as a member.
  • Verisign/Symantec - Traditionally the most expensive choice but popular with big business. Starts at $795 per year.
Remember to shop around as many different resellers of certificates offer their product at a much lower price through third parties, for example as a business user you can get brand name certificates at a much lower price via RapidSSL.

Also remember that a lot of the time, you are paying for brand names. All certificates I have listed here are equally trusted by the Windows operating system, so there isn't much point in paying $795 per year for a certificate when one you pay $59.90 a year for will function identically.

Purchasing a certificate


When you have selected a company to purchase your certificate through, you will then need to purchase your certificate through their shopping cart (unfortunately, I cannot really advise how to do this as it varies from website to website, but the concept is similar - provide payment details and wait to hear from them).

As part of the purchase you will either have to upload signed forms of your photo identification or business documentation to the certificate authority's website (so be prepared to do this, there is no way around it).

Generally, it is expected for a non-business user to be able to send scanned copies of a photo driving license and/or passport, and a recent utility bill. Also, expect to hear from the certificate authority directly via your phone number, which will be a mandatory field on the application form. This will be a call to verify your identity, and not a sales call. Generally, the level of checking for a code signing certificate is somewhat similar to that needed to open a bank account.

The reason for both of these is to prove you are who you say you are so that the certificate you are purchasing has some weight. This prevents you for example from signing up and buying a certificate claiming to be "Microsoft" or "Google" as to do so you would need that company's business documentation.

Once you have completed the process, you will be sent a link to download a certificate file.

Downloading the certificate file


Once the certificate authority has provided you with a link to download your certificate, you will then have in your possession one or more small encrypted files. You will either have (depending on the authority you selected) a seperate .crt and .key file, or a .pfx (or p7k) file, which is the .crt and .key files combined into one.

You should make sure that these files are backed up securely, as if you lose them you may have to pay for re-issue of your certificate which can be costly. My advice is to move them immediately to a DVD-ROM and lock them away wherever you keep your paper driving license and home insurance, or whatever else holds value to you.

SSL and signing fundamentals


Before we continue further with the article it is worth pointing out the difference between the certificate and key (.crt and .key file) which you have obtained from your certificate authority.

Both are important and have different uses. When you first sign up for your certificate authority of choice a "private key" is generated. This is used to uniquely identify you, and if lost can never be replaced.

Depending on the authority you choose, some may trigger creation of this file by your browser, and have it stored in your registry or browser settings (in which case it is never sent to the certificate authority, which is more secure) and others may generate it for you, and send it to you with your certificate.

Either way, in the end it is used as part of the certificate which is sent to you.

The certificate is a blob of data created by your certificate authority, and then signed by both your key (see above) and the key of your certificate authority, wihch you will never have in your possession. In simple terms, to sign your certificate means to apply a hash to it using the private key of the signer in such a way that you may verify it without that key but may not re-create it yourself, allowing you to verify its authenticity but not forge its content.

There is much more to the process, delving deep into complex maths and cryptography, but that is beyond the scope of this article which intends to simplify code signing rather than make it complex.

Saving the certificate file


If your certificate authority has provided you with a .cer and .key file, I advise that before you continue, you convert it to a .pfx file as it is easier to work with on Windows. There are several ways to convert your files, and your certificate authority might provide you with an online tool or a simple download of your certificate in .pfx form. If they do, I suggest you use this feature as it will be more straightforward.

If they do not provide such a facility, you can use the openssl toolkit to convert your .cer and .key file into .pfx using the command line below, for which you will need to install the openssl toolkit onto your PC, which is a free open source download:

openssl pkcs12 -export -out yourcert.pfx -inkey yourkey.key -in yourcert.cer

The program will prompt you for a password, as part of the process I strongly recommend you enter a strong one as this will protect your certificate from misuse if it is obtained by any third party!

Once you have the .pfx file, simply double click it and windows will prompt you to add it to your registry:

Posted Image

You should mark the certificate as "not exportable" which will stop someone from simply extracting the certificate from your registry at a later date.

Posted Image

Following through the wizard will prompt you for the password you set on the file, simply enter it, and continue clicking through the wizard accepting the defaults.

Posted Image

Once complete, you will receive a message saying the certificate was successfully imported into your registry, which means you are now ready to sign executables!

Posted Image

Please remember that the certificate you have purchased is valid for signing files until its expiry date so you only have to buy the certificate once every one or two years (or however long the certificate is valid for) and with this one purchase you can sign as many executables as you like, whenever you like. After this, the sky is literally the limit!

Signing your executables, and timestamping


We now finally have the correct configuration and the correct files to be able to sign our executables. It is important to note however that there is one important difference between signing an executable, and putting an SSL certificate onto a website or most other uses of security certificates. Binary code may be timestamped.

What this means, in simple terms, is that the signed executable can still be considered valid even if your certificate has expired, you just wouldn't be able to sign any new files with an expired certificate. To prove my point find any signed executable on your disk which is over three years old. The chances are, by now the certificate which was used to sign this file has expired (you can see this by right clicking on the file and choosing properties, then the 'security' tab) however if the file is timestamped, when you double click the file it will still be considered valid.

Timestamping is a process done automatically when you sign your file. It involves contacting a third party server which counter-signs your file with a special value which references back to the certificate issuer's servers. This value can then be used to verify that the certificate was valid at the time of signing the file rather than right now. Because of this, you should always use your certificate authorities own timestamp server which you can easily find on Google.

Armed with this information, signing your code is quite straightforward:

"C:\Program Files (x86)\Windows Kits\8.0\bin\x64\signtool.exe" sign /d "Your games name" /tr http://www.startssl.com/timestamp /a path\to\your\executable.exe

In the command above we are using the signtool.exe binary, which comes with the Windows 8 development kit. There will likely be several copies of this executable on your disk and any one of them will do fine for this task.

We specify the "friendly name" of our program using the /d parameter, as shown above, and the /tr parameter specifies the timestamp server as we discussed above.

The command above can be used not only to sign executables, but also DLL files and OCX files, driver files, CLR bytecode, and just about any other type of windows executable you can imagine.

Specifying the /a parameter to the signtool command simply tells it to use the first valid code signing certificate held within your registry to sign the file. If you followed this article to the letter this is where your code signing certificate and key will currently reside.

I store my code signing certificate here as it is generally a secure place to put it, where you don't risk accidentally putting it into your code repository or into your network drives, encrypted or decrypted.

Now you have finished the process, you can test your executable by double clicking it, and if your executable requires elevation (which most install packages etc do) then you will be presented with the friendly blue prompt:

Posted Image

Summary


Hopefully this article should give you some insight into how to sign your code. Signing your code is not just an akward expense, in the current software and games market you should consider it important for anything you release to the public. It protects you, and it protects the people who want to play your game.

If you have any questions about this article please do not hesitate to comment on this article below.

Article Update Log


21 Apr 2015: Started work on article
7 May 2015: Initial release

XRay Unreal Engine 4.5 source code

$
0
0
The Unreal Engine is a game engine developed by Epic Games, first showcased in the 1998 first-person shooter game Unreal. Although primarily developed for first-person shooters, it has been successfully used in a variety of other genres, including stealth, MMORPGs, and other RPGs.

Its code is written in C++ and it's used by many game developers today. Its source code is available for free from GitHub. Many amazing games were developed using this engine, it permits developers to produce very realistic renderings like this one.

488-unreal-engine-4.jpg

What's the source code executed behind the scene to produce this realistic rendering?

It's very interesting to go inside this powerful game engine and discover how it's designed and implemented. C++ developers could learn many good practices from its code base.

Let's XRay its source code using CppDepend and CQLinq to explore some design and implementation choices of its developement team.

1- Namespaces


Unreal Engine uses namespaces widely for three main reasons:
  • Many namespaces contain only enums as shown by this following CQLinq query, which gives us the ones containing only enums.
unreal2.png

In a large project, you would not be guaranteed that two distinct enums don't both get called with the same name. This issue was resolved in C++11, using enum class which implicitly scope the enum values within the enum's name.
  • Anonymous namespace: Namespace with no name avoids making global static variable. The “anonymous” namespace you have created will only be accessible within the file you created it in. Here it is the list of all anonymous namespaces used:
unreal3.png
  • Modularizing the code base: Let's search for all the other namespaces, i.e. neither the anonymous ones nor the ones containing only enums:
unreal6.png

The namespaces represent a good solution to modularize the application; Unreal Engine defines more than 250 namespaces to enforces its modularity, which makes the code more readable and maintainable.

2- Paradigm used


C++ is not just an object-oriented language. As Bjarne Stroustrup points out, “C++ is a multi-paradigmed language.” It supports many different styles of programs, or paradigms, and object-oriented programming is only one of these. Some of the others are procedural programming and generic programming.


2-1 Procedural Paradigm


2-1-1 Global functions


Let’s search for all global functions defined in the Unreal Engine source code:


unreal7.png

We can classify these functions in three categories:


1 - Utility functions: For example 6344 of them concern Z_Construct_UXXX functions, which are used to create instances needed by the engine.


unreal8.png


2 - Operators: Many operators are defined as it is shown, by the result of this CQLinq query:


unreal9.png


Almost all kinds of operators are implemented in the Unreal Engine source code.


3 - Functions related to the engine logic: Many global functions containing some engine treatments are implemented. Maybe these kinds of functions could be grouped by category, as static methods into classes, or grouped in namespaces.


2-1-2 Static global functions:


It's a best practice to declare a global function as static unless you have a specific need to call it from another source file.


unreal10.png


Many global functions are declared as static, and as specified before, other global functions are defined inside anonymous namespaces


2-1-3 Global functions candidate to be static.


Global not exported functions, not defined in an anonymous namespace and not used by any method outside the file where they were defined. These are good candidates to be refactored to be static.


unreal65.png


As we can observe some global functions are candidates to be refactored to be static.


2-2 Object Oriented paradigm


2-2-1 Inheritance


In object-oriented programming (OOP), inheritance is a way to establish Is-a relationship between objects. It is often confused as a way to reuse the existing code which is not a good practice because inheritance for implementation reuse leads to Tight Coupling. Re-usability of code is achieved through composition (Composition over inheritance). Let’s search for all classes having at least one base class:

unreal13.png


And to have a better idea of the classes concerned by this query, we can use the Metric View.


In the Metric View, the code base is represented through a Treemap. Treemapping is a method for displaying tree-structured data by using nested rectangles. The tree structure used in a CppDepend treemap is the usual code hierarchy:

  • Projects contain namespaces.
  • Namespaces contain types.
  • Types contain methods and fields.

The treemap view provides a useful way to represent the result of a CQLinq request; the blue rectangles represent this result, so we can visually see the types concerned by the request.


unreal12.png


As we can observe, the inheritance is widely used in the Unreal Engine source code.


Multiple Inheritance: Let's search for classes inheriting from more than one concrete class.


unreal15.png


The multiple inheritance is not widely used, only a few classes inherit from more than one class.


2-2-2 Virtual methods


Let's search for all virtual methods defined in the Unreal Engine source code:


unreal19.png


Many methods are virtual, and some of them are pure virtual:


unreal21.png


As with the procedural paradigm, the OOP paradigm is also widely used in the Unreal Engine source code. What about the generic programming paradigm?


2-3 Generic Programming


C++ provides unique abilities to express the ideas of Generic Programming through templates. Templates provide a form of parametric polymorphism that allows the expression of generic algorithms and data structures. The instantiation mechanism of C++ templates insures that when a generic algorithm or data structure is used, a fully-optimized and specialized version will be created and tailored for that particular use, allowing generic algorithms to be as efficient as their non-generic counterparts.


2-3-1 Generic types:


Let's search for all genric types defined in the engine source code:


unreal23.png


Only a few types are defined as generic. Let's search for generic methods:


unreal26.png


More than 40000 methods are generic; they represent more than 25% of the methods implemented.

To resume the Unreal Engine source code, mix between the three paradigms.

3- PODs to define the data model


In object-oriented programming, plain old data (POD) is a data structure that is represented only as passive collections of field values (instance variables), without using object-oriented features. In computer science, this is known as passive data structure

Let's search for the POD types in the Unreal Engine source code

unreal28.png

More than 2000 types are defined as POD types, many of them are used to define the engine data model.

4- Gang Of Four design patterns


Design Patterns are a software engineering concept describing recurring solutions to common problems in software design. Gang of four patterns are the most popular ones. Let's discover some of them used in the Unreal Engine source code.

4-1 Singleton

The singleton is the most popular and the most used one. Here are some singleton classes defined in the source code:

unreal29.png

TThreadSingleton is a special version of singleton. It means that there is created only one instance for each thread. Calling its method Get() is thread-safe.

4-2 Factory

Using factory is interesting to isolate the logic instantiation and enforces the cohesion; here is the list of factories defined in the source code:

unreal30.png

And here's the list of the abstract ones:

unreal31.png

4-3 Observer

The observer pattern is a software design pattern in which an object maintains a list of its dependents, called observers, and notifies them automatically of any state changes, usually by calling one of their methods.

They are some observers implemented in its source code, FAIMessageObserver is one of them.

Here's a dependency graph to show the call of the OnMessage method of this observer:

unreal70.png

4-4 Command

The command pattern is a behavioral design pattern in which an object is used to represent and encapsulate all the information needed to call a method at a later time.

Four terms always associated with the command pattern are command, receiver, invoker and client. A command object has a receiver object and invokes a method of the receiver in a way that is specific to that receiver's class.

Here's for example all commands inheriting from the IAutomationLatentCommand:

unreal33.png

5- Coupling and Cohesion


5-1 Coupling

Low coupling is desirable because a change in one area of an application will require fewer changes throughout the entire application. In the long run, this could alleviate a lot of time, effort, and cost associated with modifying and adding new features to an application.


Low coupling could be acheived by using abstract classes or using generic types and methods.


Let’s search for all abstract classes defined in the Unreal Engine source code :


unreal34.png

Only a few types are declared as abstract. The low coupling is more enforced by using generic types and generic methods.

Here's for example the methods using at least one generic method:

unreal27.png

As we can observe many methods use the generic ones, the low coupling is enforced by the function template params. Indeed the real type of these parameters could change without changing the source code of the method called.

5-2 Cohesion

The single responsibility principle states that a class should not have more than one reason to change. Such a class is said to be cohesive. A high LCOM value generally pinpoints a poorly cohesive class. There are several LCOM metrics. The LCOM takes its values in the range [0-1]. The LCOM HS (HS stands for Henderson-Sellers) takes its values in the range [0-2]. A LCOM HS value higher than 1 should be considered alarming. Here are how to compute LCOM metrics:

LCOM = 1 – (sum(MF)/M*F)
LCOM HS = (M – sum(MF)/F)(M-1)

Where:

  • M is the number of methods in class (both static and instance methods are counted, it includes also constructors, properties getters/setters, events add/remove methods).
  • F is the number of instance fields in the class.
  • MF is the number of methods of the class accessing a particular instance field.
  • Sum(MF) is the sum of MF over all instance fields of the class.

The underlying idea behind these formulas can be stated as follows: a class is utterly cohesive if all its methods use all its methods use all its instance fields, which means that sum(MF)=M*F and then LCOM = 0 and LCOMHS = 0.


LCOMHS values higher than 1 should be considered alarming.


unreal36.png


Only some types are considered as not cohesive.


6- Immutability, Purity and side effect


6-1 Immutable types

Basically, an object is immutable if its state doesn’t change once the object has been created. Consequently, a class is immutable if its instances are immutable.


There is one important argument in favor of using immutable objects: It dramatically simplifies concurrent programming. Think about it, why is writing proper multithreaded programming a hard task? Because it is hard to synchronize threads access to resources (objects or others OS resources). Why is it hard to synchronize these accesses? Because it is hard to guarantee that there won’t be race conditions between the multiple write accesses and read accesses done by multiple threads on multiple objects. What if there are no more write accesses? In other words, what if the state of the objects accessed by threads, doesn’t change? There is no more need for synchronization!


Another benefit of immutable classes is that they can never violate LSP (Liskov Subtitution Principle) , here’s a definition of LSP quoted from its wiki page:
Liskov’s notion of a behavioral subtype defines a notion of substitutability for mutable objects; that is, if S is a subtype of T, then objects of type T in a program may be replaced with objects of type S without altering any of the desirable properties of that program (e.g., correctness).

Here's the list of immutable types defined in the source code:

unreal38.png

6-2 purity and side effect

The primary benefit of immutable types come from the fact that they eliminate side-effects. I couldn’t say it better than Wes Dyer so I quote him:

We all know that generally it is not a good idea to use global variables. This is basically the extreme of exposing side-effects (the global scope). Many of the programmers who don’t use global variables don’t realize that the same principles apply to fields, properties, parameters, and variables on a more limited scale: don’t mutate them unless you have a good reason.(…)

One way to increase the reliability of a unit is to eliminate the side-effects. This makes composing and integrating units together much easier and more robust. Since they are side-effect free, they always work the same no matter the environment. This is called referential transparency.

Writing your functions/methods without side effects - so they're pure functions, i.e. not mutate the object - makes it easier to reason about the correctness of your program.

Here's the list of all methods without side-effects

unreal41.png

More than 125 000 methods are pure.

7- Implementation quality


7-1 Too big methods


Methods with many number of lines of code are not easy to maintain and understand. Let’s search for methods with more than 60 lines.


unreal44.png


Unreal Engine source code contains more than 150 000 methods, so less than 1% could be considered as too big.


7-2 Methods with many parameters


unreal45.png


Few methods have more than 8 parameters, most of them are generic, to avoid defining variadic functions, like the case of TCStringt::Snprintf methods.


7-3 Methods with many local variables


unreal46.png


Less than 1% have many local variables.


7-4 Methods too complex


Many metrics exist to detect complex functions, NBLinesOfCode, Number of parameters and number of local variables are the basic ones.


There are other interesting metrics to detect complex functions:

  • Cyclomatic complexity is a popular procedural software metric equal to the number of decisions that can be taken in a procedure.
  • Nesting Depth is a metric defined on methods that is relative to the maximum depth of the more nested scope in a method body.
  • Max Nested loop is equals the maximum level of loop nesting in a function.

The max value tolerated for these metrics depends more on the team choices, there are no standard values.


Let’s search for methods that could be considered as complex in the Unreal Engine code base.


unreal49.png


Only 1.5% are candidate to be refactored to minimize their complexity.


7-4 Halstead complexity

Halstead complexity measures are software metrics introduced by Maurice Howard Halstead in 1977. Halstead made the observation that metrics of the software should reflect the implementation or expression of algorithms in different languages, but be independent of their execution on a specific platform. These metrics are therefore computed statically from the code.

Many metrics were introduced by Halstead, let's take as example the TimeToImplement one, which represents the time required to program a method in seconds.

unreal50.png

1748 methods require more than one hour to be implemented.

8- RTTI


RTTI refers to the ability of the system to report on the dynamic type of an object and to provide information about that type at runtime (as opposed to at compile time). However, RTTI has become controversial within the C++ community. Many C++ developers choose to not use this mechanism.

What about Unreal Engine developers team?

unreal60.png

No method uses the dynamic_cast keyword, The Unreal Engine team chose to not use the RTTI mechanism.

9- Exceptions


Exception handling is also another controversial C++ feature. Many known open source C++ projects do not use it.

Let's search whether in the Unreal Engine source code an exception was thrown.

unreal62.png

Exceptions are thrown in some methods; let's take as example the RaiseException one:

unreal61.png

As specified in their comments, the exception could be generated for the header tool, but in normal runtime code they don't support exception handling.

10- Some final statistics


10-1 most popular types

It’s interesting to know the most used types in a project; indeed these types must be well designed, implemented and tested. And any change occuring to them could impact the whole project.

We can find them using the TypesUsingMe metric:

unreal71.png

However there's another interesting metric to search for popular types: TypeRank.

TypeRank values are computed by applying the Google PageRank algorithm on the graph of types’ dependencies. A homothety of center 0.15 is applied to make it so that the average of TypeRank is 1.

Types with high TypeRank should be more carefully tested because bugs in such types will likely be more catastrophic.

Here’s the result of all popular types according to the TypeRank metric:

unreal52.png

10-2 Most popular methods

unreal54.png

10-3 Methods calling many other methods

It’s interesting to know the methods using many other ones, It could reveal a design problem in these methods. And in some cases a refactoring is needed to make them more readable and maintainable.

unreal57.png

Improve Player Retention Reacting to Behavior [Server Scripts]

$
0
0
Picture this. After you’ve fought hard to release your game and you’re lucky enough to get a pretty decent number of users downloading your game, they get tangled up in Level #8 and can’t manage to get past it.

According to your analytics service, they seemed to be enjoying the game so far, but now the users are logging in at a lower rate. You’re losing active users. What’s going on?

There’s no question they like your game. Why would they play up to Level #8 if they didn’t? The thing is maybe you overestimated the user's ability to reach enough proficiency in the game to advance to further levels. Level #8 might be too difficult for most users and that’s why they are no longer logging in to the game. Thus, you’re losing users.

There are many solutions to the problem. You could reduce the number of enemy waves, add player stamina, change the timing of the game or add more game levels before they get to Level #8, allowing users to be more game-savvy by then.

You do what you have to do


Ok, you decide to modify the game’s parameters to ease it on your users so they keep on enjoying the game and choose to stay. Say you’re a programming beast and that you’re able to swiftly adjust the code and successfully test the game mechanics in one day. That’s good and all but you still need Google Play or the App Store to approve it and publish it - a day for the former and a whopping 7 days for the latter.

The lack of control over the response time for the in-game modifications hampers your ability to make the game progress. I don’t want to be a bummer, but you’re still losing users.

Having passed the period of time for the changes to go live - which seemed longer than you care to admit - users still have to accept to download the latest version of the game. Some of them do it right away, some might do it at a later time… or never at all. After all that rush to get the newest version active, it is still up to your game users having the latest version if you want to see whether the fixes have a positive effect.

Right, you continue losing users.

It’s really hard to get good feedback from the users - and react accordingly - when not all of them are running the latest version.


water-slide.jpg


You can turn it around


The use of external servers to store game mechanics data is a rapidly increasing tendency among game developers. Offering flexibility and a quick response is key to be adaptable to the needs of your users. Imagine a service that cuts your response time to a minimum, gives uninterrupted game play to your users and lets you test different approaches at the same time.

Why store parameters in an external server


#1 Never let others dictate your response time

Your response time shouldn’t be much longer than what you spend on tweaking your code. Fixing it to have the changes go live barely at the same time, you’ll be able to deliver a quicker response to your users’ needs and keep them engaged. Getting user data faster allows you to decide if the changes came to effect or if you need another iteration of changes.

#2 Don’t annoy users with a game update download

Having your users experience the updated game on-the-go releases their need to download any game updates manually. They’ll always play the latest version of the game so you’ll get very reliable user data because there won’t be different versions running at the same time.

#3 Find solutions on-the-go

Upload different solutions to the same problem to simultaneously test which one performs better among users. Split testing subtle code differences will return twice as many data, which means reducing the time you spend to find the best adjustments for the game.

Server side scripts allow maximum configurability


Take this as an example. You could create a config collection in the server side to keep a simple config JSON. This would be the code for it.

{
"levels":
{
"1": { "difficulty": 1, "time": 60 },
"2": { "difficulty": 3, "time": 70 },
"3": { "difficulty": 5, "time": 80 },
"4": { "difficulty": 7, "time": 90 },
"5": { "difficulty": 9, "time": 100 },
},
"adsplatform": "iads",
"coinseveryday":
{ "1": 10, "2": 20, "3":30, "4": 60, "5": 100 }
}

Every time a user opens a new game session you can check if this config has been changed or not. If it has, it’ll start the download of the new game’s config and will start using them right away.

Besides, you can also implement A/B testing with one custom script very easily.
  • Create two or three JSON config samples in the collection.
  • Define a custom script - new server function - called getGameParameters.
  • Call this function every time a user logs in to your game.
This function will be a simple Javascript - using a round robin technique - that will decide what JSON has to be sent: A, B or C. This way the decision point is on server side, can be easily changed and you will be able to test different simultaneous configurations to get better results.

Now you know you can improve user experience storing game mechanics in the server side, what other situations do you think you could use this for your game?

I'd like to know! Leave a comment.


This was originally posted in Gamedonia blog.

Viewing all 17825 articles
Browse latest View live


<script src="https://jsc.adskeeper.com/r/s/rssing.com.1596347.js" async> </script>