Quantcast
Channel: GameDev.net
Viewing all 17825 articles
Browse latest View live

Building a First-Person Shooter Part 1.1: Visual Studio Setup

$
0
0
This is a continuation of a multi-part tutorial on Building a First-Person Shooter - Part 1.0: Creating a Room.

Setting up the VS 2010 project


Now that we've finished building our level it is now time to begin the coding side of the project.  For this lesson, we will be using Visual Studio 2010 on Windows, but you can follow the equivalent steps for Xcode on Mac.  Right-click on the project name in the project list and select the Open Folder menu item from the context menu that pops up.  This will open the project folder in Windows Explorer (or Finder on Mac).  Navigate to the Projects/Windows folder and open the file MyGame.sln. At this point in time we are going to create a few blank C++ and Header files that we will be fleshing out throughout the tutorial.

Attached Image: Cpp1.png

Attached Image: cpp2.png

Creating C++ Files


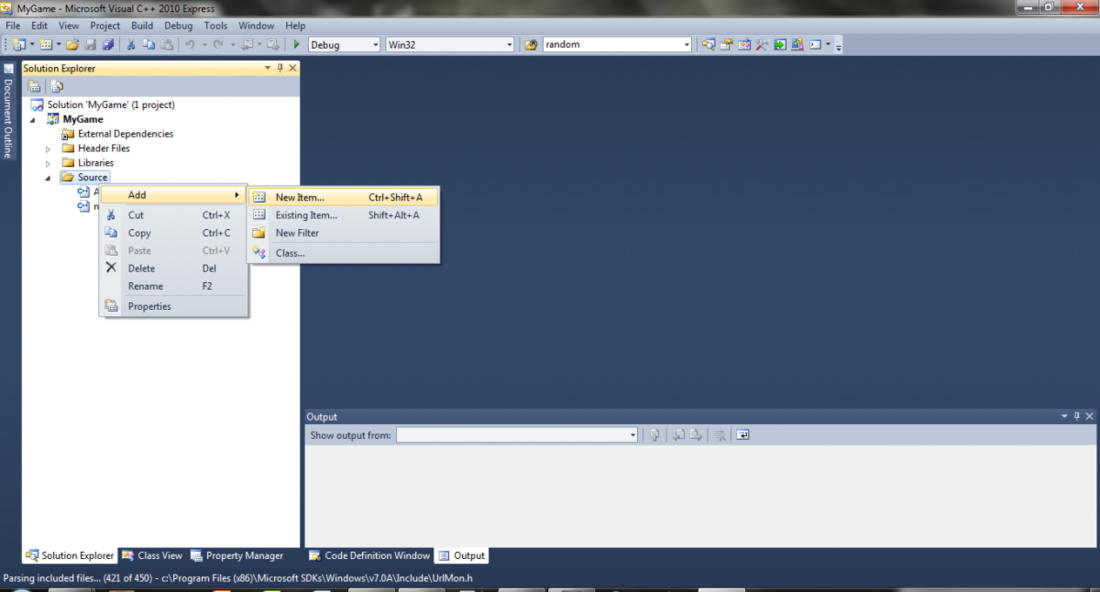
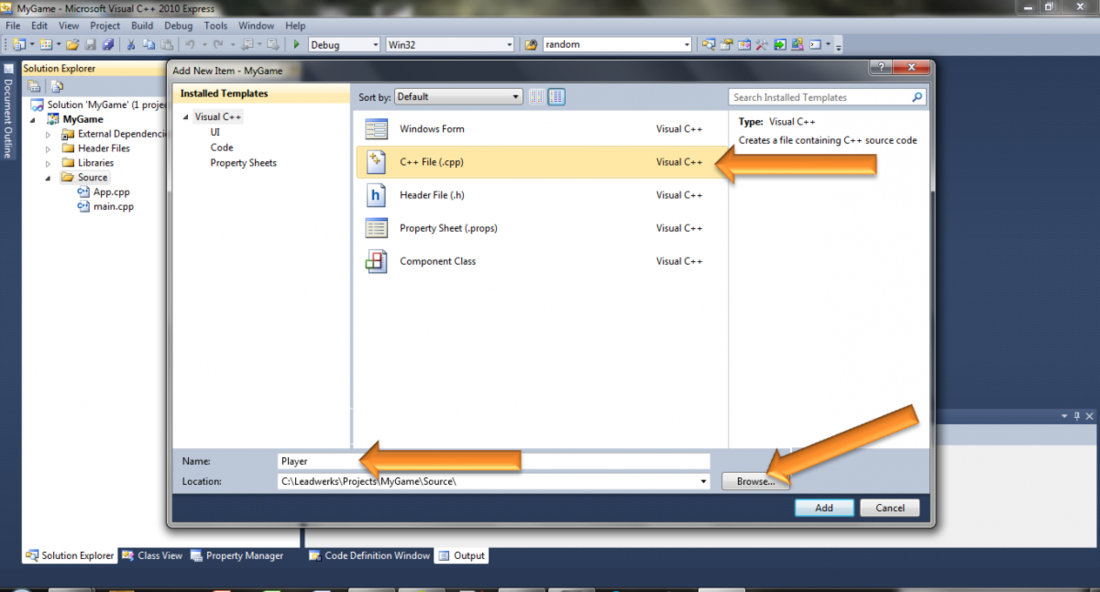
In the Visual Studio’s Solution Explorer (normally located on the left side of the screen) right click on the Source folder and select Add->New Item, A new item window will pop up and we are going to select “C++ File (.cpp)” and name the file “Player” we also want to change the location of this file so on the right side of “Location” click the browse button and navigate to “MyGame/Source” and click “Select Folder” finally click Add and our new Player.cpp file will appear in the Solution Explorer. We will also want a “Node.cpp” file so repeat the process again but this time name the file “Node”.

Attached Image: cpp3.png

Attached Image: cpp4.png

Creating Header Files


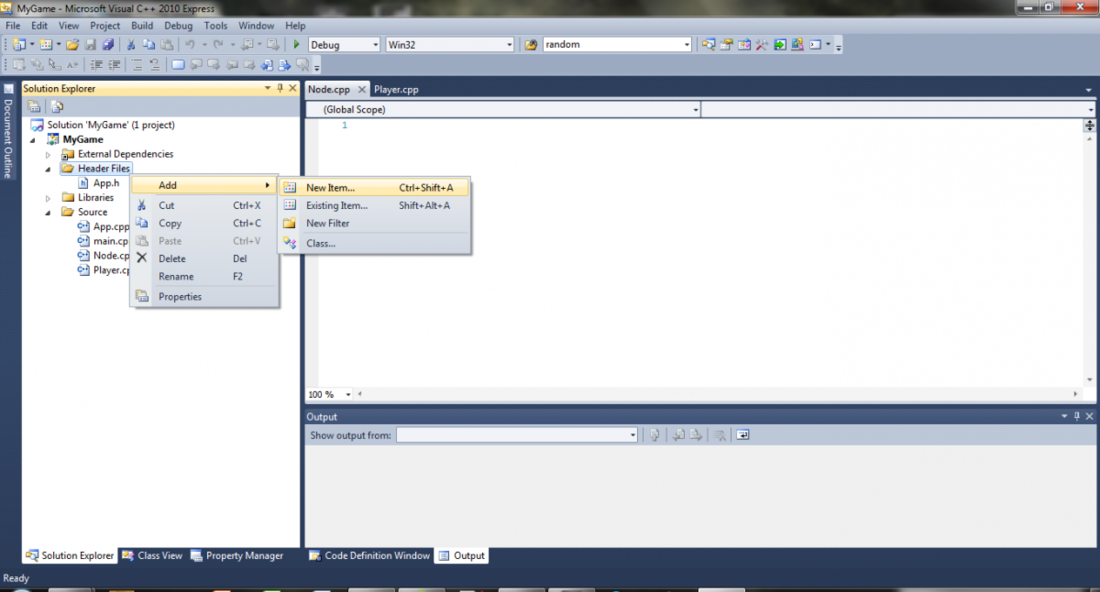
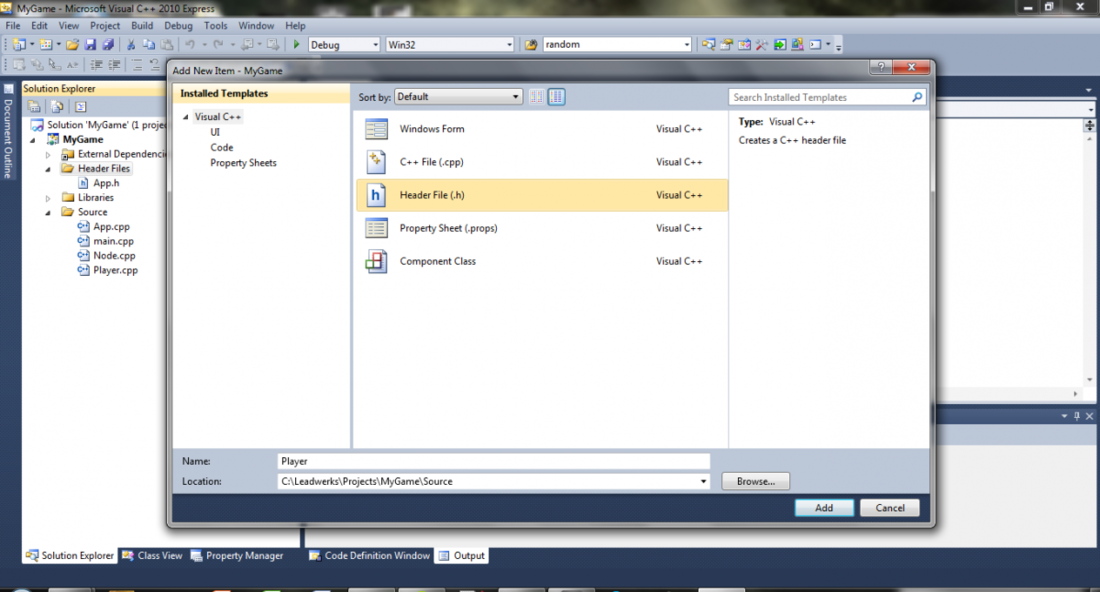
Adding header files into Visual Studios 2010 is essentially the same process as adding in a cpp file. This time we will click on the “Header Files” folder in the solution explorer, right click and select Add->New Item. The window from before will pop up, but now we select “Header File (.h)” instead. Once again we will want these files saved in the “MyGame/Source” folder so remember to save to the correct folder. We are going to make three headers for this tutorial so repeat the steps of adding a new file for Player.h, Node.h, and MyGame.h.

Attached Image: cpp5.png

Attached Image: cpp6.png

Now we're ready to start coding.

MyGame.h


Inside MyGame.h we are going to set a series of #define statements that will allow other files to just make a single #define call. You will notice a call to #pragma once, this is a preprocessor directive that says “only include the following files if they’re not already included”. After this call we insert #define calls to leadwerks.h, node.h, and player.h:

#pragma once
#include "Leadwerks.h"
#include "Node.h"
#include "Player.h"

App Class


By default the App class contains two functions for structuring a game.  App::Start() will be called when the game begins, and App::Loop() will be called continuously until the game ends. Inside App.h we are going to remove the default camera and add in a Player, the resulting file should look as such:

#pragma once
#include "Leadwerks.h"
#include "MyGame.h"

using namespace Leadwerks;

class App
{
public:
    Window* window;
    Context* context;
    World* world;
    Player* player;

    App();
    virtual ~App();

    virtual bool Start();
    virtual bool Loop();
};

Since we removed the default camera from App.h we will also need to remove the initialization call within the App constructor inside App.cpp:

App::App() : window(NULL), context(NULL), world(NULL){}

Next we are going to create a new instance of a player in App::Start() as well as call the player’s Update function in App::Loop():

//Create the player
player = new Player;
//Update the player
player->Update();

Also inside the App::Start() function, we are going to load an ambient background sound, then have that sound play on a continuous loop.  (We'll replace this with something more advanced later on, but this is fine for now):

Sound* sound = Sound::Load("Sound/Ambient/cryogenic_room_tone_10.wav");
Source* source = Source::Create();
source->SetSound(sound);
source->SetLoopMode(true);
source->Play();

By the end of these changes your finished App class should look like the following:

#include "App.h"
#include "MyGame.h"

using namespace Leadwerks;

App::App() : window(NULL), context(NULL), world(NULL) {}

App::~App()
{
    //delete world; delete window;
}

bool App::Start()
{
    //Create a window
    window = Window::Create("MyGame");

    //Create a context
    context = Context::Create(window);

    //Create a world
    world = World::Create();

    //Create the player
    player = new Player;

    std::string mapname = System::GetProperty("map","Maps/start.map");
    if (!Map::Load(mapname)) Debug::Error("Failed to load map \""+mapname+"\".");

    //Move the mouse to the center of the screen
    window->HideMouse();
    window->SetMousePosition(context->GetWidth()/2,context->GetHeight()/2);

    Sound* sound = Sound::Load("Sound/Ambient/cryogenic_room_tone_10.wav");
    Source* source = Source::Create();
    source->SetSound(sound);
    source->SetLoopMode(true);
    source->Play();
    world->SetAmbientLight(0,0,0,1);

    return true;
}

bool App::Loop()
{
    //Close the window to end the program
    if (window->Closed() || window->KeyDown(Key::Escape)) return false;

    //Update the game timing
    Time::Step();

    //Update the world
    world->Update();

    //Update the player
    player->Update();

    //Render the world
    world->Render();

    //Sync the context
    context->Sync(true);

    return true;
}

Node Class


Next we are going to create a base class which we will call Node.  All classes in our game will be derived from this base class.  This is called inheritance, because each class inherits members and functions from the class it's derived from.  We can override inherited class functions with new ones, allowing us to create and extend behavior without rewriting all our code each time.

The Node class itself will be derived from the Leadwerks Object class, which is the base class for all objects in Leadwerks.  This will give us a few useful features right off the bat.  Our Node class can use reference counting, and it can also be easily passed to and from Lua.  The node header file will get just one member, an Entity object:

#pragma once
#include "MyGame.h"

using namespace Leadwerks;

class Node : public Object
{
public:
    Entity* entity;

    Node();
    virtual ~Node();
};

In the Node.cpp file, we'll add the code for the Node constructor and destructor:

#include "MyGame.h"

Node::Node() : entity(NULL)
{
}

Node::~Node()
{
    if (entity)
    {
        if (entity->GetUserData()==this) entity->SetUserData(NULL);
        entity->Release();
        entity = NULL;
    }
}

Our code foundation has now been laid and it is finally time to move onto developing the player class, which will be the subject of our next lesson.

MVC and CBES as it Relates to Game Programming

$
0
0
Required knowledge would be intermediate programming, different styles of programming paradigms, and OOP. The requirement for OOP is to understand fully the difference between inheritance and composition. If those terms are unfamilliar please look them up before continuing.

Component Based Entity System


Now, we must discuss what exactly a CBES is, in order to understand how the MVC paradigm works.

Component


Components are the most basic elements that our entities are comprised of. Components can be very granular or very fine depending on taste or desire. For example, a physics component could represent an object in the world as a rigid body, a rag doll, a ray, etc or each of those could be its own component.

By its very definition, components are "a constituent part [or] ingredient." This means that to make up an entity we must combine or compose different components together.

So to create a car we would combine a physics component (for movement and collision), a model component or maybe a sprite component (for rendering), a sound component or 2 (for horn, brake squeal, and engine noise), and a control component (for user input). Once all of these are combined we have created a car. This could have been done using traditional OOP inheritance (PhysicsObject -> 3DPhysicsObject -> Car <- SoundEffect), but now if a different type of car, such as a race car, with a different type of physics or a second model for the driver using the traditional inheritance way becomes more cumbersome as we either need to add another layer of inheritance or create a new class just for the 3DPhysicsObject with two models. However using components we just remove the old model component and add in our 2-model component, or if the components are designed right we can just add a second model component.

Components don't do anything though. They are just a way to store or model data for use by the system. That isn't to say components can't have functions or methods, but these shouldn't perform any logic with regard to data, and merely act as helpers and convenience for the programmer (such as AddPoint() for a 3d component or GetSongLength() for an audio component.)

Entities


Entities represent anything in the game's program. From actors, to sound effects, to UI widgets. Each entity has properties and components. Entities are read-only (in a vague sense) objects in the program that tie together the components and respective properties for that entity. Entities are just containers or glue and shouldn't have any functionality at all except for perhaps parent-child-sibling traversal.

Systems


Systems are the meat of the design. Systems operate on or control the data stored in components. Systems must provide a means for the programmer to manipulate the data in the components they control, and a component should only be allowed to be controlled by a single system. For example, only the Physics system can move a physics component and the Script System should tell the Physics system to apply the force instead of moving the physics component itself.

Model, View, Control


Next up, we will discuss how the MVC paradigm works great with regards to CBES.

Models


This section will be fairly self-explanitory as we just covered it in 2 previous sections (Components and Entities). Components model the data in a specific way that allows systems to control it and views to present it. Modeling is "a system of postulates, data, and inferences presented as a mathematical description of an entity or state of affairs; also : a computer simulation based on such a system." That is to model data is to store it in a specific way.

Entities aren't technically part of the data model as they are just an abstract concept that is used as a glue or container to hold the components and properties associated with the entity.

Controls


Controls are the systems that control or manipulate the data stored by the components. Systems can also be views, so care must be taken to ensure that a system is well-defined in its actions and not attempt to maniupulate data while trying to present a view of it.

Systems could include physics simulations, user input, network input, and script input. The pattern should be clear in that controls act upon input (direct in the case of input or indirect in the case of simulations.)

Views


Views are how the data in the components are rendered, presented, or transmitted to the user or clients (networked or otherwise). Views might be a rendering engine, database query, audio playback, or even a network transmission.

Views must take care when reading components so they don't read it as a control is operating on that set of components. Views typically only present data from a specific set of components, but when provided with how to understand the data from another component, a system could present it.

The Flow


Inside the game program execution flow should follow this simple pattern:

  1. Load and model the data
  2. Loop
    1. Gather inputs
    2. Call control systems
    3. Call view systems

This will ensure that the view is presented the most updated data. This will also ensure that views don't try to present components that are being manipulated by controls causing concurrency issues or other similar problems (depending on the programming language or system.)

Article Update Log


2 May 2013: Initial release

4gency’s First Year Pt. 1: A Look at Armored Drive

$
0
0
This is Part One of a series of posts about 4gency’s first year in operation, including data on monetization, app marketing campaigns, and user acquisition. If you’re interested in learning more, contact charles@4gency.com.

It’s been a heck of a first year in operation. With two games, four platforms, three monetization models, over 60,000 users and almost a quarter-million gaming sessions logged, we’re glad to still be in one piece. Seriously, it’s tough out there.

We’ve got two games to talk about – let’s start with the second one first; with only one platform and form factor (iPhone), it’s a simpler study. Buckle up, and we’ll dig into the whole story.

Introducing Armored Drive

  • Originally developed for Windows Phone by Elbert Perez, a developer with 2M+ game downloads on Windows Phone
  • Ported to iPhone by Nick Gravelyn and Elbert Perez, published by 4gency
  • Built with an in-app purchase (IAP) model, in-app advertising included later
  • Launched worldwide on iPhone around Thanksgiving 2012
Armored Drive is a spy-car themed endless racer. Players use tilt controls on their phone to move their car left and right on the road, and touch controls to deploy weapons and gadgets to knock out other cars and get rewards. Distance and combat prowess reward the player with coins, an in-game currency, used to purchase more ammunition, gadgets, car upgrades and more.

Elbert Perez, who developed the original Windows Phone game using a free-with-ads model, gave 4gency the opportunity to take the game to iPhone, going to not only a new platform, but a new revenue model as we implemented in-app purchases (IAP) in hopes of more deeply monetizing the game.

Design Considerations


We felt Armored Drive was a good candidate for IAP. An endless racer with similar traits to Jetpack Joyride, Armored Drive had upgrades to weapons, gadgets, and car appearance that would attract a variety of players. A system of ranks and challenges brought players back in and encouraged repeat plays and investment in buying more ammo and upgrades.

We felt that we could implement IAP in a reasonable, non-annoying way by using real currency only as a way to more quickly attain in-game currency. By playing the game, a player could get kills, distance, and rank up for good coin rewards without having to ever buy the consumable IAP coin packs or durable IAP “coin doubler” we offered in the real-money marketplace.


    Attached Image: photo-1.png


There was no “end” to the game, per se – iOS leaderboards were set up to sort on maximum distance in a single run, so an expression of superiority was not simply an aggregate number of times played, but rather how effectively a player could use their tools and skills in a single effort.

Designs for “in-session” drops of additional gear were considered, as a way of extending run length per session, but had to be shelved for lack of time.

Pricing Considerations


Initial designs had Armored Drive being free from Day 1. However, a Monte Carlo-style simulation run between an IAP-only and a paid-with-IAP pricing model showed paid as the probabilistic winner in a higher percentage of scenarios. I used a modified Hubbard Research model, as described in the book “How to Measure Anything” and available in Excel form on the Hubbard Research site.


Attached Image: ArmoredDrive_RevenueModels_Vert.png


And – though we didn’t know it at the time – going paid first meant we could deploy a free promotion later to take advantage of the anchoring effect, an event that we later found drove over 15,000 users to our game virally, thanks to the network of twitterbots scouring the App Store.

In the end, the prediction made by the Monte Carlo simulation turned out to be right, if overoptimistic about the number of users that would find and convert on our game.

To this day, the amount of money made on $0.99 paid copies of the game outweighs the amount of money made on IAP.

How We Did


We staged our release through a free, quiet pre-release period in Canada, Russia, and China to try out the IAP and determine depth of spend. In the test environment, we ended up with 400 downloads and $1 in revenue, so roughly one-quarter of a cent DARPU.

It was discouraging at best. Regardless of how many downloads we got, the percentage of conversions was so low we’d be assured almost no return. It was at that point that we ratified going with the paid model. It wouldn’t be for several months until we saw the Big Data trend that showed us why we had very little chance of monetizing our game.

In the end, Armored Drive went through four versions, bounced between free and paid four times, and acquired about 20,000 total users. As this was a bootstrapped effort, we had no major marketing partners and worked through our own media channels to try to drive exposure and engagement in the game.

Total revenues equaled about $560 over 20,000 total users, or roughly three cents DARPU.


Attached Image: ArmoredDrive_PostMortem_OverallPerformance.png


What Worked, What Didn’t


Armored Drive was heavily instrumented to send back metrics ; we got a good idea of how we were stacking up in a variety of ways:
  • Good engagement – 180 seconds per session, 2.8 sessions a month, above Action games average
  • Bad acquisition - less than 10% used viral “recruit” feature, less than 1% crossover with 4gency’s other game
  • Bad monetization - DARPU $0.03, IAP < 20% of all revenue earned on the game including ads and paid downloads
The following campaigns chart outlines how each move made to the monetization and acquisition strategy landed with our user base. Important questions are marked in red – these are the numbers that surprised or frightened us.


Attached Image: Screen-Shot-2013-05-05-at-9.47.01-PM.png


What we learned:
  • Paid and free users are different creatures: while many paid users monetized, almost no free users paid for any IAP in the initial free weekend in December 2012. At our DARPU, to even get the same amount of IAP revenue from free users that we got from paid/ads, we’d need to get 70x more, or close to 700,000 users.
  • Finding whales is hard: Tied to the item above, assuming average IAP spend is $14 as Flurry suggests, that’s less than 7 IAP buyers (and probably 3 of them are “whales” > $10 spend). This suggests we missed the deepest, most spend-eager market. Our ability to pivot our metrics on just the big spenders got hobbled by a wave of false events thanks to IAP hackers (see below).
  • Getting free users can happen almost automatically: users in the low-thousands will respond to a price-drop to free without any additional marketing – Twitter bots will pick up the change and drive traffic virally.
  • Ads can work well, but they need to be heavily targeted: in January, we went to ad support – targeted ads (via PlayHaven) drove 13x the revenue of non-targeted ads, and made close to the amount we made with paid downloads in just a few months.
  • You’ll get hacked: Just 24 hours after releasing, our metrics sent back hundreds of false “purchase completed” events for our most expensive items. 5,000 of these events were reported over several months, while only 60 legit purchases were ever made. About 50% of this traffic came from China, where 50% of our game’s total userbase was located.
  • Aquisition means nothing without monetization: we investigated several acquisition mechanisms, such as FreeAppADay and Flurry and PlayHaven acquisition departments – in general, user acquisition for mobile is between $2.00 and $2.50 per person – absolutely out of the question unless DARPU can rise above those levels. At our $0.03 DARPU this would be an almost suicidal waste of money.

So, What Happened?


Our minds were full with the most critical question: why was monetization so low? It was only a few months ago that a potential answer came up, from Apsalar: while games of the “Arcade” genre have high engagement (as we did), they have disastrously low monetization. Many will come, few will pay:


    Attached Image: Screen-Shot-2013-05-05-at-10.19.02-PM.png
    Image Source


In the end, Armored Drive on iOS had a number of issues that kept it from overarching success, and stand as lessons we’ll use to better target and execute our next titles:
  • Understand the micro-market: we chased the “iOS gamer”, when we really needed to be chasing the “iOS action-arcade gamer”. This more specific market has different spending limits, hooks, and likes/dislikes from the aggregate market, and we should ensure we target it directly.
  • Be vocal, early: Acquisition was not something we paid for. If we wanted to get big and dig into the paying markets, we needed exposure, and that means being known. In the end, our groundswell contacts gave us very little – only two articles were ever published about Armored Drive. We needed to court media earlier, more aggressively, and with dedicated partners to help us.
  • Believe the test market: In the end, the test marketing effort found the problem with IAP, and we moved forward with the launch. We may not have been able to predict the genre-wide issue with IAP that all action-arcade titles had, but we might have taken the data to heart and constructed a Plan B for our game.

Conclusion


Over 125,000 sessions of Armored Drive have been played worldwide; roughly 6,000 hours of gameplay. We are proud to have brought the game onto a new platform, to a new group of players. While the game’s success suffered the familiar problems of discoverability and the less-known issue of genre-specific monetization, it is gratifying to know the game is out there for players to enjoy.

Charles Cox
Founder/CEO, 4gency

If you’re interested in learning more about our experiences with Armored Drive, contact charles@4gency.com. You can also download the iOS version or the original Windows Phone version of the game.

Documentation for Indie Studios: Why do you need it?

$
0
0
I've asked myself a lot of times a simple question - Why do so many indie studios start a project, go midway with it and the all of a sudden, they close it? It just seems that things tend to fall apart for these projects. But where did it all go wrong? The answer here is simple - the basics were messed up at some point. The game ended up being built with a base and groundwork that can't support the features intended for the end result. Also, quite a lot of times, the base of the game just ends up causing bugs and havoc in your own project. While the reasons for this can be many, one is nearly always there - these projects were all missing good documentation.

This happens mostly due to the fact that a lot of indie studios are built from guys and girls, who already have a day job and they are doing this just for the love of making games. They (especially the developers) tend to write a lot of documentation at their work place and the last thing that they want is to do this all over again in their "pleasure" time.

Also a strong factor here is that a lot of indie studios don't have a team that is well split up into groups. A lot of the times, you don't get to have a Game Designer, Developers, Designers and Animators. Most of the times, you have (for example) two or three developers, one of which plays the role of the game designer as well, then you have your 3D artist, who does the animations, works with the textures and the 2D and UI design and by some chance out of this entire team, you have a person that knows a little something on sound, so he/she does this as well. There is nothing wrong with that - this way you are all on the same side, you all know what the product is going to be like, you all gain new skills/perspectives and it's all good.

Good Documentation is a Must


In the introduction, I've pretty much given a good example of what could go wrong if you don't have good documentation. However, let's take a look at what could "go right" and in the end - benefit the entire team:
  • You get the chance to map out your ideas and analyze them as time goes by.
  • Everyone knows what's going on with the project.
  • Getting someone up to speed with what you’re doing with the project.
  • Keeping the development consistent.
  • Keeping track of the code. This is very useful for a future refactoring process.
  • Getting an overview of the main points of your concept and the way that you implement them.
These all sound like nice features, right?

There is a point to be made here – a lot of game designers and producers neglect the documentation to a huge extent. Generally speaking, most non-developers tend to neglect it. This is really going to become a problem when your ideas start to water down and you don’t have your previous ideas written down. You really need something to revert to in order to see if your current idea is consistent/good or applicable at all.

So what does a good documentation consist of?

Let’s take a look at this list:
  • Project Blueprint
  • Design Documentation
  • Technical Documentation
  • Workflow Documentation
  • Version Documentation
Now we have to look at what these are and how/when to implement them so they can serve their use.

Documentation How-To


The process of writing down your documentation has to start after your first brainstorming or whatever it is that the individual indie studio does to get their concept together.

Enter the Blueprint – the project blueprint is something really, really important. It’s not supposed to be a several hundred pages long book – it’s supposed to be a blueprint. That means that in it, you have to write down only basic things and map out what you are going to do as a base idea and what you are going to build upon. This would include:
  • Basic story – don’t get into writing storyboards. Just map out that in your game, for example, a guy will be slaying dragons, obtaining items and saving damsels.
  • Basic gameplay features – again, no details. You don’t need to have the complete rule set or high-end concept. Try to put in perspective the genre of your game, the most basic concepts of the gameplay aspect and some ground rules. To build upon the example from the previous paragraph, you should put in your blueprint that you are going to have a 3rd person hack’n’ slash game, where you will have three playable classes, you will have bosses, mobs and you will gather items and level up.
  • Target groups – this one is very important. You need to map out your audience and also, the platform you are going to build this game for. That’s not to say that you are going to include numbers here or go out of your way to do deep research. Just something like this (again, applicable for the example above) – target is RPG fans, the platform is PC.
  • Basic technical specs – this is really the meat of your document. Here you should write down what you are going to use to develop the game. You are going to choose your programming language, your game engine (if you are planning on using such and not go too low-level), your database, probable server connections, software tools (for the 2D/3D arts and sound) and so on and so forth. Here you do not need to write code specifications. Just map out the technologies that you are going to use.
  • Estimations – this one is not to be taken lightly. It’s essential that your work is traced by your own project estimations. And by estimations here, I’m not talking so much in time, as this is something that simply can’t be really estimated, but more in terms of resources. You need to estimate what kind of resource is going to go into what you are about to do. Are you going to purchase some software, or are you planning to go Open Source? How are you going to match your development process? Are there some additional things that need to be included into the estimate? Those are the things you really need to worry about.
  • Other groundwork stuff – on a game-to-game basis, this may vary or not exist as a paragraph all together. However, some games have very specific needs. If such a thing is going on with your idea, you better write it down.
So how do we go on from here ?

Well, first of all, we have to build up stages of development. That alone is a document right there. Each development process has to have phases. Building the base of the game, then adding functionalities, then adding higher detail, then pushing emphasis on certain high-end features and so on and so forth. This is all to0 general, so I’ll give an example:
  • First stage – building core mechanics on a test stage/level/whatever. Here you will build up the core mechanics and have something to upgrade and build on, in order to make a better product in the future.
  • Second stage – refine mechanics from first stage and start to add features.
That’s kind of the way you would need to go about with this. After planning as much stages as you need, you eventually would get a stage with polishes, working game fragments and in this way, you will be able to get down with the final version of your product.

This is the part where it gets more complex.

In each of these stages, the Game Design documentation has to flow into the Technical Documentation. That’s to say that the Game Design documentation has to play the role of a task giver for the technical part. The things that you would have written down there have to be developed. To be developed, they pass through the technical documentation as a first base.

The Game Design documentation should contain the features that you would want to be developed. This means all of the gameplay features per development stage should be written down here. They should be detailed as much as possible, depending on the development stage. It is key to note all of your features in this document, as this is the guideline for the developers’ tasks ahead.

When writing this down you must have a clear idea with depth. If at some point you decide that this is not the way you want to handle things, you are just going to throw in additional and basically wasted work. Write down only the features that you are sure about. The ones that you still don’t see clear enough – leave them be for now. It’s better to plan this out before someone actually starts to work on it.

After the Game Design documentation is done, the Technical Documentation goes into play.

You map out the features from the game design and start to put them into programming perspective. You lay out the tasks in front of you and from here on out you start to think about actual coding. In the Technical Documentation you should map out your future tasks and their realization only as far as class and interface logic goes. That’s to say you don’t put actual code in there. You prepare the interfaces that are going to be implemented and think out their functionality. Then you think of the classes that are going to be into play, either implementing the interfaces or going for new functionalities all together. You think of Design Pattern usage, overall algorithms and so on. From there the developer will know how to build it into working code.

Now that that’s done, you should think of the Workflow Documentation – it is comprised of the development parts that need to be put together. To talk with examples – let’s say you have a 3D designer and a developer. You have to map out the activities of each of them and see where they cross paths. That’s to say that you should strive to put the people’s effort into doing a start-to-finish kind of thing on their tasks. The developer starts to work on character movement – he has to have a model to do that to. Yes, sure he can work on that with just a basic box … but that’s just not a good practice. At all. You need to get your resources ready at the right time. That’s where you need to map out the activities -  the 3D designer should be ready with the basic model and animation by the time the developer gets around to doing the player movement.

And last but not least, the Version Documentation. This one is very critical – write down what you change with each version. That way, if something goes extremely wrong, you will know when it happened and might be able to see what caused it.

However, a strong point here is that this documentation should be kept short and should have a list format. You should not include source code in this or anything technical for that matter. It becomes hard to read and bad for problem detection.

Interesting Points


Some things to look out for when writing this type of documentation:
  • You are a specialist at your field, be it developer, game designer and so on. Don’t become a documentation fiend. You should keep your documentation writing at the low end. Write the most important things and things that have strong dependencies. Don’t waste time.
  • Do not include personal thoughts in plain text in your documentation – this is work, not the fantasy universe of Lord of the Rings.
  • Keep in mind, this is internal documentation for use within the team. High level of professional and business talk only wastes your time and that of your colleagues. Go straight to the point.
  • No need for tables and graphs. Period.

Conclusion


Documenting what you and your team are doing is something very important. It can save a lot of time in development and increase efficiency to a new level. However, documentation alone does not guarantee success. It cannot replace good technical expertise or the willingness go get such. It cannot compensate for lackluster design and bad code. It cannot make your story better or your code more readable.

If you truly want your product to succeed, be creative and at any level (beginner, intermediate, advanced etc.) try to be up to par with the best practice guides.

Article Update Log


02.05.2013 – The article was first written.

Game Development with Win32 and DirectX 11 - Part 00.5: Concept

$
0
0

Introduction


So you might be wondering why this tutorial is numbered Part 00.5 rather than Part 2. Since I released the first tutorial, I've been asked in the comments and through PM what type of game I am making and what concepts I plan on covering in this tutorial series. So without further adeu, I present my tutorial series overview.

Note:  Due to my busy schedule, I will most likely not be able to add a new tutorial part on a weekly basis as I originally planned. I will try and publish new tutorials as soon as I can, but this is no guarantee that I will be able to keep it on a weekly schedule.


Game Concept


This was one of the hardest things for me to decide on. I already knew I didn't want to create another FPS-type game (there are too many tutorials on that already), but I also wanted to choose a style and genre that would allow for almost infinite expansion. In the end, I decided to write this tutorial for an open-world action/adventure game. I'm thinking along the lines of Grand Theft Auto, Red Dead, and Midnight Club (all produced by Rockstar Games). Now, I'm not going to try and copy them, but rather develop a game with a similar gameplay style.

Tutorial Topics


Once we have a working game framework going, we'll start to expand onto more advanced topics. Some of these topics (in no particular order) include:
  • Skeletal and vertex animations.
  • Full and proper physics engine (with physically adjusted animation).
  • Advanced rendering technques (e.g. tile-based deferred rendering, HDR, global illumination).
  • Client-server and client-client multiplayer support.
  • Scripting language support (either Python or Lua).
  • Procedural game generation.
  • Xbox 360 Controller support with XInput.
It should be noted that these aren't the only concepts that will be covered, but rather the more interesting ones. None of these will be covered though until we have a fully working framework (proper graphics, sound, and keyboard & mouse input).

Multiplayer Pong with Go, WebSockets and WebGl

$
0
0
This article will guide you through the implementation of a pong server in Go and a pong client in JavaScript using Three.js as the render engine. I am new to web development and implementing pong is my first project. So there are probably things that could be done better, especially on the client side, but I wanted to share this anyway.

I assume that you are familiar with Go and the Go environment. If you are not, I recommend doing the Go tour on http://golang.org.

Setting up the Webserver and the Client


We first implement the basic webserver functionallity. For the pong server add a new directory to your go workspace, e.g., "$GOPATH/src/pong". Create a new .go file in this directory and add the following code:

package main

import (
	"code.google.com/p/go.net/websocket"
	"log"
	"net/http"
	"time"
)

func wsHandler(ws *websocket.Conn) {
	log.Println("incoming connection")
	//handle connection
}

func main() {
	http.Handle("/ws/", websocket.Handler(wsHandler))
	http.Handle("/www/", http.StripPrefix("/www/",
		http.FileServer(http.Dir("./www"))))
	go func() {
		log.Fatal(http.ListenAndServe(":8080", nil))
	}()

	//running at 30 FPS
	frameNS := time.Duration(int(1e9) / 30)
	clk := time.NewTicker(frameNS)

	//main loop
	for {
		select {
		case <-clk.C:
			//do stuff
		}
	}
}

We use the "net/http" package to serve static files that are in the "./www" directory relative to the binary. This is where we will later add the pong client .html file. We use the websocket package at "code.google.com/p/go.net/websocket" to handle incoming websocket connections. These behave very similar to standard TCP connections.

To see the webserver in action we make a new directory in the pong directory with the name "www" and add a new file to the directory called "pong.html". We add the following code to this file:

<html>
<head>
<title>Pong</title>
<style>
    body {
        width: 640px;
        margin: 0 auto;
        font-family: Tahoma, Verdana, Arial, sans-serif;
    }
</style>
<script src="http://ajax.googleapis.com/ajax/libs/jquery/1.4.2/jquery.min.js"></script>
<script src="https://raw.github.com/kig/DataStream.js/master/DataStream.js"></script>
<script src="http://threejs.org/build/three.min.js"></script>
<script type="text/javascript">
var ws

$(document).ready(function() {
	if ("WebSocket" in window) {
		// Let us open a web socket
		ws = new WebSocket("ws://"+document.location.host+"/ws/pong");
		ws.binaryType = "arraybuffer";
		ws.onopen = function() {
			console.log("connection open")
		}
		ws.onmessage = function(evt) {
		}
		ws.onclose = function() { 
			console.log("Connection is closed..."); 
		};

	}else{
		alert("no websockets on your browser")
	}
})
</script>
</head>
<body>
</body>
</html>

This code simply opens a websocket connection to the server. The libraries which will be used later in this tutorial are already included. Namely, we will use jQuery for some helper functions, Three.js to render stuff and a small helper library named DataStream.js which helps parsing data received from the server. We could also download those .js files and put them into the "www" directory and serve them directly from our Go webserver.

Now if we go back to the pong diretory and start the pong server (type "go run *.go" in the terminal) you should be able to connect to the webserver in your browser. Go to the url "http://localhost:8080/www/pong.html" and you should see a message in your terminal saying "incoming connection".

If you want to include one or several websocket-based games in a larger website I recommend using nginx as a reverse proxy. In the newest version you can also forward websocket connections. In a unix-type operating system this feature can be used to forward the websocket connection to a unix domain socket on which the game server is listening. This allows you to plug in new games (or other applications) without reconfiguring or restarting the webserver.

Handling Connections on the Server


We add three new types to store information for each client connection:

type PlayerId uint32

type UserCommand struct {
	Actions uint32
}

type ClientConn struct {
	ws         *websocket.Conn
	inBuf      [1500]byte
	currentCmd UserCommand
	cmdBuf     chan UserCommand
}

The type PlayerId is used for unique identifiers for the players. The struct UserCommand describes the information that is sent from the clients. For now it contains an integer that we use as a bitmask, which basically encodes the keyboard state of the client. We will see how to use that later on. Now we come to the actual ClientConn struct. Each client has a websocket connection which is used to receive and send data. The buffer is used to read data from the websocket connection. The currentCmd field contains the most recent received user command.

The last field is a buffer for user commands. We need this buffer since we receive the user command packages from the client asynchronously. So the received commands are written into the buffer and at the beginning of each frame in the main loop we read all commands from each player and place the most recent one in the currentCmd field. This way the user command cannot suddenly change mid-frame because we received a new package from the client.

So lets see how to implement the wsHandler function. We first need to add a new global variable

var newConn = make(chan *ClientConn)

that we need to handle incoming connections sychronously in the main loop. Next we have to import two additional packages, namely "bytes" and "encoding/binary". Now we are set up to handle incoming connections and read incoming packages:

func wsHandler(ws *websocket.Conn) {
	cl := &ClientConn{}
	cl.ws = ws
	cl.cmdBuf = make(chan UserCommand, 5)

	cmd := UserCommand{}

	log.Println("incoming connection")

	newConn <- cl
	for {
		pkt := cl.inBuf[0:]
		n, err := ws.Read(pkt)
		pkt = pkt[0:n]
		if err != nil {
			log.Println(err)
			break
		}
		buf := bytes.NewBuffer(pkt)
		err = binary.Read(buf, binary.LittleEndian, &cmd)
		if err != nil {
			log.Println(err)
			break
		}
		cl.cmdBuf <- cmd
	}
}

The wsHandler function gets called by the http server for each websocket connection request. So everytime the function gets called we create a new client connection and set the websocket connection. Then we create the buffer used for receiving user commands and send the new connection over the newConn channel to notify the main loop of the new connection.

Once this is done we start processing incoming messages. We read from the websocket connection into a slice of bytes which we then use to initialize a new byte buffer. Now we can use the Read function from "encoding/binary" to deserialize the buffer into a UserCommand struct. If no errors ocurred we put the received command into the command buffer of the client. Otherwise we break out of the loop and leave the wsHandler function which closes the connection.

Now we need to read out incoming connections and user commands in the main loop. To this end, we add a global variable to store client information

var clients = make(map[PlayerId]*ClientConn)

We need a way to create the unique player ids. For now we keep it simple and use the following function:

var maxId = PlayerId(0)

func newId() PlayerId {
	maxId++
	return maxId
}

Note that the lowest id that is used is 1. An Id of 0 could represent an unassigned Id or something similar.

We add a new case to the select in the main loop to read the incoming client connections:

...
		select {
		case <-clk.C:
			//do stuff
		case cl := <-newConn:
			id := newId()
			clients[id] = cl
            //login(id)
		}
...

It is important to add the clients to the container synchronously like we did here. If you add a client directly in the wsHandler function it could happen that you change the container while you are iterating over it in the main loop, e.g., to send updates. This can lead to undesired behavior. The login function handles the game related stuff of the login and will be implemented later.

We also want to read from the input buffer synchronously at the beginning of each frame. We add a new function which does exactly this:

func updateInputs() {
	for _, cl := range clients {
		for {
			select {
			case cmd := <-cl.cmdBuf:
				cl.currentCmd = cmd
			default:
				goto done
			}
		}
	done:
	}
}

and call it in the main loop:

		case <-clk.C:
			updateInputs()
			//do stuff

For convenience later on we add another type

type Action uint32

and a function to check user commands for active actions

func active(id PlayerId, action Action) bool {
	if (clients[id].currentCmd.Actions & (1 << action)) > 0 {
		return true
	}
	return false
}

which checks if the bit corresponding to an action is set or not.

Sending Updates


We send updates of the current game state at the end of each frame. We also check for disconnects in the same function.

var removeList = make([]PlayerId, 3)

func sendUpdates() {
	buf := &bytes.Buffer{}
	//serialize(buf,false)
	removeList = removeList[0:0]
	for id, cl := range clients {
		err := websocket.Message.Send(cl.ws, buf.Bytes())
		if err != nil {
			removeList = append(removeList, id)
			log.Println(err)
		}
	}
	for _, id := range removeList {
		//disconnect(id)
		delete(clients, id)
	}
}

We use the Message.Send function of the websocket package to send binary data over the websocket connection. There are two functions commented out right now which we will add later. One serializes the current game state into a buffer and the other handles the gameplay related stuff of a disconnect.

As stated earlier we call sendUpdates at the end of each frame:

...
		case <-clk.C:
			updateInputs()
			//do stuff
			sendUpdates()
...

Basic Gameplay Structures


Now that we have the basic server structure in place we can work on the actual gameplay. First we make a new file vec.go in which we will add the definition of a 3-dimensional vector type with some functionality:

package main

type Vec [3]float64

func (res *Vec) Add(a, b *Vec) *Vec {
	(*res)[0] = (*a)[0] + (*b)[0]
	(*res)[1] = (*a)[1] + (*b)[1]
	(*res)[2] = (*a)[2] + (*b)[2]
	return res
}

func (res *Vec) Sub(a, b *Vec) *Vec {
	(*res)[0] = (*a)[0] - (*b)[0]
	(*res)[1] = (*a)[1] - (*b)[1]
	(*res)[2] = (*a)[2] - (*b)[2]
	return res
}

func (a *Vec) Equals(b *Vec) bool {
	for i := range *a {
		if (*a)[i] != (*b)[i] {
			return false
		}
	}
	return true
}

We use three dimensions, since we will render the entities in 3D and for future extendability. For the movement and collision detection we will only use the first two dimensions.

The following gameplay related code could be put into a new .go file. In pong we have three game objects or entities. The ball and two paddles. Let us define data types to store relevant information for those entities:

type Model uint32

const (
	Paddle Model = 1
	Ball   Model = 2
)

type Entity struct {
	pos, vel, size Vec
	model          Model
}

var ents = make([]Entity, 3)

The Model type is an id which represents a model. In our case that would be the model for the paddle and for the ball. The Entity struct containst the basic information for an entity. We have vectors for the position, the velocity and the size. The size field represents the size of the bounding box. That is, for the ball each entry should be twice the radius.

Now we initialize the entities. The first two are the two paddles and the third is the ball.

func init() {
	ents[0].model = Paddle
	ents[0].pos = Vec{-75, 0, 0}
	ents[0].size = Vec{5, 20, 10}

	ents[1].model = Paddle
	ents[1].pos = Vec{75, 0, 0}
	ents[1].size = Vec{5, 20, 10}

	ents[2].model = Ball
	ents[2].size = Vec{20, 20, 20}
}

Note that the init function will be called automatically once the server starts. The way we will set up our camera on the client, the first coordinate of a vector will point to the right of the screen, the second one will point up and the third will be directed out of the screen.

We also add the two actions we need for pong, i.e., Up and Down:

const (
	Up   Action = 0
	Down Action = 1
)

and an empty update function

func updateSimulation() {
}

which we call in the main loop

...
		case <-clk.C:
			updateInputs()
			updateSimulation()
			sendUpdates()
...

Serialization and Client functionality


We add the serialization and the rendering on the client now because it is nice to see stuff even when the entities are not moving yet.

Serialization


When serializing game state my approach is to serialize one type of information after the other. That is, we first serialize all positions, then the velocities, etc.

In a more complex game with many entities I would first send the amount of entities which are serialized and then a list of the corresponding entity ids. The serialization would then also be dependent on the player id, since we might want to send different information to different players. Here we know that there are only three entities and we always send the full game state to each client.

For the serialization we need the "io" and the "encoding/binary" packages. The actual code is quite simple

func serialize(buf io.Writer) {
	for _, ent := range ents {
		binary.Write(buf, binary.LittleEndian, ent.model)
	}
	for _, ent := range ents {
		binary.Write(buf, binary.LittleEndian, ent.pos)
	}
	for _, ent := range ents {
		binary.Write(buf, binary.LittleEndian, ent.vel)
	}
	for _, ent := range ents {
		binary.Write(buf, binary.LittleEndian, ent.size)
	}
}

Note that it actually does not make sense to send the size and the model more than once, since the websocket connection is reliable and the values do not change. In general it would be better to only send data that changed in the current frame. To this end we keep a copy of the last game state and only send fields for which differences are detected. Of course we have to tell the client which data is actually sent. This can be done by including a single byte for each data type which acts as a bitmask.

We add the new variable for the old game state:

var entsOld = make([]Entity, 3)

which is updated with

func copyState() {
	for i, ent := range ents {
		entsOld[i] = ent
	}
}

in the sendUpdates() function directly after we sent the updates

func sendUpdates() {
	buf := &bytes.Buffer{}
	//serialize(buf, false)
	removeList = removeList[0:0]
	for id, cl := range clients {
		err := websocket.Message.Send(cl.ws, buf.Bytes())
		if err != nil {
			removeList = append(removeList, id)
			log.Println(err)
		}
	}
	copyState()
	for _, id := range removeList {
		delete(clients, id)
		//disconnect(id)
	}
}

We copy the state here, because the difference is needed for the serialization, and the disconnect() function can already alter the game state.

Then we update the serialization function (We also need to import the package "bytes")

func serialize(buf io.Writer, serAll bool) {
	bitMask := make([]byte, 1)
	bufTemp := &bytes.Buffer{}
	for i, ent := range ents {
		if serAll || ent.model != entsOld[i].model {
			bitMask[0] |= 1 << uint(i)
			binary.Write(bufTemp, binary.LittleEndian, ent.model)
		}
	}
	buf.Write(bitMask)
	buf.Write(bufTemp.Bytes())

	bitMask[0] = 0
	bufTemp.Reset()
	for i, ent := range ents {
		if serAll || !ent.pos.Equals(&entsOld[i].pos) {
			bitMask[0] |= 1 << uint(i)
			binary.Write(bufTemp, binary.LittleEndian, ent.pos)
		}
	}
	buf.Write(bitMask)
	buf.Write(bufTemp.Bytes())

	bitMask[0] = 0
	bufTemp.Reset()
	for i, ent := range ents {
		if serAll || !ent.vel.Equals(&entsOld[i].vel) {
			bitMask[0] |= 1 << uint(i)
			binary.Write(bufTemp, binary.LittleEndian, ent.vel)
		}
	}
	buf.Write(bitMask)
	buf.Write(bufTemp.Bytes())

	bitMask[0] = 0
	bufTemp.Reset()
	for i, ent := range ents {
		if serAll || !ent.size.Equals(&entsOld[i].size) {
			bitMask[0] |= 1 << uint(i)
			binary.Write(bufTemp, binary.LittleEndian, ent.size)
		}
	}
	buf.Write(bitMask)
	buf.Write(bufTemp.Bytes())
}

We have to write the data into a temporary buffer since we have to write the bitmask before the actual data and we only know the bitmask once we've iterated over all entities. The serialization could probably be implemented more efficiently in terms of memory allocation, but I leave that as an exercise to the reader.

Note that we added an additional input argument serAll. If serAll is set to true we serialize the complete gamestate. This flag is used to send the whole game state once to each newly connected player. Thus we have to add to the main loop on the server

...
		case cl := <-newConn:
			id := newId()
			clients[id] = cl
			buf := &bytes.Buffer{}
			serialize(buf, true)
			websocket.Message.Send(cl.ws, buf.Bytes())
...

and uncomment the call in sendUpdates()

func sendUpdates() {
	buf := &bytes.Buffer{}
	serialize(buf, false)
        ...
}

Pong Client


First we add the input-related functionality to the client. At the beginning of our script in pong.html add a variable for the client actions and for the frame duration:

...
<script type="text/javascript">
var ws
var actions = 0
var interval = 1000/30

$(document).ready(function() {
...

Inside the anonymous function passed to $(document).ready() we add handler for key events:

...
$(document).ready(function() {
	if ("WebSocket" in window) {
        ...
	}else{
		alert("no websockets on your browser")
	}
	document.onkeydown = function(event) {
		var key_press = String.fromCharCode(event.keyCode);
		var key_code = event.keyCode;
		if (key_code == 87) {
			actions |= 1<<0
		}
		if (key_code == 83) {
			actions |= 1<<1
		}
	}
	document.onkeyup = function(event){
		var key_press = String.fromCharCode(event.keyCode);
		var key_code = event.keyCode;
		if (key_code == 87) {
			actions &= ~(1<<0)
		}
		if (key_code == 83) {
			actions &= ~(1<<1)
		}
	}
})
...

The key codes 83 and 87 correspond to the 'w' and 's' key on the keyboard. If the 'w' key is pressed we set the first bit in the actions bit mask to 1, i.e., the button 'w' corresponds to the Up action. If the key is released we set the corresponding bit to 0. Of course you could use other keys. You can check the key codes here: http://unixpapa.com/js/testkey.html

Now we know the current state of the actions, but we still have to send them to the server. To this end we have to implement a main loop in the client. As I said, I am new to JavaScript, but I read that the recommended way to do this is the following (add this function to the end of the script):

function clientFrame() {
	setTimeout(function() {
		window.requestAnimationFrame(clientFrame);
        
		sendCmd();
	}, interval);
}

The function requestAnimationFrame gives some control of the update interval to the browser. That is, the number of frames per second is reduced if the browser tab is not open etc. We encapsulate this function into setTimeout(..., interval) to set a maximum number of frames per second. For simplicity we run the client with the same frames per second as the server. This could be done differently, e.g., we could run the client faster than the server and interpolate between the received game states. There is a lot of other stuff which can be done on the client-side to improve the player experience which we do not cover in this tutorial (google for client-side prediction/interpolation, lag compensation etc.).

We still have to implement the sendCmd() function. We use the DataStream class to serialize the actions. This works similar to the "encoding/binary" package. The write functions of DataStream use LittleEndian by default.

function sendCmd() {
	var cmd = new DataStream()
	cmd.writeUint32(actions)
	ws.send(cmd.buffer);
}

If we now call clientFrame() once inside the ws.onopen callback

...
		ws.onopen = function() {
			console.log("connection open")
			clientFrame()
		}
...

the client will start sending user commands to the server.

What is still missing is the logic for receiving the game states and the rendering of the game entities. The render engine is initialized as follows

var camera, scene, renderer;
var mat1,mat2
var cube,sphere

function init3d() {
	camera = new THREE.PerspectiveCamera( 45, 400/300, 1, 10000 );
	camera.position.z = 200;

	scene = new THREE.Scene();

	var ambientLight = new THREE.AmbientLight(0x252525);
	scene.add(ambientLight);
	var directionalLight = new THREE.DirectionalLight( 0xffffff, 0.9 );
	directionalLight.position.set( 150, 50, 200 ); 
	scene.add( directionalLight );

	cube = new THREE.CubeGeometry(1,1,1)
	sphere = new THREE.SphereGeometry(0.5,32,16)
	mat1 = new THREE.MeshLambertMaterial( { color: 0xff0000, shading: THREE.SmoothShading } );
	mat2 = new THREE.MeshLambertMaterial( { color: 0x00ff00, shading: THREE.SmoothShading } );

	renderer = new THREE.WebGLRenderer();
	renderer.setSize( 640, 480)

	document.body.appendChild( renderer.domElement);
}

We create a new camera and a new scene, add some lights and define two geometries. One is a sphere which we will use for the ball and the other is a cube which will be used for the paddles. We also define two materials with different colors which we will use for the ball and the paddles respectively. The radius of the sphere is set to 0.5, which results in a unit bounding box.

We also add a function to our script which we use to add new objects to the scene:

function newMesh(model) {
	var mesh
	if (model==2){
		mesh = new THREE.Mesh(sphere, mat2)
	}else if (model==1){
		mesh = new THREE.Mesh(cube, mat1)
	}
	scene.add(mesh)
	return mesh
}

where we know that a model id of 1 is a paddel and a model id of 2 is the ball.

We still have to add a call to the init function

$(document).ready(function() {
	if ("WebSocket" in window) {
		init3d()
	...
	}
}

For the deserialization we need a new variable which stores the entity data:

var ents = [new Object(),new Object(),new Object()]

The deserialization is done in the onmessage callback of the websocket.

...
		ws.onmessage = function(evt) {
			var buf = new DataStream(evt.data)

			var nEnts = 3
            
			var bitMask = buf.readUint8()
			for (var i = 0; i<nEnts; i++) {
				if ((bitMask & (1<<i))>0) {
                    			var model = buf.readUint32()
					ents[i] = newMesh(model)
				}
			}

			var bitMask = buf.readUint8()
			for (var i = 0; i<nEnts; i++) {
				if ((bitMask & (1<<i))>0) {
                    			var pos = buf.readFloat64Array(3)
					ents[i].position.x = pos[0]
					ents[i].position.y = pos[1]
					ents[i].position.z = pos[2]
				}

			}
			var bitMask = buf.readUint8()
			for (var i = 0; i<nEnts; i++) {
				if ((bitMask & (1<<i))>0) {
					var vel = buf.readFloat64Array(3)
					//On the client, we do not actually do 
					//anything with the velocity for now ...
				}

			}
			var bitMask = buf.readUint8()
			for (var i = 0; i<nEnts; i++) {
				if ((bitMask & (1<<i))>0) {
					var size = buf.readFloat64Array(3)
					ents[i].scale.x = size[0]
					ents[i].scale.y = size[1]
					ents[i].scale.z = size[2]
				}

			}
		}
...

No magic here. If the bit for a entity is set we read the corresponding data. If we get an update for the model, which should happen only once for each entity, we add a new mesh to the scene.

For now the only thing left to do on the client is to render the scene. To this end we update the clientFrame() function

function clientFrame() {
	setTimeout(function() {
		window.requestAnimationFrame(clientFrame);
        
		renderer.render(scene, camera);
            
		sendCmd();
	}, interval);
}

We set the position of the mesh to the current entity position and then render the scene. If you run the server (go run *.go) you should be able to connect to http://localhost:8080/www/pong.html and see the entities rendered in 3D.

Movement


It is time to bring some movement into the game. Before we can do that we have to deal with logins and disconnects. We add a new global variable to the gameplay file which stores the player ids of the active players, i.e., the players controlling the paddles,

var players = make([]PlayerId, 2)

Now we can add the login function

func login(id PlayerId) {
	if players[0] == 0 {
		players[0] = id
		if players[1] != 0 {
			startGame()
		}
		return
	}
	if players[1] == 0 {
		players[1] = id
		startGame()
	}
}

As soon as two players logged in we start the game by setting the velocity of the ball to a non-zero vector

func startGame() {
	ents[2].vel = Vec{5, 0, 0}
}

We also have to call the login function in the main loop

...
		case cl := <-newConn:
			id := newId()
			clients[id] = cl
			login(id)

			buf := &bytes.Buffer{}
...

We also have to handle disconnects

func disconnect(id PlayerId) {
	if players[0] == id {
		players[0] = 0
		stopGame()
	} else if players[1] == id {
		players[1] = 0
		stopGame()
	}
}

where stopGame() resets the entity positions and velocities

func stopGame() {
	ents[0].pos = Vec{-75, 0, 0}
	ents[1].pos = Vec{75, 0, 0}
	ents[2].pos = Vec{0, 0, 0}
	ents[2].vel = Vec{0, 0, 0}
}

The disconnect function is called in sendUpdates

...
	for _, id := range removeList {
		disconnect(id)
		delete(clients, id)
	}
...

Now we finally add movement for the entities

func move() {
	for i := range ents {
		ents[i].pos.Add(&ents[i].pos, &ents[i].vel)
	}
}

which has to be called in the update function

func updateSimulation() {
	move()
}

If we connect to the server from two tabs in our browser the ball starts moving to the right. Once we close one of the tabs the ball returns to the starting position.

Next we process player input.

func processInput() {
	if players[0] == 0 || players[1] == 0 {
		return
	}

	newVel := 0.0
	if active(players[0], Up) {
		newVel += 5
	}
	if active(players[0], Down) {
		newVel -= 5
	}
	ents[0].vel[1] = newVel

	newVel = 0.0
	if active(players[1], Up) {
		newVel += 5
	}
	if active(players[1], Down) {
		newVel -= 5
	}
	ents[1].vel[1] = newVel
}

If two players are connected, we check for the Up and Down actions and change the vertical velocity accordingly. This has to be called in the update function before we move the entities

func updateSimulation() {
	processInput()
	move()
}

We can now move the paddles if we connect to the server  http://localhost:8080/www/pong.html from two tabs.

We are still missing collision detection and response. First we introduce an upper and lower border

const FieldHeight = 120

func collisionCheck() {
	for i := range ents {
		if ents[i].pos[1] > FieldHeight/2-ents[i].size[1]/2 {
			ents[i].pos[1] = FieldHeight/2 - ents[i].size[1]/2
			if ents[i].vel[1] > 0 {
				ents[i].vel[1] = -ents[i].vel[1]
			}
		}
		if ents[i].pos[1] < -FieldHeight/2+ents[i].size[1]/2 {
			ents[i].pos[1] = -FieldHeight/2 + ents[i].size[1]/2
			if ents[i].vel[1] < 0 {
				ents[i].vel[1] = -ents[i].vel[1]
			}
		}
	}
}

The field is centered at the origin and we check if the bounding box of each entity is leaving the field. If we detect a collision, we reset the position and flip the vertical velocity. This might actually not be the optimal way to handle the collision for the paddles since we do not really want them to bounce from the borders, but we will keep it for now.

We call the collision check after processing the inputs and before moving the entities

func updateSimulation() {
	processInput()
	collisionCheck()
	move()
}

If we change the starting velocity of the ball, e.g.

func startGame() {
	ents[2].vel = Vec{2, 3, 0}
}

we can see it bouncing off the borders. The same effect can be seen when moving the paddles.

If we now add a collision response for the entities we are almost done. In our case the collision detection is rather simple. We have to detect the collision between a sphere and an axis aligned bounding box. This and more advanced problems are explained int this article: http://www.wildbunny.co.uk/blog/2011/04/20/collision-detection-for-dummies/.

Before implementing the collision response we have to add some functionality to our vec.go file:

func (res *Vec) Clamp(s *Vec) {
	for i := range *res {
		if (*res)[i] > (*s)[i]/2 {
			(*res)[i] = (*s)[i] / 2
		}
		if (*res)[i] < -(*s)[i]/2 {
			(*res)[i] = -(*s)[i] / 2
		}
	}
}

func Dot(a, b *Vec) float64 {
	return (*a)[0]*(*b)[0] + (*a)[1]*(*b)[1] + (*a)[2]*(*b)[2]
}

func (v *Vec) Nrm2Sq() float64 {
	return Dot(v, v)
}

func (res *Vec) Scale(alpha float64, v *Vec) *Vec {
	(*res)[0] = alpha * (*v)[0]
	(*res)[1] = alpha * (*v)[1]
	(*res)[2] = alpha * (*v)[2]
	return res
}

The Clamp function clamps a vector such that it lies within a box of size s centered at the origin. The other operators should be self explanatory.

With the new functionality we can implement the collision response by adding the following to the checkCollision function (we also need to import the "math" package)

func collisionCheck() {
    
...

	rSq := ents[2].size[0] / 2
	rSq *= rSq
	for i := 0; i < 2; i++ {
		//v points from the center of the paddel to the point on the
		//border of the paddel which is closest to the sphere
		v := Vec{}
		v.Sub(&ents[2].pos, &ents[i].pos)
		v.Clamp(&ents[i].size)

		//d is the vector from the point on the paddle closest to 
        //the ball to the center of the ball
		d := Vec{}
		d.Sub(&ents[2].pos, &ents[i].pos)
		d.Sub(&d, &v)

		distSq := d.Nrm2Sq()
		if distSq < rSq {
			//move the sphere in direction of d to remove the
			//penetration
			dPos := Vec{}
			dPos.Scale(math.Sqrt(rSq/distSq)-1, &d)
			ents[2].pos.Add(&ents[2].pos, &dPos)

            //reflect the velocity along d when necessary
			dotPr := Dot(&ents[2].vel, &d)
			if dotPr < 0 {
				d.Scale(-2*dotPr/distSq, &d)
				ents[2].vel.Add(&ents[2].vel, &d)
			}
		}
	}

}

I added some comments to hopefully make things clear. The first part is finding the closest distance from the paddle to the sphere which is done as described in the linked article. For the collision response we have to change the velocity of the ball. We use the vector connecting the closest points as contact normal and reflect the ball at the corresponding contact plane.

A last check we need to add is if the ball got past the paddle on the left or right side. The check itself is straightforward, but we first need to add a field to our entity struct containing the score

type Entity struct {
	pos, vel, size Vec
	model          Model
	score          uint32
}

This is probably not the cleanest way to keep track of the scores, because not every entity needs to have a score field, but it keeps things simple. I will share some more thoughts on the storage of the game state later.

We reset the scores in the startGame function

func startGame() {
	ents[0].score = 0
	ents[1].score = 0
	ents[2].vel = Vec{2, 3, 0}
}

Now we need to add the following to the collision check:

func collisionCheck() {
    
    ...
        
	if ents[2].pos[0] < -100 {
		ents[2].pos = Vec{0, 0, 0}
		ents[2].vel = Vec{2, 3, 0}
		ents[1].score++
	} else if ents[2].pos[0] > 100 {
		ents[2].pos = Vec{0, 0, 0}
		ents[2].vel = Vec{-2, 3, 0}
		ents[0].score++
	}
}

We also have to send the score to the client, so it can be displayed in the browser. To this end we add the following to the serialization function

func serialize(buf io.Writer, serAll bool) {
    
    ...
        
	bitMask[0] = 0
	bufTemp.Reset()
	for i, ent := range ents {
		if serAll || ent.score != entsOld[i].score {
			bitMask[0] |= 1 << uint(i)
			binary.Write(bufTemp, binary.LittleEndian, ent.score)
		}
	}
	buf.Write(bitMask)
	buf.Write(bufTemp.Bytes())
}

and the following to the deserialization on the client

...
    
		ws.onmessage = function(evt) {
    
    			...
                    
			var bitMask = buf.readUint8()
			for (var i = 0; i<nEnts; i++) {
				if ((bitMask & (1<<i))>0) {
					ents[i].score = buf.readUint32()
				}

			}
		}
...

To display the scores on the client we simply add two div elemnts to the html body

<body>
	<div id = "p1score" style="float:left">score1</div>
	<div id = "p2score" style="float:right;margin-right:10px">score2</div>
</body>

and change the deserialization of the scores to update the html elements

...
			var bitMask = buf.readUint8()
			for (var i = 0; i<nEnts; i++) {
				if ((bitMask & (1<<i))>0) {
					ents[i].score = buf.readUint32()
					console.log(i,ents[i].score)

					if (i==0) {
						$("#p1score").html(ents[i].score)
					} else if (i==1) {
						$("#p2score").html(ents[i].score)
					}
				}

			}
...

We completed the first prototype of the multiplayer pong project (Here is the link again: http://localhost:8080/www/pong.html )

Further Considerations


The server-side serialization is a bit awkward, with lots of code duplication. We could use a different structure for storing the game state which is more compatible with the serialization. Note that this is only a suggestion and all ways of storing the game state have pros and cons.

To this end we remove the following global variables and structures related to the game state

type Entity struct {
	pos, vel, size Vec
	model          Model
	score          uint32
}

var ents = make([]Entity, 3)
var entsOld = make([]Entity, 3)
var players = make([]PlayerId, 2)

and replace them with

type GameState struct {
	pos, vel, size []Vec
	model          []Model
	score          []uint32
	players        []PlayerId
}

func NewGameState() *GameState {
	st := &GameState{}
	st.pos = make([]Vec, 3)
	st.vel = make([]Vec, 3)
	st.size = make([]Vec, 3)
	st.model = make([]Model, 3)

	st.score = make([]uint32, 2)
	st.players = make([]PlayerId, 2)

	return st
}

var state = NewGameState()
var stateOld = NewGameState()

We can see that we switched from a slice of structures to a structure of slices. We also included the list of active players in the game state since it could also be useful to send it to the client.

We have to modify all references to the old global variables. This is a bit tedious, but most of it should be fairly straightforward. Keep in mind that the slices are reference types, so we have to perform a deep copy when copying the states

func copyState() {
	copy(stateOld.pos, state.pos)
	copy(stateOld.vel, state.vel)
	copy(stateOld.size, state.size)
	copy(stateOld.model, state.model)

	copy(stateOld.score, state.score)
	copy(stateOld.players, state.players)
}

We replace all other references to the ents variable except in the serialization function, which we will rewrite now. We add a helper function to serialize a slice of vectors

func serializeVecSlice(buf io.Writer, serAll bool, vs, vsOld []Vec) {
	bitMask := make([]byte, 1)
	bufTemp := &bytes.Buffer{}
	for i := range vs {
		if serAll || !vs[i].Equals(&vsOld[i]) {
			bitMask[0] |= 1 << uint(i)
			binary.Write(bufTemp, binary.LittleEndian, &vs[i])
		}
	}
	buf.Write(bitMask)
	buf.Write(bufTemp.Bytes())
}

and update the serialization function

func serialize(buf io.Writer, serAll bool) {
	bitMask := make([]byte, 1)
	bufTemp := &bytes.Buffer{}
	for i := range state.model {
		if serAll || state.model[i] != stateOld.model[i] {
			bitMask[0] |= 1 << uint(i)
			binary.Write(bufTemp, binary.LittleEndian,
				state.model[i])
		}
	}
	buf.Write(bitMask)
	buf.Write(bufTemp.Bytes())

	serializeVecSlice(buf, serAll, state.pos, stateOld.pos)
	serializeVecSlice(buf, serAll, state.vel, stateOld.vel)
	serializeVecSlice(buf, serAll, state.size, stateOld.size)

	bitMask[0] = 0
	bufTemp.Reset()
	for i := range state.score {
		if serAll || state.score[i] != stateOld.score[i] {
			bitMask[0] |= 1 << uint(i)
			binary.Write(bufTemp, binary.LittleEndian,
				state.score[i])
		}
	}
	buf.Write(bitMask)
	buf.Write(bufTemp.Bytes())

	bitMask[0] = 0
	bufTemp.Reset()
	for i := range state.players {
		if serAll || state.players[i] != stateOld.players[i] {
			bitMask[0] |= 1 << uint(i)
			binary.Write(bufTemp, binary.LittleEndian,
				state.players[i])
		}
	}
	buf.Write(bitMask)
	buf.Write(bufTemp.Bytes())
}

We also have to make a small change to the client since we are sending only two score variables now. We change the deserialization of the scores to

...
			var nPlayers = 2
			var bitMask = buf.readUint8()
			for (var i = 0; i<nPlayers; i++) {
				if ((bitMask & (1<<i))>0) {
					var score = buf.readUint32()
					if (i==0) {
						$("#p1score").html(score)
					} else if (i==1) {
						$("#p2score").html(score)
					}
				}

			}
...

If we also send each client its own player id and deserialize the list of active players, the client would actually know which paddle it controls. This could for example be used to write a client which plays on its own. This and making the client more pretty is left as an exercise for the reader.

Shortcut


The files for this tutorial can also be found on https://github.com/dane-unltd/pongtut. The files with the changes from the last section can be found on https://github.com/dane-unltd/pongtutimp

You can use the Go command, e.g., "go get github.com/dane-unltd/pongtut" to install the files in your Go workspace. Then go to the pongtut directory in the terminal and execute "go run *.go". You can now play pong in your browser under following link http://localhost:8080/www/pong.html.

How to Structure a Game

$
0
0
Basic game structure is a topic that many people have trouble with, yet it somehow gets overlooked.  In this lesson, I will show you exactly how to set up and structure code for commercial games.

We're going to use Leadwerks 3 in this lesson because it makes C++ game development faster, but the ideas here are applicable to any programming environment.

Direct vs. Component Programming


Although the component-based script system Leadwerks supports is a convenient way to get simple demos running quickly with Leadwerks, it can be limiting when you try to make a full game.  Fortunately Leadwerks supports direct programming, in both C++ and Lua.  This gives a lot more power and control than component-based systems.  To really take advantage of this power, we need to understand some basic principles on how to set up and structure our game.

Class Structure


We start with a base class for all objects in our game.  We'll call this the Node class, and derive it from the Leadwerks::Object class.  The Node class is not an entity, but it has an entity as a member.  Think of a Node as your own game object that is associated with an entity.

For this lesson we'll create an imaginary class called Foo derived from the Node class.  The Foo class could represent an enemy, an NPC, a bullet, a grenade, or anything else.  We can use the same structure for all of these things.  The Foo class has one function called Update.  This is where all our game code that updates that single instance of this class would go.  This code could control the trajectory of a bullet, the AI of an enemy, or anything else.  The point is all the code that controls that object is compartmentalized into this function, and it gets called over and over again, for each instance of the class.

In order to keep track of each instance of the Foo class, let's use a standard C++ list.  This is listed in the header file as a static member, so that each instance of the class can access this list:

static std::list<Foo*> list;

Each instance of the Foo class will also have a list iterator so we can remove it from the list when it's deleted:

std::list<Foo*>::iterator it;

In the Foo() constructor, the object will add itself to the list of all objects in this class:

Foo::Foo()
{
    list.push_front(this);
    it = list.begin();
}

And in the destructor, we will use the iterator to remove the object from the list:

Foo::~Foo()
{
    list.erase(it);
}

Why do we need a list of all the instances of our Foo class?  Well, this means we can now iterate through each one, at any point in our program.  This is very powerful because it means we can create new instances of the Foo class at any time, and our game will adjust to keep them all running, without hard-coding a lot of specific behavior.  Iterating through the list is done with the following code:

//First we declare an iterator so we can cycle through our loop
std::list<Foo*>::iterator it;

//Loop
for (it = Foo::List.begin(); it!=Foo::List.end(); it++)
{
    //The Foo object is gotten with (*it)
    (*it)->Update();

    //Alternatively, you could declare a Foo* variable and set it to this value
    //Foo* foo = *it;
    //foo->Update();
}

This code should go somewhere in your main game loop.  You'll end up with a loop like that for each class your game uses, if it's a class that needs to be continuously updated.  (Some types of objects can just sit there until something happens to make them react.  For those situations, I recommend using a collision callback or other means to activate them.)  So your main loop will look something like this now:

bool App::Loop()
{
    std::list<Foo*>::iterator it;

    for (it = Foo::List.begin(); it!=Foo::List.end(); it++)
    {
        (*it)->Update();
    }

    world->Update();
    world->Render();
    context->Sync();
}

We're going to do one more thing to make our code a little cleaner.  Because we'll probably end up with a dozen or more classes by the time our game code is done, we can take that loop and put it into a static function:

void Foo::UpdateEach()
{
    std::list<Foo*>::iterator it;
    for (it = List.begin(); it!=List.end(); it++)
    {
        (*it)->Update();
    }
}

The Main Loop


Our main game loop becomes a little easier to manage now:

bool App::Loop()
{
    Foo::UpdateEach();
    world->Update();
    world->Render();
    context->Sync();
}

By the time our game is done, the main loop will look something like this:

bool App::Loop()
{
    Enemy::UpdateEach();
    Player::UpdateEach();
    Projectile::UpdateEach();

    world->Update();

    Explosion::UpdateEach();

    world->Render();
    context->Sync();
}

You might wonder why I didn't just create a list in the Node class, and have an Update function there.  After all, any class derived from the Node class could override that function, and a single loop could be used to update all game objects.  There's two reasons we don't do that.

First, not all of our game objects need an Update function to be called each frame.  Iterating through hundreds or thousands of unnecessary objects would hurt our performance for no good reason.  We can put an Update function in a base Enemy class, however, and have both goblins and trolls use the same Update loop, when Enemy::UpdateEach() is called.

Second, we want to control the order and time at which each class is updated.  Some classes work best when they are updated at the beginning of the loop.  Some work best when they are updated between the call to World::Update() and World::Render().  It's different for each class, depending on what you make them do, and we want to leave room for ourselves to experiment and not get locked into a design that can't be easily changed when needed.  We could try working around this by setting a priority for each class, so objects are updated in a specified order, but I wouldn't do this.  In my opinion, this is the point where your structure is done and you should think about structuring the classes for your game, and filling in their code.

So what does the Foo:Update() function do that's so important, anyways?  Foo::Update() presently does nothing, but it does everything.  This is where your game code goes.  We can use this structure for AI, bullets, rockets, explosions, enemies, tanks, planes, ninjas, pirates, robots, or giant enemy crabs that shoot laser beams out of their eyes.  In fact we can also use the same structure for those laser beam objects the crab is emitting!

Conclusion


The main point of this is to show how to graduate from writing simple single-file demos, and to start thinking in terms of classes.  Your game code should be written in such a way that it doesn't matter how many objects there are of each class, when they get created, or when they get destroyed.  Each class Update() function is written from the point of view of that single object, looking out at the world around it.  This simple concept can be used to make just about any type of game, from first-person shooters to MMOs.

The image for this article was provided by oppenheimer.

Notes on GameDev: Blaine Christine

$
0
0
Originally published on NotesonGameDev.net
September 15, 2008


Although we specialize in game art and design, we couldn't pass up the opportunity to talk with Blaine Christine, Producer at BioWare Austin. Sadly we didn't get any good juicy bits about the mysterious unannounced forthcoming MMO (are you thinking what I'm thinking?) but we did get ourselves a case of BioWare job envy. Blaine's is a classic story from QA to Producer.

Hey Blaine! Thanks for your time. Before being a Producer at BioWare Austin, of course you had to work your way there. How did you first get into game industry and how did you build up credentials to be a Producer?

I began my career in the game industry at Activision in April 2000.  I moved to LA to attempt a career as an actor and I was looking for a mildly enjoyable temp job that would still allow me to go to auditions, look for an agent, etc.  I was always an avid gamer (read – nerd) and as I was thumbing through a copy of Computer Gaming World, I realized that there were a ton of game companies in the Los Angeles area.  I put in applications for Quality Assurance at Blizzard and Activision.  I never managed to get an interview at Blizzard, but I was brought into Activision QA for an interview within a couple of weeks and was offered a job as a Temp Tester.  On my first day, we spent the morning in training (how to identify and write up bugs) and then I was placed on the QA Team for X-Men: Mutant Academy.  After a couple of months I was promoted to Lead Tester and was hired on in a permanent position.  My first major project as a QA Lead was Lion King for the PlayStation.  This project was in QA for over nine months (and only took 3 hours to complete – “playing games for a living” in QA actually is WORK, folks) during which time I got to know the Producer very well.  Thanks to this grueling task, I was promoted into the Production department after almost exactly one year at Activision.

As a Production Coordinator, I was essentially an assistant to the Producer I worked for.  Over the course of the next two years I worked on a variety of handheld games on Nintendo GameBoy and GameBoy Color.  Looking back at this early point in my career, I feel very fortunate that I was able to work on small-scale games.  At the time, it seemed like a drag because it was always more fun to work on the “big” titles, but in reality I learned the full Production cycle on a game by repeating it every 6-9 months on small titles and working on more than one game at a time.  Unless you are working on cell phone games, it would be hard to have a similar experience entering the industry now since these days even handheld games tend to have teams and budgets as big as PlayStation titles did eight years ago.

The entire time I was cutting my teeth on the handheld titles, we had a little project brewing with Raven in Madison, WI.  The Producer and I would fly out every couple of months to check on the progress of X-Men Legends.  We would periodically review documentation, receive builds and have meetings where I was privy to the workings of a big project from inception to completion.  After two years in Production and an upgrade to Associate Producer, the Producer I was working for was pulled off to work on another game that needed help.  Since I had been working with the team at Raven for a couple of years and had several games under my belt, management gave me the opportunity to act as Producer and finish the game on my own.  It didn’t hurt that the team at Raven actually liked working with me as well.  This was a big break for me.  I got to hire my own Production team and represent the game both internally and externally.  X-Men Legends came out in Fall 2005 and we were already in pre-Production on X-Men Legends 2 when I left Activision to move somewhere I could afford to buy a house.

What a ride in promotions! What was your journey from Activision to BioWare?

After Activision, I moved to Salt Lake City with a couple of leads on jobs, but no offers.  Todd Sheridan of GlyphX games hired me on to head up internal QA on Advent Rising and with the promise of becoming a Producer on whatever they worked on after Advent shipped.  This was my first time working on the Development side instead the Publishing side of the industry, so I wasn’t sure how my experience would translate.  Fortunately, I found that the skills I acquired at Activision were a huge help and I was able to play a big role in getting Advent Rising finished by stepping into an internal Producer role in the last few months of development.  My experience on the Publishing side of things gave me a unique insight into what the publisher (Majesco) needed and I was able to help both parties determine the best way to get the game finished before time and money ran out completely.  Unfortunately, there would be no game for GlyphX after Advent Rising so I had to go on the hunt for a new gig.

Luckily, a friend from Activision had moved to Austin, TX to work for Aspyr Media and was able to bring me on as they expanded beyond the Mac gaming market and into North American publishing of games from Jowood (Spellforce 2, Gothic 3) and FunCom (Dreamfall).  This proved to be a great move for me all around.  I fell in love with Austin, TX and got to travel to Europe several times to visit with developers in Germany and Norway.  After a year at Aspyr, I was promoted to Executive Producer and ran the Production department until I left for BioWare.  Leaving Aspyr was difficult, but when I saw an ad pop up in Gamasutra for a Producer at the BioWare’s Austin studio, I knew I had to throw my hat in the proverbial ring.  As a big fan of RPGs in general and BioWare games in particular, it was an opportunity I simply could not ignore.

Yeah, I hear BioWare is the place for anyone with a passion for RPGs and getting to geek out with co-workers. What do you feel is unique about working at BioWare? In other words, what's the company culture and work environment like and is this a unique experience?

Working at BioWare is definitely unlike working any place I’ve been before.  Within a week of starting at the Austin studio, I felt like I had joined an all star team.  It’s like the Olympic basketball team – everyone has years of experience and has worked on amazing games – we can all be stars in a smaller venue, but when you bring everyone together for one game, the energy is incredible.  There are definitely days that I feel like a small fish in the big pond, but it’s amazing to be in meetings with so many industry veterans.  Our Creative Director, James Ohlen, has been with BioWare for over 11 years and was the Design Lead on Baldur’s Gate, so every meeting is like a mini-tutorial on how to do great game design.  Every day I learn more about the industry from my peers, which is fantastic.  I’m also learning the MMO space, which is not an area I was exposed to prior to BioWare.

Beyond our game and studio, Ray and Greg (the founders of BioWare) make a huge effort to make us feel like part of the larger BioWare organization.  They regularly attend meetings in Austin and still preside over new employee orientation meetings in person.  The culture is very much driven towards quality, creativity, and humility.  BioWare has a very high regard for the fans that they’ve cultivated over many years, so there is a strong expectation that every game must hit the same level of quality as its predecessors to honor the people that buy our games and ultimately make us successful.

No doubt, I've seen the excitement from the community at the online forums, although that dates back to the work from BioWare Edmonton. Since you're at the Austin studio, do you have much communication with the Edmonton studio? Is the Edmonton studio thought of as the mother branch?

Yes, there is regular communication with the Edmonton studio and even sharing of resources when and where appropriate.  BioWare Edmonton is where it all started years ago with Shattered Steel and Baldur’s Gate, so yes, they are the “mother ship”.  When I visit the Edmonton office, it feels like walking the halls of a world class Hollywood studio with awards lining the hallways from many years of *great* games.  There are only a handful of developers who can claim the same level of consistent quality, so I am truly honored to be part of the BioWare family and hope to live up to the same standards.  The other amazing thing about being in Edmonton is the number of employees that have been there for many years and many great games.  To me, it speaks volumes about how well BioWare treats its employees and gives me great confidence that we will continue to make games that excite and inspire gamers everywhere.

For sure! BioWare also seems to be a very family-friendly company. Even if someone can't make the move out to Austin or Edmonton, what do you feel it takes to become a Producer in game industry in general?

The number one skill for Production is communication.  This is why many Producers start out in Quality Assurance.  As a Tester, your job is to find bugs (easy part) and convey them in a meaningful fashion to the folks on the team who can fix them (hard part).  If you have the ability to communicate well in writing and verbally, you have a strong foundation for a successful role in Production.  Beyond that, Producers are facilitators, so you have to be able to take a task and see it through to completion – even if it is a task you have never been involved with before.  Most Production involves some mediation skill as well – being able to understand two different viewpoints and then taking action to find a good resolution between the parties with differing opinions.

The Producer role is a very interesting job.  It is defined differently by every company I’ve worked for (at least the specifics of the job) and it is a career that doesn’t necessarily have clear entry path.  My educational background is Acting – specifically, a Master’s degree.  Does this apply to Production?  Absolutely!  As a Producer, I am often called upon to present status, information, or the game itself to Executives, the Press, or the Public.  Does this mean that an Acting degree is necessary to be a Producer?  Absolutely not!  I know Producers with a huge variety of backgrounds including Film, Art, Business, Marine Biology, Armed Forces, and Law to name a few (I think the ones with the Law background just figured out they were bored and wanted to come play with the cool kids).  As Producer, you really need to be a jack-of-all trades – I know a little bit about a lot of things, but not a lot about anything.  Well, except games.

Speaking of which, what challenges have you faced so far at BioWare as a Producer?

The biggest challenge is just learning that even in an environment of industry veterans and extremely talented co-workers, I can bring something to the table.  My experience at Activision was a great foundation to build on, but ultimately developers in the game business respond to other gamers.  The fact that I have been playing games since I first got a Commodore 64 in 1984 lends as much credence to my opinion as my eight years in the games industry.  I guess this is an add-on to the question above.  It is certainly possible to be a Producer in the games industry and not be a huge gamer, but I think to survive someplace like BioWare would be next to impossible.  The culture here is very accepting of input from every member of the team, but that is predicated on the belief that team members actually play games.  Perhaps a good analogy to the “never trust a skinny chef” would be “don’t trust a tan game Producer” because they’ve been outside too much to be a true gamer…

Heh heh heh, nice. On the upside, what are your triumphs?

The biggest challenge leads to the biggest triumph in my case.  After exactly one year at BioWare I feel like I truly do add value to the team.  I’ve come to a company with a huge legacy of quality and humility and have earned the respect of those that I work with (I hope – check back two weeks after this posts and I’ll let you know how many e-mails I get that tell me otherwise).  My goal is to work hard to uphold the promise of BioWare to the legions of fans they’ve garnered over the years.

A Journey Through the CPU Pipeline

$
0
0
It is good for programmers to understand what goes on inside a processor. The CPU is at the heart of our career.

What goes on inside the CPU? How long does it take for one instruction to run? What does it mean when a new CPU has a 12-stage pipeline, or 18-stage pipeline, or even a "deep" 31-stage pipeline?

Programs generally treat the CPU as a black box. Instructions go into the box in order, instructions come out of the box in order, and some processing magic happens inside.

As a programmer, it is useful to learn what happens inside the box. This is especially true if you will be working on tasks like program optimization. If you don’t know what is going on inside the CPU, how can you optimize for it?

This article is about what goes on inside the x86 processor’s deep pipeline.  

Stuff You Should Already Know


First, this article assumes you know a bit about programming, and maybe even a little assembly language. If you don’t know what I mean when I mention an instruction pointer, this article probably isn’t for you. When I talk about registers, instructions, and caches, I assume you already know what they mean, can figure it out, or will look it up.

Second, this article is a simplification of a complex topic. If you feel I have left out important details, please add them to the comments at the end.

Third, I am focusing on Intel processors and the x86 family. I know there are many different processor families out there other than x86. I know that AMD introduced many useful features into the x86 family and Intel incorporated them. It is Intel’s architecture and Intel’s instruction set, and Intel introduced the most major feature being covered, so for simplicity and consistency I’m just going to stick with their processors.

Fourth, this article is already out of date. Newer processors are in the works and some are due out in a few months. I am very happy that technology is advancing at a rapid pace. I hope that someday all of these steps are completely outdated, replaced with even more amazing advances in computing power.

The Pipeline Basics


From an extremely broad perspective the x86 processor family has not changed very much over its 35 year history.  There have been many additions but the original design (and nearly all of the original instruction set) is basically intact and visible in the modern processor.

The original 8086 processor has 14 CPU registers which are still in use today. Four are general purpose registers -- AX, BX, CX, and DX. Four are segment registers that are used to help with pointers -- Code Segment (CS), Data Segment (DS), Extra Segment (ES), and Stack Segment (SS). Four are index registers that point to various memory locations -- Source Index (SI), Destination Index (DI), Base Pointer (BP), and Stack Pointer (SP). One register contains bit flags. And finally, there is the most important register for this article: The Instruction Pointer (IP).

The instruction pointer register is a pointer with a special job. The instruction pointer’s job is to point to the next instruction to be run.

All processors in the x86 family follow the same pattern. First, they follow the instruction pointer and decode the next CPU instruction at that location. After decoding, there is an execute stage where the instruction is run. Some instructions read from memory or write to it, others perform calculations or comparisons or do other work. When the work is done, the instruction goes through a retire stage and the instruction pointer is modified to point to the next instruction.

This decode, execute, and retire pipeline pattern applies to the original 8086 processor as much as it applies to the latest Core i7 processor.  Additional pipeline stages have been added over the years, but the pattern remains.

What Has Changed Over 35 Years


The original processor was simple by today's standard. The original 8086 processor began by evaluating the instruction at the current instruction pointer, decoded it, executed it, retired it, and moved on to the next instruction that the instruction pointer pointed to.

Each new chip in the family added new functionality. Most chips added new instructions. Some chips added new registers. For the purposes of this article I am focusing on the changes that affect the main flow of instructions through the CPU. Other changes like adding virtual memory or parallel processing are certainly interesting and useful, but not applicable to this article.

In 1982 an instruction cache was added to the processor. Instead of jumping out to memory at every instruction, the CPU would read several bytes beyond the current instruction pointer. The instruction cache was only a few bytes in size, just large enough to fetch a few instructions, but it dramatically improved performance by removing round trips to memory every few cycles.

In 1985, the 386 added cache memory for data as well as expanding the instruction cache. This gave performance improvements by reading several bytes beyond a data request. By this point both the instruction cache and data cache were measured in kilobytes rather than bytes.

In 1989, the i486 moved to a five-stage pipeline. Instead of having a single instruction inside the CPU, each stage of the pipeline could have an instruction in it. This addition more than doubled the performance of a 386 processor of the same clock rate. The fetch stage extracted an instruction from the cache. (The instruction cache at this time was generally 8 kilobytes.) The second stage would decode the instruction. The third stage would translate memory addresses and displacements needed for the instruction. The fourth stage would execute the instruction. The fifth stage would retire the instruction, writing the results back to registers and memory as needed. By allowing multiple instructions in the processor at once, programs could run much faster.

1993 saw the introduction of the Pentium processor. The processor family changed from numbers to names as a result of a lawsuit—that’s why it is Pentium instead of the 586. The Pentium chip changed the pipeline even more than the i486. The Pentium architecture added a second separate superscalar pipeline. The main pipeline worked like the i486 pipeline, but the second pipeline ran some simpler instructions, such as direct integer math, in parallel and much faster.

In 1995, Intel released the Pentium Pro processor. This was a radically different processor design. This chip had several features including out-of-order execution processing core (OOO core) and speculative execution. The pipeline was expanded to 12 stages, and it included something termed a ‘superpipeline’ where many instructions could be processed simultaneously. This OOO core will be covered in depth later in the article.

There were many major changes between 1995 when the OOO core was introduced and 2002 when our next date appears. Additional registers were added. Instructions that processed multiple values at once (Single Instruction Multiple Data, or SIMD) were introduced. Caches were introduced and existing caches enlarged. Pipeline stages were sometimes split and sometimes consolidated to allow better use in real-world situations. These and other changes were important for overall performance, but they don’t really matter very much when it comes to the flow of data through the chip.

In 2002, the Pentium 4 processor introduced a technology called Hyper-Threading. The OOO core was so successful at improving processing flow that it was able to process instructions faster than they could be sent to the core.  For most users the CPU’s OOO core was effectively idle much of the time, even under load. To help give a steady flow of instructions to the OOO core they attached a second front-end. The operating system would see two processors rather than one. There were two sets of x86 registers. There were two instruction decoders that looked at two sets of instruction pointers and processed both sets of results. The results were processed by a single, shared OOO core but this was invisible to the programs. Then the results were retired just like before, and the instructions were sent back to the two virtual processors they came from.

In 2006, Intel released the "Core" microarchitecture. For branding purposes, it was called "Core 2" (because everyone knows two is better than one). In a somewhat surprising move, CPU clock rates were reduced and Hyper-Threading was removed. By slowing down the clock they could expand all the pipeline stages. The OOO core was expanded. Caches and buffers were enlarged. Processors were re-designed focusing on dual-core and quad-core chips with shared caches.

In 2008, Intel went with a naming scheme of Core i3, Core i5, and Core i7. These processors re-introduced Hyper-Threading with a shared OOO core. The three different processors differed mainly by the size of the internal caches.

Future Processors: The next microarchitecture update is currently named Haswell and speculation says it will be released late in 2013. So far the published docs suggest it is a 14-stage OOO core pipeline, so it is likely the data flow will still follow the basic design of the Pentium Pro.

So what is all this pipeline stuff, what is the OOO core, and how does it help processing speed?

CPU Instruction Pipelines


In the most basic form described above, a single instruction goes in, gets processed, and comes out the other side. That is fairly intuitive for most programmers.

The i486 has a 5-stage pipeline. The stages are – Fetch, D1 (main decode), D2 (secondary decode, also called translate), EX (execute), WB (write back to registers and memory). One instruction can be in each stage of the pipeline.


Attached Image: pipeline_superscalar.PNG


There is a major drawback to a CPU pipeline like this. Imagine the code below. Back before CPU pipelines the following three lines were a common way to swap two variables in place.

XOR a, b
XOR b, a
XOR a, b


The chips starting with the 8086 up through the 386 did not have an internal pipeline. They processed only a single instruction at a time, independently and completely. Three consecutive XOR instructions is not a problem in this architecture.

We’ll consider what happens in the i486 since it was the first x86 chip with an internal pipeline. It can be a little confusing to watch many things in motion at once, so you may want to refer back to the diagram above.

The first instruction enters the Fetch stage and we are done with that step. On the next step the first instruction moves to D1 stage (main decode) and the second instruction is brought into fetch stage. On the third step the first instruction moves to D2 and the second instruction gets moved to D1 and another is fetched.  On the next stage something goes wrong.  The first instruction moves to EX … but other instructions do not advance.  The decoder stops because the second XOR instruction requires the results of the first instruction. The variable (a) is supposed to be used by the second instruction, but it won’t be written to until the first instruction is done. So the instructions in the pipeline wait until the first instruction works its way through the EX and WB stages. Only after the first instruction is complete can the second instruction make its way through the pipeline.  The third instruction will similarly get stuck, waiting for the second instruction to complete.

This is called a pipeline stall or a pipeline bubble.

Another issue with pipelines is some instructions could execute very quickly and other instructions would execute very slowly. This was made more visible with the Pentium’s dual-pipeline system.

The Pentium Pro introduced a 12-stage pipeline. When that number was first announced there was a collective gasp from programmers who understood how the superscalar pipeline worked.  If Intel followed the same design with a 12-stage superscalar pipeline then a pipeline stall or slow instruction would seriously harm execution speed. At the same time they announced a radically different internal pipeline, calling it the Out Of Order (OOO) core. It was difficult to understand from the documentation, but Intel assured developers that they would be thrilled with the results.

Let’s have a look at this OOO core pipeline in more depth.

The Out Of Order Core Pipeline


The OOO Core pipeline is a case where a picture is worth a thousand words. So let’s get some pictures.

Diagrams of CPU Pipelines


The i486 had a 5-stage pipeline that worked well. The idea was very common in other processor families and works well in the real world.


Attached Image: pipeline_486.PNG


The Pentium pipeline was even better than the i486. It had two instruction pipelines that could run in parallel, and each pipeline could have multiple instructions in different stages. You could have nearly twice as many instructions being processed at the same time.


Attached Image: pipeline_586.PNG


Having fast instructions waiting for slow instructions was still a problem with parallel pipelines. Having sequential instruction order was another issue thanks to stalls. The pipelines are still linear and can face a performance barrier that cannot be breached.

The OOO core is a huge departure from the previous chip designs with their linear paths.  It added some complexity and introduced nonlinear paths:


Attached Image: pipeline_OOO.PNG


The first thing that happens is that instructions are fetched from memory into the processor’s instruction cache. The decoder on the modern processors can detect when a large branch is about to happen (such as a function call) and can begin loading the instructions before they are needed.

The decoding stage was modified slightly from earlier chips. Instead of just processing a single instruction at the instruction pointer, the Pentium Pro processor could decode up to three instructions per cycle. Today’s (circa 2008-2013) processors can decode up to four instructions at once. Decoding produces small fragments of operations called micro-ops or µ-ops.

Next is a stage (or set of stages) called micro-op translation, followed by register aliasing. Many operations are going on at once and we will potentially be doing work out of order, so an instruction could read to a register at the same time another instruction is writing to it. Writing to a register could potentially stomp on a value that another instruction needs. Inside the processor the original registers (such as AX, BX, CX, DX, and so on) are translated (or aliased) into internal registers that are hidden from the programmer. The registers and memory addresses need to have their values mapped to a temporary value for processing. Currently 4 micro-ops can go through translation every cycle.

After micro-op translation is complete, all of the instruction’s micro-ops enter a reorder buffer, or ROB. The ROB currently holds up to 128 micro-ops. On a processor with Hyper-Threading the ROB can also coordinate entries from multiple virtual processors.  Both virtual processors come together into a single OOO core at the ROB stage.

These micro-ops are now ready for processing. They are placed in the Reservation Station (RS). The RS currently can hold 36 micro-ops at any one time.

Now the magic of the OOO core happens. The micro-ops are processed simultaneously on multiple execution units, and each execution unit runs as fast as it can. Micro-ops can be processed out of order as long as their data is ready, sometimes skipping over unready micro-ops for a long time while working on other micro-ops that are ready.  This way a long operation does not block quick operations and the cost of pipeline stalls is greatly reduced.

The original Pentium Pro OOO core had six execution units: two integer processors, one floating-point processor, a load unit, a store address unit, and a store data unit. The two integer processors were specialized; one could handle the complex integer operations, the other could solve up to two simple operations at once. In an ideal situation the Pentium Pro OOO Core execution units could process seven micro-ops in a single clock cycle.

Today’s OOO core still has six execution units. It still has the load address, store address, and store data execution units, the other three have changed somewhat. Each of the three execution units perform basic math operations, or instead they perform a more complex micro-op. Each of the three execution units are specialized to different micro-ops allowing them to complete the work faster than if they were general purpose. In an ideal situation today’s OOO core can process 11 micro-ops in a single cycle.

Eventually the micro-op is run. It goes through a few more small stages (which vary from processor to processor) and eventually gets retired. At this point it is returned back to the outside world and the instruction pointer is advanced. From the program’s point of view the instruction has simply entered the CPU and exited the other side in exactly the same way it did back on the old 8086.

If you were following carefully you may have noticed one very important issue in the way it was just described. What happens if there is a change in execution location? For example, what happens when the code hits an 'if' statement or a 'switch" statement? On the older processors this meant discarding the work in the superscalar pipeline and waiting for the new branch to begin processing.

A pipeline stall when the CPU holds one hundred instructions or more is an extreme performance penalty. Every instruction needs to wait while the instructions at the new location are loaded and the pipeline restarted. In this situation the OOO core needs to cancel work in progress, roll back to the earlier state, wait until all the micro-ops are retired, discard them and their results, and then continue at the new location. This was a very difficult problem and happened frequently in the design. The performance of this situation was unacceptable to the engineers. This is where the other major feature of the OOO core comes in.

Speculative execution was their answer. Speculative execution means that when a conditional statement (such as an 'if' block) is encountered the OOO core will simply decode and run all the branches of the code. As soon as the core figures out which branch was the correct one, the results from the unused branches would be discarded. This prevents the stall at the small cost of running the code inside the wrong branch.  The CPU designers also included a branch prediction cache which further improved the results when it was forced to guess at multiple branch locations.  We still have CPU stalls from this problem, but the solutions in place have reduced it to the point where it is a rare exception rather than a usual condition.

Finally, CPUs with Hyper-Threading enabled will expose two virtual processors for a single shared OOO core.  They share a Reorder Buffer and OOO core, appearing as two separate processors to the operating system.  That looks like this:


Attached Image: pipeline_OOO_HT.PNG


A processor with Hyper-Threading gives two virtual processors which in turn gives more data to the OOO core. This gives a performance increase during general workloads. A few compute-intensive workflows that are written to take advantage of every processor can saturate the OOO core. During those situations Hyper-Threading can slightly decrease overall performance. Those workflows are relatively rare; Hyper-Threading usually provides consumers with approximately double the speed they would see for their everyday computer tasks.

An Example


All of this may seem a little confusing. Hopefully an example will clear everything up.

From the application's perspective, we are still running on the same instruction pipeline as the old 8086. There is a black box. The instruction pointed to by the instruction pointer is processed by the black box, and when it comes out the results are reflected in memory.

From the instruction's point of view, however, that black box is quite a ride.

Here is today’s (circa 2008-2013) CPU ride, as seen by an instruction:

First, you are a program instruction. Your program is being run.

You are waiting patiently for the instruction pointer to point to you so you can be processed. When the instruction pointer gets about 4 kilobytes away from you -- about 1500 instructions away -- you get collected into the instruction cache. Loading into the cache takes some time, but you are far away from being run. This prefetch is part of the first pipeline stage.

The instruction pointer gets closer and closer. When the instruction pointer gets about 24 instructions away, you and five neighbors get pulled into the instruction queue.

This processor has four decoders. It has room for one complex instruction and up to three simple instructions. You happen to be a complex instruction and are decoded into four micro-ops.

Decoding is a multi-step process. Part of the decode process involved a scan to see what data you need and if you are likely to cause a jump to somewhere new. The decoder detected a need for some additional data. Unknown to you, somewhere on the far side of the computer, your data starts getting loaded into the data cache.

Your four micro-ops step up to the register alias table. You announce which memory address you read from (it happens to be fs:[eax+18h]) and the chip translates that into temporary addresses for your micro-ops. Your micro-ops enter the reorder buffer, or ROB. At the first available opportunity they move to the Reservation Station.

The Reservation Station holds instructions that are ready to be run. Your third micro-op is immediately picked up by Execution Port 5. You don’t know why it was selected first, but it is gone. A few cycles later your first micro-op rushes to Port 2, the Load Address execution unit. The remaining micro-ops wait as various ports collect other micro-ops. They wait as Port 2 loads data from the memory cache and puts it in temporary memory slots.

They wait a long time...

A very long time...

Other instructions come and go while they wait for their micro-op friend to load the right data. Good thing this processor knows how to handle things out of order.

Suddenly both of the remaining micro-ops are picked up by Execution Ports 0 and 1. The data load must be complete. The micro-ops are all run, and eventually the four micro-ops meet back in the Reservation Station.

As they travel back through the gate the micro-ops hand in their tickets listing their temporary addresses. The micro-ops are collected and joined, and you, as an instruction, feel whole again. The CPU hands you your result, and gently directs you to the exit.

There is a short line through a door marked "Retirement". You get in line, and discover you are standing next to the same instructions you came in with. You are even standing in the same order. It turns out this out-of-order core really knows its business.

Each instruction then goes out of the CPU, seeming to exit one at a time, in the same order they were pointed to by the instruction pointer.

Conclusion


This little lecture has hopefully shed some light on what happens inside a CPU. It isn't all magic, smoke, and mirrors.

Getting back to the original questions, we now have some good answers.

What goes on inside the CPU? There is a complex world where instructions are broken down into micro-operations, processed as soon as possible in any order, then put back together in order and in place. To an outsider it looks like they are being processed sequentially and independently.  But now we know that on the inside they are handled out of order, sometimes even running braches of code based on a prediction that they will be useful.

How long does it take for one instruction to run? While there was a good answer to this in the non-pipelined world, in today's processors the time it takes is based on what instructions are nearby, and the size and contents of the neighboring caches. There is a minimum amount of time it takes to go through the processor, but that is roughly constant. A good programmer and optimizing compiler can make many instructions run in around amortized zero time. With an amortized zero time it is not the cost of the instruction that is slow; instead it means it takes the time to work through the OOO core and the time to wait for cache memory to load and unload.

What does it mean when a new CPU has a 12-stage pipeline, or 18-stage, or even a "deep" 31-stage pipeline? It means more instructions are invited to the party at once. A very deep pipeline can mean that several hundred instructions can be marked as 'in progress' at once. When everything is going well the OOO core is kept very busy and the processor gains an impressive throughput of instructions. Unfortunately, this also means that a pipeline stall moves from being a mild annoyance like it was in the early days, to becoming a performance nightmare as hundreds of instructions need to wait around for the pipeline to clear out.

How can I apply this to my programs?  The good news is that CPUs can anticipate most common patterns, and compilers have been optimizing for OOO core for nearly two decades. The CPU runs best when instructions and data are all in order. Always keep your code simple. Simple and straightforward code will help the compiler's optimizer identify and speed up the results. Don’t jump around if you can help it, and if you need to jump, try to jump around exactly the same way every time. Complex designs like dynamic jump tables are fancy and can do a lot, but neither the compiler or CPU will predict what will be coming up, so complex code is very likely to result in stalls and mis-predictions. On the other side, keep your data simple. Keep your data in order, adjacent, and consecutive to prevent data stalls. Choosing the right data structures and data layouts can do much to encourage good performance. As long as you keep your code and data simple you can generally rely on your compiler’s optimizer to do the rest.

Thanks for joining me on the ride.


updates
2013-05-17 Removed a word that someone was offended by

Object-Oriented Game Design

$
0
0
C++ can be intimidating to new programmers.  The syntax does at first glance look like it was designed for robots to read, rather than humans.  However, C++ has some powerful features that speed up the process of game design, especially as games get more complex.  There's good reason C++ is the long-standing standard of the game industry, and we'll talk about a few of its advantages in this lesson.

Object-Oriented Design


C++ is an object-oriented language.  This means that instead of using a lot of variables for different aspects of each object, the variables that describe that object are stored in the object itself.  For example, a simple C++ class might look like this:

class Car
{
public:
    float speed;
    float steeringAngle;
    Model* tire[4];
    Model* steeringWheel
};

We can pass the Car object around and access its members, the class variables that describe different aspects of the object:

Car* car = new Car;
float f = car->speed

Object-oriented design compartmentalizes code so we can have lots of objects, each with its own set of parameters that describe that object.

Inheritance


In C++, we can create classes that are built on top of other classes.  The new class is derived from a base class.  Our derived class gets all the features the base class has, and then we can add more in addition to that.  We can also override class functions with our own, so we can just change the bits of behavior we care about and leave the rest.  This is extremely powerful because:

  1. We can create new classes that just add or modify a couple of functions, without writing a lot of new code.
  2. We can make modifications to the base class, and all our derived objects will be automatically updated.  We don't have to change the same code for each different class.

In the previous lesson we created a base class all our game classes would be derived from.  All the features of the base GameObject class are inherited by the derived classes.  Now I'll show you some of the cool stuff you can do with inheritance.

Consider a bullet object, flying through the air.  Where it lands, nobody knows, but it's a good bet that it's going to do some damage when it hits.  Let's use the pick system in Leadwerks to continually move the bullet forward along its trajectory, and detect when it hits something:

void Bullet::Update()
{
    PickInfo pickinfo;
    Vec3 newPosition = position + velocity / 60.0;
    void* userData;

    //Perform pick and see if anything is hit
    if (world->Pick(position, newPosition, pickinfo))
    {
        //Get the picked entity's userData value
        userData = pickinfo.entity->GetUserData();

        //If the userData has been set, we know it's a GameObject
        if (userData!=NULL)
        {
            //Get the GameObject associated with this entity
            GameObject* gameobject = (GameObject*)userData;

            //==================================
            //What goes here???
            //==================================

            //Release the bullet, since we're done with it
            Release();
        }
    }
    else
    {
        position = newPosition;
    }
}

We can assume that for all our GameObjects, if a bullet hits it, something will probably happen.  Let's add a couple of functions to the base GameObject class that can handle this situation.  We'll start by adding two members to the GameObject class in its header file:

int health;
bool alive;

In the class constructor, we'll set the initial values of these members:

GameObject::GameObject() : entity(NULL), health(100), alive(true)
{
}

Now we'll add two functions to the GameObject class.  This very abstract still, because we are only managing a health value and a live/dead state:

void GameObject::TakeDamage(const int amount)
{
    //This ensures the Kill() function is only killed once
    if (alive)
    {
        //Subtract the specified amount from the object's health
        health -= amount;
        if (health<=0)
        {        
            Kill();
        }
    }
}

//This function simply sets the "alive" state to false
void GameObject::Kill()
{
    alive = false;
}

The TakeDamage() and Kill() functions can now be used by every single class in our game, since they are all derived from the GameObject class.  Since we can count on this function always being available, we can use it in our Bullet::Update() function:

//Get the GameObject associated with this entity
GameObject* gameobject = (GameObject*)userData;

//Add 10 damage to the hit object
gameobject->TakeDamage(10);

//Release the bullet, since we're done with it
Release();

At this point, all our classes in our game will take 10 damage every time a bullet hits them.  After being hit by 10 bullets, the Kill() function will be called, and the object's alive state will be set to false.

Function Overriding


If we left it at this, we would have a pretty boring game, with nothing happening except a bunch of internal values being changed.  This is where function overriding comes in.  We can override any function in our base class with another one in the extended class.  We'll demonstrate this with a simple class we'll call Enemy.  This class has only two functions:

class Enemy : public GameObject
{
public:
    virtual void TakeDamage(const int amount);
    virtual void Kill();
};

Note that the function declarations use the virtual prefix.  This tells the compiler that these functions should override the equivalent functions in the base class.  (In practice, you should make all your class functions virtual unless you know for sure they will never be overridden.)

What would the Enemy::TakeDamage() function look like?  We can use this to add some additional behavior.  In the example below, we'll just play a sound from the position of the character model entity.  At the end of the function, we'll call the base function, so we still get the handling of the health value:

void Enemy::TakeDamage(const int amount)
{
    //Play a sound
    entity->EmitSound(sound_pain);

    //Call the base function
    GameObject::TakeDamage(amount);
}

Once the enemy takes enough damage, the GameObject::TakeDamage() function will call the Kill() function.  However, if the GameObject happens to be an Enemy, it will kill Enemy::Kill() instead of GameObject::Kill().  We can use this to play another sound.  We'll also call the base function, which will manage the object's alive state for us:

void Enemy::Kill()
{
    //Play a sound
    entity->EmitSound(sound_death);

    //Call the base function
    GameObject::Kill();
}

So when a bullet hits an enemy and causes enough damage to kill it, the following functions will be called in the order below:
  • Enemy::TakeDamage
  • GameObject::TakeDamage
  • Enemy::Kill
  • GameObject::Kill
We can reuse these functions for every single class in our game.  Some classes might act differently when the health reaches zero and the Kill() function is called.  For example, a breakable object might fall apart when the Kill() function is called, and get replaced with a bunch of fragments.  A shootable switch might open a door.  The possibilities are endless.  The Bullet class doesn't know or care what the derived classes do.  It just calls the TakeDamage() function, and the behavior is left to the different classes to implement.

Conclusion


C++ is the long-standing game industry standard for good reason.  In this lesson we learned some of the advantages of C++ for game development, and how object-oriented game design can be used to create a system of interactions.  By leveraging these techniques, you can create wonderful worlds of rich interaction and emergent gameplay.

RPG Character Design: Technical Blueprints 101

$
0
0
In this article, I’m going to try to get over a 101 guide on how to do the technical design for an RPG’s character classes and how you can implement a basic programming model in order to make your development consistent, flexible and generic.

In order for this article to be of any use to you, you should have at least a base knowledge of Object Orientated Programming and concepts like working with Interfaces, Inheritance, Polymorphism etc.

Another thing to note – this article will not be a programming tutorial, rather a technical overview on how things should happen. I’m going to map over the functionalities, however I’m not going to overload this article with code. Most of the developers that are familiar with the above mentioned concepts should have absolutely no problem to implement this technical design in their game.

I also want to mention that this is basic character design. We will not go into the depth of the skill trees, skills usage and character builds. The topic is just far too wide for the scope of the article.

So, how is this going to go?

Well, to start off, for example and simplicity reasons – let’s say we are going to develop the hero character model of an RPG that has three classes: Warrior, Mage and Archer.

In order to develop these classes in a generic, easy to maintain and flexible to extend frame, we are going to develop an interface and class hierarchy that is going to take care of all of our troubles.

The Hero Class Technical Model


As general development, this is not too hard of a task. The problem here is that a lot of times, the end-product is not reusable, it’s not flexible and it’s not generic. Here is a typical problem, when someone is making a design of this nature – more inexperienced developers tend to develop three separate classes – a Warrior class, a Mage class and an Archer class. And that’s it. Just these three classes. Don’t get me wrong, this will work. However, it’s problem prone.

What’s not good about this concept? Here is a list of some of the biggest problems:
  • You have to re-write basic stuff that all of these classes have in common.
  • If you have to change a basic concept of the characters, you have to make the change in all of these classes.
  • If a consistent bug pops up, you are going to have to implement fixes in all of the classes.
  • Many other things that may trip you up.
So how do we avoid this issue?

It’s pretty simple. We are going to build up a character Interface that is going to map out the common traits of all of the characters. Then we are going to have a basic Character class that is going to implement the Interface with some basic programming logic that’s again common to all of the heroes, and last but not least, we are going to create the Warrior, Mage and Archer classes and they are all going to extend the character class that we earlier developed.  

Developing the Technical Design


We will start off from the ground.

Character Interface


First off, we will create the character interface. For this article, let’s simply name it ICharacter.
Now let’s start thinking. What do all of these characters have in common? Well, they can all attack, move, trigger actions and die. Of course, each of them will have its own interpretation of these traits later on.
So, the interface will have these methods:
  • onMove()
  • onAttack()
  • onActionTrigger()
  • onCharacterDeath()

Character Class


Now that we have the Interface up and ready, we should create a basic class that is going to implement it. For this article, we will call the class CharacterBase. So how will it work? When we implement the interface, we will craft out the most basic logic that is going to be initiated for all characters in this. Each method will contain just the very basic amount of logic.
  • onMove() – here we will process the user input from the user controller (regardless if we handle it through an abstract user controller class or whatever – this is currently out of scope) and move our character model’s (the actual thing) transform position as it is needed. We will also trigger the movement animation.
  • onAttack() – since each of the character classes has a specific attack type, the only thing we will do here is handle the animation trigger and also make sure (in terms of game design, this step may vary) that we have the needed setup for the attack to commence. Calculate the damage to the target as well.
  • onActionTrigger() – this should basically just trigger an animation whenever we want to interact with something.
  • onCharacterDeath() – this will trigger the death animation, save statistics or whatever is needed to be saved in order for the game to go further with its logic.

Warrior Class


We have the basics down. So let’s create the Warrior class. We will call it WarriorCharacter. It will extend CharacterBase and basically override all of its methods.

This is how the methods should be customized to fit the WarriorCharacter class:
  • onMove() – here we don’t have a lot to modify.
  • onAttack() – the method should firstly check the distance from the Warrior’s transform position in regards to its target. If we are in range – that is up close and personal, we will call the CharacterBase onAttack() method logic by using super.onAttack() or whatever technique your programming language supports in order to do so.
  • onActionTrigger() – this is basically the same as well. If you want to make things more complex, you can add logic that makes the warrior interact with objects in a different way than the other classes, though that’s not the scope of the article.
  • onCharacterDeath() – To build upon the death animation logic, when a Warrior dies, we would want to implement a specific death effect, like dropping your weapon. After we call the original logic, we can add that as well.
Keep in mind, that in order to execute the basic logic from the CharacterBase class, you need to do something like

super.onAttack()

or the method you actually want to call.

Mage Class


Now to implement the mage logic. We will call this class MageCharacter. It will extend CharacterBase and things will work much like with the WarriorCharacter class. The differences here will come from the onAttack() method. Here, the distance of your attack is going to be vastly different from that of the warrior and gradually, the damage is going to be different as well. Again, when you put extra logic in your methods, make sure you are calling the original ones from the CharacterBase as well. If you don’t do that, their basic functionality will not be executed and then nothing useful will come out of this.

Archer Class


And just like with the mage and warrior, we extend CharacterBase with a class called ArcherCharacter. We will modify the onAttack() method to have a very large range and different damage. We will also modify onMove() to have this character move considerably faster than the others. Again, this is all in the fashion, detailed in the Warrior example.

Interesting Points


In this article I simply want to make a point on how you can do your most basic character class design. If you are to actually make this into a best practice kind of thing, you should make the hierarchy a lot bigger, including separate classes for melee characters, characters that use magic, range characters. From there do the inheritance for specific character classes.

Also, to be fair, in order for this to actually work good, you would need a bigger array of methods at your disposal. Methods to handle your character’s statistics, usage of skills etc. You would also need to add some variables to handle the health, stamina and a character-specific resource, like mana for example.

However, this is going to get the article too complicated. This article is aimed for developers that have just recently started using concepts like Inheritance, Polymorphism and so on and so forth. If you can get down to write just your basic technical design down, then you should pretty much be able to go to an upper level with no problems.

Conclusion


The technical side of the character class design is not something hard to understand or implement. Just keep in mind, that the concepts of Object Oriented Programming and the reusability factor that stands behind these concepts can save you a lot of time, bugs and make your code really better in all terms.

Article Update Log


4 May 2013: Initial release

7 May 2013: Additional article format

Life of a Level Designer

$
0
0
When somebody asks me what I do, I try to explain it in a few simple sentences. “I design levels, I place walls, enemies etc”. In return I usually hear “Wow! That’s a great job, you are playing for a whole day and you get paid for it“. Ehhh… both statements don’t represent how it really is.

It’s easy to imagine that making a level is a piece of cake. What’s difficult about putting in a few walls, placing some enemies, adding dialogues, cutscenes or an event like a dragon riding a sledge? A day’s work and tadam! I’m drinking beer, playing my super mega marvelous level, delighted how it came out, knowing players will be exited when they play it. Honestly, it’s a shame that this couldn’t be further from the truth…

Don’t get me wrong. I love my job and I don’t see myself anywhere else, but I assure you it’s no picnic and nothing like you imagine. You want to know why? Read on.


Attached Image: lifeofanld01.jpg
    This is what you see in game

Attached Image: lifeofanld02.jpg
    This is how it looks behind the scenes


Only the very beginning of the process is how you might imagine it. It involves making a sketch of a level, basically planning all the cool events from start to finish. This is the nice part. It’s also the most important phase of level creation. But that’s not necessarily because you’re planning the chain of events. It’s because it’s the time when you have to think a few months up front and analyze gameplay problems, technicalities and memory issues – how this will affect that, is this doable, will this work just as you planned etc. All this is necessary if you want to avoid huge problems in the future and have a fun and well-done level.

You need to know everything. What is this room? How will this sequence look like? How many enemies do you plan to have here? Where are they going to walk out from? What will distinguish this fighting arena from the next 12 arenas? You have to be able to present it to others, show them a huge gray block moving and explain that you imagine this as a half-car half-monkey mutated alien baby…

But also this must be achievable for programmers, meshers and be certified by your lead, production and most important of all – the Creative Director. After couple of suggestions, a few changes, trying several different approaches, scenarios, correcting this, changing that, after another and another round of meetings, corrections etc you can finally finish your sketch… uff. You think: now for the easy part… You couldn’t be more wrong. You didn’t even start your work yet. You need to start making more complex geometry and script everything.


    Attached Image: lifeofanld03.jpg
The LD's vision - paper sketch of great fighting arenas


Let’s get to work. We have a simple situation to script: player’s character and his friend (sidekick) walks out on the street from a building, he says 3 sentences and after few steps forward they fight with Skull gang members. After that, around the corner they fight against Creeps. Sounds simple? Ok then let’s get to the scripting you have to do.


Attached Image: lifeofanld04.jpg
    This is a sketch made in the editor, try to explain others what do you see...


When the player enters the area you need to spawn four Skulls, hidden from the player's view and additional two when player kills any of the living ones. Scripting this is simple. Now you have to organize the arena, but placing four crates and marking cover places for the enemies isn’t good enough. It takes a lot of time, a lot of playthroughs, checking different enemy types, and various cover changes to make a single arena really interesting and fun.

Besides enemies, you also need to check if a player’s sidekick behaves properly and doesn’t disturb the player. Don’t forget he also needs places to take cover, other than the ones the player is using. If you want some piece of the cover to be destructible, you need to remember to script the enemies and sidekicks not to use that cover after it’s been destroyed. You want enemies to flank a player if he stays in one particular area for too long? You have to script it.


Attached Image: lifeofanld05.jpg
    Example of scripting something easy


Nearly every little detail you want to be happening on your level, you have to script yourself. This is not as easy as giving enemies a “flanking” command and they know everything they need to do. You have to determine a path they will be moving on, you need to tell them where to take cover, where to stop and when to start shooting. What about a situation in which the player shoots them during the maneuver? What should they do? Shoot him back, take cover, ignore? If he leashes one of them should he get up and still run to the destination point? That wouldn’t make much sense, would it?

What if the player rushes forward and kills Skulls at the end of the arena and sees your two additional Skulls spawning out of thin air three meters away from him? What if he doesn’t kill any of them and rushes even further into next arena where you spawn 6 Creeps? 10 enemies at a time? Will the player make it? Maybe. What about the memory? It may be too much and the game will crash. Yes, yes we need more scripting…


Attached Image: lifeofanld06.jpg
    Things get a little more complex


Maybe the player won’t charge, and instead he goes back to the room he was in before going out on the street. The simplest thing to do is to close the door when player walks through it, but did you forget that the sidekick needs to do it as well? Script, script, script…

The level designer needs to analyze the player’s every possible move, check every scenario and be sure he controls everything, there is no place for leaving some unpredicted situation unsecured or taking chances. It’s a little like playing god, but above all the player cannot see your fingers, because he will feel cheated. How would it look like if player walked out through a destroyed door, turned around and saw a brand new metal door materializing, just because you wanted to block his way back? He was feeling the mood, he believed he was a soldier and you just reminded him that this is just a crappy made game. Look, no hands! Pure magic!


Attached Image: lifeofanld07.jpg
    Editor view - this is where you spend 90% of your time


When you are working as an LD you need to remember that there is always a small chance that something will go wrong and you need to be ready for it. For example what if a sidekick got stuck somewhere and won’t ever walk out that door which you wanted to close so badly? What if a sidekick was supposed to open a door to the next building? He won’t do it now. You need some scripted safety teleport mechanism, but again watch your fingers so the player can’t notice them.

You planned in your sketch that Gray was suppose to say 3 sentences about classical ballet before the fight starts. What if he rushes into battle and the ballet chit-chat is still playing like nothing happens? You didn’t think about that during sketch phase – your bad. Now how will you fix it? You could just stop him in the middle of a sentence, but this sounds unnatural. You are adding extra “WTF? Skulls!” after the stop, but it doesn’t always fit. You have to think of some other way to solve that problem.

You need one music track before battle, a different one for the fight. Slowly your scripting grows like a tangle of vines. You want the Skulls to drink beer and have a chit-chat before they notice the player, then to scatter, push over tables, make covers out of benches and you want the sidekick to kick the first one on the left? Ok, now you’ve got a jungle you need to script yourself. Besides there is a case of making objects, animations, sounds, particles… but that’s something I’ll write about another time.


    Attached Image: lifeofanld08.jpg
The final scripting of a complicated longer event


How much do you think it takes to make one level from the beginning till the final version? A 45 minute level, nothing special, no player in aircraft-tank-boat facing King Kong, just a normal bit of shooting. The answer is: months of hard work. This piece of gameplay I just described above would take about 1min 30sec for the player to pass it. But there is still 43min and 30 sec of gameplay scripting to do and we work on 3 levels at the same time, so there isn’t much time.

The more you script the more variables and scenarios you get, the more complicated your scripting is and the probability of bugs rises. You need to take care of everything, test it, polish it and make it unbreakable, safe and most importantly – fun and interesting to play. You are not only coming up with ideas, but also you are the one that needs to make them work and work well. Scripting is just a part of a level designers work. There is more, but hopefully this gives you have a better idea of what we really do.

The bottom line is a Level Designer does 1001 things that an average player won’t ever notice! Even if at times it is hard and time consuming I wouldn’t change it for anything else, because it gives me satisfaction like no other job before.


Reposted with permission from the PCF Blog

Binding D To C

$
0
0
This is a topic that has become near and dear to my heart. Derelict is the first, and only, open source project I've ever maintained. It's not a complicated thing. There's very little actual original code outside of the Utility package (with the exception of some bookkeeping for the OpenGL binding). The majority of the project is a bunch of function and type declarations. Maintaining it has, overall, been relatively painless. And it has brought me a fair amount of experience in getting D and C to cooperate.

As the D community continues to grow, so does the amount of interest in bindings to C libraries. A project called Deimos was started over at github to collate a variety of bindings to C libraries. There are several bindings there now, and I'm sure it will continue to grow. People creating D bindings for the first time will, usually, have no trouble. It's a straightforward process. But there are certainly some pitfalls along the way. In this article, I want to highlight some of the basic issues to be aware of.

Static vs. Dynamic Bindings


Terminology


The first thing to consider is what sort of binding to use, static or dynamic. By static, I mean a binding that allows linking with C libraries or object files directly at compile time. By dynamic, I mean a binding that does not allow linking at compile time, but instead loads a shared library (DLL/so/dylib/framework) at runtime. Derelict is an example of the latter; most, if not all, of the bindings in the Deimos repository the former. Before going further, it's important to understand exactly what I mean when I use these terms.

When I talk of a static binding, I am not referring to static linking. While the two terms are loosely related, they are not the same at all. Static bindings can certainly be used to link with static libraries, but they can also be linked with dynamic libraries at compile time. In the C or C++ world, it is quite common when using shared libraries to link them at compile time. On Windows, this is done via an import library. Given an application "Foo" that makes use of the DLL "Bar", when "Foo" is compiled it will be linked with an import library named Bar.lib. This will cause the DLL to be loaded automatically by the operating system when the application is executed. The same thing can be accomplished on Posix systems by linking directly with the shared object file (extending the example, that would be libBar.so in this case). So with a static binding in D, a program can be linked at compile time with the static library Bar.lib (Windows) or libBar.a (Posix) for static linkage, or the import library Bar.lib (Windows) or libBar.so (Posix) for dynamic linkage.

A dynamic binding can not be linked to anything at compile time. No static libraries, no import libraries, no shared objects. It is designed explicitly for loading a shared library manually at run time. In the C and C++ world, this technique is often used to implement plugin systems, or to implement hot swapping of different application subsystems (for example, switching between OpenGL and Direct3D renderers) among other things. The approach used here is to declare exported shared library symbols as pointers, call into the OS API that loads shared libraries, then manually extract the exported symbols and assign them to the pointers. This is exactly what a dynamic binding does. It sacrifices the convenience of letting the OS load the shared library for more control over when and what is loaded.

To reiterate, a static binding can be used with either static libraries or shared libraries that are linked at compile time. A dynamic binding cannot be linked to the bound library at compile time, but must provide a mechanism to manually load the library at run time.

Tradeoffs


When choosing whether to implement a static or dynamic binding, there are certain tradeoffs to consider. D understands the C ABI, so it can link with C object files and libraries just fine, as long as the D compiler understands the object format itself. Therein lies the rub. On Posix systems, this isn't going to be an issue. DMD (and of course, GDC and, I assume, LDC) uses the GCC toolchain on Posix systems. So getting C and D to link and play nicely together isn't much of a hassle. On Windows, though, it's a different world entirely.

On Windows, we have two primary object file formats to contend with: COFF and OMF. Most Windows compilers are configured, or can be configured, to output object files in the COFF format. This shouldn't be an issue when using GDC or LDC, both of which use MinGW as a backend. With DMD, which format is used depends on whether 32-bit or 64-bit compilation is configured. When compiling for 32-bit, DMD uses an ancient linker called Optlink which only works with OMF objects. When compiling for 64-bit, DMD makes use of the Microsoft compiler tools which only understand the COFF format.

All of this means that when making a C binding, a decision must be made up front whether or not to deal with the object file format issue or to ignore it completely. If the latter, then a dynamic binding is the way to go. Generally, when manually loading DLLs, it doesn't matter what format they were compiled in, since the only interaction between the app and the DLL happens in memory. But if a static binding is used, the object file format determines whether or not the app will link. If the linker can't read the format, then no executable can be generated. That means either compiling the bound C library with a compiler that outputs a format the given D linker understands, using a conversion tool to convert the library into the proper format, or using a tool to extract a link library from a DLL. If the binding is to be made publicly available, will the C libraries be shipped with it in multiple formats? Or will it be left to the users to obtain the C libraries themselves? I've seen both approaches.

In my mind, the only drawback to dynamic bindings is that you can't choose to have a statically linked program. I've heard people complain about "startup overhead", but if there is any it's negligble and I've never seen it. The only drawback to static bindings is the object file mess. But with a little initial work up front, it can be minimized for users so that it, too, is negligible.

Manual vs Automated


Once a decision is made between static and dynamic, it's not yet time to roll up the sleeves and start implementing the binding. First it must be decided how to create the binding. Doing it manually is a lot of work. Trust me! That's what I do for all of the bindings in Derelict. Once a systematic method is developed, it goes much more quickly. But it is still drastically more time consuming than using an automated approach.

To that end, I know people have used SWIG and a tool called htod. VisualD now has an integrated C++-to-D converter which could probably do it as well. I've never used any of them, so I can't comment on the pros and cons one way or another. But I do know that any automated output is going to require some massaging. There are a number of corner cases that make an automated one-for-one translation extremely difficult to get right. So regardless of the approach taken, in order to prevent the binding from blowing up down the road, it is absolutely imperative to understand exactly how to translate D to C. And that's where the real fun begins.

Implementation


When implementing bindings, there is a page at dlang.org that can be used as a reference, Interfacing to C. This is required reading for anyone planning to work on a D binding to a C library. This article should be considered a companion to that page.

Linkage Attributes


When binding to C, it is critical to know which calling convention is used by the target C library. In my experience, the large majority of C libraries use the cdecl calling convention across each platform. Modern Windows system libraries use the stdcall calling convention (older libraries used the pascal convention). A handful of libraries use stdcall on Windows and cdecl everywhere else. See this page on x86 calling conventions for the differences.

D provides a storage class, extern, that does two things when used with a function. One, it tells the compiler that the given function is not stored in the current module. Two, it specifies a calling convention via a linkage attribute. The D documentation lists all of the supported linkage attributes, but for C bindings the three you will be working with most are C, Windows and System.

Although linkage attributes are used for both static and dynamic bindings, the form of the function declarations is different. For the examples in this section, I'll use function declarations as they would appear in static bindings. Dynamic bindings use function pointers. I'll discuss those later in the article.

The C attribute, extern( C ), is used on functions that have the cdecl calling convention. If no calling convention is specified in the C headers, it's safe to assume that the default convention is cdecl. There's a minor caveat in that some compilers allow the default calling convention to be changed via the command line. This isn't an issue in practice, but it's a possibility implementers should be aware of if they have no control over how the C library is compiled.

// In C
extern void someCFunction(void);

// In D
extern( C ) void someCFunction();

The Windows attribute, extern( Windows ), is used on functions that have the stdcall calling convention. In the C headers, this means the function is prefixed with something like __stdcall, or a variation thereof depending on the compiler. Often, this is hidden behind a define. For example, the Windows headers use WINAPI, APIENTRY, and PASCAL. Some third party libraries will use these same defines or create their own.

// In C
#define WINAPI __stdcall
extern WINAPI void someWin32Function(void);

// In D
extern( Windows ) void someWin32Function();

The System attribute, extern( System ), is useful when binding to libraries, like OpenGL, that use the stdcall convention on Windows, but cdecl on other systems. On Windows, the compiler sees it as extern( Windows ), but on other systems as extern( C ). The difference is always hidden behind a define on the C side.

// In C
#ifdef _WIN32
#include <windows.h>
#define MYAPI WINAPI
#else
#define MYAPI
#endif

extern MYAPI void someFunc(void);

// In D
extern( System ) void someFunc();

In practice, there are a variety of techniques used to decorate function declarations with a calling convention. It's important to examine the headers thoroughly and to make no assumptions about what a particular define actually translates to.

One more useful detail to note is that when implementing function declarations on the D side, it is not necessary to prefix each one with an extern attribute. An attribute block can be used instead.

// An attribute block
extern( C )
{
	void functionOne();
	double functionTwo();
}

// Or alternately
extern( C ):
	void functionOne();
	void functionTwo();

Typedefs, Aliases, and Native Types


D used to have typedefs. And they were strict in that they actually created a new type. Given an int typdefed to a Foo, a type Foo would actually be created rather than it being just another name for int. But D also has alias, which doesn't create a new type but just makes a new name for an existing type. typedef was eventually deprecated. Now we are left with alias.

alias is what should be used in D when a typedef is encountered in C, excluding struct declarations. Most C headers have a number of typedefs that create alternative names for native types. For example, something like this might be seen in a C header.

typedef int foo_t;
typedef float bar_t;

In a D binding, it's typically a very good idea to preserve the original typenames. The D interface should match the C interface as closely as possible. That way, existing C code from examples or other projects can be easily ported to D. So the first thing to consider is how to translate the native types int and float to D.

On the dlang page I mentioned above, there is a table that lists how all the C native types translate to D. There it shows that a C int is a D int, a C float is a D float, and so on. So to port the two declarations above, simply replace typedef with alias and all is well.

alias int foo_t;
alias float bar_t;

Notice in that table the equivalent to C's long and unsigned long. There is a possibility that the C long type could actually be 64-bits on some platforms and 32-bits on others, whereas D's int type is always 32-bits and D's long type is always 64-bits. As a measure of protection against this possible snafu, it's prudent to use a couple of handy aliases on the D side that are declared in core.stdc.config: c_long and c_ulong.

// In the C header
typedef long mylong_t;
typedef unsigned long myulong_t;

// In the D module
import core.stdc.config;

// Although the import above is private to the module, the aliases are public
// and visible outside of the module.
alias c_long mylong_t;
alias c_ulong myulong_t;

One more thing. When translating typedefs that use types from C's stdint.h, there are two options for the aliases. One approach is to use native D types. This is quite straightforward since the sizes are fixed. Another way is to include core.stdc.stdint, which mirrors the C header, and just replace typedef with alias. For example, here are some types from SDL2 translated into D.

// From SDL_stdinc.h
typedef int8_t Sint8;
typedef uint8_t Uint8;
typedef int16_t Sint16;
typedef uint16_t Uint16;
...

// In D, without core.stdc.stdint
alias byte Sint8;
alias ubyte Uint8;
alias short Sint16;
alias ushort Uint16;
...

// And with the import
import core.stdc.stdint;

alias int8_t Sint8;
alias uint8_t Uint8;
alias int16_t Sint16;
alias uint16_t Uint16;
...

Enums


Translating anonymous enums from C to D requires nothing more than a copy/paste.

// In C
enum
{
	ME_FOO,
	ME_BAR,
	ME_BAZ
};

// In D
enum
{
	ME_FOO,
	ME_BAR,
	ME_BAZ,
}

Note that enums in D do not require a final semicolon. Also, the last member may be followed by a comma.

For named enums, a bit more than a direct copy/paste is needed. Named enums in D require the name be prefixed when accessing members.

// In C
typedef enum
{
	ME_FOO,
	ME_BAR,
	ME_BAZ
} MyEnum;

// In D
enum MyEnum
{
	ME_FOO,
	ME_BAR,
	ME_BAZ
}

// In some function...
MyEnum me = MyEnum.ME_FOO;

There's nothing wrong with this in and of itself. In fact, there is a benefit in that it gives some type safety. For example, if a function takes a parameter of type MyEnum, not just any old int can be used in its place. The compiler will complain that int is not implicitly convertible to MyEnum. That may be acceptable for an internal project, but for a publicly available binding it is bound to cause confusion because it breaks compatibility with existing C code samples. One work around that maintains type safety is the following.

alias MyEnum.ME_FOO ME_FOO;
alias MyEnum.ME_BAR ME_BAR;
alias MyEnum.ME_BAZ ME_BAZ;

// Now this works
MyEnum me = ME_FOO;

It's obvious how tedious this could become for large enums. If type safety is not important, there's one more workaround.

alias int MyEnum;
enum
{
	ME_FOO,
	ME_BAR,
	ME_BAZ
}

This will behave exactly as the C version. It's the approach I opted for in Derelict.

#defines


Often in C, #define is used to declare constant values. OpenGL uses this approach to declare values that are intended to be interpreted as the type GLenum. Though these values could be translated to D using the immutable type modifier, there is a better way.

D's enum keyword is used to denote not just traditional enums, but also manifest constants. In D, a manifest constant is an enum that has only one member, in which case you can omit the braces in the declaration. Here's an example.

// This is a manifest constant of type float
enum float Foo = 1.003f;

// We can declare the same thing using auto inference
enum Foo = 1.003f; // float
enum Bar = 1.003; // double
enum Baz = "Baz!" // string

For single #defined values in C, these manifest constants work like a charm. But often, such values are logically grouped according to function. Given that a manifest constant is essentially the same as a one-member enum, it follows that we can group several #defined C values into a single, anonymous D enum.

// On the C side.
#define FOO_SOME_NUMBER 100
#define FOO_A_RELATED_NUMBER 200
#define FOO_ANOTHER_RELATED_NUMBER 201

// On the D side
enum FOO_SOME_NUMBER = 100
enum FOO_A_RELATED_NUMBER = 200
enum FOO_ANOTHER_NUMBER = 201

// Or, alternatively
enum
{
	FOO_SOME_NUMBER = 100,
	FOO_A_RELATED_NUMBER = 200,
	FOO_ANOTHER_NUMBER = 201,
}

Personally, I tend to use the latter approach if there are more than two or three related #defines and the former if it's only one or two values.

But let's get back to the manifest constants I used in the example up above. I had a float, a double and a string. What if there are multiple #defined strings? Fortunately, D's enums can be typed to any existing type. Even structs.

// In C
#define LIBNAME "Some Awesome C Library"
#define AUTHOR "John Foo"
#define COMPANY "FooBar Studios"

// In D, collect all the values into one enum declaration of type string
enum : string
{
	LIBNAME = "Some Awesome C Library",
	AUTHOR = "John Foo",
	COMPANY = "FooBar Studios",
}

Again, note the trailing comma on the last enum field. I tend to always include these in case a later version of the C library adds a new value that I need to tack on at the end. A minor convenience.

Structs


For the large majority of cases, a C struct can be directly translated to D with little or no modification. The only major difference in the declarations is when C's typedef keyword is involved. The following example shows two cases, with and without typedef. Notice that there is no trailing semi-colon at the end of the D structs.

// In C
struct foo_s
{
	int x, y;
};

typedef struct
{
	float x;
	float y;
} bar_t;

// In D
struct foo_s
{
	int x, y;
}

struct bar_t
{
	float x;
	float y;
}

Most cases of struct declarations are covered by those two examples. But some times, a struct with two names, one in the struct namespace and one outside of it (the typedef), may be encountered. In that case, the typedefed name should always be used.

// In C
typedef struct foo_s
{
	int x;
	struct foo_s *next;
} foo_t;

// In D
struct foo_t
{
	int x;
	foo_t *next;
}

Another common case is that of what is often called an opaque struct (in C++, more commonly referred to as a forward reference). The translation from C to D is similar to that above.

// In C
typedef struct foo_s foo_t;

// In D
struct foo_t;

When translating the types of struct members, the same rules as outlined above in Typedefs, Aliases, and Native Types should be followed. But there are a few gotchas to be aware of.

The first gotcha is relatively minor, but annoying. I mentioned that I believe it's best to follow the C library interface as closely as possible when naming types and functions in a binding. This makes translating code using the library much simpler. Unfortunately, there are cases where a struct might have a field which happens to use a D keyword for its name. The solution, of course, is to rename it. I've encountered this a few times in Derelict. My solution is to prepend an underscore to the field name. For publicly available bindings, this should be prominantly documented.

// In C
typedef struct
{
	// oops! module is a D keyword.
	int module;
} foo_t;

// In D
struct foo_t
{
	int _module;
}

The next struct gotcha is that of versioned struct members. Though rare in my experience, some C libraries wrap the members of some structs in #define blocks. This can cause problems not only with language bindings, but also with binary compatibility issues when using C. Thankfully, translating this idiom to D is simple. Using it, on the other hand, can get a bit hairy.

// In C
typedef struct
{
	float x;
	float y;
	#ifdef MYLIB_GO_3D
	float z;
	#endif
} foo_t;

// In D
struct foo_t
{
	float x;
	float y;
	// Using any version identifier you want -- this is one case where I advocate breaking
	// from the C library. I prefer to use an identifier that makes sense in the context of the binding.
	version(Go3D) float z;
}

To make use of the versioned member, -version=Go3D is passed on the command line when compiling. This is where the headache begins.

If the binding is compiled as a library, then any D application linking to that library will also need to be compiled with any version identifiers the library was compiled with, else the versioned members won't be visible. Furthermore, the C library needs to be compiled with the equivalent defines. So to use foo_t.z from the example above, the C library must be compiled with -DMYLIB_GO_3D, the D binding with -version=Go3D, and the D app with -version=Go3D. When making a binding like Derelict that loads shared libraries dynamically, there's no way to ensure that end users will have a properly compiled copy of the C shared library on their system unless it is shipped with the app. Not a big deal on Windows, but rather uncommon on Linux. Also, if the binding is intended for public consumption, the versioned sections need to be documented.

Read more about D's version conditions in the D Programming Language documentation.

The final struct member gotcha, and a potentially serious one, is bitfields. The first issue here is that D does not have bitfields. For the general case, we have a library solution in std.bitmanip, but for a C binding it's not a silver-bullet solution because of the second issue. And the second issue is that the C standard leaves the ordering of bitfields undefined.

Consider the following example from C.

typedef struct
{
	int x : 2;
	int y : 4;
	int z: 8;
} foo_t;

There are no guarantees here about the ordering of the fields or where or even if the compiler inserts padding. It can vary from compiler to compiler and platform to platform. This means that any potential solution in D needs to be handcrafted to be compatibile with a specific C compiler version in order to guarantee that it works as expected.

Using std.bitmanip.bitfields might be the first approach considered.

// D translation using std.bitmanip.bitfields
struct foo_t
{
	mixin(bitfields!(
		int, "x", 2,
		int, "y", 4,
		int, "z", 8,
		int, "", 2)); // padding
}

Bitfields implemented this way must total to a multiple of 8 bits. In the example above, the last field, with an empty name, is 2 bits of padding. The fields will be allocated starting from the least significant bit. As long as the C compiler compiles the C version of foo_t starting from the least significant bit and with no padding in between the fields, then this approach might possibly work. I've never tested it.

The only other alternative that I'm aware of is to use a single member, then implement properties that use bit shift operations to pull out the appropriate value.

struct foo_t
{
	int flags;
	int x() @property { ... }
	int y() @property { ... }
	int z() @property { ... }
}

The question is, what to put in place of the ... in each property? That depends upon whether the C compiler started from the least-significant or most-significant bit and whether or not there is any padding in between the fields. In otherwords, the same difficulty faced with the std.bitmanip.bitfields approach.

In Derelict, I've only encountered bitfields in a C library one time, in SDL 1.2. My solution was to take a pass. I use a single 'flags' field, but provide no properties to access it. Given that Derelict is intended to be used on multiple platforms with C libraries compiled by multiple compilers, no single solution was going to work in all cases. I decided to leave it up to the user. Anyone needing to access those flags could figure out how to do it themselves. I think that's the best policy for any binding that isn't going to be proprietary. Proprietary bindings, on the other hand, can be targeted at specific C compilers on specific platforms.

Function Pointers


Function pointers are often encountered in C libraries. Often they are used as function parameters or struct members for callbacks. D has its own syntax for function pointer declarations, so they must be translated from the C style in a binding.

// A D-style function pointer declaration.
int function() MyFuncPtr;

So the format is: return type->function keyword->parameter list->function pointer name. Though it's possible to use MyFuncPtr directly, it's often convenient to declare an alias.

alias int function() da_MyFuncPtr;
da_MyFuncPtr MyFuncPtr;

Running the following code snippet will show that there's no difference between the two approaches in the general case.

int foo(int i)
{
	return i;
}
 
void main()
{
	int function(int) fooPtr;
	fooPtr = &foo;
 
 
	alias int function(int) da_fooPtr;
	da_fooPtr fooPtr2 = &foo;
 
 
	import std.stdio;
	writeln(fooPtr(1));
	writeln(fooPtr2(2));
}

Unfortunately, the general case does not always apply. I'll discuss that below when I talk about implementing dynamic bindings.

Here's how to translate a C function pointer to D.

// In C, foo.h
typedef int (*MyCallback)(void);
 
// In D
extern( C ) alias int function() MyCallback;

Notice that I used the alias form here. Anytime you declare a typedefed C function pointer in D, it should be aliased so that it can be used in the same way as it is elsewhere in the C header. Next, the case of function pointers declared inline in a parameter list.

// In C, foo.h
extern void foo(int (*BarPtr)(int));
 
// In D.
// Option 1
extern( C ) void foo(int function(int) BarPtr);
 
// Option 2
extern( C ) alias int function(int) BarPtr;
extern( C ) void foo(BarPtr);

Personally, I prefer option 2. Finally, function pointers declared inline in a struct.

// In C, foo.h
typedef struct
{
	int (*BarPtr)(int);
} baz_t;

// In D
struct baz_t
{
	extern( C ) int function(int) BarPtr;   
}

Function Declarations in Static Bindings


In D, we generally do not have to declare a function before using it. The implementation is the declaration. And it doesn't matter if it's declared before or after the point at which it's called. As long as it is in the currently-visible namespace, it's callable. However, when linking with a C library, we don't have access to any function implementations (nor, actually, to the declarations, hence the binding). They are external to the application. In order to call into that library, the D compiler needs to be made aware of the existence of the functions that need to be called so that, at link time, it can match up the proper address offsets to make the call. This is the only case I can think of in D where a function declaration isn't just useful, but required.

I explained linkage attributes in the eponymous section above. The examples I gave there, coupled with the details in the section that follows it regarding type translation, are all that is needed to implement a function declaration for a static D binding to a C library. But I'll give an example anyway.

// In C, foo.h
extern int foo(float f);
extern void bar(void);
 
// In D
extern( C )
{
 
    int foo(float);
 
    void bar();
}

Implementing Dynamic Bindings


Barring any corner cases that I've failed to consider or have yet to encounter myself, all of the pieces needed to implement static bindings are in place up to this point. The only thing left to cover is how to implement dynamic bindings. Here, function pointers are used rather than function declarations. As it turns out, simply declaring function pointers is not enough. It's a bit more complicated. The first thing to consider is function pointer initialization.

In one of the examples above (fooPtr), I showed how a function pointer can be declared and initialized. But in that example, it is obvious to the compiler that the function foo and the pointer fooPtr have the same basic signature (return type and parameter list). Now consider this example.

// This is all D.
int foo() { return 1; }
 
void* getPtr() { return cast(void*) &foo; }
 
void main()
{
 
    int function() fooPtr;
 
    fooPtr = getPtr();
}

Trying to compile this will result in something like the following.

fptr.d(10): Error: cannot implicitly convert expression (getPtr()) of type void* to int function()

Now, obviously this is a contrived example. But I'm mimicking what a dynamic binding has to go through. OS API calls (like GetProcAddress or dlsym) return function pointers of void* type. So this is exactly the sort of error that will be encountered if naively assigning the return value to a function pointer declared in this manner.

The first solution that might come to mind is to go ahead and insert an explicit cast.

fooPtr = cast(fooPtr)getPtr();

The error here might be obvious to an experienced coder, but certainly not to most. I'll let the compiler explain.

fptr.d(10): Error: fooPtr is used as a type

Exactly. fooPtr is not a type, it's a variable. This is akin to declaring int i = cast(i)x; Not something to be done. So the next obvious solution might be to use an aliased function pointer declaration. Then it can be used as a type. And that is, indeed, one possible solution (and, for reasons I'll explain below, the best one).

alias int function() da_fooPtr;
da_fooPtr fooPtr = cast(da_fooPtr)getPtr();

This compiles. For the record, the 'da_' prefix is something I always use with function pointer aliases. It means 'D alias'. It's not a requirement.

I implied above that there was more than one possible solution. Here's the second one.

int foo() 
{ 
	return 1; 
}

void* getPtr() 
{ 
	return cast(void*) &foo; 
}

void bindFunc(void** func) 
{ 
	*func = getPtr(); 
}

void main()
{
	int function() fooPtr;
	bindFunc(cast(void**)&fooPtr);
}

Here, the address of fooPtr is being taken (giving us, essentially, a foo**) and cast to void**. Then bindFunc is able to dereference the pointer and assign it the void* value without a cast.

When I first implemented Derelict, I used the alias approach. In Derelict 2, Tomasz Stachowiak implemented a new loader using the void** technique. That worked well. And, as a bonus, it eliminated a great many alias declarations from the codebase. Until something happened that, while a good thing for many users of D on Linux, turned out to be a big headache for me.

For several years, DMD did not provide a stack trace when exceptions were thrown. Then, some time ago, a release was made that implemented stack traces on Linux. The downside was that it was done in a way that broke Derelict 2 completely on that platform. To make a long story short, the DMD configuration files were preconfigured to export all symbols when compiling any binaries, be they shared objects or executables. Without this, the stack trace implementation wouldn't work. This caused every function pointer in Derelict to clash with every function exported by the bound libraries. In other words, the function pointer glClear in Derelict 2 suddenly started to conflict with the actual glClear function in the OpenGL shared library, even though the library was loaded manually. So, I had to go back to the aliased function pointers. Aliased function pointers and variables declared of their type aren't exported. If you are going to make a publicly available dynamic binding, this is something you definitely need to keep in mind.

I still use the void** style to load function pointers, despite having switched back to aliases. It was less work than converting everything to a direct load. And when I implemented Derelict 3, I kept it that way. So if you look at the Derelict loaders...

// Instead of seeing this
foo = cast(da_Foo)getSymbol("foo");
 
// You'll see this
foo = bindFunc(cast(void**)&foo, "foo");

I don't particularly advocate one approach over the other when implementing a binding with the aid of a script. But when doing it by hand, the latter is much more amenable to quick copy-pasting.

There's one more important issue to discuss. Given that a dynamic binding uses function pointers, the pointers are subject to D's rules for variable storage. And by default, all variables in D are stashed in Thread-Local Storage. What that means is that, by default, each thread gets its own copy of the variable. So if a binding just blindly declares function pointers, then they are loaded in one thread and called in another... boom! Thankfully, D's function pointers are default initialized to null, so all you get is an access violation and not a call into random memory somewhere. The solution here is to let D know that the function pointers need to be shared across all threads. We can do that using one of two keywords: shared or __gshared.

One of the goals of D is to make concurrency easier than it traditionally has been in C-like languages. The shared type qualifier is intended to work toward that goal. When using it, you are telling the compiler that a particular variable is intended to be used across threads. The compiler can then complain if you try to access it in a way that isn't thread-safe. But like D's immutable and const, shared is transitive. That means if you follow any references from a shared object, they must also be shared. There are a number of issues that have yet to be worked out, so it hasn't seen a lot of practical usage that I'm aware of. And that's where __gshared comes in.

When you tell the compiler that a piece of data is __gshared, you are saying, "Hey, Mr. Compiler, I want to share this data across threads, but I don't want you to pay any attention to how I use it." Essentially, it's no different from a normal variable in C or C++. When sharing a __gshared variable across threads, it's the programmer's responsibility to make sure it's properly synchronized. The compiler isn't going to help.

So when implementing a dynamic binding, a decision has to be made: thread-local (default), shared, or __gshared? My answer is __gshared. If we pretend that our function pointers are actual functions, which are accessible across threads anyway, then there isn't too much to worry about. Care still needs be taken to ensure that the functions are loaded before any other threads try to access them and that no threads try to access them after the bound library is unloaded. In Derelict, I do this with static module constructors and destructors (which can still lead to some issues during program shutdown, but that's beyond the scope of this article).

extern( C )
{
	alias void function(int) da_foo;
	alias int function() da_bar;
}
 
__gshared
{
	da_foo foo;
	da_bar bar;
}

Finally, there's the question of how to load the library. That, I'm afraid, is an exercise for the reader. In Derelict, I implemented a utility package (DerelictUtil) that abstracts the platform APIs for loading shared libraries and fetching their symbols. The abstraction is behind a set of free functions that can be used directly or via a convenient object interface. In Derelict itself, I use the latter since it makes loading an entire library easier. But in external projects, I often use the free-function interface for loading one or two functions at a time (such as certain Win32 functions that aren't available in the ancient libs shipped with DMD). It also supports selective loading, which is a term I use for being able to load a library even when specific functions are missing (the default behavior is to throw an exception when an expected symbol fails to load).

Conclusion


Overall, there's a good deal of work involved in implementing any sort of binding in D. But I think it's obvious that dynamic bindings require quite some extra effort. This is especially true given that the automated tools I've seen so far are all geared toward generating static bindings. I've only recently begun to use custom scripts myself, but they still require a bit of manual preparation because I don't want to deal with a full-on C parser. That said, I prefer dynamic bindings. I like having the ability to load and unload at will and to have the opportunity to present my own error message to the user when a library is missing. Others disagree with me and prefer to use static bindings. That's perfectly fine.

At this point, static and dynamic bindings exist for several popular libraries already. Deimos is a collection of the former and Derelict 3 the latter. Some bindings for the same library can be found in both and several that are in one project but not the other. I hope that, if the need arises, the tips I've laid out in this article can help fill in the holes for those developing new static or dynamic bindings.
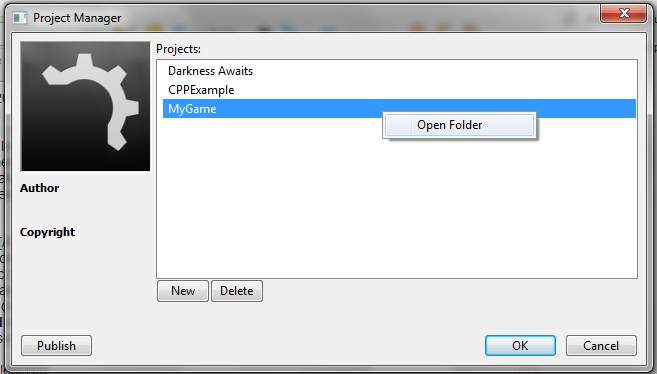
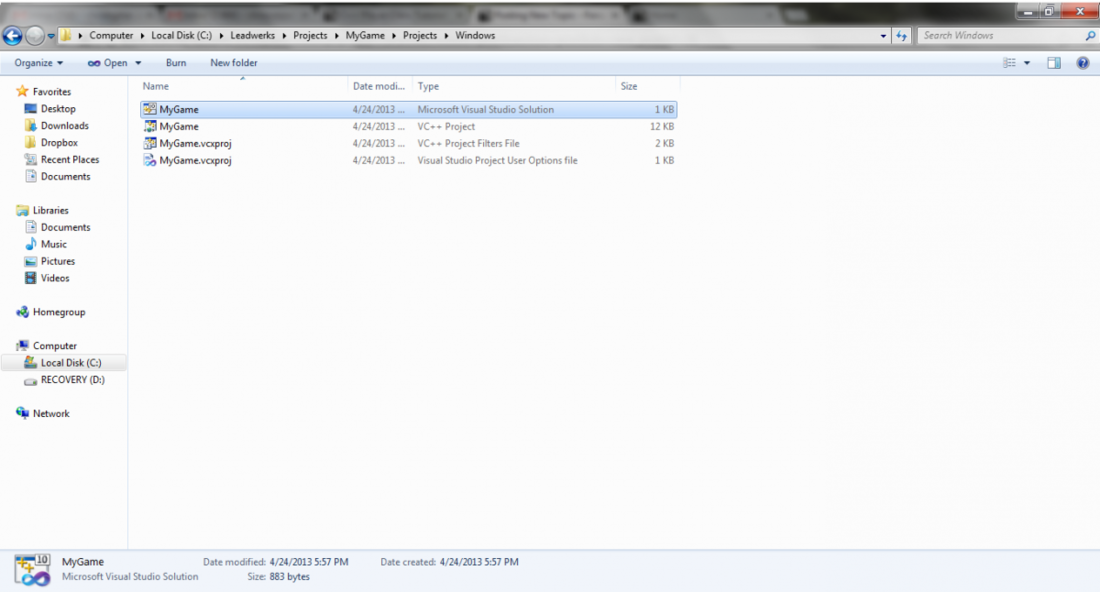
Scripting Custom Windows in Unity3D

$
0
0
Unity allows you to extend its interface by scripting your own custom windows, which will be draggable and re-sizable like the other windows in Unity (i.e. Project, Scene, Hierarchy, Inspector).

I'm going to teach you the basics of making your own windows.

You will need:
  • Unity3D
  • Something to edit scripts with.  If you have Unity installed, you should at least have the built-in editor, UniSciTE, installed.
  • You should at least know the very basics of Unity and scripting with Unity.

Creating a Window


Let's start by getting our new window to show up.  Unity makes this rather simple.

Create a new project or open an existing project (whichever you prefer).

In your Project window (by default, it's at the bottom of the screen), click the Create button and then click 'Folder'.  You can also right-click anywhere in the Project window, hover your mouse over 'Create', and then click 'Folder'.


Attached Image: CreateFolder.png


In order to script a window, you have to put your script files in a folder that's named "Editor".  If it's not in a folder named Editor, it cannot access the classes and functions it needs to behave like a window.  So name the new folder you created 'Editor'.  If it's not already being renamed, click twice on the folder name to begin renaming it.

Once the folder is properly named, right-click on it, select Create, and then the type of script you want to make (JavaScript, C#, or Boo).  Name this new script "MyWindow".

Open the script with your text editor.

Note:  
JavaScript users may not know this: every script file in Unity is actually a class that extends the MonoBehaviour class.  Unity 'hides' the class declaration from you if you use JavaScript (but it doesn't do this for Boo or C#), but it lets you declare it yourself if you want to.


We want our new script to inherit from the EditorWindow class, not MonoBehaviour, because we don't need to place this script on GameObjects; we just need it for this window.

Declare your class like this:

//C Sharp:
using UnityEngine; //This should be in your script file already.
using UnityEditor; //This won't be in your script file by default, so put it there.  It lets us access all of Unity's methods and classes for making windows.

public class MyWindow:EditorWindow //Name your class the same thing you named your script file, and make sure it inherits from EditorWindow instead of MonoBehaviour (it will inherit from MonoBehaviour by default!)
{
	
}

//JavaScript:
import UnityEditor; //This won't be in your script file by default, so put it there.  It lets us access all of Unity's methods and classes for making windows.

public class MyWindow extends EditorWindow //Name your class the same thing you named your script file, and make sure it extends EditorWindow instead of MonoBehaviour (it will extend MonoBehaviour by default!)
{

}

Now we'll add an option to create our window.  Put this function in your window class (the one named MyWindow that we just made):

//C Sharp:
[MenuItem ("Window/My Window")] //This is the place that the option to create the window will be added.
public static void ShowWindow() //Don't change the name of the function
{
	EditorWindow.GetWindow(typeof(MyWindow)); //If you disobeyed this article and named your class something else, replace the 'MyWindow' in this line with that name.
}

//JavaScript:
@MenuItem("Window/My Window") //This is the place that the option to create the window will be added.
static function ShowWindow() //Don't change the name of the function
{
	EditorWindow.GetWindow(MyWindow); //If you disobeyed this article and named your class something else, replace the 'MyWindow' in this line with the actual name.
}

Now you can open your window by clicking on the 'Window' menu at the top of the screen, then finding 'My Window' and clicking on that.  Your window won't have anything in it yet.

Displaying Things in the Window


Now that your window is showing up, let's get it to show things.

This kind of code should go in the OnGUI() function in your class.

Usually, you'll be using editor functions that you can find in the EditorGUI and EditorGUILayout classes, which we have access to since we're inheriting from EditorWindow.

Let's make some fields that the user can input into.  Here's the code, including all of the previous code:

//C Sharp:
using UnityEngine;
using UnityEditor;

public class MyWindow:EditorWindow
{
	//Let's declare some variables that we'll use later:
	public string textField = "Text";
	public int intField = 2;

	void OnGUI() //This is where we'll put all of our code that the window should run
	{
		textField = EditorGUILayout.LabelField("Input some text:",textField); //This will display the first string, followed by a box that the user can type characters into
		intField = EditorGUILayout.IntField("Input some numbers:",intField); //This will display the first string, followed by a box that the user can type numbers into
	}
	
	//Displaying the Window:
	[MenuItem ("Window/My Window")]
	public static void ShowWindow()
	{
		EditorWindow.GetWindow(typeof(MyWindow));
	}
}

//JavaScript:
import UnityEditor;

public class MyWindow extends EditorWindow
{
	//Let's declare some variables that we'll use later:
	public var textField:String = "Text";
	public var intField:int = 2;

	function OnGUI() //This is where we'll put all of our code that the window should run
	{
		textField = EditorGUILayout.TextField("Input some text:",textField) as String; //This will display the first string, followed by a box that the user can type characters into
		intField = EditorGUILayout.IntField("Input some numbers:",intField); //This will display the first string, followed by a box that the user can type numbers into
	}
	
	@MenuItem("Window/My Window")
	static function ShowWindow()
	{
		EditorWindow.GetWindow(MyWindow);
	}

}

Conclusion


Now you're prepared to make your own windows in Unity.  Once again, make sure you always place your window scripts in an 'Editor' folder, and be sure to inherit from EditorWindow instead of MonoBehaviour.

Here are some miscellaneous notes about scripting Unity windows:
  • The Input.mousePosition variable is not updated when the game is not playing, and is useless for editor windows.  If you want to get the mouse position, you'll have to use Event.current.mousePosition in an OnGUI() function instead.
  • Variables that aren't public will reset to their default values when your project refreshes.  This means if you edit a script or add a new file to your Assets folder, every variable that is not public will revert back to what you declared it as.  For example, if a variable is set to 2 by default, but during your use of the window, you set that variable to 5, then it would reset back to 2 every time the project refreshes.

Article Update Log


May 10 2013: Initial release

Making it in Indie Games: Starter Guide

$
0
0

Every now and then someone will ask me for advice on making it as a professional indie game developer. First, it’s a huge honor to be asked that. So I want to say “Thank you!” Second… damn, if I really want to help out it’s a serious endeavor. Of course, I could always say “Give it your best! Work hard! Be true to yourself!” and it wouldn’t be a terrible reply… just not a terribly useful one, either.


So here it is. Here is what I’m going to link when that rare situation arises again, because it’s too much work to write it up more than once! This is advice that I feel may actually be practical to someone who is just starting out as an indie game developer. Hope it helps!


INDIEPENDENT


So yeah, what does being “indie” even mean? Is “indie” short for independent? Is this game “indie”? Is “indie” a genre? IT’S CONFUSING - WHY DO WE NEED THE WORD “INDIE” AT ALL.


To answer the last question, I offer the following scenarios. Scenario 1: a person is looking to make games, and perhaps start their own studio. They type “game development” into a search engine. The results, to say the least, are underwhelming. Dry. Academic. Programming-centric. (Try it yourself and see.)


Scenario 2: the person instead types “indie games” into a search engine. Instead of pages upon pages of conferences, bachelor’s degrees, and programming tools, that person is met instead with pages upon pages of games to play and vibrant communities filled with people who are doing exactly what he or she wants to be doing. Some of them went to school, but many did not. A wealth of different ideas and tools are used. There are even documentaries about making games! It’s not just something where you get a degree and wait in line for a job. You can start making games RIGHT NOW.


The word “indie” is more than just a way to describe a type of developmental process… like any label, it actually provides an avenue for people to explore that process and then flourish within it. It has a real purpose. It serves real lessons on game creation and entrepreneurialism. It offers real motivation!


Of course, it can be irritating to see the term misused, or become a vehicle for pretentiousness and arrogance. Like any label, “indie” also breeds a certain amount dogmatism, croneyism, and other -isms. But the net result is really worth something. As someone who once gave up on professional game-making because I thought it meant a 9-to-5, I can tell you that it’s genuinely valuable.


As for what games are “truly” indie, we’ll never fully agree, and that’s probably for the best. But I can tell you the criteria I’ve devised for The Independent Gaming Source to determine whether a game is fit for coverage:


1. “Independent”, as in no publisher.


2. Small studio (roughly 20 members or less).


I choose that definition because it’s the most useful one. Someone who is looking to become an “indie” game developer is interested in what is possible under those constraints and how those types of studios operate. It excludes companies like Valve and Double Fine, which are certainly independent but too large to be “indie”. It also excludes “feels indie”-type games that are not self-published.


Under that definition you still run into gray areas, but hey, just because we don’t know when “red” turns into “purple” doesn’t mean the words aren’t useful. Just think about someone who wants to make a game with a small team and self-publish it… what should they type into Google for inspiration, advice, community, etc.? “Indie” is still as good a word as any, in my opinion.


So, should I go to school to learn how to make games?


The most important thing to know about video game development and schooling is that no one, whether it’s an indie studio or big company, cares about degrees. How could it, when some of its most prominent members are drop-outs or never-beens? John Carmack, Cliff Bleszinski, Jonathan Blow, and Team Meat are all prominent members of this club.


A degree is a piece of paper that says you can do something in theory - game developers want to know that you have enough passion to do real work, regardless of whether you’re being graded on it. And if you’re thinking of going indie, it won’t matter what other people think - you’ll simply need that passion to succeed or else you won’t. You’re the only one holding the door open in that case.


This isn’t to dissuade you from going to college, per se (I studied computer science in college, and while it was far from a perfect experience, I also gained a lot from both the curriculum and the friends I made there). The point is make something - games, mods, art, and music. If school helps you with that, great. If it doesn’t, then you need to rethink how you’re spending your most valuable resources: time and money (both of which can be exorbitant costs for schooling).


If I go to school, what should I study?


At a regular university, I would suggest majoring in computer science, even if you “just want to be a designer”. The design of games is very much tied to how they are made.


At an art school, illustration, concept art, and 3d modeling courses are probably the most useful for games.


At a game school, they will hopefully try to involve you in all aspects of game creation, from programming to design. I would stay far away from design-only schools or curricula - those are either scams or are better suited to academia than actual game-making. Also, it’s worth finding out whether or not the school owns what you make while you’re a student there.


See also: Jonathan Blow - How to Program Independent Games (read the comments as well as watch the video)


Okay, you say make something. How do I start?


My best advice for those starting out is not to get ahead of themselves. It’s easy to start worrying about tools, teams, platforms, deals, marketing, awards, and whatever else before you’ve even gotten a sprite moving around the screen. Those stars in your eyes will blind you. They’ll freeze you up. You need to be actively making games all the time.


If we were talking about painting, I’d tell you to pick up a painting kit and a sketchpad at your local art store ASAP and just have at it. You’d proceed to put absolute crap down on the pad and get frustrated. But it’d also be kind of fun - so you’d keep doing it. Along the way you’d read some theory and study other people’s work. With good taste and under a critical eye, you would keep doing that until the day you painted something good.


We’re talking about games, though. I recommend Game Maker and Unity as two all-purpose game-making suites. They both have a good balance of power versus ease-of-use; they’re both affordable or have free demos, and they both have a wealth of tutorials and plug-ins online. Both are used by professional developers (Unity in particular). Grab one of those and start running through the tutorials. When you run into trouble, ask for help. Give help back when you begin figuring things out. Get active in a game-making community.


But above all else, keep making games. It’s the only way to truly answer all of those questions in your head right now.


Also, watch this:


LASTLY, MY TOP 10 TIPS


1. Finish your games.


2. Don’t skimp on artwork. It’s easy to underestimate the importance of artwork to a game. And even if you don’t, it’s easy to underestimate the importance of having a unique style of artwork. The result is that there are many ugly or generic-looking (i.e. “clip-arty”) games failing to capture people’s attention.


If you have no artistic talent, go for style and coherency as many successful indie developers do. And even ugly is probably better than generic, all told. Remember: this is most people’s first impression of your game.


3. Don’t blame marketing (too much). In the indie community it’s become popular to write “how I failed” articles where the screenshots and comments tell the story of an ugly, boring game and yet the article itself tells the story of bad marketing decisions. Let’s face it, no one wants to admit that they lacked any amount of creativity, vision, or talent. It’s much easier to put the blame on release dates, trailers, websites, and whatever else.


This is the internet, though. A good game will make its way out there. Marketing will certainly help, and hype may get you quite far in the short term, but it’s not going to make or break you - it’s only a multiplier of however good your game is. Saying otherwise is only hurting your ability to self-criticize and therefore improve your craft. It’s also encouraging others to do the same.


4. Indie is not a genre or aesthetic. Make the game you want to make, not what you think an indie game “should be”. Recently, the very small and very independent team behind The Legend of Grimrock announced that their very traditional first-person dungeon crawler sold over 600,000 copies. Don’t feel pressured to be dishonest about what you’d like to do - after all, what is independence if not freedom from such pressures?


5. Build yourself a working environment that’s healthy for you. Are you introverted and lose energy around other people or are you extroverted and gain energy that way? Or something in-between? What do you want your average working day to be like?


You’ll want to focus all of the energy available to you toward creating, and it’s amazing how much of it can be lost to seemingly mundane things. Figuring out your physical working space as well as your personal support system is a key part of the solution to this problem, and its vitally important to you as an independent creator.


6. Stay independent! To be sure, going indie can be daunting. There is always going to be the temptation of selling yourself or your ideas to someone else for a bit of a feeling of security. But honestly, once you go down that road it’s hard to come back - every moment you’re simply securing may not be a moment you’re progressing. I’m not recommending recklessness, but it’s important to stay committed and focused on the task at hand. Life is short.


Also, don’t give up your IP or in any way limit your opportunities long term. Keep exclusivity timed. When Aquaria released we weren’t aware of Steam. The Humble Bundle did not yet exist. iPad did not exist. Being on all of those platforms has been great for us. You need to keep your hands untied to take advantage of what future will bring.


7. Create your own luck. As an artist, I owe a lot to the people around me - my family, friends, peers, and idols. I accept that a lot of my success was simply the luck of being born with these people in my life.


But it’s important to realize that you create many of your own opportunities, too. For example, I met Alec (my friend and Aquaria co-creator) because he offered to help work on I’m O.K. I’m O.K. was a game started on the Pix Fu forums. The Pix Fu forums were part of my personal website and its members were friends of mine I’d made much earlier during my Blackeye Software/Klik n’ Play days.


You could trace a similar path from the XBLA version of Spelunky to the original PC version and the TIGSource forums.


The point is - put yourself out there. Make things (I can’t stress that enough!). You never know when serendipity will strike, but when it does it will likely be related to situations in your past when you chose to actively engage someone or some idea.


8. Avoid “business as war”. As a professional you’ll need to do business and make business-related decisions at least occasionally, and as a creative type you might not be that interested in that stuff. Hell, you might even be downright scared of it.


Well, I’m here to tell you that you don’t have to be Gordon Gekko to make it as an indie. And please, don’t try to be. In fact, avoid the Gordon Gekkos. Avoid the people who try to confuse you. Avoid the ones who try and nitpick. Avoid the ones who try and rush you.


If you have a great game, there is no distributor you will absolutely have to work with, platform you have to be on, or person you will have to team up with. Always be willing to walk away from a bad deal, especially if it’s to maintain your independence as a creator. In turn, be a direct and generous person yourself.


People get defensive when they’re scared. Don’t sit at the table with someone like that or as someone like that and doing business should be fairly pleasant! This isn’t Wall Street!


9. No gimmicks. Simply put, focus on making a good game - a deep, interesting, unique game - rather than devising cheap tricks to grab people’s attention. Whether we’re talking about clever-sounding-but-ultimately-shallow game systems or off-the-wall marketing ideas, a gimmick is a gimmick. And you should stay away from them because they’re short-term, high-risk solutions that ultimately cheapen you as an artist, perhaps literally as well as metaphorically.


Certainly, one should take risks in game design as well as in life. My point is that they should be honest, worthwhile ones - those tend to be less risky in the long run.


10. You are your game - understand and develop yourself. As an indie game developer your game will likely be more “you” than a game made by hundreds or thousands of people. You have to understand yourself quite well in order to make a truly successful game. Fortunately, the unraveling of what makes you “you” - your taste, what you care about, your abilities - is one of the great pleasures in life and goes hand in hand with your goal of being an independent creator. Treasure it!


Reprinted with permission from Derek's blog

Indie tutorial: Organizing your work as a team

$
0
0
Let's see, we already have a game prototype and a team of quality people. What do we do now? Well, you could always actually start working on your game and maybe someday finish it and release it. After all, that's what we strive to achieve. And if there's something that could help us all in that long journey, it's called work organization.

First of all, I'll remind you once again that the more people you have on your team, the worse - the more people you’ve got, the bigger the tension and stress can get and you may easily lose control of them. There are many approaches to working on a project, I’ll present you how I do this.

Now, if everyone has already looked through the prototype, group yourself up and start a conference on Skype or any other communicator of your choice that allows more than 2 people to chat at the same time. Or just meet IRL if you can. During that ‘brain storm’ everyone should give their own ideas, remarks and comments about the project. Even if the idea might seem meh at first, someone might be able to modify it and turn it into a very good one, so never be afraid to share your thoughts. Someone that is working as a designer in your team should be writing down all those ideas.

After the ‘brain storm’ he should sit alone and separate good ideas from the bad ones, bearing in mind that he has to limit himself to not design a project that would take too much time to complete. He should also take into account that the team is most likely inexperienced and so very complicated mechanics shouldn’t be included in the final design. Surely there might be many great features you would like to see in the game, but you have to be realistic – someone will have to implement them and do all that in an optimal time. Pick what you’re capable of, you don’t want to sit on your first project for two years.


Game-Design.jpg


After the initial adjustments, the designer shows a more detailed vision of the game to the other team members. And again – discussion. Now without those big ideas, just do the small changes if needed and you’re ready to go. Keep in mind that you don’t have to plan all maps, missions, vehicles, enemies or anything like that at the beginning. Those details you can always do further in your development cycle. Programmers and artists should know from start what to expect from the game and what is needed (it sucks when you realize in the middle of your work that half of the code is trash as someone just thought of changing one feature or that some of the assets are going to waste because something wasn't clarified from the beginning).

Someone who is handling organization in your project should write down all the needed assets (sprites, sounds) and create some sort of milestones for the development process. Sure, you could go with just todo lists, but the possibility of 'unticking' more tasks at once as you approach your big milestone, which puts a solid closure on this particular part of the game, is a much better motivator. You will always know what is done, work will be divided into portions that are easier to handle. It's also easier to force yourself to work when you see that there are only a few more tasks until the end of the current milestone, instead of seeing a 2MB txt file with the todo list of all things needed to finish the game.

And picking tasks for the next milestone is always a fun event for the whole team ;)


game-design2.jpg


Here is a list of some tools that might help you in your work:
  • Dropbox – for assets, design documents, you can also store here todo lists, assets list, some other project files, etc.
  • SVN/Github/Bitbucket – for programmers specifically as for example Visual Studio and Dropbox seem to hate each other. When you and others work on the same project opened several times on Dropbox, it will start to create some crappy database files or other shit that takes quite a lot of space. It’s just irritating.
  • Forums – can work the same way as Dropbox, surely brings better organization of files and may look better but isn’t so convenient, Dropbox is much faster to use, though we still use forums for some development-related things.
  • Wiki – project documentation, not every project needs it though, for some forums work just as fine
  • Skype/MSN – for chatting & conferences.
  • Google Docs - sharing documents, with the possibility of real-time co-writing is surely something that could be useful.
While using Dropbox it’s good to spend some time on creating a proper folder structure as after some time without any form of order, you will start to waste more time on looking for some files than actually doing anything with them.

There is one more tool that I left for the end of the post, it's so good that I can't express it. It's called Trello, it's a website where you can easily organize work for the whole team. We're using it since Rune Masters and it's really a perfect tool that can substitute almost all other tools. With Trello you can create milestones, todo lists, handle discussions about various topics, host images, files, notes, literally everything that you could need. It looks like this:


trello1-1024x573.jpg
trello2-1024x572.jpg
trello5.jpg
trello3.jpg
trello4.jpg


Let me know what you think or what you’d like to read about in the comment section.

Don’t forget to subscribe to our blog or like us on Facebook/follow on Twitter to not miss any posts.

If you have yet to start working on your prototype, remember – a small but interesting idea is the key!


Reprinted from the Spiffy Goats blog

Techniques for Finding Unlisted Game Internships

$
0
0
If you’re interested in any field, especially game development, then it’s important to get your foot in the door early in order to learn how things work and to get yourself some real experience on your resume. It’s a good idea your sophomore or junior year to try your best to find a game internship for the summer so you can be moving ahead and preparing for your career after college.

There are hundreds of game companies out there, but only the largest of them have online job websites where they list open positions. Many of them may just have a website with no job information at all, or a general “we’re hiring!” page. Some of the large companies like EA, Activision, or Zynga have job boards, but many companies don’t have the time to put these together. Yet, there are lots of students who find positions at small game companies who earn themselves a decent wage and some notches in their belts that can then help to propel them to better job opportunities later on.

So how do you find these hidden game internships? Where do you go?

What do game companies with internships want?


There are a few simple concepts to understand in order to answer this question: you need to understand how game companies think. First, game companies are trying to be successful, which means they are trying to make money by building and selling popular game titles. So that’s what they want to do. Anyone who can help them do that will immediately be of value to them. Second, game companies, like any other business, operate on relationships. If they need someone to get a job done, be it mobile game programming or web server development, then they first think of who they know who can get the job done. Can they think of anyone that comes to mind? If so, they contact those people and see if they are interested. If not, they use other tools like job boards or advertising to find people they don’t yet know.

Understanding these two concepts and getting into the minds of game companies can help you find unlisted game internships.

By understanding that companies want people who can help them build their products, you can learn and tailor your skills and resume to the products they want to build. Do you dream of working for a company that does XBox development? Then work on a lot of Xbox games and make sure you have a solid understanding of XNA, then when the opportunity comes, you’ll be able to say, “I’m the guy for the job.” Do you want to work in mobile development, making games for iPhone or Android devices? Then start working on them now! Get familiar with the languages associated with those devices, or making artwork for small screens or designing tiny UI interfaces. Pick the type of companies you want to work for and then go from there.

By understanding that companies try to think of people they already know as a first step to hiring someone to do a job for them, you can be proactive in finding and building relationships with people in companies. When I work with parents and students for career advising, I always tell my students to pick out companies that they’d like to work for and then try to politely get in contact with someone at that company. You’d be surprised how easy it is to find email addresses or phone numbers if you do some digging. Once you find someone, then ask if they’d be willing to speak with you about what they do, saying that you are a student interested in careers in games. Most of the time they will be happy to, and then you’ll have a phone conversation with them. This gives you a good opportunity to say, “Thank you so much for your time. I have experience doing X, if there is ever anything I can do for you, please don’t hesitate to contact me.” You can then send them your resume with your contact information, which can lead to game internships and other opportunities.

Have the Skills, Make the Connection


This is how I got my first game internship in the industry. While I was in college I heard that there was someone who graduated from my program who was working at a particular game company. I searched online and got their email address, and then I emailed them and asked if I could chat with them for a few minutes on the phone to learn more about what being an engineer in games was like. They agreed, and after a discussion they recommended that I send my resume to their hiring manager, and a few months later I ended up with an internship that hadn’t been listed on any website. They saw that I could help them and they thought of me, and the rest flowed from there.

Developing skills that companies need and then building relationships ahead of when the job is posted is a great way to sow seeds that can grow into game internship opportunities.

Best of luck!

Article Update Log


No updates so far.

This article is a reproduction from The Game Prodigy, a site for students and parents where you can browse more articles on finding game internships.

Photo Credit: joeduty

Building a First-Person Shooter Part 1.2: The Player Class

$
0
0
It's finally time to begin fleshing out our player class.  This class will manage the first-person user controls. We will start by setting up player.h. This header file will contain the declarations of the player class as well as the various variables and functions that will be held within the player class. At this time copy and paste the following code into player.h:

#pragma once
#include "MyGame.h"

using namespace Leadwerks;

class Player: public Node
{
private:
        Camera* camera;
        float standheight;
        float crouchheight;
        float cameraheight;
        float move;
        float strafe;
        float movementspeed;
        float maxacceleleration;
        float sensitivity;
        float smoothedcamerapositiony;
        float cameraypositionsmoothing;
        float cameralooksmoothing;
        float runboost;
        float jump;
        float jumpforce;
        float jumpboost;
        int footstepwalkfrequency;
        int footsteprunfrequency;
        long footsteptimer;
        bool running;
        bool crouched;
        bool landing;
        Vec2 mousespeed;
        Vec3 normalizedmovement;
        Vec3 cameraposition;
        Vec3 playerrotation;
        Sound* footstepsound[4];
        Sound* landsound[4];
        Sound* jumpsound[1];

public:
        Player();
        virtual ~Player();

        virtual void UpdateControls();
        virtual void Update();
};

Setting Up the Player Class


The player.cpp file will contain all the logic and code for setting up FPS player mechanics. We start with a basic player class that contains a constructor, destructor, and two empty functions:

#include "MyGame.h"

using namespace Leadwerks;

Player::Player()
{
}

Player::~Player()
{
}

void Player::UpdateControls()
{
}

void Player::Update()
{
}

Since the player class is a child of the node class it will inherit an entity member from its parent. In the player constructor we assign a value to this entity member with a call to Pivot::Create(). A pivot is an invisible entity with no special properties, it is essentially an instantiation of an empty entity:

entity = Pivot::Create();

We now want to setup the player physics properties for the entity:

entity->SetPhysicsMode(Entity::CharacterPhysics);
entity->SetCollisionType(Collision::Character);
entity->SetMass(10.0);

And finally position the player at the origin:

entity->SetPosition(0,0,0,true);

With the code additions our player class will now look as such:

#include "MyGame.h"

using namespace Leadwerks;

Player::Player()
{
        //Create the entity
        entity = Pivot::Create();
        //Set up player physics
        entity->SetPhysicsMode(Entity::CharacterPhysics);
        entity->SetCollisionType(Collision::Character);
        entity->SetMass(10.0);
        //Player position
        entity->SetPosition(0,0,0,true);
}

Player::~Player()
{
}

void Player::UpdateControls()
{
}

//Update function
void Player::Update()
{
}

Adding in a Camera


In a FPS the player’s camera acts as the player’s head, in that it should be positioned at a height directly above the player’s shoulders and be restricted to normal human movements. For the player’s height we will create and initialize three separate variables in the constructor:

standheight=1.7;
crouchheight=1.2;
cameraheight = standheight;

We then create the camera, position it to the height of a standing player, and narrow the camera’s field of view:

camera = Camera::Create();
camera->SetPosition(0,entity->GetPosition().y + cameraheight,0,true);
camera->SetFOV(70);

We also don’t want to forget to deal with the camera when an instance of the player class gets deleted. so in the destructor we add in:

if (camera)
{
        camera->Release();
        camera = NULL;
}

After these changes the player class will now look like this:

#include "MyGame.h"

using namespace Leadwerks;

Player::Player()
{
        //Create the entity
        entity = Pivot::Create();

        //Initialize values
        standheight=1.7;
        crouchheight=1.2;
        cameraheight = standheight;
        //Create the player camera
        camera = Camera::Create();
        camera->SetPosition(0,entity->GetPosition().y + cameraheight,0,true);
        camera->SetFOV(70);
        //Set up player physics
        entity->SetPhysicsMode(Entity::CharacterPhysics);
        entity->SetCollisionType(Collision::Character);
        entity->SetMass(10.0);
        //Player position
        entity->SetPosition(0,0,0,true);
}

Player::~Player()
{
        if (camera)
        {
                camera->Release();
                camera = NULL;
        }
}

void Player::UpdateControls()
{
}

//Update function
void Player::Update()
{
}

Up next, we'll talk about movement with keyboard input.

Breaking Out of Breakout

$
0
0
For the past couple of years, me and some friends have spend one day each week working on Caromble!, which is essentially a Breakout-style game. In this article I would like to share some of our observations on the genre, and I’ll discuss how and why we created an evolved Breakout of our own.

The basics


Let’s start by asking what made the original Breakout fun. The first mechanic that stands out is when you manage to get the ball behind a lot of objects, where it keeps bouncing and destroying lots of bricks. Even though you have little actual interaction at this point, it feels awesome. You are tearing this wall down! Eventually you might lose the ball because you’re too busy watching the fireworks, but it never feels unfair. You were simply unable to move the paddle on time.

The other thing that I really like about a good brick-breaking game is getting the final few bricks. There is no more chaos, but you have much more control. Where you could clear the first bit of the stage by just keeping the ball in play, getting those last few blocks requires skill. No more surprises, no more uncontrolled destruction. You can only finish the level if you sit down and take your time to aim.

Those two things sum up Breakout for me. Together they form a very powerful combination. You get to cause a chain of events over which you have no direct control, but you have very direct control over the most important bit in the game world.

In that sense, Breakout is a little bit like pinball, where the ball shouldn't reach bottom of the pinball machine. You also have a good measure of control when you hit the ball, but it is outside of your control afterwards. This is an important observation, because pinball machines have lots of cool features that usually don’t find their way into the brick-breaker style of game. Like lots of blinking lights, and physical effects that keep the game interesting to watch.

Chaos++


One can also discover some limitations of the classic Breakout and pinball machines. They limit the amount of moving parts - too much chaos just was not possible technically. Wouldn’t it be much more fun if the elements would fall down and interact with each other after they are hit? This game just screams for a physics engine, which can make destruction very entertaining. One of our team members wrote a blog post about this the other day. It boils down to the fact that deep down we are still children that just love to topple over stuff.

Surprise and unpredictability is a satisfying addition - stacks of bricks are much more fun to destroy. Even a simple structure, such as the wall in the picture, will collapse differently every time you hit it. But we have to make sure that the other important aspect of the gameplay, the amount of control, is unaffected.


Attached Image: screen-2.jpg


Maintaining control means being very careful with what we let the physics simulation do, and where you have to have more direct control. We solved this by keeping control of the ball movement by our own code, while the physics simulation handles pretty much everything else. The blog post I mentioned goes into this with more detail.

What’s outside the box?


Going to 3D also means you’ll have to provide some answer to the question of what’s going on outside the playing area. What are those indestructible walls and what is behind them? Here you can really use your imagination. Why not place the playing area on top of a driving car, or a spaceship?


Attached Image: screenshot024.png


For Caromble! we had the idea of simply placing the first playing area inside the second area. When you start the level you can’t get outside of the walls, but as soon as you’ve cleared the first stage, the ball will grow. The indestructible walls are now part of the stacks of bricks in the second area. This screenshot shows that effect. You can see the next area waiting for you just behind the walls of this one. This is also a nice way to do some foreshadowing of what’s going to happen in the next area.

The Camera


Now is a good moment to think about where you are going to place the camera. Having a camera high above the action will give the player a perfect sense of where the ball is. In terms of control this is excellent. However, it is not the best way to show all the action you have going on in the background, and you can’t show glimpses of what is going to come soon either.

A low camera angle gives nice scenic images. The stacks of bricks are towering above the player and the effect of being in a three dimensional world is at its strongest. But it is hard to get a good sense of where the ball is located and at what speed it is moving.

We find ourselves constantly playing around with the positions of the cameras.

Pinball


One thing that pinball machines have in common, is several flippers. Why not try multiple paddles too? This leads to all sorts of cool new things you can try.


Attached Image: Untitled2.png


One option is to add separate areas to a stage, that you can reach by hitting a ramp. And we even made some platform-game like side scrolling levels. Or levels where you get to jump from building to building. Also for levels with some puzzle elements, having more than one paddle is great.

Power-ups


You can’t have Breakout without power-ups. Growing and shrinking paddles, faster and slower balls, extra balls, all either influence the amount of control you have, or the amount of chaos you can unleash. Since ‘Caromble!’ is set in 3D, we can have power-ups that weren’t available to the developers of the original. For example the jump power-up. It allows the player to jump over obstacles and can be used as a challenging gameplay element.

Another power-up that I’m personally fond of is the frog-view power-up. It lowers the camera until it is right above the paddle. You get to see the game from quite a different perspective, and it is quite challenging to keep the ball in play.


Attached Image: Untitled.png


Caromble!


In this article I’ve touched on some of the many things that you can do with a Breakout-style game. Our initial motive to create a game like ‘Caromble!’ was to have a simple little game that we would actually finish and release. But along the way we really fell in love with the genre. The brick-breaker type of game is a great platform to build upon.

Starting from a classic game mechanic is great, because you know exactly what players expect. It is a great challenge to invent new things that they won’t expect. I think that is what was really driving us along the way. There is just so much you can do with such a simple concept.

We’ve added a lot of our ideas to ‘Caromble!’, but there must be so many more ways to expand on the old classic. We are very curious to see what other people will come up with.

Building an In-Game Store for the First Time? Here are the 4 Keys to Success

$
0
0
So you have a great concept for a mobile game and you've heard that free 2 play games with in-app purchase is the way to go but you are not sure where to start. Guess what? You are not alone. Designing a good in-game store is very different than designing the core of the game and many game developers are unsure about how to do it right.

Let me take you through some of the keys to designing a store that users will enter frequently and hangout in for long periods:
  • Put the store where users can find it and make it a natural part of the game loop
  • Create items that players use in your game every day
  • Make the store experience an interesting one
  • Limit continuous game play
If you implement these elements in your game you are significantly increasing your chances to succeed. Adding a few of these is good but if you want 3 stars try to get them all. Here is more specific advice about each one of these.

Put the Store Entrance Where Users Are


Getting users to naturally enter the store as part of the game flow is very important. Let's check a few methods for achieving this. If your game has levels, it should be easy enough for you to add a button to the store from the screen that notifies the user about a successful level completion. Is your game a 'survival mode' type game or an 'endless runner'? No problem. These games have limited sessions that usually end with a summary screen. This will be the right place to put your store button. Designing other types of games? If you implement the 4th tip you would actually break the game into sessions and would be able to use the session end screen. Alternatively, you can add the store button to screens that notify the user about achievements. You can also use virtual goods that require users to activate or equip them and use the store as the interface for picking the active character/vehicle/weapon. This will help you get users to the store more frequently.

Add Items that Players Need Regularly


Ok, so the store is now accessible from every screen in the game but why would a user want to enter it? Let's think about the real world. The store that we enter the most is the one that sells the product we use and consume every day. Let's create some goods like that and make them easy to buy with game coins. How easy? The user should be able to collect enough coins in 1-3 levels or a few minutes of game play. The item itself should be regularly consumed and make it easier for the user to collect more coins. If you do this correctly you end up with a consumption loop that brings the users to the store almost every time they play the game.

Here is how to make an effective regular use item:
  • Make it complement the game store (bananas for a monkey, fuel for a car, ...)
  • Price it so that users can earn enough to buy it within a few minutes of game play
  • Create an item that is fun to use and makes the game more engaging
  • Give the item powers that will make earning coins easier

Design an Engaging Store


You should also give the user reasons to spend time in your In-App Purchase store. Think of ways to make the store engaging and interesting for a long time - extend the variety, add some mystery and try to keep it fresh. If you want to look at a good example of store variety - look at CSR racing. That store has over 2 million items you can buy. You can also add mystery by using silhouettes to hide an item until the right time has come. This helps in keeping the user engaged and curious about what the store has to offer. The last bit is to keep your store fresh by adding items, unlocking items and even featuring seasonal items and limited editions.

Add "Waiting Mechanics"


If you want to really play it like the pros, you need to limit the user's ability to play continuosly and add short breaks. This is a bit tricky so you will need to approach this carefully and make sure not to annoy your users. The best way to do it is by experimenting with different levels of limitations and measuring the impact on users until you reach the sweet spot. If you do choose to explore this direction, you should design a resource that is consumed naturally in gameplay and automatically adds up as time goes by. Candy Crush Saga has 'lifes' and in other games you can see fuel or energy. When the user runs out, she can choose to do one of three things: buy more, stop playing and come back later or wait inside the game. If you followed the rest of the advice, the option of staying inside the game and visiting the store should be a likely choice for a user who wants to kill some time.

I already wrote about the risks in the last tip but if you look at the top games, most of them have some version of it. You just have to make sure you are balancing it correctly. I will discuss how to do it in one of my next posts.
Viewing all 17825 articles
Browse latest View live


<script src="https://jsc.adskeeper.com/r/s/rssing.com.1596347.js" async> </script>