Quantcast
Channel: GameDev.net
Viewing all 17825 articles
Browse latest View live

Smart Pointers Gotchas

$
0
0
There are at least several questions about using smart pointers in modern C++11
  • Why is auto_ptr deprecated?
  • Why does unique_ptr finally work good?
  • How to use arrays with unique_ptr?
  • Why create shared_ptr with make_shared?
  • How to use arrays with shared_ptr?
  • How to pass smart pointers to functions?
While learning how to use the new C++ standard I came across several issues with smart pointers. In general you can mess up a lot less using those helper objects and thus you should use them in your code instead of raw pointers. Unfortunately there are some topics you have to understand to take full advantage of them. As in most cases when you get a new tool to solve your problems, this tool introduces another problems as well.

Some predefines


Let us take a simple Test class with one member field to present further concepts:

class Test
{
public:
    Test():m_value(0) { std::cout << "Test::Test" << std::endl; }
    ~Test() { std::cout << "Test::~Test destructor" << std::endl; }

    int m_value;
};

typedef std::auto_ptr<Test>   TestAutoPtr;
typedef std::unique_ptr<Test> TestUniquePtr;
typedef std::shared_ptr<Test> TestSharedPtr;

Why is auto_ptr deprecated?


auto_ptr was one of the first type of smart pointers introduced in C++ (in C++98 to be more precise). It was designed to serve as a simple unique pointer (only one owner, without any reference counter), but people tried to use this also in a form of shared pointer. None of those functionalities were satisfied by auto_ptr's implementation! Quick example below:

void doSomethig(TestAutoPtr myPtr) {
    myPtr->m_value = 11;
}

void AutoPtrTest() {
    TestAutoPtr myTest(new Test());
    doSomethig(myTest);
    myTest->m_value = 10;
}

Try to compile and run this... what happens? It crashes just after we leave the doSomething procedure! We would assume than in doSomething some reference counter for our pointer is incremented, but auto_ptr has no such thing.

The object is destroyed because when we leave doSomething our pointer gets out of scope and it is deleted. To make it work we need to pass a reference to this auto pointer.

Another thing is that we have limited way of deleting more complicated objects, there is no control over it at all, only standard delete can be used here.

Why does unique_ptr finally work good?


Fortunately with the new standard we got a brand new set of smart pointers! When we change auto_ptr to std::unique_ptr<test> in our previous example we will get a compile (not runtime) error saying that we cannot pass a pointer to another function. And this is the proper behaviour.

unique_ptr is correctly implemented because of move semantics basically. We can move (but not copy) ownership from pointer to another. We also need to be aware when and where we pass the ownership. In our example we can use:

doSomethig(std::move(myTest));

to move the pointer's ownership. That way after the function returns our pointer is also not valid, but we did it on purpose after all. Another nice advantage of this type of pointer is that we can use custom deleters. It is useful when we have some complicated resources (files, textures, etc, etc).

How to use arrays with unique_ptr?


First thing to know:

std::unique_ptr<int> p(new int[10]);  // will not work!

The above code will compile, but when resources are about to be deleted only single delete will be called. So how do we ensure that delete[] is called? Fortunately unique pointers have a proper partial specialization for arrays and we can write:

std::unique_ptr<int[]> p(new int[10]);  
p[0] = 10; 

For our particular example:

std::unique_ptr<Test[]> tests(new Test[3]);

And we will get the desired output:

Test::Test
Test::Test
Test::Test
Test::~Test destructor


As expected :)

Note that if you want to pass address of the first element, you have to use &(pointerToArray[0]). Writing pointerToArray will not work.

Why create shared_ptr with make_shared?


Unique pointers provide their features only via wise usage of C++ syntax (using private copy constructor, assignment, etc), they do not need any additional memory.  But with shared_ptr we need to associate some reference counter with our object. How to do that efficiently? When we do:

std::shared_ptr<Test> sp(new Test());
std::shared_ptr<Test> sp2 = std::make_shared<Test>();

We will get the output as expected:

Test::Test
Test::Test
Test::~Test destructor


So what is the difference? Why not use syntax similar to creation of unique_ptr? The answer lies in the allocation process. With the first construct we need to allocate a space for the object and then for the reference counter. With the second construct there is only one allocation (using placement new) and ref counter shares the same memory block as the pointed object.


Attached Image: smartPtr1.png
VS 2012 local's view


Above you can see a picture with local's view in the VS 2012. Compare the addresses of object data and reference counter block. For the sp2 we can see that they are very close to each other.

To be sure I got proper results I've even asked question on stackoverflow: http://stackoverflow.com/questions/14665935/make-shared-evidence-vs-default-construct

How to use arrays with shared_ptr?


Arrays with shared_ptr are a bit trickier that when using unique_ptr, but we can use our own deleter and have full control over them as well:

std::shared_ptr<Test> sp(new Test[2], [](Test *p) { delete [] p; });

We need to use custom deleter (here as a lambda expression). Additionally we cannot use make_shared construction.

Unfortunately using shared pointers for arrays is not so nice. I suggest taking boost instead. For instance: http://www.boost.org/doc/libs/1520/libs/smartptr/sharedarray.htm

How to pass smart pointers to functions?


We should use smart pointers as a first class objects in C++, so in general we should pass them by value to functions. That way reference counter will increase/decrease correctly. But we can use some other constructions which seems to be a bit misleading. Here is some code:

void testSharedFunc(std::shared_ptr<Test> sp) {
    sp->m_value = 10;
}

void testSharedFuncRef(const std::shared_ptr<Test> &sp) {
    sp->m_value = 10;
}

void SharedPtrParamTest() {
    std::shared_ptr<Test> sp = std::make_shared<Test>();

    testSharedFunc(sp);
    testSharedFuncRef(sp);
}

The above code will work as assumed, but in testSharedFuncRef we get no benefit of using shared pointers at all! Only testSharedFunc will increase reference counter.

For some performance critical code we, additionally, need to notice that passing by value will need to copy the whole pointer block, so maybe it is better to use even raw pointer there.

But perhaps the second option (with reference) is better? It depends. The main question is if you want to have full ownership of the object. If not (for instance you have some generic function that calls methods of the object) then we do not need ownership... simple passing by reference is a good and fast method.

It is not only me who got confused. Even Herb Sutter paid some attention to this problem and here is his post on that matter: http://herbsutter.com/2012/06/05/gotw-105-smart-pointers-part-3-difficulty-710/

Some additional comments


Smart pointers are very useful, but we, as users, also need to be smart :) I am not as experienced with smart pointers as I would like to be. For instance sometimes I am tempted to use raw pointers: I know what will happen, and at a time I can guarantee that it will not mess with the memory. Unfortunately this can be a potential problem in the future. When code changes my assumptions can be not valid any more and new bugs may occur. With smart pointers it is not so easy to break things.

All this topic is a bit complicated, but as usually in C++, we get something at a price. We need to know what we are doing to fully utilize the particular feature.

Code for the article: https://github.com/fenbf/review/blob/master/smart_ptr.cpp

Links

This article also is hosted on: www.codeproject.com


Reprinted with permission from Bartłomiej Filipek's blog

Fast Heuristic Search for RTS Game Combat Scenarios

$
0
0
David Churchill and Abdallah Saffidine and Michael Buro
University of Alberta
Computing Science Department
Edmonton, Alberta, Canada

Abstract


Heuristic search has been very successful in abstract game domains such as Chess and Go. In video games, however,
adoption has been slow due to the fact that state and move spaces are much larger, real-time constraints are harsher, and constraints on computational resources are tighter. In this paper we present a fast search method — Alpha-Beta search for durative moves — that can defeat commonly used AI scripts in RTS game combat scenarios of up to 8 vs. 8 units running on a single core in under 50ms per search episode. This performance is achieved by using standard search enhancements such as transposition tables and iterative deepening, and novel usage of combat AI scripts for sorting moves and state evaluation via playouts. We also present evidence that commonly used combat scripts are highly exploitable — opening the door for a promising line of research on opponent combat modelling.

Attached File  aiide12-combat.pdf   210.84K   38 downloads


References


Balla, R.-K., and Fern, A. 2009. UCT for tactical assault planning in real-time strategy games. In Boutilier, C., ed., IJCAI, 40–45.

Churchill, D., and Buro, M. 2011. Build order optimization in starcraft. In Proceedings of the Seventh AAAI Conference on Artificial Intelligence and Interactive Digital Entertainment, AIIDE.

Coulom, R. 2006. Efficient selectivity and back-up operators in Monte-Carlo tree search. In Proceedings of the 5th Conference on Computers and Games (CG’2006), volume 4630 of LNCS, 72–83. Torino, Italy: Springer.

Furtak, T., and Buro, M. 2010. On the complexity of two-player attrition games played on graphs. In Youngblood, G. M., and Bulitko, V., eds., Proceedings of the Sixth AAAI Conference on Artificial Intelligence and Interactive Digital Entertainment, AIIDE 2010.

Kovarsky, A., and Buro, M. 2005. Heuristic search applied to abstract combat games. Advances in Artificial Intelligence 66–78.

Orkin, J. 2006. Three states and a plan: the AI of FEAR. In Game Developers Conference. Citeseer.

Saffidine, A.; Finnsson, H.; and Buro, M. 2012. Alpha-Beta pruning for games with simultaneous moves. In Proceedings of the Twenty-Sixth Conference on Artificial Intelligence (AAAI-12).

GDC 2013 - Interview with Richard Hofmeier

$
0
0


Do you think video game development is way too much work? Well, work harder, hard worker! Design3 had the pleasure of interviewing Richard Hofmeier at GDC 2013, where he discussed the thought-process of creating the award-winning game, Cartlife, his theme-reinforcing graphics, reasons for becoming a game developer, and more.


www.richardhofmeier.com/cartlife

Why You Shouldn't Be Making an MMO

$
0
0
Author's Note: This is an adaptation of a popular but highly controversial journal entry I wrote here almost two years ago. This is solely my own opinion and is in no way intended to be representative of my employer. Enjoy it (or hate it!) for what I meant it to be - a sarcastic backlash against a common aspiration of game development newcomers.

The MMO Gold Rush


It's nothing new, this trend, but it also doesn't seem to be going away as quickly as most fads; perhaps we can accuse World of Warcraft for making this such a huge deal, or maybe it all goes back to Ultima Online and Everquest. We may never know for sure.

One thing is definitely clear, though, and that's that a significant contingent of people show up here at GDNet wanting to make their own MMO games. There have been many words bandied about in the past over this subject, and plenty of advice warning newbies not to get their hopes up when it comes to shipping a true MMO.

Sure, not everyone is committed to the RPG genre; some people want to make an FPS, or maybe even an RTS. Others might have even more creative and unique ideas for how their game should play. But the real issue here is not the gameplay itself: it's the MMO part. More than that, it isn't even the "multiplayer" or "online" that is really an issue - it's the "massive."

The Real Issue


MMOs are expected to host dozens of servers running thousands of players apiece. Successful games may be played by over a million people; some notable ones are played by far more than that. Even a low-grade MMO serves a few hundred thousand players.

With modern technology and toolkits, it's entirely in reach of a lone wolf or a small team to create an incredible game that can host even a few hundred players. However, as wiser men than myself have observed, "a difference in quantity can often mean a difference in kind."

Consider the original airplane, as developed by the Wright brothers over a century ago: a simple wood and canvas structure with a (relatively) lightweight and effective engine, with some simple control mechanisms. Now consider a jet liner. Both are flying machines; but in order to comfortably handle two hundred passengers, the airplane had to do a lot of changing over the years.

Even a fighter jet is a different beast. Just changing one quantity - speed - leads to qualitative differences in many ways. A fighter jet has different engines, different control surfaces, different kinds of fuel, different training to fly, and on and on. Go one step further: a fighter jet that's invisible to radar again has many, many differences (ranging from shape to materials to operating principles) than a traditional jet.

Many people have set eyes on the available game-development technologies of today, and noticed that they can put a hundred players in a world and turn them loose. The assumption that you can just twiddle some knobs and tweak some sliders to get an MMO is deeply flawed.

As a personal anecdote, I once set out to write a realtime ray-tracing engine. I had experience with a popular graphics package called POV-Ray, back when it was still a relatively fresh spinoff from DKBTrace. Since POV-Ray represented an early incarnation of a model of what we would now call "open source", I had access to the code; my plan was to "optimize" POV-Ray and turn it into a realtime system.

What I failed to understand was that the difference in speed I wanted represented a tremendous change in how the code had to be written. I managed to eke out about a 5% speed gain over the original POV-Ray before giving up and writing a fresh engine from scratch.

(For the record, I did achieve realtime ray-traced rendering in that project, but it was truly hideous and awful code. I still have it someplace but if I remember correctly I left it in a horribly broken state. It's probably better that way. Overall, though, the experience was incredibly educational.)

The Challenges


It's a far cry from 16 people playing Halo on a home-rigged LAN to the kind of stuff a real MMO must cope with. Even throwing in something like Xbox Live Matchmaking is incredibly resource-intensive. Companies like Bungie have people whose full time jobs involve doing very little but making sure the matchmaking experience runs smoothly. When a major company has to employ people to do nothing but run their multiplayer system, you can bet it's a good sign that Little Old Joe in his garage or basement isn't going to be up to doing something similar.

But wait! Even running a matchmaking system for a few hundred thousand players pales in comparison to what an MMO must do. After all, a matchmaker simply needs to join up different players and get them running on a separate system (usually hosted by one of the players themselves, or maybe a dedicated server for PC games). If dedicated servers are involved, the matchmaker is often really just a catalog of what severs are running. This is the kind of thing that a lone wolf coder could easily accomplish on his own; something like Xbox Live matchmaking, however, is getting past the realm of stuff that one guy (or gal) could ever do alone.

So if a solo developer can't really hope to build, deploy, and run a large-scale matchmaking service, what about an MMO?

Let's take the demands of a typical matchmaking service and chuck in a handful of complications.
  • Persistent Worlds. Instead of just shuffling through a list of players and handing out matchups, which may last a few rounds at the most, an MMO must store data on every player and every action ever made. Sure, many modern games store statistics like how many shots you fired, where you died most often, and so on; but even that is a huge leap of data warehousing beyond what a typical small team can hope to build and maintain by themselves.
  • Active Simulation. A matchmaker can often get away with having a player host the game, which is the typical approach used in console games these days. Matchmaking servers don't have to have any code besides the stuff that links people together, making the actual multiplayer portion fairly straightforward by comparison. Again, remember that for up to about a dozen players, off-the-shelf network code is often sufficient to get a decent game experience. It does require some skill to make it happen, but it's at least plausible that a single person (or a small team of people) could get away with building a good low-scale multiplayer game.
  • Massive Scale. We're not talking about sorting through a few thousand people to create a 10-man match; we're talking about having thousands of people connected to a single server, all constantly doing things. Combine this with persistence and active simulation, and stuff just got a lot more painful.

An Amusing Magic Trick


Here's an educational homework exercise for you. Even better, it has a magic trick twist to it. Pick your favorite MMO, and go look up the game credits, either in-game or on the web or wherever. Count the number of people involved. Don't cherry-pick either - look at programmers, artists, musicians, producers, designers, marketing folks, operations/IT staff, and anyone else you can find who participates in a non-trivial way in making that game happen. (You can ignore janitorial staff for the purposes of this exercise.)

Now, don't tell me your number. Keep it secret.

Without talking to you in any way - before you even do this exercise - I will know more about your number than you might be comfortable admitting.

In fact, I'm so sure about this number, that I'll even make you a bet.

I will bet you a beer (or suitable beverage of your choice) that you can't find an MMO with over a million players with a development team of less than 100 people.

Here's another magic trick. Go find the lead developers and senior-level programmers, artists, producers, musicians, and other high-ranking folks from your MMO's team. Now go find out what other games those people worked on before the MMO. Do the same thing for the less-senior guys as well; average up how many titles everyone has worked on in their past.

I will bet you a second tasty beverage that the average developer working on an MMO has shipped at least 2 games prior to shipping a successful MMO. Many successful MMO titles are even the results of collaborative efforts from dozens of people with prior MMO experience.

A Case Study in Real MMOs


At its peak, the Guild Wars 2 team included something like 300 people - and that doesn't account for those who came and left over the course of the game's development. The codebase is many millions of lines of code (I don't have exact figures, and probably couldn't release them anyways.) There are terabytes of assets - ranging from artwork to music to design documents to configuration files.

If that scale alone isn't enough to convince you that MMOs are out of reach for the Five Amigos, then let's talk business.

MMOs are fiercely competitive, and a cutthroat business. People are doing all manner of wildly innovative and devious things to make money in the MMO space, and most of them are failing. There are some fascinating studies of how people move between MMOs, and they tend to suggest that many people are constantly on the hunt for the next great big thing - meaning that they'll bail on a mediocre MMO in a heartbeat to go play something cooler.

Running an MMO is immensely expensive. Internet hosting and server costs alone can be in the tens of thousands of dollars a month range. Buying all the hardware you need to run the game up-front can be well into the millions. You need a dedicated datacenter for the endeavor, with redundant power, fire safety systems, industrial cooling, and hundreds of miles of both copper cabling and fiber optics. A single network switch capable of running an MMO backbone can cost ten grand by itself. And if you want a global reach, you'd better roll out a datacenter on every major continent, at the very least.

I'll gloss over the details like how to go about creating all the assets and content necessary to flesh out a true MMO, and stick with the technical specifics (which is where I spend most of my time anyways).

At this level, everything becomes important.

The difference between allocating space for a buffer on the stack versus the heap is a crucial design decision. Calling conventions must be selected with great care. Exception handling is nearly verboten, because it has too much runtime overhead and can create unpredictable execution flows in code that must run continuously for years at a time. One-byte memory leaks are show-stopper, can't-ship-the-game-like-this bugs - because that one byte will kill you when it leaks constantly for eight months. Microseconds of sloppily implemented code turn into milliseconds of delay when scaled across thousands of players, which adds up to lag - the number one evil of an MMO.

You'd better be a sheer wizard at lock-based concurrency, because the order in which you lock things might spell the difference between a happy server and a worldwide outage. For that matter, you'd better be a wizard at lockless concurrency too, because locks are often too expensive and too exclusive to scale to thousands of active connections. Memorize those atomic operations, folks, and if you still think "volatile" means anything useful, go back to Go and do not collect $200.

You'd better understand how operating system kernels work, because you'll be taxing the living hell out of yours. Your job will bank on you knowing things like pre-emptive multitasking architectures, monolithic versus micro-kernels, how kernel-versus-user-mode code works, and how schedulers are implemented.

Better brush up on your compiler theory, too, because you'll need to know exactly how your code gets converted to machine language. For that matter, you'd better know your assembly language and your computer architecture, too. Two or three clock cycles here and there will add up in a damned impressive hurry. Don't know what a superscalar CPU architecture is? Pipelining? L1, L2, and L3 caching? Don't know how a memory bus is implemented? Don't know the difference between a northbridge and a southbridge? Don't know the role of device drivers and how they work? Don't know where the network stack of your OS of choice lives and under what context it runs? Pack your bags and don't sell the bike shop, 'cuz you aren't cut out to be writing an MMO server.

It takes half a dozen dedicated programmers just to write the servers for Guild Wars 2 - and that doesn't include the people who wrote some of the legacy code we inherited and modified from GW1, or the people working on auxiliary support features like web sites, forums, wikis, and so on. It doesn't even include the network admins who build the hardware and maintain it, or the community managers who take care of ensuring that the experience is enjoyable for all the players.

The guys I work with are, to a soul, incredibly good programmers. I'm still not entirely convinced that I'm cut out to be working with them, or on a project of this magnitude. It's without question an extreme challenge - but one that I'm tackling with gusto, because I love a good challenge. There's more brilliance packed into the room I sit in every day than I've seen in years in the industry, and I've worked with some damn good people in the past.

The Moral of the Story


My goal here isn't to scare off everyone who doesn't have a pile of money and time at their disposal; my goal is to filter down to the people who are motivated enough to put in that time. I'm not trying to discourage people from pursuing their dreams - I'm just trying to help people self-select their dreams and maybe try leaping at some smaller goals before shooting for the moon.

Individuals interested in accomplishing great stuff need to first prove themselves - and hone their skills - in smaller arenas. Some may not agree, which is fine, but harsh experience and observation of many successful people in the business (as well as many people who failed to go anywhere) has taught me that the only certain way to large-scale success is to master the small first. Yes, maybe some obscure genius did the big thing once without ever learning the basics, but those are exceptions, and rare ones at that - in my mind, it's a disservice to newcomers to any craft to tell them that they can be just like that, because in the majority of cases it simply isn't true.

I'm not arguing that individuals or smaller teams can't make awesome games - there's ample evidence that they can and do. Even multiplayer games are not out of reach. My point centers entirely around the "massive" label.

By all means - go make games. Make fun, awesome, compelling, memorable, and successful games.

Just be mindful of the fact that success is equal parts intensely hard work, and knowing how to pick your battles.


GameDev.net Soapbox logo design by Mark "Prinz Eugn" Simpson

Practical Guide to Bezier Curves

$
0
0
This is meant as an intermediate guide to Bezier curves. I'm assuming you've all read about Bezier curves and the Bernstein basis functions and have a general idea about how it all works. This is meant as the next level up and some ways to implement them in practical code. This isn't meant as a thorough exploration of the mathematics, but as a jump-off point. I'm sure others here know more than I do, but I'd like to introduce some things here that can be helpful to those who want to delve into this topic.

The Story So Far...


Bernstein Basis Polynomials


To quickly sum things up, Bezier (pronounced [be.zje]) curves use the Bernstein basis functions multiplied by control points to create a curve. A Bernstein basis function takes the form %5Cnormalsize%5C%21b_%7Bi%2Cn%7D%28t%29%, where i is the ith basis function and n is the degree of the Bernstein basis. The basis function form a partition of unity, which means that for any parameter value between 0 and 1, %5Cnormalsize%5C%21%5Csum_%7Bi%3D0%7D%5E.

A Bernstein polynomial is simply where the basis functions are multiplied by coefficients and summed:%5Cnormalsize%5C%21B_%7Bi%2Cn%7D%28t%29%, where c is the coefficient for the ith term. This polynomial is a parametric curve. To clarify, the sum in the Bernstein polynomial doesn't just add to 1 because of the coefficients.

Bezier Curves


You've probably seen this equation so many times you know it by heart:%5Cnormalsize%5C%21%5Csum_%7Bi%3D0%7D%5E

N-dimensional Bezier curves can be expressed as N Bernstein polynomials where the coefficients of the Bernstein polynomials are the control points in a certain dimension. For example, a 2D Bezier curve can be expressed as 2 Bernstein polynomials, one for the x-direction and one for the y-direction:

%5Cnormalsize%5C%21%5Cbegin%7Bcases%7D%2

The control points are given as %5Cnormalsize%5C%21P_i%20%3D%20%28x_i%2C. There are n+1 control points for a degree-n Bezier curve. 3D and 4D curves can be expressed in this same fashion. Bezier curves can have any bounds on the t-parameter, but unless specified it can be assumed that it only varies from 0 to 1. Note: if the interval isn't between 0 and 1, the curve definition takes on a slightly modified form:

%5CLARGE%5C%21%5Csum_%7Bi%3D0%7D%5En%20%

Bezier curves allow the user to intuitively control the shape of the curve. As the control points move in a certain direction, the curve moves in that direction too. We can gain some additional control of our curve by creating rational Bezier curves.

The Cool, New Stuff


Bezier Curve Evaluation


Before we get too far into rational Beziers, let's go over evaluation of Bezier curves. We could just do the simple evaluation of Bezier curves and get our answer. Let's say we're not so naive and used the recurrence relation for the binomial coefficient (if you're not familiar with the binomial coefficient, read the Wikipedia article): %5Cnormalsize%5C%21%5Cbinom%7Bn%7D%7Bi%7. For 3D curves, the pseudocode might go like this:

    function evaluate(double t)
    {
        x = 0, y = 0, z = 0;
        nChooseI = 1;
        for(int i=0;i<controlpoints.length;i++)
        {
            u = pow(t,i);
            uComp = pow(1-t,i);
            if(i != 0)
            {
                nChooseI *= n-i+1/i;
            }
            x += nChooseI * controlpoints[i].x * u * uComp;
            y += nChooseI * controlpoints[i].y * u * uComp;
            z += nChooseI * controlpoints[i].z * u * uComp;
        }
        return x,y,z;
    }

Even with all of our tricks, we're still computing the power terms on each loop. So what can we do to get faster? Turns out there's 4 simple methods for quick evaluation:

  1. Use the de Casteljau method.
  2. Use a modified form of Horner's algorithm.
  3. If you want to compute the whole curve quickly, use a forward difference table.
  4. **Construct a set of matrices and multiply for evaluation.

de Casteljau Method

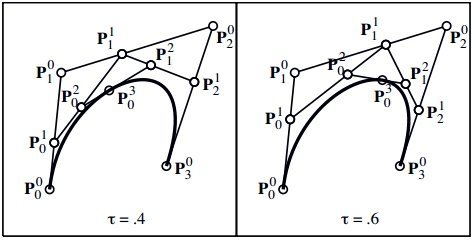
The de Casteljau method is a technique that takes advantage of the nature of the Bernstein basis functions. To start, let's say the t-parameter of a Bezier curve is between 0 and 1. If that curve is a degree-1, it represents a line between the 2 control points. If t=0, the evaluated point is P0; if t=1, the evaluated point is P1. If t=0.5, the point is halfway between the control points. The t-parameter tells us how far to go between P0 and P1. The Bezier curve takes the form %5Cnormalsize%5C%21P%28t%29%3D%281-t%29P. This is how linear interpolation is done.

Now let's say we had a degree-2 curve. The Bernstein basis functions would arise if we linearly interpolated between P0 and P1, between P1 and P2, then linearly interpolated between those 2 linearly interpolated points. The t-parameter would tell us how far to interpolate at each step. Mathematically, it would look something like this:

%5CLARGE%5C%21%5Cbegin%7Balign%7D%20P%28

The Wikipedia article shows how the curve is constructed in this manner. Since the degree for this is 2, 2 linear interpolations are done. The higher order the polynomial, the more linear interpolations are done. This is precisely how the de Casteljau method works. Mathematically, the de Casteljau method looks like this:

Attached Image: deCasteljau.jpg

%5CLARGE%5C%21P_i%5Ej%3D%281-%5Ctau%29P_

The tau must be between 0 and 1. Incidentally, the de Casteljau method is useful for breaking up a Bezier curve into 2 Bezier curves. In the formula above, the points %5Cnormalsize%5C%21P_0%5E0%2C%20P_0%5E1% are the control points for the Bezier curve on the interval (0, tau) of the original curve, and the points %5Cnormalsize%5C%21P_0%5En%2C%20P_1%5E%7 are the control points for the Bezier curve on the interval (tau, 1) of the original curve.

Modified Horner's Method

The following code is the modified version of Horner's algorithm for quick evaluation. It takes advantage of the recurrence relation for the binomial coefficient as well as implements the nested multiplication like the classic Horner's algorithm:

function eval_horner(double t)
{
	double u = 1 - t;
	double bc = 1;
	double tn = 1;
	double tmp = controlpoints[0] * u;
	for(int i = 1; i < n; i++)
	{
		tn *= t;
		bc *= (n-i+1)/i;
		tmp = (tmp + tn * bc * controlpoints[i]) * u;
	}
	return (tmp + tn * t * controlpoints[n]);
}

Forward Differencing

If you're evaluating a curve at evenly-spaced intervals, forward differencing is the fastest method, even faster than Horner's algorithm. For a degree-n polynomial, Horner's algorithm requires n multiplies and n adds. However, the forward differencing method only requires n additions, after a small initialization (which we could use Horner's algorithm for). There is a derivation for this method that I won't show here, but you can try this out and evaluate with Horner's and compare the methods.

This method requires n+1 curve evaluations to initiate the forward differencing. The easiest explanation of the method is to demonstrate it. Let's say that we had a degree-4 polynomial and the first 5 evaluations were: f(i)=1, f(i+1)=3, f(i+2)=2, f(i+3)=5, and f(i+4)=4. We build a table by subtracting f(i+1)-f(i), putting that value in the next row, and so on, like the following:

%5Cnormalsize%5C%21%5Cbegin%7Balign%7D%2

The method states that the number in the last row, -15 in this case, will stay constant for every column in that row. That means that if we put -15 in the next column, then add -15 to the number above it (-8), store that value in the next column on that row, and do this until we reach the value row, we can compute the value for f(i+5). Repeat for f(i+6), and all successive values for f(t). It would look something like this:

%5Cnormalsize%5C%21%5Cbegin%7Balign%7D%2

This method is fast, but it's numerically unstable. This means that eventually, over the course of the forward difference, errors creep in and throw off the computation. This means a lot to the CAD world, but for rendering forward differencing is usually sufficient.

Matrix Evaluation

There is a matrix evaluation that can be quick as well, but that discussion is better suited to the discussion on Bezier surfaces. So you'll just have to wait...

Rational Bezier Curves


A rational Bezier curve adds a weight to each control point. As the weight increases, the curve bends toward that control point. The formulation for a rational Bezier curve is given by:

%5CLARGE%5C%21B%28t%29%3D%5Cfrac%7B%5Csu

As you can see, if all the weights are 1, then the curve becomes a normal Bezier curve. Rational Bezier curves help us because:

  1. Rational Bezier curves can represent conic sections exactly.
  2. Perspective projections of Bezier curves are rational Bezier curves.
  3. The weights allow for additional control of the curve.
  4. Reparameterization of the curve is accomplished by changing the weights in a certain fashion (which I won't get into here).

Rational curves allow us to represent circular arcs (since a circle is a conic section). The image below shows what this would look like:

Attached Image: rationalcircles.jpg

A degree-2 rational Bezier curve can represent an arc. The control points P0 and P2 must be on the circle, but the control point P1 is at the intersection of the extended tangent lines of the circle at P0 and P2. The weights of the control points P0 and P2 are 1, but the weight of control point P1 is cos(theta)/2, where theta is the angle of the arc. A degree-3 (cubic) Bezier curve can also represent a circular arc. Like in the degree-2 case, the endpoints P0 and P3 must be on the circle, but P1 and P2 must lie on the extended tangent lines of the circle at P0 and P3, respectively. The distance that P1 and P2 must be from P0 and P3, respectively, is given by the equation 2%7D%7D%20r.gif.

Rational Bezier Curves as 4D Bezier Curves


Yup, just like the title says, rational Bezier curves can be represented as 4D Bezier curves. I know some of you might be scratching your head and clicking to a new page, but let me explain. If we create a mapping from a 4D curve to our 3D rational curve, we could do some normal Bezier curve evaluation using the algorithms above and not have to modify them. The mapping is simple: if in 3D we have (x,y,z) and weight w, then in 4D we can express it as (X,Y,Z,W) = (x*w, y*w, z*w, w). That means that the conversion from 4D to 3D is as simple as division. This does create weird equalities, such as point (x,y,z) in 3D maps to multiple points in 4D, such as (2x, 2y, 2z, 2), (3x, 3y, 3z, 3), and so on. For our purposes, this is just fine, so just something to note. This mapping works for rational curves because, as we stated above, when all the weights equal 1, then the rational curve is identical to a normal Bezier curve. By elevating the problem to a higher dimension, we gain a lot of computational simplicity. (As an aside, a similar mapping can be made from 2D rational Bezier curves to 3D normal Bezier curves, and you can picture the 3D-to-2D mapping as the projection of the 3D curve onto the plane z=1.)

In 4D, that means a 3D rational Bezier curve takes the following form:

%5CLARGE%5C%21%5Cbegin%7Bcases%7D%20X%28

If you look at the top 3 equations, they're identical to the expanded numerator of the rational Bezier definition. If you notice, the bottom equation is identical to the denominator of the rational Bezier. This means that if we want to compute a 3D rational Bezier curve, we can simply elevate it to 4D space, do one more additional computation in our curve evaluation, then just do the perspective divide of the point back to 3D. In fact, we can elevate all our regular Bezier curves into 4D by making the weights 1, and then just do perspective divide to get the point back to 3D.

Conclusion


One of the primary difficulties with the Bezier formulation is that each control point influences the entire curve. Also, the number of control points is directly tied to the degree of the resulting Bernstein polynomials. Thus, a Bezier curve with 6 control points yields a 5th degree polynomial. Evaluating higher degree polynomials takes extra computation time (even with Horner's algorithm, so we want to avoid having high degree polynomials if possible. These problems have been overcome by B-splines. B-splines aren't much harder to understand once you get Bezier curves down. In the future, if there's enough response here, I'll add a basic introduction to B-splines and easy ways to generate them (not necessarily computationally efficient) and do them by hand too.

Article Updates


05 Jun 2013: Fixed some typographical errors
28 May 2013: Initial release

References


A lot of the information here was taught to me by Dr. Thomas Sederberg (associate dean at Brigham Young University, inventor of the T-splines technology, and recipient of the 2006 ACM SIGGRAPH Computer Graphics Achievement Award). The rest came from my own study of relevant literature.

Pursuing a Career in Game Design

$
0
0

So, youthful pals, you intend to be a game designer?


Before anything else, anyone thinking about becoming a game designer needs to make a huge career choice first: either enter training courses or go to college? Training offers folks specified competencies that individuals can easily employ to obtain jobs directly after leaving school. However, higher education delivers more comprehensive abilities, and over time, it will definitely help young graduates to a greater degree. It really is a decision involving short-term solutions vs. strategic plans of attack.

The short route will certainly generate speedy outcomes. People taking this path will probably grasp the fundamentals and basics of contemporary game design.

But, hang on here, hot dog. There really is a contrast between those who work with others on video games and those who develop them. Most of the time, the early projects that training-course grads snag are among the weakest of projects, very small duties, such as animating trivial figures. Later, these game design support-staffers might just even receive a promotion; although, they really should not bet on it.

The fundamental dilemma here is that there are literally thousands or even millions of junior-grade applicants who are exploding with enthusiasm to enter the gaming sector, who will do more and work for less.

The only question is, do you just want work with video games or actually want to design them?


Right now, there is an answer, and this is just how it works.
Before anything else, get hands on your hands on proper knowledge.


Think about securing credentials such as bachelor's degrees in technology and computer systems or master's degrees in computer gaming development, which readies college students for employment in the overwhelming, in-demand line of work of video game construction.

These types of higher-education folks eventually advance to become computer-game audio designers, game programmers, electronic-game producers, and maybe even, game testers. These tech jobs usually trigger high-paying, senior-level, video gaming careers like lead artist, Sr. software engineer or product manager.

The Princeton Review, not long ago, noted its top-ten undergrad and grad school choices for computer game design, which are reviewed here. Have a look at their leading-five video game design programs by matching up them at DegreeJungle where people can compare schools and get recommendations on ways folks can get into advanced gaming education programs.

  1. University of Southern California – Los Angeles, CaliforniaUSC's Information Technology Program (ITP) showed up number-one on Princeton Review's checklist thanks to the institution's distinctive applied-innovation programs delivered at the Viterbi School of Engineering. ITP features seventy-five, hands-on university courses in cutting-edge: cyberspace development, modern multimedia, 3D computer animation, and computer-game development/programming. Other impressive learning categories show up among ITP's nine minors and specializations.
  2. University of Utah - Salt Lake City, UtahThe Entertainment Arts and Engineering (EAE) program is a multidisciplinary, higher-education course at the University of Utah. EAE merges the school's Department of Film and Media Arts with the School of Computing, in order to create courses of study where recipients leave the institution equipped to produce code, enhance animation, develop resources, and offer authority for the creation of tomorrow's computer games.
  3. DePaul University - Chicago, IllinoisDePaul's Game Dev degree focuses on team-based, multidisciplinary paths to video game production. The school’s curriculum addresses a couple of fields: game creation and style and game coding. University students in each field work in key, Game Dev workshops and conclude their learning with a hand-on, senior capstone video game activity. The capstone project earns graduating students some base-training in programming and game blueprinting, in addition to manufacturing and supervision competencies that catch the attention of Chicago businesses in gaming sectors.
  4. Worcester Polytechnic Institute (WPI) - Worcester, MassachusettsWPI is certainly the home of one of the oldest and top-ranked multimedia and video game development institutions in the United States. College students at this school discover things through interactive performance, and they establish a career portfolio in an atmosphere that promotes both creative and high-tech fields of studies.
  5. Drexel University (DU) - Philadelphia, PennsylvaniaDrexel delivers Bachelor's degrees in video game modeling-development, computer game programming-production, and a Masters in electronic multimedia. University students in this school study at the institution's RePlay Lab where media science and creative design clashes with information technology. Drexel University students learn in several different school departments that simulate real-world, gaming business environments.

And so, best of luck, to you guys and girls, tomorrow's gaming world is definitely cheering for you.

Crafting a Platformer Game

$
0
0
The topic on the Platformer games is a very interesting one. This genre of games is one of the best places to start if you are a beginner-level Game Designer or for that matter, a developer. This comes from the fact that the Platformer has enough action in it to make it fun, yet it is simple to design and build. You don't have any real constraints here to hinder you and you actually have a lot of freedom in designing your game.

In this article, I will concentrate on the Game Design of a Platformer game. We will craft out a game that will have a total of three different levels to go through.

The Platformer


Now before we go venturing into the game's core, let's brush up on what this genre actually stands for – platforms. Our main goal in the game that we are currently going to be designing is going to be to get from point A to point B by jumping from platform to platform. We will also encounter some enemies along the way as well. Some traps here and there too. Some small (and I do mean small) puzzles as well. That's to say – we will certainly add features but the core experience has to come from jumping from platform to platform in order to get to your current goal.

The Player


Let's kick things off with the most important thing in a game – the player. We would need to have a specific set of skills for our character to possess in order to complete the game. Let's take a look at a picture of what we are going to be able to do with our player.


Attached Image: Player Actions.png


As you can see from the picture, our character will be able to move forward, backward and jump. The jump directions are going to be handled by the forward/backward motion that can be executed on performing a jump. I'm going to include only these basic movement patterns in this article. This is beginner material so we don't want to go into an overload.

Our player can also shoot. Why shoot you ask? Why not stomp our enemies by furiously jumping on their heads? Well, for a number of reasons. The idea behind the current platformer is to jump on platforms to get to a certain point. However, we have to make things hard for the player. So – we add enemies (and later on other stuff too) to make our life miserable. However that would not be the case if you can jump all over them from the platform above, right? They would be much more of a threat (that does not imply in all cases – just in the current design) if you fall from a platform onto them and you die. Yeah, not too realistic, though platformers are not too good at being simulators either. So, back to the point – why shooting and not something more complex or original? Well, because, again, this is a beginners article. Just basic stuff.

And lastly, the player should have the ability to “use” things. Why? So we can put some kind of puzzles in the game, make it a bit more complex then just plain grinding jumps. We will see an example of why we need this later on.

The Levels


We are going to go in-depth on the levels further down in this article. This is an overview.

We are going to craft out three levels. The levels will be structured to make the player go up in difficulty. The higher the level, the harder it will be to get through. We will also implement a change in the gameplay directions, however you will see how that goes later on. By doing so we will shift the dynamics a little bit but we'll get to that shortly.

Now, to make things look a bit more interesting, we will implement an objective. The player has to get from his starting position to an exit door. On some (most) of the levels, this door is going to be locked, so the player has to find a key to open the door. Simple but it's all we need for the purpose of this article.

So without going further into overview details, here are the levels.

Level 1

With Level 1 I want to illustrate more in-depth the process of designing the level itself. As we go further, we are going to go more into the pure mechanics design and less on the level parts, however the platformer is very very level-centric so we need to do this.

To start off, let's just have a player starting position and a door.


Attached Image: Platformer Base 01.png


So we have a plane here and on it we have our player and our door. Great! Where is the challenge in that? Let's get down to adding some things – an enemy and a jump.


Attached Image: Platformer Base 02.png


So now we have a pit through which we can fall and an enemy. Note that the enemy will patrol back and forth. This will go for all of the enemies you will encounter from here on out through this article. However, back to the matter at hand – this is just not a platformer. There is nothing interesting to do here. So how do we make it a platformer? Well, we totally block the path to the door with an obstacle and we add the meat to the game – the platforms. And to make things worse, we will add enemies to some specific locations where they can cause trouble.


Attached Image: Platformer Base 03.png


Now to get to the door, you need to jump on the platforms, get past the enemy on top of the obstacle and jump from there. Really intense. Yeah. We need to upgrade this. Let's say that this door is locked and we need a key for it. How about this – we put this key in a harder place to reach. Somewhere on top of the level. And let's make things more interesting. Aside from the regular platforms, let's add a slippery platform that can cause the player to fall.


Attached Image: Platformer Base 05.png


As you can see in the picture, there are a couple of things the player can do here – if we go down the same path we had as in the previous picture, we'd get to the door. Great, however that door is locked. We should get a nice message that we need to find the key. So we go off again. We jump on the other obstacles and we get back to the big one. From there we take the route on the other platforms. So what to we see while jumping around? More enemies. So we jump, we shoot them, we jump some more and we get to the point where we have our slippery platforms. Now what happens here? Well, if you overdo your jump – you fall. And you fall back to the big obstacle you came from. And maybe right on top of a re-spawned enemy. Oh happy times. So now let's say you manage to jump and get the key. Though you end up falling from the key platform. No worries – a spiked platform is there – it's waiting for you. Well, let's get this over with and say that you did everything right. From here you can find your way back to the door and finally leave this blasted level.

Level 2

So, up until now, in the previous level we had a pattern of movement where we would jump back and forth on the platforms but mostly in a forward-like motion. Our objective was always in a forward path in relation to our point of view.

Now, let's switch up the dynamics – let's have our objective be in an upward path – that's to say that our objective will be above us in relation to our point of view. To get a better perspective of this, let's take a look at this picture.


Attached Image: Platformer Upwards 01.png


As you can see, we start at the bottom and the door is at the top. So basically we are going to be doing an Icy Tower kind of thing (just a reference). That's also one of the reasons why I decided to remove the key from the equation for this level. We are going to make it challenging enough to simply jump up through the level. So without further distractions, let's look at a demo of what we are headed in for.


Attached Image: Platformer Upwards 03.png


As you can see, we have made a nice mix of regular platforms, slippery platforms and spiked platforms. In regards to making the level harder, we will build on the slippery platforms and in some cases we will make them smaller and way harder to jump correctly on. We will also introduce the concept of having your enemy patrol back and forth while you try to jump on a specific platform that may slip. You just might bump into your opponent without even wanting to. And last but not least, we introduce to you the soft comfort of the spiked platforms that will insure your untimely demise in case you fall from a platform.

Now let's take a look at the real thing and analyze it.


Attached Image: Platformer Upwards 04.png


Now this is getting intense. The slippery platforms are getting smaller, further apart and the enemies grow in numbers. That's nothing to say of the big spiked platform in the middle of it all. The further you go up, the harder it gets. That's the total point of all of this – a new dynamic and a new perspective of platform jumping. After you've gone through the big amount ofweird platforms, you are finally ready to go through the door and move on.

Level 3

Now it's time to remove the safety wheels. After we've gone through two different types of dynamics and after we've explored the danger of the platforms themselves, let's blend this into a mixer and add some other stuff for taste.

Our first (and sadly – only) puzzle for this article is here.


Attached Image: Platformer Hard Level 01 Explanation.png


Do you remember the switch from the Player section of the article? Well, here is your use case. Here the key makes his triumphant return, only to be locked away behind a dropdown bridge. So … this is how it's going to work. After you pull on the switch, the bridge falls. You will have some time to get to the key before the bridge goes back up. How do you know how much time is enough? Well you have to play through your own game to find out. This is best calculated on a trial and error basis.

Now, let's get down and dirty with the level composition.


Attached Image: Platformer Hard Level 02.png


Now there is something new – after combining the different approaches from the first two levels, we get this insane jumping platformer. So let's take a look at what we have – we need to go up in order to get to the door. However, going up is implemented in a forward-like motion. You would need to explore in order to get to the point you need.

Here we introduce a lot of small and slippery platforms, along with the normal ones and, of course, the spiked one. We have a lot of places from which we can fall and we have no particular direction that points to our exact goal, so we have to explore a bit by jumping.

However, this level seems a little too quiet and safe. Let's get the danger meter up a little.


Attached Image: Platformer Hard Level 03.png


Now things are starting to look better. Let's break down what we have here. First off, lots of enemies. Even though in this current design they are not so hard, they can still be pretty annoying. Their placement makes them tough as well. The new thing we have here though is the Trap Door. What does it do ? Well, what a trap door does – it opens and you fall through it. Pretty simple. Thing is here, that you fall to another region in the level. This sets you back and in some cases, that's a lot. I thought of including a trap door that leads to a spiked platform, though I trashed that. You can experiment if you want though. And last but not least, we have our first dead end – in the far left of the corner, just underneath the key platform. What's it's use? Well, to make you explore more. It is actually a really probable path to go down.

After you've collected your key, you can go past the door and complete the three levels.

The Camera


This is an important point here. In this design, I had my mind set on the camera to reveal only a small portion of the level. There are a lot of platformers that show big parts of the stage, however that's not a path I want to go through with. What should be a good camera view here is the standard “Super Mario Bros” kind of thing (again, using this game only for a reference) where the camera is following our character throughout the level. However, in this regard, we should keep the line of sight a bit smaller. I'd say that for this design, I would want a camera that would be three character forward jumps in width (that's calculated on a basis where the camera is not following the player) and two character normal jumps in height.

Interesting Points


Normally this kind of game would include a scoring point system. I've purposely left that out as the article is getting too big and the information might get too much.

There are other points to be made here, like number of player lives, timers etc., however, I'm going to leave this out as well. This is something that has to come after playing your own product and seeing just how hard you've made it.

Conclusion


The Platformer is a good genre to experiment. You can also put it on all sorts of devices and still have similar gameplay experience.

Experiment with these kind of games – it can benefit you a lot.

Article Update Log


30 May 2020: Initial release

Organizing Code Files in C and C++

$
0
0

Introduction


While many simple programs fit into a single C or CPP source file, any serious project is going to become far more manageable if split up into several source files. However, many beginning programmers may not realize what the point of this is - especially since some may have tried it themselves and run into so many problems that they decided it wasn't worth the effort. This article will explain why to do it, and how to do it properly. A brief explanation of how compilers and linkers work will be given where necessary, to help understand why things have to be done in a certain way.

Note:  
This article was originally published to GameDev.net back in 2002. It was revised by the original author in 2008 and published in the book Beginning Game Programming: A GameDev.net Collection, which is one of 4 books collecting both popular GameDev.net articles and new original content in print format.


Terminology


In this article, I will call standard C and C++ files (usually with the .C or .CPP extension) "source files". This will be to distinguish them from "header files" (usually with the .H or .HPP extension). This terminology is widely used. However, note that the difference is purely conceptual - they are both just text files with code inside them. However, as the rest of the article will show, this difference in the way you treat source and header files is very important.

Why split code into several files?


The first question some novice programmers ask when they see a directory full of separate code files is, "why isn't it all just in one file?" To them, they just don't see the point of scattering the code about.

Splitting any reasonably-sized project up buys you some advantages, the most significant of which are the following:
  • Reduce time wasted on re-compilation - most compilers work on one a file at a time, and have to process the entire file. So if all your 10000 lines of code is in one file, and you change one line, then you have to recompile 10000 lines of code. On the other hand, if your 10000 lines of code are spread evenly across 10 files, then changing one line will only require 1000 lines of code to be recompiled. The 9000 lines in the other 9 files will not need recompiling.
  • Allow distributed or concurrent builds – it is becoming more common for developers to use concurrent builds now, where tools such as "distcc" or "Incredibuild" make it possible for separate source files to be compiled in parallel, either on separate cores or processors on your own computer, or perhaps distributed across other computers on a network. But obviously, if you only have one source file, you can't take advantage of this.
  • Increase organization - Splitting your code along logical lines will make it easier for you (and any other programmers on the project) to find functions, variables, struct/class declarations, and so on. Even with the ability to jump directly to a given identifier that is provided in many editors and development environments (such as Microsoft Visual C++), there will always be times when you need to scan the code manually to look for something. Just as splitting the code up reduces the amount of code you need to recompile, it also reduces the amount of code you need to read in order to find something. Imagine that you need to find a fix you made to the sound code a few weeks ago. If you have one large file called GAME.C, that's potentially a lot of searching. If you have several small files called GRAPHICS.C, MAINLOOP.C, SOUND.C, and INPUT.C, you know where to look, cutting your code-browsing time by 3/4.
  • Facilitate code reuse - If your code is carefully split up into sections that operate largely independently of each other, this makes it easy to use that code in another project, saving you a lot of rewriting later. There is a lot more to writing reusable code than just using a logical approach to file organization, but without such an organization it is very difficult to know which parts of the code work together and which do not. Therefore putting subsystems and classes in a single file or carefully delineated set of files will help you later if you try to use that code in another project.
  • Share code between projects - The principle here is the same as with the reuse issue. By carefully separating code into certain files, you make it possible for multiple projects to use some of the same code files at the same time, without needing to duplicate them. The benefit of sharing a code file between projects rather than just using copy-and-paste is that any bug fixes you make to that file or files from one project will affect the other project, so both projects can be sure of using the most up-to-date version. If you decide to package the shared code into a library later, it will be easier to do if it already lives in files that are separate from the individual programs.
  • Split coding responsibilities among programmers - For really large projects, this is perhaps the main reason for separating code into multiple files. It isn't ideal for more than one person to be making changes to a single file at the same time. Version control software such as CVS, Subversion, or even Visual SourceSafe can help to manage this, but the further you split your code up, the less likely you are to use the same file as someone else, and therefore less likely to encounter problems having to merge or coordinate your changes with someone else's.
All of the above can be considered to be aspects of modularity, a key element of both structured and object-oriented design.

How to do it: The Basics


By now you're probably convinced that there are benefits to splitting up your project into several smaller files. So, how would you go about it? Although some of the decisions you make will be reasonably arbitrary, there are some basic rules that you should follow to ensure that it all works.

Firstly, look at how you would split your code into logical sections, each handling a conceptually different part of your application. For example, you might be able to split your program up into separate subsystems or 'modules' such as sound, music, graphics, file handling, etc. You generally want one header file for every source file.

In C, you might have a header for each subsystem you identified, and a source file containing the function implementations. And occasionally a single module could be split into two or more files, because it might make sense to do so on logical grounds. For example, perhaps your sound engine would split cleanly into code dealing with sound effects and code dealing with music.

In C++ it is customary to go a bit further and put each class into its own pair of files - a header containing the class definition and a source file containing the implementation of the various methods. However, this is not really all that different from the C approach, since each class typically corresponds to one distinct area of functionality anyway.

Either way, first create new source files with meaningful filenames so that you know at a glance which class or what kind of code is in them. Then move all the code that belongs to that class or module into that file.

Once you have split it up in this way into separate source files, the next stage is to consider what will go into the corresponding header files. On a very simple level, code that you usually put at the top of the source file is a prime candidate for moving into a separate header file. This is presumably why they got termed 'header' files, after all.

This code to go in a header usually includes some or all of the following:
  • class and struct definitions
  • typedefs
  • function prototypes
  • global variable declarations (but see below)
  • constants
  • #define macros
  • #pragma directives
Additionally, when using C++, the definitions for template and inline functions usually need to be in the header file. The reasons for this should become clear later.

Global variable declarations differ from a typical variable definition in that they need to be preceded by the 'extern' qualifier. eg. “extern int myGlobalInt;”. This is important, but again, more on this later.

If you're using namespaces in C++, don't forget to enclose any relevant parts of your header file in that namespace, in much the same way that the functions and variables in question would be within that namespace in your source file.

These header files become the interface between your subsystems or classes. By #including a header, you gain access to all the structure definitions, function prototypes, constants etc. for that subsystem. Therefore, every source file that uses sprites in some way will probably have to #include "sprite.h", every source file that uses sound is likely to need to #include "sound.h", and so on. Note that you typically use double quotes rather than angular brackets when #including your own files. The quotes tell the compiler to look for your headers in the program directory first, rather than among the compiler's standard headers.

As mentioned earlier, as far as the compiler is concerned there is absolutely no difference between a header file and a source file, both are plain text files that are filled with code (with a small exception: some compilers will refuse to compile a header file directly, assuming that you made a mistake in asking.) The distinction is a conceptual one that programmers must adhere to in order to keep the logical file structure intact. The key idea is that headers contain the interface, and the source files contain the actual implementation. This applies whether you are working in C or C++ in an object-oriented way or a structural way. This means that one source file uses the functionality provided by another source file by including the second source file's header.

As a final point of interest, sometimes you have functions that exist purely as local helpers that you won't need to access from outside that file. In C, you would prefix these functions with the 'static' modifier. In C++ if they are not methods of a class, you would enclose them in an unnamed namespace. Since these functions aren't available outside of the source file, they wouldn't form part of the interface, so you wouldn't put their function prototypes in the header. Instead place them at the top of the source file if needed. This allows the other functions in that file to see the prototypes, but keeps them hidden from other files.

Potential Pitfalls


The rules given above are fairly vague and merely serve as a starting point for organizing your code. In simple cases, you can produce completely working programs by following those guidelines. However there are some more details that have to be accounted for, and it is often these details that cause novice programmers so much grief when they first start splitting their code up into header files and source files.

Typically, there are four basic errors that people encounter when they first enter the murky world of user-defined header files.

  1. The source files no longer compile as they can't find the functions or variables that they need. (This often manifests itself in the form of “undeclared identifier” errors, although this can produce any number of different error messages depending on exactly what you are trying to reference.)
  2. Cyclic dependencies, where headers appear to need to #include each other to work as intended. A Sprite may contain a pointer to the Creature it represents, and a Creature may contain a pointer to the Sprite it uses. No matter how you do this, either Creature or Sprite must be declared first in the code, and that implies that it won't work since the other type isn't declared yet. This “chicken or egg” type of problem manifests itself at compile time in a variety of different ways, such as the compiler saying a class isn't defined when you have clearly included the relevant header, or by a class being redefined, etc.
  3. Duplicate definitions where a class or identifier ends up being included twice in a single source file. This is a compile time error and usually arises when multiple header files include one other header file, leading to that header being included twice when you compile a source file that uses them. (In MS Visual C++, this might look something like "error C2011: 'MyStruct' : 'struct' type redefinition.)
  4. Duplicate instances of objects within code that seemed to be fine when files are compiled individually. This is a linking error, and often comes with difficult to understand error messages. (In MS Visual C++, you might see something like "error LNK2005: "int myGlobal" (?myGlobal@@3HA) already defined in myotherfile.obj".)

So how do we prevent or fix these issues?

Fixing Problem 1


Luckily these issues are easy to avoid once you understand them.

The first error, where a source file refuses to compile because one of the identifiers was undeclared, is easy to resolve. Simply #include the header file that contains the definition of the identifier you need. If your header files are organized logically and named well, this should be easy. For example, if you need to use the Sprite struct or class, then you probably need to #include "sprite.h" in every file that does so.
One mistake that programmers often make is to assume that a file is #included simply because another header #includes it for itself. Example:

/* Header1.h */
#include "header2.h"
class ClassOne { ... };


/* Header2.h */
class ClassTwo { ... };


/* File1.cpp */
#include "Header1.h"
ClassOne myClassOne_instance;
ClassTwo myClassTwo_instance;

In this case, File1.cpp will compile fine, as including Header1.h has indirectly #included Header2.h, meaning that File1.cpp has access to the Class2 class. But what happens if, at a later date, someone realises that Header1.h doesn't actually need to #include Header2.h? They can remove that #include line, and suddenly File1.cpp will break the next time you try to compile it.

Similarly, if the situation arose where File1.cpp no longer required a ClassOne instance, removing that instance and the related #include for would cause the ClassTwo instances to stop compiling.

The key here, is to explicitly #include any header files that you need for a given source file to compile. You should never rely on header files indirectly including extra headers for you, as that status may change. The 'extra' #includes also serve as documentation, by demonstrating what other code this file is dependent on. So if you know you need that header included somehow, put the #include line in.

Fixing Problem 2


Cyclic or two-way dependencies are a common problem in software engineering. Many constructs involve a two-way link of some sort, and this implies that both classes and structures know about each other. Often this ends up looking something like this:

/* Parent.h */
#include "child.h"
class Parent
{
    Child* theChild;
};


/* Child.h */
#include "parent.h"
class Child
{
    Parent* theParent;
};

Given that one of these headers has to be compiled first in order for the other to compile, you need some way to break the cycle. In this case, it's actually quite trivial. The Parent class doesn't actually need to know the details of the Child class, as it only stores a pointer to one. Pointers are pretty much the same no matter what they point to, so you don't need to have the definition of the structure or class in order to store a pointer to an instance of that structure or class. So, the #include line is not actually needed here. However, simply taking it out will give you an "undeclared identifier" error when it encounters the word 'Child', as that class definition is no longer visible, so you need to let the compiler know that Child is a class or class that you wish to point to. This is done with a forward declaration, taking the form of a struct or class definition without a body. Example:

/* Parent.h */
class Child; /* Forward declaration of Child; */
class Parent
{
    Child* theChild;
};

Notice how the #include line is replaced by the forward declaration. This has allowed you to break the dependency between Parent.h and Child.h. Additionally, it will speed up compilation as you are reading in one less header file. In this case, the same procedure can (and should) be followed in Child.h by forward declaring "class Parent;" As long as you are only referring to a pointer and not the actual type itself, you don't need to #include the full definition. In 99% of cases, this can be applied to one or both sides of a cycle to remove the need to #include one header from another, eliminating the cyclic dependency.

When using C++, it's usually preferable to use a reference wherever possible rather than a pointer, as references are less error-prone. As with pointers, a forward declaration of the class being referred to is typically all you need in the header.

In the source files, it's quite likely that there will be functions that apply to Parent that will manipulate the Child also, or vice versa. Therefore, it is probably necessary to #include both parent.h and child.h in parent.c and child.c.


Attached Image: gdarticle_cyclic1.jpg


Another situation where cyclic dependencies can often arise in C++ is where inline functions are defined in the header file. Inline functions are potentially faster but typically must be fully defined in the header, rather than just having a prototype (the reason for this will be explained below). However, since the inline function may need to know details of classes it operates on, this tends to mean that the header file it's in will need to #include more headers in order for the function to compile. The first piece of advice here is that you should only make functions inline when you are sure that they are too slow otherwise. If you have tested your code and certain functions absolutely need to be inlined - and thus have their definitions in the header file - try and ensure that the dependency between 2 header files is only one way by isolating the inline functions in one of the two headers.

Note that being able to eliminate a dependency entirely is not always possible. Many classes and structs are composed of other classes and structs, which is a dependency you cannot avoid. However, as long as this dependency is one-way, the order of compilation will be fixed and there should be no problem.

There are more in-depth ways of resolving cyclic dependencies, but they are beyond the scope of this article. In 99% of cases, using forward declarations and favoring normal functions in C./.CPP files over inline functions in header files will be enough.

Fixing Problem 3


Duplicate definitions at compile time imply that a header ended up being included more than once for a given source file. This leads to a class or struct being defined twice, causing an error. The first thing you should do is ensure that for each source file you only include the headers that you need. This will aid compilation speed since the compiler is not reading and compiling headers that serve no purpose for this file.

Sadly, this is rarely enough, since some headers will include other headers. Let's revisit an example from earlier, slightly modified:

/* Header1.h */
#include "Header3.h"
class ClassOne { ... };


/* Header2.h */
#include "Header3.h"
class ClassTwo { ... };


/* File1.cpp */
#include "Header1.h"
#include "Header2.h"
ClassOne myClassOne_instance;
ClassTwo myClassTwo_instance;

Header1.h and Header2.h #include Header3.h for some reason. Maybe ClassOne and ClassTwo are composed out of some class defined in Header3.h, or perhaps Header3.h contains basic functionality that is used all over your program. The reason itself is not important; the point is that sometimes headers include other headers indirectly, which means that sometimes a header will end up being #included twice for a given source file despite your best intentions. Note that it doesn't matter that header3.h is being #included from different header files: during compilation, these all resolve to one file. The #include directive literally says "include the specified file right here in this file while we process it", so all the headers get dumped inline into your source file before it gets compiled. The end result looks conceptually something like this:


Attached Image: gdarticle_includefiles.jpg


For the purposes of compilation, File1.cpp ends up containing copies of Header1.h and Header2.h, both of which include their own copies of Header3.h. The resulting file, with all headers expanded inline into your original file, is known as a translation unit. Due to this inline expansion, anything declared in Header3.h is going to appear twice in this translation unit, causing an error.

So, what do you do? You can't do without Header1.h or Header2.h, since you need to access the structures declared within them. You need some way of ensuring that, no matter what, Header3.h is not going to appear twice in your File1.cpp translation unit when it gets compiled. This is where inclusion guards come in.

If you've looked at other people's code, or perhaps through your compiler's standard libraries, you may have noticed lines near the top similar to the following, taken from one compiler's 'stdlib.h':

#ifndef _INC_STDLIB
#define _INC_STDLIB

And at the bottom of the file, after all the important declarations and function prototypes, something like:

#endif  /* _INC_STDLIB */

This is what is known as an inclusion guard. In plain English, it says "if we haven't defined the symbol "_INC_STDLIB" yet, then define it and continue. Otherwise, skip to the #endif." This is a similar concept to writing the following code to get something to run once:

static bool done = false;
if (!done)
{
    /* Do something here */

    /* Ensure we won't get this far again */
    done = true;
}

This ensures that the 'do something' part only ever happens once. The same principle goes for the inclusion guards. Imagine we included the stdlib.h header described above in File1.cpp. During compilation it would reach the #ifndef line and continues because "_INC_STDLIB" is not yet defined. The very next line defines that symbol and carries on reading in stdlib.h. If stdlib.h is included again during the compilation of File1.cpp, perhaps indirectly through another header,  it will read to the #ifndef check and then skip to the #endif at the end of the file, leaving out all the  declarations in the middle. This is because everything between the #ifndef and the #endif is only executed if "_INC_STDLIB" is not defined; and it got defined the first time we included it. This way, it is ensured that the definitions within stdlib.h are only ever included once by putting them within this #ifndef / #endif pair.

This is trivial to apply to your own projects. At the start of every header file you write, put the following:

#ifndef INC_FILENAME_H
#define INC_FILENAME_H

Note that the symbol (in this case, "INC_FILENAME_H") needs to be unique across your project. This is why it is a good idea to incorporate the filename into the symbol. Don't add an underscore at the start like stdlib.h does, as identifiers starting with an underscore followed by a capital letter are supposed to be reserved for "the implementation" (ie. the compiler, the standard libraries, and so on). Then add the #endif /* INC_FILENAME_H */ at the end of the file. The comment is not necessary, but will help you remember what that #endif is there for.

On a related note, you may have also noticed the “#pragma once” directive used occasionally at the top of a header file. This effectively achieves the same thing as the inclusion guards, without having to worry about filenames, or adding the #endif at the bottom of the file, by saying that "for this translation unit, only include this file once". However, remember that this, as with all #pragma directives, is not standard across all compilers. Although the Visual C++ and GCC compilers support the #pragma once directive, not all do, so it's a good habit to use the standard inclusion guard mechanism anyway, even if you do use #pragma once.

With inclusion guards in all your headers, there should be no way for any given header's contents to end up included more than once in any translation unit, meaning you should get no more compile-time redefinition errors.

So that's compile-time redefinition fixed. But what about the link-time duplicate definition problems?

Fixing Problem 4


When the linker comes to create an executable (or library) from your code, it takes all the object (.obj or .o) files it created during compilation, one per translation unit, and joins them together. The linker's main job is to resolve identifiers (basically, variable or function names) to machine addresses in the file. This is what links the various object files together. The problem arises when the linker finds two or more instances of a single identifier in the object files, as then it cannot determine which the 'correct' one to use is. The identifier should be unique to avoid any such ambiguity. So how come the compiler doesn't see an identifier as being duplicated, yet the linker does?

Imagine the following code, showing a global variable used in 2 files:

/* Header.h */
#ifndef INC_HEADER_H
#define INC_HEADER_H
int my_global;
#endif /* INC_HEADER_H */


/* code1.cpp */
#include "header1.h"
void DoSomething()
{
    ++my_global;
}


/* code2.cpp */
#include "header1.h"
void DoSomethingElse()
{
    --my_global;
}

This first gets compiled into two object files, called something like code1.obj and code2.obj. Remember that a translation unit contains full copies of all the headers included by the file you are compiling. Finally, the object files are combined to produce the final file.

Here's a visual depiction of the way these files (and their contents) are combined:


Attached Image: gdarticle_linker.jpg


Notice how there are two copies of "my_global" in that final block. Although "my_global" was unique within each translation unit (this would be assured by the correct use of the inclusion guards), combining the object files generated from each translation unit would result in there being more than one instance of my_global in the file. This is flagged as an error, as the linker has no way of knowing whether these two identifiers are actually supposed to be the same one, or if one of them was just misnamed and they were actually supposed to be 2 separate variables. So you have to fix it.

The answer is not to define variables or functions in headers. Instead, you define them in the source files where you can be sure that they will only get compiled once (assuming you don't ever #include any source files, which is a bad idea for exactly this reason). This gives you a new problem: how do you make the functions and variables globally visible if they aren't in a common header any more? How will other files "see" them? The answer is to declare the functions and variables in the header, but not to define them. This subtle distinction lets the compiler know that the function or variable exists, but delegates the act of resolving the address to the linker.

To do this for a variable, you add the keyword 'extern' before its name:

extern int my_global;

The 'extern' specifier is like telling the compiler to wait until link time to resolve the 'connection'. And for a function, you just put the function prototype -- the first line of the function without the body:

int SomeFunction(int parameter);

Functions are considered 'extern' by default so it is customary to omit the 'extern' in a function prototype.

Of course, since these are just declarations that my_global and SomeFunction exist somewhere, it doesn't actually create them. You still have to do this in one of the source files, as otherwise you will see a new linker error when it finds it cannot resolve one of the identifiers to an actual variable or function. So for this example, you would add "int my_global" to either Code1.cpp or Code2.cpp, and everything should work fine. If it was a function, you'd add the function including its body (the code of the function) into one of the source files.

The rule here is to remember that header files define an interface, not an implementation. They specify which functions, variables, and objects exist, but it is not responsible for creating them. They may say what a struct or class must contain, but it shouldn't actually create any instances of that struct or class. They can specify what parameters a function takes and what it returns, but not how it gets the result. And so on. This is why the list of what can go into a header file earlier in this article is important.

For convenience, some people like to put all the 'extern' declarations into a Globals.h file and all the actual definitions into a Globals.cpp file. Of course, most experienced programmers would tell you that global variables are generally bad, and therefore making an effort to reduce or eliminate them will improve your program anyway. Besides, most so-called globals don't need to be truly global. Your sound module probably doesn't need to see your Screen object or your Keyboard object. So try to keep variables in their own modules rather than placing them all together just because they happen to be 'global'.

There are two notable exceptions to the "no function bodies in header files", because although they look like function bodies, they aren't exactly the same.

The first exception is that of template functions. Most compilers and linkers can't handle templates being defined in different files to that which they are used in, so templates almost always need to be defined in a header so that the definition can be included in every file that needs to use it. Because of the way templates are instantiated in the code, this doesn't lead to the same errors that you would get by defining a normal function in a header. This is because templates aren't actually compiled at the place of definition, but are generated and compiled as they are used by code elsewhere.

The second exception is inline functions, briefly mentioned earlier. Like template functions, inline functions are not like normal functions, but are blueprints for different code depending on how they're used. An inline function is compiled directly into the code that calls it, rather than called in the normal way. This means that any translation unit where the code 'calls' an inline function needs to be able to see the inner workings (the implementation) of that function in order to insert that function's code directly. This means that a simple function prototype is insufficient for calling the inline function, meaning that wherever you would normally just use a function prototype, you need the whole function body for an inline function. As with templates, this doesn't cause linker errors as the inline function is not actually compiled at the place of definition, but is inserted at the place of calling.

Other Considerations


So, your code is nicely split across various files, giving you all the benefits mentioned at the start like increased compilation speed and better organization. Is there anything else you need to know?

Firstly, if you use the C++ standard library, or any other library that uses namespaces, you may find yourself using their identifiers in your header files. If so, don't use the "using" keyword in your headers, as it reduces the effectiveness of namespaces almost to the point of uselessness. Instead, put the using keyword in the source files if necessary, and explicitly qualify the names with their namespace prefix in the header files. Otherwise, when you start using functions that have the same names as the standard library, whether your own or from another library, you'll either have to start renaming them or go back and edit your header anyway, which in turn will affect all the files that depend on it. Better to do it properly in the first place.

Secondly, the use of macros should be carefully controlled. C programmers have to rely on macros for a lot of functionality, but C++ programmers should avoid them wherever possible. If you want a constant in C++, use the 'const' keyword, and if you want an inline function in C++, use the 'inline' keyword. If you want a function that operates on different types in C++, use templates or overloading. But if you do need to use a macro for some reason, and you place it in a header file, try not to write macros that could potentially interfere with code in the files that include it. When you get weird compilation errors, you don't want to have to search through every header file to see if someone used a #define to inadvertently change your function or its parameters to something else. So wherever possible, keep macros out of headers unless you can be sure that you don't mind them affecting everything in the project.

Conclusion


If done properly, organizing your files this way can speed your development without hindering you at all or introducing any extra problems. Although it seems like there is a lot to consider when doing so, it becomes second nature in no time. Just remember these key points:
  • Split your code up along logical module divisions
  • Put the interface into the header files and the implementation into the source files
  • Use forward declarations wherever possible to reduce dependencies
  • Add an inclusion guard to every header file you make
  • Don't put code in the headers that might adversely affect source files that include it
Good luck!

Crafting a 2D RPG

$
0
0
In this article we are going to go over a nearly-complete Game Design for an RPG game. We are going to take a look at how the game world is going to be structured, how the player is going to operate, what kind of enemies we are going to have, a deeper look into the skill tree and much more.

I plan this article to be lengthy because I would like to cover as much material as possible. So here it is, let's get started.

The RPG


So I'm not going to go in-depth here on all of the features. They will be discussed further down the article. However, I am going to make an overview of what we are going to design.

To start things off, I want to say that we will be taking a look at a simple example of a 2D-Style RPG. We are going to keep it on a beginner level in nearly all terms. So, the 2D-style RPG will feature an old school King's Quest kind of camera. And yes, I know it's not particularly famous in the role playing genre, however I'm a believer that people should experiment when designing their own games, especially in the indies. So long story short – that's how I felt the viewpoint should be for the purpose of this game.


Attached Image: Camera 01.png


Now onward with the player. The player is the most important unit in a game, especially in a RPG. At the beginning of the game, the player will get to choose his character's gender, have the option to switch between two sprites per gender to customize the look and from there – pick a class. The available classes are going to be Warlord (Warrior), Tempest(Warrior/Caster), Elementalist (Caster) and Forest Hunter (Archer). Upon choosing a class, the player is going to be put inside the game world. From there, the player can level up, gear up etc., and thus improve the character. And as far as controlling our player's movement and using specific objects (yes, we are going to talk about this too), we are going to keep things simple – point and click, point and click, point and click.

Each character class is going to have its own unique skill tree. Though we are not going to overload this rather simple game with higher-end mechanics, we are going to implement a couple of different use cases for each class' skills.

The Game World, as you may have already guessed, is going to be based in a fantasy medieval world. For the bigger part, the world is going to be structured around three large cities, several smaller ones and other areas, such as forests, graveyards etc., and to make things more interesting and not go too linear with the gameplay, all of these regions are going to be available to the player from the very beginning, with an exception for one particular region but we will talk about that later. But back to the topic – the player is going to have one starting zone and from there it's going to be all about exploring the world and going from region to region on a free note basis. You can pick up quests from each region at any desirable time, however there are going to be main quests that are going to get highlighted. But again, we'll talk about that when the time is right.

The combat is an essential part of an RPG as well. In the current design for this RPG, I wanted to go for a turn-based combat system. Since we are reverting to old school methods, I thought that it would be an interesting feature to be able to build your attack on a turn. The skills and attacks are going to be selected from a menu and executed on that turn. The first one that gets a go at attacking is the attacker. However, as we are going to see with the enemies, this might not always be the player.


Attached Image: Combat 01.png


The narrative is also something that we are going to work with. And not just the narrative itself but the entire story telling process. Firstly though, we need to keep in mind a couple of things – there are players that want to dive deep into the story and the lore and there are those that just want to get the objective and move on. Now, normally you can't make everyone happy, however for this particular case, there is a resolution that suits both types of players. We are going to discuss this further down the article. Another thing to note about the story telling is that we are not going to implement the entire thing in narrative. We will work around this by telling stories through the gameplay. Again, in the Narrative section we will take a closer look at how we can achieve this.

In terms of an item base we will have a big variety to choose from. We will have three basic item classes and they are going to be based on quality. The items are going to be of normal type, rare type and artifacts. The normal gear can be bought from shops throughout the game and as loot from lesser enemies. The rare items are going to be loot exclusive and are going to be dropped by more powerful enemies. And finally – the artifacts. They are going to be connected to the story. That would mean that you can get this gear by completing quests – both main and optional. The artifacts will be related to the story and will be the most powerful item quality. In order to maintain balance, however, these items will be way harder to find. This will be discussed in detail in the Items section.

The Quests are also going to be an interesting component to the gameplay. For this design we will have two main quest directions – main quests and optional quests. Both are going to contribute to the story and the optional quests are going to help the player out a lot in terms of gear, leveling and skills. However, only the main quests are going to be mandatory to beat the game.

So, this was the overview of the RPG. Now let's get down into details and explain further on the listed components and expand with new ones.

The Player


The Player will enter this game in the shoes of an unnamed main protagonist. The player has to be able to engage in all of the core mechanics of the game and thus – make the experience full. This would imply that the player needs to be able to do the following things:
  • Navigate freely throughout the game world.
  • Interact with certain objects.
  • Initiate in the game's story by engaging in dialogues and mainly quests.
  • Evolve accordingly with the game's story and progress.
  • Have the option to do certain things before others – that is, have options in front of him.
  • Has to be as much a part of the story as any other component of the game.
Now, let's see how we can accomplish that. First we'll start with the navigation. As we are going to see in the Game World section further down, about 80% of the regions are going to be unlocked for us to explore and take part in quests, fights with enemies etc., and by crafting such an open world, we get the freedom of choosing a different path each time around, without actually creating story dependencies. As we will see further down the line, the main motive in the game will not require the following of one routine path, rather multiple linear quest lines with no particular starting point.

Another interesting notion are the controls and the point of view of the player. We will be able to move around the world and interact with it on the point and click principle. This is going to allow us to have a more quest/adventure-like feeling to our game, however the core mechanics are still those of an RPG. As far as the point of view goes, while exploring the world, we will have our camera fixated on the visible region that we are in, instead of the player. This is mainly for simplicity reasons in developing the navigation to different parts of the game world. As I've mentioned a lot in previous chapters, this is a design for beginners, so in my mind it would be better to focus more on the pure RPG elements instead of focusing on the point of view and camera angle (though this is a really important feature in itself). Another plus to this is the fact that such a game with a point and click movement and region fixated camera, is really easy to port to a mobile device and yet not compromise controls and still be easy to catch on to.

In the upcoming sections we will expand on the player logic and how he handles himself in the game world.

The Game World


The Game World is one of the most important things to develop here. The fictional world that gives life to our fantasy has to be thought out in such a way, that it makes the player dive into it. Now, firstly, let's take a look at what we have as a design for the current game.


Attached Image: World Map 01.png


So, this is what we have. To cut things into pieces, we have three main cities and several smaller ones. As you may have guessed, these cities are going to be the place where we will explore for quests and where we will be able to purchase items. We will go into detail how this is going to be structured further down in this section. Now, aside from these cities and towns, you can see a big red area. This will be the place that is going to give us access to the last parts of the game – some pre-final battles and a last boss battle. How this works, we'll talk later on.

Something I especially want to look into here are the regions. If you take a closer look, they are split into themes. Each big city has it's own area and that area has it's own theme to correspond to. For city A the theme is going to be “Forest”, for city B the theme is going to be “Mountains” and for city C - “Water”. This is evident by the way these regions are structured – with A we have a logistic pathway that is surrounded by trees. For B our path is clearly surrounded by mountains and with C – sea side and rivers/lakes. All of the elements that have a path leading to them are going to be explorable and most certainly are going to be a part of a quest. If there is a road to it – you can go there. Now back to the themes – if you take a good look at the world, you can see that we have taken into consideration the altitude. Why? Well, the most important reason is to make the player's journey feel more like one. If you straight up hop from the mountain to the sea coast that just feels too fast-paced. With a smoother transition mountain – forest – sea you give the player a chance to feel more like he is on a quest and on a journey, rather then just going from one place to another.

The themes are not here just to make the world look nice though. We are going to have different enemies in the different regions. Each foe is going to be in a corresponding blend with the current theme. That's to say that for example, in the woods we would get attacked by a feral wolf or by a pack of bandits that have the proper attire. In the mountains we would be attacked by some Big Foot type creature (we will get to the enemies later) or by bandits in winter coats. And at the sea coast we would get attacked by a sea monster or by pirates. As we will see later with the Character Classes, the themes are also going to have a big effect on the character's biography as well.

Another thing to note in the world design are the paths and the logistics. In order to promote the exploration factor, we should be able to go from any one area to any other. It might not be through a direct path, however there needs to be a connection. And on that note, if you look at the entire structure of the map, it is built like a graph. This particular map is not picture perfect in terms of the core graph design that is often implemented into building such a thing. That's for two reasons – firstly, at the moment I don't have the resource (especially in terms of time) to build it in the absolutely by-the-book way and secondly, I want to keep things as intuitive as possible. However, when performing this kind of design for a game that is going to go in production and out on the market, you should do your work on the graph structure. Without going too much into detail, you can check more out on the graph theory here.

Now – onward to the cities and how they should be structured in this design. Let's take a look at the following picture.


Attached Image: City Big 01.png


In this picture we have an example of how we would build City A from the world map. As you can quickly see, I've mapped out only the buildings in the city. Stuff like the Town Square, fountains and other public places are not put into this. They are up to the artist, as they will more likely craft the atmosphere. However, we need to take a look at the functionality in the city, so here is a list of the buildings and what they are there for:
  • City Hall – This is an important building for a lot of reasons. Most of your NPCs with high authority are going to be nested here. The story line intersects with these authorities, whether it's the Mayor, the city guard's Captain or whatever. A lot of the quests will lead you up to this building.
  • Temple – This is the religious center of the city. As you will later on see, in the fictional religion of the game world, this would be the place to go and seek spiritual advice. The Temple is also going to serve the purpose of a healing center, a hospital if you will. Not in a literal way though.
  • The Weapons Shop – Here you will be able to buy/sell items. Mainly weapons. This shop is a useful point for the Warlord, the Forest Hunter and the Tempest.
  • The Armor Shop – Here you will be able to buy/sell items. Mainly armor. This shop is a useful point for the Warlord and the Tempest.
  • The Clothes Shop -   Here you will be able to buy/sell items. Mainly leather armor and robes. This shop is a useful point for the Elementalist and the Forest Hunter.
  • The Mage Guild – This place is pretty much the biggest interest point for the Elementalist. From here you are going to be able to buy staffs, wands, books etc. (the items we will cover later on).
  • The Supply Shop -  Here you will be able to buy/sell items. Supplies like food, bandages, potions and others.
  • The Prison – In this place you are going to be able to take up “bounty hunter” quests. These are going to be discussed later on.
  • The Library – This is going to be a point of interest only for the players that want to dive deep into the story of the game. As this design promotes exploration, the library is going to do just that – give you the ability to explore facts and myths about the game world. You are going to be able to read books on enemies you might encounter, on the origin of the player classes and many others.
  • Every other building on the picture, the Courtyard included, is there to be able to meet you with quest givers. People from the population of the city. That's not to say that you can't design the vendor at a certain shop to give you a quest, however the approach with having ordinary citizens reveal their not so ordinary stories through quests, is something that can be really enjoyable. The other buildings can vary. I've depicted them as houses, however the artist can choose for them to be something else.
Now that we have the big city broken down, what do we do with the smaller cities? Well, here is the thing – we need to scale this down. To start off, instead of the large City Hall, we would have a much smaller Town Hall. The figures of authority are going to be less. Adding to that, we are not going to have separate prisons and courtyards. We are going to blend this into one institution. Be it somewhat of a Sheriff's office or a detention center. And as far as the shops go, we are going to start to combine things. We are going to have a Blacksmith instead of an Armor Shop and a Weapons Shop. The Mage Guild will scale down and we will have a Druid Gathering or something along these lines. The Supply Shop is going to be scaled down as well and will be combined with the Clothes shop in a Local Market  where we are just going to have two separate vendors for supplies and for clothes. The Temple is going to be much smaller and it's going to be the source of the book readings as well. This means no library.

So now we've covered the world, the regions, the cities and towns. Time to move on to the next topic.

Basic Story


Now in order for our world to have some logic into it, we need to mark out at least the overall story. No details, just the most fundamental things. They influence the gameplay, so basically we need to have them. So without going into names, details and other things along these lines, here is what it's all about.

The game world was crafted by three godlike entities – one for each of the themes. A forest god, a mountain god and a water god. These three entities were tyrants and despots. They saw creation as a means to have something to destroy. As years pass and their torment over the beings of this world progresses and this pointed out to a defining moment in history. One of their own creations – a demigod hero, created for the purpose of forcefully spreading their will, is now too attached to the earthly creatures and opposes the entities. After an excruciating battle, the hero manages to seal them in an alternate isolated realm. He would have to offer himself as a sacrifice for three seals – one for each of the entities. By giving his own life, he manages to lock up the evils away from the realm of humans. The three seals were scattered throughout the world into the strangest of places and thus – the tyrants were no more.

After the three entities were locked away, humanity progressed like never before. The people managed to find left over artifacts, scrolls and many other things that belonged to the tyrants and their minions. And even though the minions were still in this realm and not with their masters, they were no match for the humans. They became outcasts – terrorizing and attacking from a distance and not engaging in open warfare.

This state allowed the humans to evolve beyond anything they've imagined possible – they tamed magic, they became exceptional warriors, they started to bend their own world to their will. In the wake of these events, a new religion came to be – one that would worship the hero that locked away the evils so long ago. And in the way of that religion, an order would be formed – The Order of the Tempests. They settled near the gateway to the other realm that was sealed so long ago and protect its entirety with their lives.

Even more years pass. The hero, the evil entities and their cosmic battle now looks to be more of a religious story then an actual event. The only ones that still see and treat it as something real are the Tempests, however with time, they started becoming more and more of an outcast heretic order. However, some disturbing events are starting to unravel. The minions of the godlike entities, treated like insane heretics by the current population, are growing in numbers. They are starting to go through with more and more open attacks. It is at this point that our main protagonist receives a dark vision. The likeness of the ancient hero appears to him/her and tells a story of an upcoming storm that you have to stop. A story in which the evil entities have to be killed once for all or humanity will be devoured by them.

And thus – after deepening the visions, our player is convinced that this is something that's real and has to to, so he/she sets on a quest to find the three seals, enter the tyrants' realm and put an end to them once and for all.

So, now that we've looked at the story, let's go to something else in that regard – the questing and the narrative.

Storytelling, Questing and Narrative


Now, in order to get a better grasp of how we are going to handle things with the storytelling, we will start off with the quests.

Questing is going to be the essence of the game. We don't want a grindfest, mostly due to the core mechanics of the game. What we want is for the player to get the goods and rewards he deserves by doing something significant, at least to some extent. So, now we will have two lines of quests – main and optional. The main quests are going to serve as your progress meter – the more of these you complete, the further you will go. However, doing main quests only should not make your experience the best one out there. Yes, sure, you should be able to play through the game but not easily. The main quests should play the role of the mechanism that moves the story forward while optional quests should be there to grant the player experience and thus – levels, to enforce the story and last but not least – to help the player gear up with good items. That way, you will make the player experience more full and in turn – promote exploration. This is at the core of the current mechanics so this is something that we should strive for.

Now onwards at how we are going to tell the story. This is something that we have to be very careful about. There are players that love story and dialogue and there are those that want to get straight to the point. Both types of players are right in their wishes and it is not impossible to attract both in one game. So to start off, one of the most important things in this regard are the dialogue interactions. On initiation, the dialogue should be short, concise, make a good but short summary of what's it all about and if it's information regarding a quest – you should be able to receive it in as few sentences as possible. However, with this being said, this should not be the dialogue in it's entirety. This is the feature that's meant for the players that want to go out and do things instead of talking. But let's extend on the dialogue – after everything is said and done, you should have more dialogue options. One is to stop the dialogue by saying “Thanks, bye now.” but the others should have the function of extracting more and more information on your current topic. These other options should not contain data that is mandatory to complete the quest – that should be in the first, short version of the dialogue. The dialogue should enforce additional story, not mission objectives.

So, the dialogue structure is out of the way. However our storytelling should not be restricted in just the narrative of dialogue. The gameplay and environment should be able to help out. How? Well, let's give a couple of examples. Let's say that you have a quest in a town and the objective is to hunt down a dangerous criminal. You have not taken the quest yet. As you go through the town, there should be one or two “WANTED” posters. On “use” action, you should be able to read more information on the wanted person. Also, this can be enforced by having the local people talk about the criminal. That way when you go and take the quest, you know what you are dealing with and that's done with no cut scenes and no additional dialogue. Another example of this would be the ability to read parts of the story in a big city's library. Let's say you want more information on an enemy type that you've encountered in the region. By going to the library you can read something on that enemy's origin and other helpful stuff along these lines.

Another thing to note are the cut scenes. Even though we are talking about a 2D game, this can still be an issue. Cut scenes are awesome when implemented correctly and a real joy killer in other cases. So for our design we should have as few cut scenes as possible. They should be reserved only for the most important parts of the game and should not be too long. In them, we should just get the main point across. Nothing more and nothing less.

Player Classes, Leveling and Skill trees


Now, in the beginning we've talked about the four classes that we are going to have – the Warlord, the Tempest, the Forest Hunter and the Elementalist. Now we are going to go more into detail of how they work, what their skills are going to look like and what the skill tree system is going to be. Just to clarify though – we are not going to go into details in terms of skills. Just outline them. Otherwise this article is going to get way too big. So now on to the classes.

Warlord – this is the warrior class in the game. Brutal and ruthless, the Warlord craves combat and glory in an open battle. Can equip heavy armor and leather armor. Can use swords, maces, axes, spears, daggers and knives, hammers, shields. The skills of this class should be orientated to melee combat and close-quarter fighting. The skillsets that the Warlord can implement are those of a two-arm weapon specialist, dual wield weapon specialist and sword and shield specialist. This would mean that the first type is a slower, more damage dealing kind of build, the second is a faster fighter that deals less pure damage but more critical hits and lastly the last build is that of a character that places defense and attack on the same level. That is – he does not have the biggest damage output, however he can survive.

Now, some of you might ask – what does faster and slower mean in a turn-based RPG? Well, it means that if you play a slow character, there is a bigger chance that your opponent can attack you twice before you can attack back.  A faster is the opposite – you get a bigger chance of attacking twice. In case you level up correctly, you can get that attack number to three before the opponent can lash back. The normal pace is the norm – turn per turn.

Tempest – the tempest is part warrior part caster. Can equip heavy armor and leather armor. Can use one handed swords, maces, hammers and shields. The skills are orientated to melee combat and close quarter fighting. The Tempest in his essence is not a real caster. The skills at his disposal are primarily buffs that increase either the attack, defense, speed or other attribute. Aside from that, the combat abilities are paced to an offensive warrior with a weapon and shield. This class should really be diverse and the way of play should be felt the strongest at your combat strategies.

Elementalist – this is the caster class in the game. The Elementalist uses magic to bend the elements to his will. Can equip robes and clothes. Can use staffs, wands, daggers and books. In the gameplay of the Elementalist, the book is the off-hand weapon, like the shield in the examples above. Aside from that, the staffs can be two-handed and one-handed. The wands and daggers are naturally one handed. As a skill set, here we have three main builds – a fire mage that uses the power of the flames, a lightning wielder that bends the lightning to his will and a water mage that uses immense water attacks to drown his enemies.

Forest Hunter – this is the archer in the game. The Forest Hunter's purpose is to keep the balance of nature intact. That some times, and that's quite often, requires a lot of killing. Being more of a cleanser to those who would threaten the forest, this range fighter has no problems in doing whatever is needed. Can equip leather armor. Can use bows, crossbows, daggers, knives, claws. As a build, the Forest Hunter can go on and kill opponents from a distance, thus giving two attacks to the player one after the other, he can also attack up close with increased critical hits and last but not least, he can use stealth as an increased defense mechanism, thus making him hard to hit.

Each class has their own starting region. For the Warlord that would be the cold and brutal reality of the mountain terrain of City B; for the Forest Hunter, the woods of City A are the perfect place to fulfill their desire to balance out nature; for the Elementalist the perfect home are the shores of City C where they would gather knowledge from many known and unknown wizards and mages that travel from coast to coast; and the Tempest would find refuge in the town that's positioned right next to the sealed gate (the big red circle on the world map), leading to the exiled ancient evils.

Now onto the leveling system. Naturally as with all games of this genre, we will level up through gaining experience. The attributes of a character (strength, agility, magic, health, mana, stamina) are going to be automatically incremented on a pre-defined basis. Per say the Warlord is going to gain more strength per level then the Elementalist. Now, as far as the level cap goes, in my estimation a total of 30 levels is going to be more then enough for this small setup. Now, on the topic of the attributes, we should take a look at just these simple schematics – strength increases damage; agility increases the chance that the enemy misses an attack; magic increases magic damage; health, mana and stamina are pretty clear. The one thing that needs to be noted here is this – the resource that the Elementalist and Tempest use for their skills is mana, and the resource for the Warlord and Forest Hunrer is stamina.

So now that we've got the leveling and attributes covered, let's take a look at how we are going to spend skills. You will gain one point to spend per level. You will have a skill tree split into three branches, each of them being a character specialization as shown above. Now, the first skill of each branch is going to be unlocked at the beginning, the others are going to have a requirement of points invested into the branch. So, with the first skill being unlocked, you would need 3 points allocated into the branch and more specifically into the first skill in order to unlock the second skill and be able to allocate points into it. The third skill will need 8 points allocated into the branch, the fourth will need 16 and the final and fifth – 25. As the point number allocated per skill grows, so does the skill's efficiency. Now, let's take a look at how a skill can be used in a combat scenario – remember the combat picture from above? Well, the Shield Bash could be considered a skill in that instance. From the UI menu you would pick a possible “Skill” option and use the one that you would want.

Items


Now to take a brief overview of the items. I've pretty much explained the items' grades and quality up to here, so I'm not going to repeat myself mostly because this article is starting to grow a lot. So, let's see how the rare items and the artifacts are going to affect our character. To start off, let's look at the rare items – they will have higher damage then your normal ones. Aside from that, they will grant you attribute bonuses. For example, a rare sword could give +3 to your strength. There could be all sorts of combinations in terms of upgrading your attributes. However, we need to add a bit of balance to this, so here is a rule for the current design – a rare item should not be able to add bonus points to more then two attributes.

The artifacts are a different thing all together. Remember how in terms of the story they are left behind by the three godlike entities and their most powerful minions? Well, we have to reinforce that logic. These items have to really give the player the feeling that they have something special in their possession. So, straight to the point – the artifacts are going to be able to give bonus points up to four attributes. They are also going to be able to give up to 3 points to a specific skill. If the player has not allocated points to that skill, he will still be able to use it but as if just one point was allocated. In some special cases where the item has close correlation to the story, it can possess a special skill on its own and allow the player to use it.

Aside from these item statistics, I'm not going to venture more into this, since again, this article is going to become too big. However, I want to note that the key to developing good items and good item systems is to test, test and test again. Do this until you have a good balance and a good experience.

Enemies and Random Encounters


The enemies are a key feature in a game where exploration is in the center stage. If you want to have a good exploration feeling, you must have diversity in your opponents. As we've talked about earlier, the enemies are going to be theme-based. In order to make a good roster of enemies per theme, we should do a little grouping that looks something like this:
  • Recurring enemies – these are the lowest in power terms in the hierarchy. Only their attire changes on a regional basis.
  • Region specific – these are enemies you will see in the entire region but are exclusive for it.
  • Area specific – these enemies appear only in specific areas in the region. For example in the cemetery or in a specific forest.
  • Bosses – they are unique. We will only have several of these throughout the game.
Some enemies should also possess specific skill sets. For example an Area specific enemy from City C, let's say a Hydra, should be able to cast some kind of water spells. This is not valid for all enemies tough.

Another thing that I really wanted to discuss is the Random Encounters. So this is how they are going to work – say you are walking down some path that you are exploring and boom – you suddenly get attacked by an enemy. This adds an element of surprise and gives for more excitement. Also, in some areas, it will make you rethink your visits to that place unprepared. The mechanic behind the random encounters is going to be percent-based. Say you want to make an area of a region support this feature. For that specific place you should add a percent that the attack will happen. So this obviously has many virtues in terms of excitement, leveling, looting etc., but what if you are more into the story and the pure exploration instead of the combat element? Well, this is a feature that is easily placed and easily removed. Removing the Random Encounter can be customized per player experience. It can be done in several ways. For example by disabling them on difficulty selection. Or better yet – something you can do is enable/disable them through the Options menu. That way you can have the idea of doing random encounters if you want to, and not do them if you don't feel like it.

The Final Encounter


This is a very interesting point. However, I'm not going to discuss it in the current article since we are going into overload mode. I'm going to write a separate article on the encounter where we are going to talk about boss fights in a more broad spectrum and then I'll link the two materials together.

Conclusion


Crafting a game experience is something that has to come from your own vision of what you want to see. In this design, I wanted to see a revert to the old school turn-based gameplay, quest-like atmosphere and broad exploration. I may have missed out on something but I hope I've encompassed enough in the current article.

Article Update Log


2 Jun 2013: Initial release

Cross Platform Test Driven Development Environment Using CMake (Part 5)

$
0
0
With the release of CMake 2.8.11, some new features have been made available which greatly simplify certain areas of work compared to the prior articles.  The primary feature of note is what the CMake documentation calls ‘target usage requirements‘.  In general, CMake now maintains a hierarchy of information about targets, what is needed to not only link them but to also use them from other targets.  Previously much of the information required to use a target had to be manually maintained and exported in variables, which was the focus of the prior 4 articles.  With the new abilities, I have no problem throwing all that prior work out the door and hopefully once you get through reading this, you won’t either.  The simplifications to using CMake is impressive and will greatly speed up work with CMake in the future, hopefully this short article will be useful in applying the new feature.

Target Usage Requirements


In versions of CMake prior to 2.8.11, it was possible to tell CMake to link with libraries by simply specifying the target name.  So, if you have a library such as Core, and you wanted an executable to link against it, you could write the following:

ADD_EXECUTABLE( Main main.cpp )
TARGET_LINK_LIBRARIES( Main Core )

CMake would take care of figuring out the path and extension of the Core library automatically.  This simplification was a great utility given that paths could change based on different build settings and having to track such things would be a chore.  Unfortunately this still left the user to deal with dependencies, include paths and compiler definitions in order to use the library correctly.  As such, the above example would fail in practice since you can not actually use the library without the additional information.  In the prior articles, the missing information was provided through a set of standardized variable names which were created at the same time as the Core library target and exposed to the parent CMake context.  In Core, the following items were exposed:

SET( CORE_STATIC_LIBS Core ... )
SET( CORE_INCLUDE_DIRS ... )
SET( CORE_STATIC_DEFS ... )

With those items, it was then possible to properly setup the usage of the Core library as follows:

INCLUDE_DIRECTORIES( ${CORE_INCLUDE_DIRS} )
ADD_EXECUTABLE( Main main.cpp )
TARGET_LINK_LIBRARIES( Main ${CORE_STATIC_LIBS} )
TARGET_DEFINITIONS( Main ${CORE_STATIC_DEFS} )

Note:  
This is not exactly how it was setup, this is a simplification for example purposes only.


While this is a working solution, it is also tiresome work which was prone to error even with the standardized names.  Thankfully with target usage requirements, this additional work is no longer required; a more encapsulated solution is now possible.

Dependency Tracking


Going back to the original example of defining the Main target:

ADD_EXECUTABLE( Main main.cpp )
TARGET_LINK_LIBRARIES( Main Core )

Wouldn’t it be nice if that were to work without all the manual hoops to jump through?  This is exactly what target usage requirements does; it adds the data which was previously manually tracked into the target information itself.  As such, not only does the target know where the library exists, it also has information about what other libraries it requires, which include paths are needed and what compile time definitions need to be set in order for another target to use it.  This feature is added through a minor modification of one command and the addition of two new commands:

TARGET_LINK_LIBRARIES: Modified to track library dependencies and not just the location of the target.
TARGET_INCLUDE_DIRECTORIES: New command which adds include directory requirements to the target.
TARGET_COMPILE_DEFINITIONS: New command which adds compile time definitions to the target.

Ignoring some of the additional details for the moment and simply applying the new features to the Core library is very simple.  Much of the old setup work can be removed and you should consider certain commands as deprecated in the future, among the items to remove: ‘INCLUDE_DIRECTORIES’ and ‘SET_TARGET_PROPERTIES’ for definitions should be stripped out.  After removing some of the old setup work, after ‘ADD_LIBRARY’ you can simply add the three commands:

TARGET_LINK_LIBRARIES( Core GFlags GLog )
TARGET_INCLUDE_DIRECTORIES( Core PUBLIC "${INCLUDE_DIRECTORIES}" )
TARGET_COMPILE_DEFINITIONS( Core PRIVATE BUILDING_CORE PUBLIC PUBLIC "${DEFINITIONS}" )

Now the simplified Main target will automatically get all the information it requires to link and compile against the Core library.  Anyone who has done anything beyond the trivial with CMake should quickly realize just how much of a time saver this is going to be once pushed out to all the list files.
    

New Command Details


Both of the new commands have some details which were ignored for the simple example.  For instance, when defining the compile definitions, what are the “PUBLIC” and “PRIVATE” attributes about?  There are actually three attributes which the two new commands support, the missing one being “INTERFACE”.  The concepts are quite easy to grasp in terms of some simple usage examples.

Core provides inclusion of GFlags and GLog as part of its job.  Unfortunately GFlags and GLog need some special definitions (primarily for Windows) in order to both compile and be used by others correctly.  For this purpose, the attribute “PUBLIC” is used to specify the definitions for GFlags and GLog.  The public attribute specifies that the definitions exist both when the target itself is being compiled and also when a user of the target is being compiled.  The other definition being supplied “BUILDING_CORE” is another Windows-only requirement used only by Core when it is being compiled.  It is marked as “PRIVATE” such that it is only defined while Core itself is compiling and any user of the target will not receive the definition.  The final unused attribute “INTERFACE” is the opposite of “PRIVATE” in that anything defined after that attribute is not defined while the target is built, it is only defined for users of the target.

The same behavior of the definition attributes is used for the include directories.  So, for instance, if Core wrapped GFlags instead of exposing it, the include directory for GFlags could be marked “PRIVATE” such that it is only used while compiling Core.  Any user of Core that tried to directly include “gflags.h” would have to do the inclusion themselves since it would not be inherited from Core.

There are also additional attributes which can be applied to the link libraries but those are mostly special cases which will be ignored.  The only real notable attribute is “LINK_PRIVATE” for static libraries which are being placed in shared libraries.  Otherwise, the default public linkage is usually appropriate.

Conclusion


The new CMake release is a welcome simplification to maintaining larger modular projects.  The simplification and removal of manual information tracking reduces the verbosity of list files and removes considerable chance for errors.  It should be hoped that many projects which use CMake will not hesitate in transitioning to the target usage requirements system and hopefully, if needed, this article will prove useful in making the transition.  For the individual user targeting cross platform work, the new release provides even less likelihood of having to deal with difficult to track build problems.

Games and the Imagination

$
0
0

Introduction


Can you remember when you discovered video games? I can, and I don't think that my experience was much different from others who discovered games at around the same age. At nine years old I was not a logical child; technical matters were beyond me and by the standards of today I was probably the least likely person to be interested in computers but I was completely entranced by the idea of video games. Years before I got my first computer, I would make my father take me round computer shops to look at the games on offer. You probably remember the outlandish descriptions of the games on the back of the boxes, "You are Earth's last hope! Destroy the evil Zarg Empire before it wipes out humanity!" Or, "Brave the terrors of the Forest of Auria and rescue the beautiful princess!" Of course, to the trained eye, the Zarg empire was a number of small blocky shapes that stuttered across the screen, and the Forest of Auria was either a collection of ASCII characters or a short text description, but to the young mind that read these descriptions, video games were a gateway to the kinds of experiences previously only offered by dreams, books and cinema, the closest you could get to living in a fantasy world.

Note:  
This article was originally published to GameDev.net back in 2004 as a 4-part series. It was revised and combined by the original author into a single article in 2008 and published in the book Design and Content Creation: A GameDev.net Collection, which is one of 4 books collecting both popular GameDev.net articles and new original content in print format.


For me, the attraction was the promise that these games held, through their themes, characters and perspectives; the promise that a young child could explore in safety and daylight the shadowy and indistinct mental world that imposed itself on him at night. They removed the clumsy limitations of toys, the dissatisfaction that came with increasing age of realising that the dark alleyway on the corner of his housing estate was not the entrance to the world of ghosts. They satisfied his desire to return there even after he was told it did not exist.

Three years ago I was working on a design that I hoped would speed my journey into the games industry. I was thinking deeply about games and was frustrated with the tendency of the industry and the games press to talk about games only in what I call constructional terms; that is, in terms of the technical elements that make up a game such as 3D engine, AI etc. What I wanted were words that I could use to describe the experience. Despite spending hours poring through games magazines, websites and interviews I could find little referring to the experience of playing, except perhaps for playability, a term which by its vagueness proves that there has been little insight into the subjective experience of playing games.

I kept being drawn to a particular memory and had an urge to explore it, so I sat at my computer and wrote the two paragraphs that begin this article. I wanted to continue, to elaborate on this memory only to realise that I knew nothing more. But somewhere in this memory, I thought, there might be a key to a deeper understanding of games and a widening of the language we use to discuss them. So I began a personal quest to find out everything I could about subjective experience, fantasy and imagination, a quest culminating in the writing of this article, which I hope is of use and interest to gamers and developers alike.

The first step I took was to explore the games media and talk to as wide a cross section of gamers as I could, in order to see if there were any commonalties between my personal reflections and the experience of others. This research could not be called scientific by any means, but the questions and experiences I tried to explore are essential to any understanding of video games. Little is achieved by merely asking the simplistic question of whether games are good or bad for us, and the contradictory results of several studies bears this out. What is far more important is to ask, without judgement, how an individual relates to a game, to explore questions of personal meaning and imaginative response. Whatever the value of my investigations, I became convinced that an exploration of fantasy and personal meaning could lead to an opening up of the way that we think about and design games.

Widening the Language of Convention


Over the years, the games industry has evolved an impressive language of terms to describe games. This language has two main strands: genre terminology and technical terminology. Genre terminology describes the "type" of game and technical terminology describes the set of technologies that make up a game such as AI or 3D engine. Take a look at any games magazine and you will see most games described in these terms. Initiation into this language is essential for anyone who wants to be a developer or hard-core gamer. Many young players, keen and recent initiates into the world of gaming, wield these terms as proof of their knowledge and to distinguish themselves from their ignorant, casual-gaming fellows. I should know, I was one of these initiates.

But language is a cage. This terminology, perpetuated by gamers and developers alike has the effect of shaping our perception of a game, and often determines how we design new ones. Many developers, it seems, are straining against this prison of words, sensing vague intimations of aspects of gaming outside the language of convention, but lack the concepts with which to catch these shadows and render them concrete in code.

To escape this prison, we need to look at the aspects of gaming that lie outside of it, from the ideas of children yet unversed in the language of gameplay, to the intriguing mental shadows that we, the initiated, push aside as we play. I attempted to uncover some of these aspects in my research, aspects that I'm sure many readers will recognise in their own gaming experiences.

The Primacy of the Imagination


During my conversations with gamers old and young, I found (with younger gamers in particular) that the primary factor in attracting many of them to a game was its premise; the experience alluded to by its characters, themes and imagery. Here a player chooses a game because it allows him to experience a particular fantasy: being a racing driver, adventurer or soldier, to name just a few. This fact seems to be well-known to the copy writers of game advertising and packaging who, in most cases tend to emphasise the themes, characters and plotlines in a game rather than its constructional description, although many games for hard-core, initiated audiences will focus on describing the game in terms of its genre history, as displaying more polygons than Call of Duty 4 or having better HDR lighting for example. This emphasis on the internal history of the video game can be a disadvantage, I feel, as it shuts out the uninitiated and promotes the limiting ideal of a game as a mere collection of algorithmic special effects which, as I hope to prove, is not the case.

This concept of the primacy of an underlying fantasy is given more weight if we read old games magazines from the early to mid eighties and look at how games were described when today's constructional and genre-based terminology was still being formed. Apart from the quaint clumsiness of such early terms as the "platform-and-ladders" game, there seemed to be much more of an emphasis on the themes, tasks and characters, in some cases evoking scenes of such unparalleled adventure that a young reader would be hard pressed to discern a game's genre were it not for the accompanying screenshots, and would probably be greatly disappointed when he actually got to play the game. This shows that the development of constructional and genre terminology has been valuable, not least in giving players a shorthand way of knowing what to expect from a game. But it also demonstrates that a gamer lacking the concepts with which to enclose his experience will respond to a game with a much greater portion of his imagination.

The underlying fantasies that a player has about a game may be of a general theme, such as the desire to win a race, be a soldier or rescue a princess, or they may be more complex and specific. Gamers may desire to experience a particular interplay between certain types of character, such as between a man and his evil relative, as with Zidane and Kuja in Final Fantasy IX. They may want to explore the interplay between two opposing concepts, such as the fight between democracy and tyranny in a strategy game, or the balance of good and evil in Black and White. Commonly, they will want to experience a particular character in a particular situation, such as the popular theme of the lone warrior in a post-apocalyptic world. Some gamers will often think primarily in terms of theme, choosing games that reflect a particular imaginative concern irrespective of genre.

Younger gamers often see game characters and situations as imaginatively real, and see far more in a game object than the older, jaded eye. For example, one of the older Zelda games has an enemy which splits itself up into blocks, which fly around the screen and reform. The experienced player knows that it is a collection of blocky sprites and in playing will regard the situation as a matter of timing his attacks, avoiding the blocks and finding a safe position. In other words he will see the situation as a system, paying only a little attention to the enemy as a character. But one young gamer described this enemy to me, in excited terms as a sand monster that turned itself into a sandstorm to attack the player. It seemed that he focused more on the monster as a character, seeing it as a being to be contended with rather than as a system to be negotiated.

In older gamers too we can see the primacy of an underlying fantasy. More than one gamer has admitted to me that he plays Civilization because he likes the idea of ruling a nation, waging war and taking over the world. One gamer of my acquaintance told me how he enjoys playing Civilization in a certain way, to create a situation where there are two main world powers in the game, himself and an opponent, both with advanced levels of technology. He would then plan a massive campaign against his enemy, creating an all-or-nothing war to end all wars. So in many games, a fantasy might arise when their playing pieces become arranged in a certain way, creating a situation or process of interest to the gamer.

It seems that one of the reasons why developers often rehash the same old game ideas is not because they can't think of anything better, but because they want to create an ever more perfect representation of a particular fantasy or experience.

Games are deeply linked with other forms of imaginative play, with game characters and themes influencing play away from the computer. We can see this in the number of websites devoted to popular game characters such as Sephiroth from Final Fantasy and the popularity of game related action figures, movies and comics, not to mention the cosplay phenomenon. This is evidence enough to convince us that games can evoke a strong emotional and imaginative response and be a great influence on the inner life of a player.

Not all gamers report these kinds of experiences. Some stick unreservedly to a constructional view of games, some ignore character and storyline and concentrate instead on the kinetic experience of playing or the cognitive manipulation of game objects and puzzles. Most gamers, it seems, sway between two different modes of playing, The first is an extroverted mode, where the players emphasis is focused more on the kinetic experience of playing and winning than on storyline or character, and on social gaming where the emphasis is more on the group doing the playing than the game itself. The second is the introverted mode of playing, where the game acts as a catalyst or facilitator for the gamer’s own feelings or imagination. Here the player imagines himself into the game. It is important to point out that these are just rough working categories, and describe modes of playing, not types of player. An individual might move from one mode to another depending on the game and situation.

Another reason why some people might not report or acknowledge these experiences is because of our society. We live in a society which is profoundly extroverted, where inner experiences are often regarded as pathological aberrations, or waved away as being "only psychological". In schools, introversion is regarded as a problem to be fixed rather than a natural tendency; no teacher has ever suggested that a boisterous, extroverted child should spend more time in quiet reflection, except perhaps as a punishment.

This kind of prejudice, as well as reflecting a simple lack of empathic understanding, has its roots in a wider social trend. It is fashionable in our culture to cultivate emotional distance and cynical detachment, to not let slip that we are moved, certainly not by an ephemeral, commercial medium such as the video game. Another factor is our attitude towards fantasy itself. The epic and magical worlds adored by western gamefreaks and eastern otaku are often derided as vessels of mere escapism. It is no wonder that these experiences remain in the shadows of both the mainstream games industry and of society as a whole.

Whatever the prejudices of our society, it is clear from this evidence that underneath the surface there is a complex imaginative relationship between a player and a game, a relationship that underlies the literal and technical aspects of a game and merges with the players world and inner life. That these experiences inform the work of many developers is not disputed, but the fact remains that they do not yet form a part of mainstream discussion, nor have they been integrated into the common language of games design; an integration that may transform the entire field.

So how do we integrate these experiences? Without a full psychological investigation we can only speculate on the nature of these experiences and how they relate to games, and given the status of video games in the mainstream eye, such an investigation is unlikely. But we can go some way in understanding these experiences by relating them to ideas already existing in psychology.

Approaching the Imagination


When I began to study this area I had initially hoped to find straightforward psychological theories that I could apply to my thinking in video games. Instead I found an unbridgeable chasm dividing one ideology from another, a division running deep within psychology with imagination and subjective experience at its heart. On one side of this divide lie the schools of cognitive, behaviourist and biological psychology, their theories and research being limited to the aspects of the mind that can be verified objectively using scientific methods. On the other side lie the psychodynamic and humanist psychologies, concerned mainly with personal subjective experience and basing their work on the philosophy of phenomenology, which states that in any investigation we must start with our subjective experience, it being the only viewpoint open to us with any certainty.

The problem is that while the objective (or "third person") viewpoint has been extremely successful in providing models of behaviour and in describing explicit concepts such as learning and memory, it has had less success in the first-person realms of experience, consciousness and identity. As such, its proponents either limit their work to the non-subjective or take the extreme view that consciousness and subjective experience are secondary phenomena and do not represent an accurate context from which to view reality.

The phenomenological, first person viewpoint has a similar problem. Although it has been successful as a framework for a large number of psychotherapies and as an essential component in literary and cultural analysis, it has had difficulty finding an objective, scientific base in the theories offered by the third person perspective.

As psychologist William Glassman puts it (after D.N Robinson) "...it seems we are forced to choose between a psychology which is not scientific, and a science which is not psychology!" (Glassman, 2000). In approaching the imagination we are forced to choose the former, at least until we have a theory that successfully unites the first and third person approaches, since the experiences described earlier, and indeed the whole idea of game playing lie within the context of first person experience.

Having decided on which side of the border we are on, we now have the second problem of finding a set of concepts to interpret these experiences. The first person realm is a vast sea of interconnecting and conflicting approaches, from depth psychology to cultural studies and post-structuralism. All of these perspectives seem equally valid and no single viewpoint can encompass the entirety of first person experience. This means that anything we say about first person experience will be an interpretation, not an explanation; one viewpoint amongst many others.

One of the most interesting and useful viewpoints that we can use to explore video games and the experiences they evoke is that of Jungian depth psychology. Although it is controversial in academic circles, Jungian psychology has been a great influence on the humanities and on many artists, writers and film-makers. Its concepts seem to fit video games like a glove, offering us a set of ideas that we can use to explore the complex relationship between a player and a game, and indeed between a designer and a game. Let’s start off by exploring the psychology of play and fantasy, subjects that underlie every aspect of game playing.

Fantasy, Play and Projection


Play has long been recognised as a fundamental part of human, even animal nature. Psychologists and educationalists see play as being a natural form of learning. Through play, nature trains the biological and psychological functions necessary for life, from hunting and physical survival, to social co-operation and cultural participation. On a cognitive level, play encourages the development of our concepts about the world. By toying with objects and ideas through playful experimentation we develop an understanding of the physical world and our place within it.

But there is more to play than just encouraging adaptation to our surroundings or the development of rational skills. The great theorist of play Johann Huizinger believed that it was the basis of all forms of ritual and represented the foundational impulse behind many forms of art and drama. He also maintained that far from being a wasteful exercise or the antithesis of work, play was essential to the well-being of society (Poole, 2000; Rheingold, 1991).

Although the educational and social aspects of play are widely known and accepted, introverted play, fantasy and pure make-believe are less well regarded. This may be due to the extroverted bias of our culture or to Freud's popular notion that fantasy represents a regressive means of escaping from reality. But according to Jungian psychology, fantasy is just as important as any other kind of thinking and in fact, is essential to healthy psychological growth. Just as extroverted play orientates the individual to the outside world and helps him comprehend it, introverted play or fantasy, according to Jung, orientates the individual to his inner world. In the stories, figures and landscapes of fantasy, an individual plays with different elements of his own personality rendered in symbolic form (Stevens, 1999).

This is not to say that extroverted and introverted play are mutually exclusive. I'm sure many readers will remember playing with toys or other objects and investing them with a meaning quite unrelated to their actual function. By projecting his imagination (often unconsciously) onto an object, an individual gives it a new and personal meaning. This allows him to concretise his inner fantasy play by representing it with symbolic objects. Thus a stick becomes a gun, a teddy bear becomes a comforting friend and a collection of blocky sprites becomes a menacing foe. Projection is used in this way by play therapists, who know that a child, who may not be able to verbalise or consciously understand her feelings, will often enact personal issues through toys, with inner processes, conflicts and goals mirrored symbolically in the stories and themes of play.

The Game as Imagination Space


I think that the concept of projection goes some way in describing how a person becomes immersed in a video game. Through identifying consciously or subconsciously with the different characters, narratives and processes in a game, the player is able to explore personal issues, goals and ideals, as well as participate in those transmitted to her by her culture. This doesn't just mean that a player will identify solely with a game's controllable characters, it means that the game as a whole will act as a kind of "imagination space" with enemies, themes, landscapes, items and processes all reflecting a particular imaginative concern. The interplay of two opposing characters or political groups for example, may symbolise an inner conflict. A satisfying union, such as the moment in an RPG when a particularly enigmatic or dangerous character joins the player's party may symbolise the resolution of an inner conflict represented by the characters differing natures. Of course, seeing everything in a game as a projection of the imagination is a best case scenario. Since most games have fixed processes and plotlines, they won't all relate to the concerns of every player. But as games increase in complexity and freedom, they will be able to accommodate many different playing styles and personal goals, mirroring the inner dynamics of the players personality. This idea of a game as an imagination space may sound unusual but it has an interesting historical parallel in the form of ancient Greek theatre.

When a citizen of ancient Greece went to the theatre, he didn't go to be mildly amused or to view the kind of lightweight nonsense that passes for entertainment today. He went there to experience catharsis, a release of deep feeling that to the Greeks was related to the purification of the senses and the soul. The key to catharsis was mimesis, a combination of the suspension of disbelief, the ability to empathise with the characters on-stage and the ability to internalise the drama as it was performed, In other words, to relate to the drama on a personal, imaginative level (Rheingold, 1991). To the Greeks, catharsis was a healthy way of dealing with the great themes of life and death, and it's not for nothing that the term is retained by psychology today, to describe the release of emotion related to the resolution of an internal difficulty. Such catharsis may also occur within our digital imagination space, when an event occurs of particular resonance to the gamer, such as the union of two formerly opposing characters or the surmounting of a difficult obstacle, though often at differing levels of intensity.

Another parallel is found in the work of the novelist and Nobel laureate Hermann Hesse. In his novel Steppenwolf, Hesse explores the possibility of literature representing "...the ego as a manifold entity." He also advises the reader, "not to regard the characters of such a creation as separate beings, but as the various facets and aspects of a higher unity" (Hesse, 1927).

But what are the various facets and aspects of the psyche that we project onto a game? Can we say anything general about them that we could use in game design or are they utterly unique in every person? And how do the inner concerns of an individual relate to and identify with the epic and often otherworldly themes found in games and fantasy? To answer these questions we need to turn to Jung's map of the imagination.

The Archetypes and the Collective Unconscious


Many readers will be familiar with the notion of the unconscious or subconscious mind, that aspect of the psyche that contains all that consciousness is unaware of. This includes such things as memories, forgotten experiences, subliminal perceptions and habitual tendencies such as the ability to drive a car without thinking about it. Most popular formulations of the unconscious regard it as a tabula rasa, or a blank slate upon which a person's experiences are written as he or she goes through life. This view leads many to the conclusion that all minds are utterly different, or that the personality is entirely constructed by society and circumstance. As well as failing to take biology into account, with the fact that all brains share the same basic mechanisms, this idea failed to impress Carl Jung, who for nine years had conducted a study of the delusions and hallucinations experienced by sufferers of schizophrenia.

Jung noticed, when studying the dreams, fantasies and delusions of his patients, that many of them contained images and ideas that could not be related to a patient's life history. They could, of course, be explained away as meaningless mental irregularities, but he also noticed that these images and ideas were very similar to ones found in mythical and religious symbolism from all over the world. As psychiatrist Anthony Stevens explains, "Jung gathered a wealth of evidence which persuaded him that this universal symbolism was due less to individual experience or cultural dissemination than to the structure of the human brain and to a fundamental component of the unconscious psyche which was shared by all humankind" (Stevens, 1999). Jung called this fundamental component the collective unconscious.

Within the collective unconscious, Jung posited the existence of archetypes. These are fundamental psychological patterns that relate to the universal symbols described above. As Jung explains, "The concept of the archetype... is derived from the repeated observation that, for instance, the myths and fairy tales of world literature contain motifs which crop up everywhere. We meet these same motifs in the fantasies, dreams, deliria and delusions of individuals living today...These typical images and associations are what I call archetypal ideas" (Storr, 1998). Although Jung's archetypal hypothesis is controversial, some thinkers believe that it might represent a first-person view of such third-person concepts as the cognitive schemata of cognitive science and the evolved psychological mechanisms of evolutionary psychology; although it is not yet clear how much of an archetypal pattern is inherited and how much is culturally transmitted (Glassman, 2000; Stevens, 1998).

Typical archetypal ideas that often appear in myths, dreams and fantasies include: the hero, the devouring monster, the wise old man or woman, the father, the mother, the "dream woman" the "dream man", helpful animals and the dangerous enemy. There are also archetypal processes such as the heroic quest, the descent into the underworld, the slaying of a beast, sexual union, the rising and setting of the sun, birth and death. These archetypal ideas symbolise the universal components and processes of the psyche and can often evoke a strong emotional impact.

This is not to say that an archetype is a mythical image or being. Mythical images, along with those found in dreams and fantasies, are representations or symbols of the archetypes. Archetypes themselves are innate psychological patterns with no content of their own, that take on the appearance of real life images that relate to them in some way. For example, one person may have heroic fantasies of being a cyberpunk hacker, bringing down the systems of evil corporations, and another may have fantasies of scoring the winning goal in the World Cup. Although the content of these fantasies are different, the basic form of their fantasies and the emotions associated with them are the same. Both examples depict the heroic triumph of a special individual, a universal theme of great antiquity, and both have similar related emotions; the feelings of mastery, personal strength, self-confidence and victory. In both individuals the hero archetype is at work, but it is expressed in different ways depending on their respective personalities and backgrounds.

Here's an example of great relevance to video games. Imagine a timid young boy, fearful of risk and somewhat over-dependant on his parents. One day he sees a cartoon depicting heroic adventures. The boy feels a great emotional resonance when watching the show, watches it every week and starts playing imaginary games based upon it, seeing himself as his television hero or sharing the same adventures. He might imaginatively summon his favourite characters to himself when he encounters difficult situations or before sleep, when he is alone in the darkness of night. Gradually, and with parental support and understanding the boy becomes more confident and independent.

This TV show has activated the boy's hero archetype. This archetype often comes to the fore in dreams and fantasies whenever courage and strong self-identity are needed. The heroic games of children are expressions of this archetypal pattern that will arise quite naturally as part of their development, through conquering the dragons of dependence and fear, a child becomes less emotionally reliant on his parents and begins to build a stronger sense of identity. In this example, although the child may have had vague feelings of unease surrounding his initial situation, and may have had dreams containing heroic imagery, the TV show gave him concrete images that he could relate to and emulate. Through their similarity to the inner archetype, the images of the TV show become emotionally resonant symbols of it and make the unconscious qualities of self identity and courage known to the conscious mind. Through fantasy and play the child will eventually integrate the aspects of the hero archetype represented by the TV show into his conscious personality. The hero and the heroic quest are found almost universally in video games, and contrary to popular belief, are not limited to childhood concerns. I will explore these archetypes and their relevance to video games in more detail later.

The four most important archetypes essential to any understanding of Jungian psychology are the shadow, anima, animus and self. These primary archetypes generally appear in most dreams and fantasies and in many video games, under various symbolic guises. In many individuals, the shadow is the first one to appear in dream and fantasy life and is a constant factor in the development of personality (Jung, 1964).

The Shadow


The shadow often (but not always) appears in dreams and fantasies as a threatening enemy representing the aspects of the unconscious mind that are unknown or repressed because of the attitude of the conscious mind towards them. In other words, the shadow is our "dark side" and will taint other archetypes depending on our relationship with them. An example given by the psychotherapist Marie Louise Von Franz is of the straight-laced business man who dreams of threatening anarchists or bohemians storming into his office and causing a scene. Her interpretation of this dream would be that the bohemians symbolise an unconscious creative talent, or attitude towards life that could be useful to the dreamer but remains outside the conscious personality because of his attitude towards it. This doesn't mean that the dreamer should drop everything and become a bohemian, it means that he should try and integrate a little more creativity and spontaneity (or whatever he associates with bohemians) into his life, qualities that for whatever reason his conscious personality finds threatening. (Von Franz, 1964)

The shadow is often projected onto others. Perhaps our business man may be moved to rage whenever he encounters free-spirited creative individuals and will associate them with all kinds of evils. If he understands his dream and acts upon it, he may later dream of less threatening or even friendly bohemians, and will probably develop a more tolerant understanding of their real life counterparts.

A person who sees himself as a free-spirited bohemian however, may dream or fantasise about having conflicts with threatening straight laced business men, reflecting qualities that he consciously finds unpleasant, but may be useful to him, such as the ability to organise and think rationally. Working with the shadow is a real moral responsibility as it forces us to confront what we do not accept in ourselves and often project onto others, sustaining such problems as racism and homophobia. To deal with the shadow is to deal with the ancient problem of good and evil on a personal level.

Jung's shadow is pretty much the same as the notion of the Other, which is found in cultural studies and describes the way one culture represents those different from it. As the writer and academic Ziauddin Sardar describes it, "The most common representation of the Other is as the darker side, the binary opposite of oneself: we are civilised, they are barbaric; the colonialists are hard-working, the natives are lazy..." (Sardar and Van Loon, 1999). Of all Jung’s concepts, the shadow has probably been the most influential outside psychology.

Although the shadow often appears threatening, it may also represent qualities that the dreamer finds positive, but does not attribute to himself. A person might dream of a friend or compelling stranger of the same sex who displays qualities that the dreamer finds admirable, but is afraid of integrating into conscious life.

People might try to integrate the entire shadow or fight it off at every turn, but this is impossible. The basic facts of individual existence, that a person is one thing and not another, that a person says yes to some things and no to others, implies the basic opposition of ego and shadow, me and you, good and evil. The task of the individual is to develop an understanding of their shadow and what it tells them about themselves, to integrate what they can and negotiate with what they cannot.

The shadow appears almost universally in video games, as every enemy and every threatening character or idea. A gamer might choose games that depict the destruction of a certain order of enemy, reflecting his own relationship with his shadow. A designer may also create enemies and processes that reflect his own inner concerns.

The Anima and Animus


As we saw earlier, the anima and animus are the contrasexual archetypes within men and women respectively. Just as there is a biological imperative behind sexual attraction, Jung maintained that there was also a related psychological imperative. Jung said of man and the anima, "...the whole nature of man presupposes woman, both physically and spiritually. His system is tuned to woman from the start" (Stevens, 1999). And woman is tuned to man in much the same way. But the roles of the anima and animus go beyond blind sexual instinct as it is popularly perceived. The meaning of man to woman, and of woman to man relate closely to every aspect of the psyche and to every stage of its development.

According to Jungian psychology, the anima and animus, when they appear in dreams and fantasies, are personifications of the relationship of an individual with his or her unconscious. In other words, a man will experience his unconscious as feminine, and a woman will experience hers as masculine. The anima often appears as a witch or as a magical woman with knowledge of deep and unfathomable realms, i.e. the unconscious mind, or as a guide such as Beatrice in Dante's Divine Comedy (Jung, 1964). The anima also appears as a lover or companion, reflecting in dreams a successful relationship with the unconscious. She may sometimes appear as a princess to be rescued, as in many fairy tales and games. Guarded by a beast symbolising some attitude of the psyche that prevents a good relationship with the anima or with women, she must be saved by a hero strong enough to stand up to such a creature and not be devoured.

The anima also has a negative or shadow aspect. She may appear as a femme fatale, like the mythical sirens luring men to their doom with their magical songs, or as a dangerous witch, symbolising both a negative attitude towards the anima and the unconscious, and the danger of encountering the unconscious without strength and discrimination. The anima is also tied up with all the qualities and attitudes that a man regards as feminine and by working with the anima, he can integrate and understand such valuable qualities.

The animus, the male image within a woman, often appears as an attractive heroic figure, sometimes as a wise spiritual guide. Just as the anima relates to feminine qualities in a man, the animus relates to perceived masculine qualities within a woman, such as heroic courage and rationality. By working with the animus, a woman can integrate these positive qualities into her personality. The animus also has a negative aspect and can appear as a rogue or criminal. Sometimes he appears as a beast, reflecting a wild, untamed and unintegrated animus, or a negative attitude towards masculinity and her relation to it. A woman dreaming of such a beast may be fearful at first, but as she works with the animus, he will be transformed into more attractive human forms. The story of Beauty and the Beast is a reflection of this process (Jung, 1964).

As I described earlier, the anima and animus can be projected on to real men and women, sometimes causing all kinds of dangerous obsessions and misunderstandings. By subconsciously tying up their anima or animus with a person of the opposite sex, an individual effectively identifies them with his own unconscious and requires their presence and their compliance to engage with it. This is not to say that anima and animus projection is entirely negative, it can be a tool of personal growth when recognised, and when the real man or woman behind the projection is accepted and understood.

The anima often appears in games as a woman to be rescued by the player, sometimes as a companion. One of the most interesting depictions of the anima is in Ico, designed by Fumito Ueda. In Ico, the player must lead Yorda, his ghostly anima-companion, out of a dangerous castle, whilst fighting enemies, solving puzzles and trying to uncover the secret of her identity. Although the emotional range that the relationship evokes is limited, due to the simple ways that the characters can interact with each other and the world, the way the game revolves around the interaction between the hero and a mysterious, almost autonomous other, is inspired. I would however, contrast Yorda with other anima depictions such as Dante's Beatrice, and Rider-Haggard's She, since she is much less active, and demands little from the player other than his protection.

There are few games depicting the relationship between a woman and her animus. But some games, such as the Final Fantasy series, do a good job by giving the player a large number of male and female characters to control. To a male player a female character can symbolise his anima, such as Rinoa from FFVIII; Squall could symbolise the animus of a female player. Squaresoft make this work by depicting their relationship from both perspectives. Gamers might choose games with themes that reflect their own relationship with their anima or animus, and designers might create characters and stories that reflect theirs.

The Self


Jung referred to the self as the "archetype of archetypes" (Stevens, 1999). It represents the totality of the psyche, both consciousness and unconsciousness, and all that they contain. To Jungian psychology, the self is the innermost nucleus of the psyche. It is often symbolised in dreams, fantasies and mythology as a circle, mandala or square; as a quaternity, such as the "four corners of the universe" the four directions or a circle divided into four. It may appear personified as a wise old man to a male dreamer, as a wise old woman to a female, or perhaps as a great king or queen. Sometimes it appears as a divine or magical child. Generally in myths, the self is symbolised by the "cosmic man" or woman, representing the totality of the individual. In games it is sometimes represented by the most powerful principle in the game's world. In RPG's it may be symbolised by the four elements, a magical jewel in the centre of the world or the tree of life. In other games it may be represented by such things as the space-time continuum, the fundamental genetic code, a nation state or by anything that symbolises the greatest power in a game.

The self is also symbolised by the helpful animals that often turn up in fairy tales to advise and assist the hero. Many of these animals appear in games, such as Link's owl companion in Zelda 64, or the moogles in the Final Fantasy games. The horse in Shadow of the Colossus also seems to operate as such a symbol.  These creatures, unpredictable, often indestructible, but somehow vulnerable, possess a natural wisdom that defies any enemy and lifts them from the mundane world. They are often represented as servants of a great power, depicting the early appearance of the self as it guides the struggling hero towards his destiny.

The self is also an archetype of healing and unity, and will often arise in the dreams and fantasies of people struggling with inner conflicts. The drawings of children who are in the midst of divorce or family difficulties often contain circular motifs, symbolising the attempt of the self to bring some unity and healing to a child's fragmenting inner world (Stevens, 1999). This healing and unifying aspect of the self can turn up in games, with the almost universal representation of force fields and energy shields as circular or spherical zones of light.

But the self also has a shadow side; as the most powerful force in the Jungian psyche, the shadow of the self is often symbolised by an ultimate evil. Taken together these two aspects reflect the great polarities of consciousness and unconsciousness, light and darkness.

These four archetypes are the main forces within the unconscious and are often projected onto objects in the outside world, including games. As one can see from the examples given, many games already contain symbols of these archetypes, either through social convention and repetition or through the imagination of the designer, who might spontaneously produce such symbols in a fantasy. But developers cannot simply stick an archetypal image in a game and leave it at that. We need to understand how the archetypes relate to the individual and to his psychological development, and why he has one fantasy rather than another.

The Archetypes and the Individual


The archetypes and the collective unconscious are, in Jungian terms, the lowest level of the unconscious psyche, their patterns shaping the layers above. But as we have seen, the archetypes appear in dreams and fantasies as images from personal life. We have also seen that archetypes appear as positive or negative images depending on our relationship to them. In other words, they are coloured by the experiences we have in life and by our conscious attitude towards them. In Jung's model of the psyche, our relationship with the archetypes that determine how they appear to us is shaped by the personal and cultural unconscious.

Above the collective unconscious lies the personal and cultural unconscious. The cultural unconscious contains all the unconscious assumptions given to an individual by the society he or she grows up in. Some writers do not refer to a cultural unconscious as, strictly speaking, all these experiences are mixed up with personal ones. However I will separate them as it allows an entry point for cultural studies which, as I will show, is an essential subject when using archetypal images in games. The personal unconscious is similar to the traditional view of the unconscious mind described at the start of this section. It contains all our memories, forgotten experiences, subliminal perceptions and habitual tendencies. It also contains our complexes.

The basic units of the personal unconscious that shape our relationship with the archetypes are the complexes. I'm sure many are familiar with the term complex, as it has entered popular use as a term describing all manner of psychological problems, but few are aware of what a complex actually is or how it arises. When an archetype is activated it gathers to itself ideas images and experiences associated with the situation or person that activated it. This bundle of experiences, emotions and ideas surrounding an archetype is a complex. A good example, given by psychiatrist Anthony Stevens, is the activation of the mother archetype in a child. According to Jungian psychology, every child is born with an innate expectancy of a mother figure, the archetype of the mother. This archetype becomes active when the child experiences a woman whose behaviour is similar to the child's innate expectation of a mother. Sometimes this woman may be the birth mother, sometimes it may be a foster parent, aunt or older sister. The emotions and experiences associated with this mother figure form a complex, surrounding the archetype's emotional core (Stevens, 1999).

The forming of complexes is completely normal, but they often cause suffering. An example of this is given by Anthony Stevens. Stevens described a woman whose childhood had been dominated by a brutal, tyrannical father. This woman's father archetype was activated only partially and only the law-giving, authoritarian aspects of the father archetype were built into her father complex, with the loving and protecting aspects of the paternal archetype remaining unconscious. Stevens continued to describe how this woman kept being drawn to bullying men, but at the same time she had an unfulfilled longing for a man who would give her love and protection. According to Stevens, this woman's dreams fantasies and behaviour showed that she longed for someone to activate and fulfil the unconscious aspects of her father archetype (Stevens, 1999). As well as demonstrating the harm done by bad parenting, this example also shows that archetypes are complete, that they contain every aspect of fatherhood, motherhood, herohood and selfhood, and that once activated, they seek completion and conscious realisation. The archetypes in their total form are often symbolised in world mythology as figures such as Mother Earth or Gaia; as ultimate father figures such as Zeus, and as ultimate heroes such as Odysseus.

Our relation to the archetypes and the content of our complexes is also shaped by the culture we grow up in and the unconscious assumptions that we pick up as a member of society. An example is a society that promotes and encourages the view that a hero never shows his feelings. These emotions and images bound up with a particular society's view of what makes a hero represent a kind of cultural complex, since it is held by a large number of people, and will be transmitted to members of that society whose own complexes are formed by such images. These cultural complexes are often projected onto others and often affect the way a society functions. They can be harmful, as sociologists and cultural critics have shown, but such complexes cannot be argued with, reasoned with or overthrown by revolution; like personal complexes, which in fact they are, they require healing and transformation.

The gradual process of working through complexes and integrating unconscious material into the conscious personality is what Jung calls the individuation process. Unlike some theories of development that focus on social adaptation alone, the process of individuation describes a lifelong and personal process of increasing self awareness, maturity and self realisation. Individuation is a natural process of the psyche, occurring in the background of one's life, but it can be arrested by traumatic experiences, harmful complexes or ones attitude towards the unconscious. Individuation begins with the awakening of self consciousness and self identity in a child, and continues through the whole of life with the gradual integration and conscious understanding of the unconscious material that appears to an individual in their dreams fantasies and projections. The culmination of individuation is a successful relationship with the self, the archetype of wholeness that represents the totality of the individual psyche.

Complexes, such as a woman's struggle against a tyrannical father figure and her search for his loving counterpart form the characters, themes and set-pieces of the inner dramas that are enacted in dreams and fantasies and projected on to the outside world. Therefore, it is reasonable to assume that the emotional resonance that a player associates with certain video game characters and themes derives from a projection of the player’s current psychological situation.

The fact that games are interactive allows a player to go beyond the passive projection of theatre and literature, and to consciously take part in their fantasy. Thus the woman described earlier might be particularly drawn to a game that depicted a tyrant as an enemy and the rescue or discovery of a loving male figure as a goal. Whether such a game could help her therapeutically is debatable, but by seeing her inner concern and the path to its resolution within a game, and by being forced by its interactivity to make decisions regarding her inner situation, the woman is given a concrete set of ideas and images that might help her in some way. At the very least, this game and its challenges will be very relevant and involving to this particular woman.

By seeing images that reflect unconscious archetypal potential, a gamer may in some cases be assisted in his personal development. The emotional resonance experienced when unconscious archetypal potential is projected onto an image may account for the popularity of certain game characters and themes, and give a reason why some gamers like dressing up as their favourite character, or spend time drawing them or writing fan fiction. A gamer’s favourite character is a symbol or a reflection of dormant archetypal potential. By playing the game, drawing pictures etc. the gamer is trying to integrate the aspects of the archetype represented by the character into his or her conscious personality.

The process of resolving inner conflicts and integrating unconscious material may sound like very unusual subjects for a game, but this process is reflected in many games already, because it is symbolised in myths and fairy tales as the heroic quest.

The Game as Quest


One of the most important archetypal processes is the heroic quest, which not only forms the structure of countless myths and fairy tales from across the globe, but also appears in the structures, processes and plots of many video games.

From Crowther and Wood's Advent, through Zelda and Final Fantasy, to Tomb Raider, Pokemon and beyond, the heroic quest has been at the core of video games. It appears both explicitly, as in most of the RPG genre, and in a lighter, thematic sense as in Command and Conquer, or in any game that depicts an individual or a group under a common banner, a challenge and a goal. Its continuing popularity amongst developers and gamers suggests that this theme goes beyond the mere cliché.

Why is it such a common theme? The writer Steven Poole suggests that the action-based nature of the heroic quest lends itself to video games which are not yet equipped to handle the nuance of other themes (Poole, 2000). This may be true, but it only tells part of the story. As a choice of theme the heroic quest goes beyond the utilitarian. For example, there is the interesting observation that a great number of beginning game designers attempt an RPG, the most common representation of the quest, as their first effort, or at least express the desire to work towards creating one in the future. For many designers the perfectly realised heroic quest represents the summit of their efforts. It seems reasonable to suppose that there is a whole class of "questing" designers, as opposed to those who might see their work chiefly in terms of logical puzzles or literary and cinematic storytelling, etc.

One of main reasons why the heroic quest is such a popular theme for both gamers and developers is that it is an archetypal theme, a universal human symbol. To Jungian psychology the heroic quest is a symbolic reflection of an important part of the inner journey of psychological growth and development. According to Jungian psychology, the motif of the hero arises in dreams and fantasies whenever strong self identity and consciousness are needed (Jung, 1964). The hero is the person who can encounter the forces of the unconscious mind with its dark labyrinths and devouring beasts without being lost or devoured, without being overwhelmed by the unconscious and losing his individual identity. This archetype is especially important in the psychological development of children and young people who are faced with the task of separating psychologically from their parents and developing a strong sense of identity. But it isn't exclusive to childhood alone; it can appear in dreams and fantasies whenever strength is needed to encounter the forces of unconsciousness and return safely with its treasures.

The Structure of the Heroic Quest


According to the scholar Joseph Campbell, who studied the heroic quest from a moderately Jungian perspective in his book The Hero with a Thousand Faces, the heroic quest is an amplification of the initiation rituals found in many cultures across the globe. These rituals generally have three stages, departure, initiation and return. In the first stage, the person undergoing the initiation either leaves or is taken from his familiar surroundings. In the second stage, the person undergoes an initiation ritual which has the effect of significantly changing his view of the world. In the third stage, the individual who has been initiated returns home, transformed. Some cultures, for example initiate boys into manhood by taking them away from the childhood world of their families and subjecting them to painful or strenuous rituals that have the effect of breaking the psychological tie with the old world and preparing them for their new roles as men (Campbell, 1949).

From the Jungian perspective, this cycle of departure, initiation and return reflects the inner process of encountering the unconscious mind, integrating previously unknown psychological contents, and making them a part of the conscious personality. This process mirrors the initiation ritual in that it involves a departure from one's old sense of self (childhood for example, or a set of views that no longer serve a person), a sometimes strenuous encounter with the contents of the unconscious in the form of inner turmoil, dreams, fantasies and projections, resulting in their integration into the conscious personality, which "returns" as it were, transformed, with a new sense of self (Jung, 1964).

This process is symbolised by the heroic quest, which Campbell summarised as, "A hero ventures forth from the world of common day into a region of supernatural wonder: fabulous forces are there encountered and a decisive victory is won: the hero comes back from this mysterious adventure with the power to bestow boons on his fellow man"(Campbell, 1949). So, heroic tales act as imagination spaces, with the hero representing the ego of the individual (or in many cases, the strength of ego required by an individual undergoing such a journey), the different places he visits and the beings he encounters representing different aspects of his unconscious mind, and the narrative itself representing the ways in which the ego deals with these unconscious contents. The boon of the returning hero is a symbol of the inner treasure that has been wrested from unconsciousness and successfully integrated into the conscious personality.

Some myths and fairy tales symbolise a single cycle, that is, they deal with only a few "inner issues". Others are comprised of many such cycles, often nested within each other, dealing with different aspects of the psyche within a single epic journey, a journey that taken as a whole represents the entire process of individuation. These cycles are not necessarily in a linear order, in most stories and games they overlap and interrelate in complex ways. Let’s look at each stage of the cycle in turn and explore a few of the many motifs associated with them. Readers wanting to explore more mythical motifs are referred to the books in the bibliography; particularly Jung's Man and His Symbols, Campbell's The Hero With a Thousand Faces and Marie-Louise Von Franz's The Interpretation of Fairy Tales and Shadow and Evil in Fairy Tales.

Departure


Here begins the journey. The opening scene of the heroic quest and the introduction of the hero often occurs in relatively mundane surroundings, such as the hero's native town or family home. Sometimes, this place may be idyllic, sometimes, as in many modern stories such as The Matrix, the opening situation is less pleasant. It is an undifferentiated state, where the hero's identity has yet to emerge from the unconscious collectivity of the family home or society. Sometimes it symbolises a way of life gone stale, a state of being that no longer suits an individual. In Jungian terms, the opening scene of the quest is a symbol of an initial psychological situation. This could be a safe childhood home reflecting the world of a child before he separates psychologically from his parents, or a scene of a man dissatisfied with his life as it is, living below his potential in some anonymous metropolis. As an imagination space, the totality of the initial scene, its landscapes and characters, mirror a particular inner state.

But the normality of this scene is interrupted. A messenger arrives, in the form of a stranger, an animal or a fateful event that gives the hero-to-be a glimpse of another world. This is the hero's call to adventure. Perhaps the benevolent king falls ill and needs the cure of a magical herb; perhaps the hero catches a glimpse of a beautiful woman or a compelling stranger; an enemy may arise, threatening the home of the hero; or kidnapping him or his relatives or friends. The mythical world has many ways of luring people to their destiny.

This strange messenger or event in its negative form is a symbol of the shadow; in its positive form it may symbolise the anima, animus, or perhaps an early appearance of the self. It has appeared to lure the hero away from his initial, unsatisfying situation, to show him aspects of himself or of his life that he must deal with if he is to grow.

For me, Zelda, Ocarina of Time is the game that is most successful in creating this initial situation. The village in which the adventure starts is a warm, enclosed childhood paradise, the enjoyment of which is enhanced by the ominous high walls and dark exit tunnels surrounding it, giving the player a foreknowing of the dangers to come; an awareness of both the safety of home, and the shadowy world outside. This contrast between safety and fear is precisely the experience of the call to adventure.

Sometimes the messenger is ignored, the call refused. The hero becomes trapped in his fear of change, by his own misguided apprehensions. His world becomes a sterile wasteland. After glimpsing the world beyond, yet refusing it in favour of the safe, limiting village, he essentially refuses to grow. The hero becomes a victim to be saved. The story of sleeping beauty has this motif, with the young Briar Rose's refusal symbolised by her being put to sleep by a hag. This motif appears in Final Fantasy VII, when the hero Cloud falls into a paralysing despair, requiring the heroine Tifa to enter his dream world and rescue him.

The first encounter for those who have not refused the call is usually with a mentor, a kindly teacher or guide. The mentor is often depicted as a wise old man or woman, or sometimes as an animal, and supplies the hero with advice or magical items needed on the journey. Examples include Obi-Wan Kenobi, Luke's mentor in Star Wars; Professor Oak in Pokemon, and in Zelda, Ocarina of Time, a wise owl who appears at appropriate times to give direction and advice. These characters are early symbols of the self, the totality of the psyche, giving the hero the assurance that the strange realms about to be entered can be survived and understood.

After leaving home and meeting with a mentor, the hero faces the challenge of the threshold guardian, a being who protects the gateway between the known and the unknown. Every region has its tales of the bogeymen, ogres and monsters that lurk outside the city gate, the trolls under the bridge, the wild punishment for those who dare to venture beyond conventional boundaries, both cultural and personal. This threshold represents the point of no return, the boundary between the known and the unknown, the conscious and the unconscious. Sometimes the crossing of the threshold is symbolised by a hazardous journey or by the entrance to a cave or labyrinth.

Initiation


Having crossed the threshold, the hero enters a world of strange powers and difficult challenges, all reflecting the psychological concerns that led the hero from his home. Some tales may tell of only one challenge but most contain several, repeating the cycle again and again within this realm, reflecting the different psychological contents that must be integrated and understood in order to face a greater final challenge.

Three common trials or events that take place in the realm of initiation are the confrontation with an enemy, a meeting with, or rescue of a beloved person, and the theft or retrieval of a magical or important object. The battle with an enemy may symbolise the struggle with a harmful or inappropriate attitude, such as a child's overdependence on his parents. In this case the symbolic enemy must be battled with and slain so that the individual can progress. Sometimes the encounter with an enemy may symbolise the struggle with the shadow, with unconscious contents that one does not accept but could be integrated into the conscious personality like the businessman example given earlier. In this case, the enemy is confronted and battled, but is eventually redeemed.

Sometimes a beloved person is rescued. In many stories and games this person is a woman, symbolising the anima, the battle for her rescue symbolising the struggle to free her and her related qualities from the clutches of a negative attitude such as a harmful dependence on one's parents. The negative attitude can sometimes be symbolised by the beloved being in a frightening form as in Beauty and the Beast.

In many cases the object of the hero's struggle is a magical or important item. This item is a symbol of some important quality that has remained unconscious. Jung gave an example of a woman patient who dreamed of discovering a sword. When asked about this sword, the woman replied that it reminded her of a dagger belonging to her father. Her father was a wilful man with a powerful personality, possessed of qualities that the woman felt she lacked. By discovering this sword, she was beginning to uncover these qualities in herself (Hyde, 2000).

Return


After the struggle of initiation the hero returns triumphantly to his home, transformed by his experiences. Often, the hero is crowned king or given an important position. His victory may have revitalised the world, having vanquished the forces that threatened it. Just as the opening scene of the quest symbolises an initial psychological situation, the end scene represents the new healed or transformed inner situation; the new order in the hero's land symbolising the new order in the psyche.

Individuation and the Hidden Process


Although the heroic quest appears most explicitly in RPG and action games, the process that it symbolises, the individuation process, seems to exist at a low level in many other games. In my other chapter, The Yin and Yang of Games: Code and Content, I described a "hidden" process found in many games.

Interestingly the process it describes, of gradually coming to knowledge of game elements is very similar to the individuation process, of gradually integrating unconscious contents into the conscious mind. In other words, the individuation process is, or can be, represented in a game at a very low level; in abstract, systematic terms as well as in terms of plot or imagery. One could even say that representing this process is what games do best, and that rather than being simply a platform for storytelling or simulation, games are primarily platforms for psychological and imaginative expression.

Fantasy and Genre


From time immemorial developers have divided games into distinct genres, such as the platform game, the RPG and the first-person-shooter. Although these terms are useful as a shorthand way of talking about games, their repeated use has led them to be regarded as the primary elements of game design. As we discussed in the beginning, this has created a very restrictive situation where many designers find it hard to see anything outside this limiting typology. The lack of wider descriptive terms forces a designer to see everything in terms of RPG or first-person-shooter, and to regard any widening of this language or the creation of a new genre as the result of some intuitive leap of genius.

But the concept of the imagination space gives us a way of overcoming this situation, a way of transcending the limits of genre by placing it within a much wider framework of ideas. In this new formulation, the primary framework is the underlying fantasy, the inner world or imagination space that the developer wishes to express in code. The developer does this by exploring the fantasy and finding particular technical devices and structures that can express it. Such devices include display techniques such as the isometric map or first person view, different types of control techniques such as the point and click mechanism commonly used in the RTS, and other complex structures and relationships involving multiple game objects. From this perspective, the different elements and devices that make up a game are a kind of language that is used to express an imagination space.

Certain devices work well at expressing particular fantasies, so they get used again and again often unreflectively, eventually becoming fused with the ideas they attempt to express, creating the idea of distinct genres. It would be a worthwhile undertaking, I think, to analyse a large number of games and explore how these common devices work together to evoke a particular fantasy or experience. Such an analysis would yield a large number of different building blocks and relationships that could be used independently of any particular theme.

Many developers make the mistake of focusing on these secondary devices rather than on the fantasy that they want to express. Separating the two is often very difficult, as a game designer's fantasy may contain elements of these structures. The trick is to notice the feelings associated with them, to take the primary images, feelings and themes of a fantasy and find or create the best constructional techniques to express them.

On Violence


Violence is an unavoidable and inflammatory subject in video games. Since the earliest days of the industry there have been concerns about the violent nature of many games, concerns which unfortunately have never been satisfactorily allayed by the industry's major figures. There is a feeling in the industry that it is hard to design non-violent games, harder still to sell them to a predominantly young male audience. Admittedly, many of the arguments against violence in games stem from ignorance and from a misunderstanding of the gaming experience; but on the other hand, most of the arguments from the developer’s side have an evasive quality that does little to convince. The scientific research done on the subject has been inconclusive.

If the industry is to defeat the arguments levelled against it, it must face up to this issue. It must come to understand the range of reactions that a game can evoke and formulate a coherent way of depicting violence with psychological responsibility.

These are difficult issues, but the Jungian approach to games design can help us a great deal. Firstly, it tells us that games (and music for that matter) are not so much causes of behaviour (except perhaps in the very young) as they are catalysts, or mirrors for feelings that already exist, either consciously or unconsciously. A person may come to a game to validate a particular fantasy, but the game is unlikely to be a root cause.  Secondly, it tells us that simply forcing people to make non-violent games will not work. A gamer will have no interest in a game if it does not in some way reflect his or her psychological situation. A gamer with a propensity towards violent fantasy will be attracted to games that mirror those concerns.

So how can designers create violent games with psychological responsibility? The answer is by creating games that depict the integration of the shadow, by taking the gamer on a journey from opposition and anger, to integration and understanding. This can be done through the storyline or through the game mechanics. One RPG design I created attempted this by having two main characters, one good and one evil. At certain points the scene would change and the player would be in control of the evil character. The story would then continue from his point of view, and the player would be forced into comprehending and undertaking decisions that would have a detrimental effect on the main, good character and the world at large. The game would gradually lead these two characters together, transforming them both, and the player would be taken along with them. Although it is easier to depict the integration of the shadow with story based games, it can be done in almost any game with a little thought.

Conclusion


Throughout this article I have discussed fantasy, a subject derided by many as irrelevant escapism. I hope I have proved in some small way that fantasy is in fact, relevant escapism. It is through the images of imaginative fantasy that we escape and overcome our limitations. By their enchantment our fantasies lead us away from the mundane, unquestioned life. They point out directions, signal dangers, and have the power to enrich our lives if we can learn to watch and understand them.

Bibliography

Campbell, Joseph, The Hero With a Thousand Faces (1949; 1993, Fontana)
Dare, Richard, The Yin and Yang of Games: Code and Content (2001, Gamedev.net)
Glassman, William, Approaches to Psychology (2000, Open University Press)
Hesse, Hermann, Steppenwolf (1927; 1965 Penguin)
Hyde, Maggie, McGuinness, Michael, Introducing Jung (1999, Icon)
Jung, Carl Gustav, Jaffe, Anelia,  Memories Dreams, Reflections (1963; 1983, Flamingo)
Jung, Carl Gustav, Von Franz, Marie-Louise, Henderson, J.L., Jacobi, Jolande, Jaffe, Anelia
Man and His Symbols (1964; 1978 Picador)
Poole, Steven, Trigger Happy, The Inner Life of Video Games (2000, Fourth Estate)
Rheingold, Howard, Virtual Reality (1991, QPD)
Sardar, Ziauddin and Van Loon, Borin, Introducing Cultural Studies (1999, Totem)
Stevens, Anthony, On Jung (1999, Penguin)
Storr, Anthony (editor), The Essential Jung (1998, Fontana)
Von Franz, Marie-Louise, The Interpretation of Fairy Tales (1996, Shambhala)
-Shadow and Evil in Fairy Tales (1974, Spring)

Finite State Machines and Regular Expressions

$
0
0

Introduction


I want to present an important and interesting topic in computer science, the Finite State Machine (FSM). In this part we start with the basics, gaining an understanding of what FSMs are and what they can be used for. This part is very elementary, so please be patient. In subsequent parts things will become much more complicated and interesting.

Note:  
This article combines a series of 6 works originally published to GameDev.net throughout 2004 entitled "Algorithmic Forays". It was collected together and revised by the original author in 2008 and published in the book Advanced Game Programming: A GameDev.net Collection, which is one of 4 books collecting both popular GameDev.net articles and new original content in print format.


Finite State Machines - What are they?


A finite state machine is a conceptual model that can used to describe how many things work. Think about a light bulb for instance. The circuit consists of a switch that can be ON or OFF, a few wires and the bulb itself. At any moment in time the bulb is in some state - it is either turned on (emits light) or turned off (no visible effect). For a more focused discussion, let's assume that we have two buttons - one for "turn on" and one for "turn off".

How would you describe the light bulb circuit? You'd probably put it like this: When it's dark and I press ON, the bulb starts emitting light. Then if I press ON again, nothing changes. If I press OFF the bulb is turned off. Then if I press OFF again, nothing changes.

This description is very simple and intuitive, but in fact it describes a state machine!

Think of it the following way: we have a machine (the bulb) with two states, ON and OFF. We have two inputs, an ON switch and an OFF switch. If we are in state ON, pressing ON changes nothing, but pressing OFF moves the machine to state OFF. If we are in state OFF, pressing OFF changes nothing, but pressing ON moves the machine to state ON.

The above is a rephrasing of the first description, just a little more formal. It is, in fact, a formal description of a state machine. Another customary way to describe state machines is with a diagram (people like diagrams and drawings more than words for some insights):


Attached Image: AdvGameProg_FSMandRDP_Bendersky_1.jpg


Textual descriptions can become quite wordy, and a simple diagram like this can contain a lot of information. Note how states are represented by circles, and transitions by arrows. This is almost all one needs to know, which makes diagrams very descriptive. This state machine can also be translated to (C++) code:

...
...
typedef enum {ON, OFF} bulb_state;
typedef enum {TURN_ON, TURN_OFF} switch_command;
...
...
bulb_state state;
switch_command command;
switch (state)
{
  case ON:
    if (command == TURN_ON)
    {
    }
    else if (command == TURN_OFF)
    {
      state = OFF;
    }
    break;
  case OFF:
    if (command == TURN_ON)
    {
      state = ON;
    }
    else if (command == TURN_OFF)
    {
    }
    break;
    default:
      assert(0);
}

If code such as this looks familiar, it's hardly surprising. Many of us write state machines in our code without even noticing. Most of the state machines we write are "implicit", in the sense that there isn't a single switch statement that handles the whole machine, but rather it's distributed throughout the whole program. If, additionally, the state variables don't have the word "state" in their name, guessing that a certain code is a state machine in disguise is even harder.

Many programs we write are state machines. Think about a chess game for a moment. If we write a program to play chess against human beings, it's actually a state machine in some sense. It waits for the human to move - an idle state. Once the human moves, it goes into active state of "thinking" about a move to make. A game can have an "end" state such as a victory for one side or a draw. If we think of a GUI for a chess game, the state machine is even more obvious. There is a basic state, when it's a human's move. If a human clicks on some piece, we go into the "clicked" state. In this state, a click on an empty tile may produce a move by the piece. Note that if we click on an empty tile in the "basic" state (no pieces selected), nothing happens. Can you see an obvious state machine here?

Finite?


In the beginning of this part, I said we were going to discuss FSMs. By now I hope you already know what a state machine is, but what has "finite" got to do with it?

Well, our computers are finite. There's only so much memory (even if it's quite large these days). Therefore, the applications are finite. Finite = Limited. For state machines it means that the amount of states is limited. 1 is limited, 2 is limited, but 107 is also limited, though quite large.

This point may seem banal to some of you, but it is important to emphasize. So now you know what a FSM is: a state machine with a finite number of states. It can be inferred that all state machines implemented in computer hardware and software must be FSMs.

Employing state machines for our needs


State machines can be also used explicitly. We can benefit a lot from knowingly incorporating state machines in our code. First and foremost, it's a great way to reason about difficult problems. If you see that your code or a part of it can actually be in several states, with inputs affecting these states and outputs resulting from them, you can reason about this code using a state machine. Draw a diagram; visualizing always helps. With a diagram errors can be spotted more easily. Think about all the inputs to your code - what should they change in every state? Does your code cover all possibilities (all inputs in all states)? Are some state transitions illegal?

Another use of state machines is for certain algorithms. In the next part you'll see how essential state machines are for a very common and important application: regular expressions.

Regular expressions (regexes)


Think of an identifier in C++ (such as this, temp_var2, assert etc.). How would you describe what qualifies for an identifier? Let's see if we remember... an identifier consists of letters, digits and the underscore character (_), and must start with a letter (it's possible to start with an underscore, but better not to, as these identifiers are reserved by the language).

A regular expression is a notation that allows us to define such things precisely:

letter (letter | digit | underscore) *

In regular expressions, the vertical bar | means "or", the parentheses are used to group sub expressions (just like in math) and the asterisk (*) means "zero or more instances of the previous". So the regular expression above defines the set of all C++ identifiers (a letter followed by zero or more letters, digits or underscores). Let's see some more examples:
  • abb*a - all words starting with a, ending with a, and having at least one b in-between. For example: "aba", "abba", "abbbba" are words that fit, but "aa" or "abab" are not.
  • 0|1|2|3|4|5|6|7|8|9 - all digits. For example: "1" is a digit, "fx" is not.
  • x(y|z)*(a|b|c) - all words starting with x, then zero or more y or z, and end with a, b or c. For example: "xa", "xya", "xzc", "xyzzzyzyyyzb".
  • xyz - only the word "xyz".
There is another symbol we'll use: eps (usually denoted with the Greek letter Epsilon) eps means "nothing". So, for example the regular expression for "either xy or xyz" is: xy(z|eps).

People familiar with regexes know that there are more complicated forms than * and |. However, anything can be built from *, | and eps. For instance, x? (zero or one instance of x) is a shorthand for (x|eps). x+ (one or more instances of x) is a shorthand for xx*. Note also the interesting fact that * can be represented with +, namely: x* is equivalent to (x+)|eps.

[Perl programmers and those familiar with Perl syntax (Python programmers, that would include you) will recognize eps as a more elegant alternative to the numerical notation {m, n} where both m and n are zero. In this notation, x* is equivalent to x{0,} (unbound upper limit), x+ is x{1,} and all other cases can be built from these two base cases. - Ed.]

Recognizing strings with regexes


Usually a regex is implemented to solve some recognition problem. For example, suppose your application asks a question and the user should answer Yes or No. The legal input, expressed as a regex is (yes)|(no). Pretty simple and not too exciting - but things can get much more interesting.

Suppose we want to recognize the following regex: (a|b)*abb, namely all words consisting of a's and b's and ending with abb. For example: "ababb", "aaabbbaaabbbabb". Say you'd like to write the code that accepts such words and rejects others. The following function does the job:

bool recognize(string str)
{
  string::size_type len = str.length();
  // can't be shorter than 3 chars
  if (len < 3)
    return false;
  // last 3 chars must be "abb"
  if (str.substr(len - 3, 3) != "abb")
    return false;
  // must contain no chars other than "a" and "b"
  if (str.find_first_not_of("ab") != string::npos)
    return false;
  return true;
}

It's pretty clean and robust - it will recognize (a|b)*abb and reject anything else. However, it is clear that the techniques employed in the code are very "personal" to the regex at hand.

If we slightly change the regex to (a|b)*abb(a|b)* for instance (all sequences of a's and b's that have abb somewhere in them), it would change the algorithm completely. (We'd then probably want to go over the string, a char at a time and record the appearance of abb. If the string ends and abb wasn't found, it's a rejection, etc.). It seems that for each regex, we should think of some algorithm to handle it, and this algorithm can be completely different from algorithms for other regexes.

So what is the solution? Is there any standardized way to handle regexes? Can we even dream of a general algorithm that can produce a recognizer function given a regex? We sure can!

FSMs to the rescue


It happens so that Finite State Machines are a very useful tool for regular expressions. More specifically, a regex (any regex!) can be represented as an FSM. To show how, however, we must present two additional definitions (which actually are very logical, assuming we use a FSM for a regex).
  • A start state is the state in which a FSM starts.
  • An accepting state is a final state in which the FSM returns with some answer.
It is best presented with an example:


Attached Image: AdvGameProg_FSMandRDP_Bendersky_2.jpg


The start state 0 is denoted with a "Start" arrow. 1 is the accepting state (it is denoted with the double border). Now, try to figure out what regex this FSM represents.

It actually represents xy* - x and then 0 or more of y. Do you see how? Note that x leads the FSM to state 1, which is the accepting state. Adding y keeps the FSM in the accepting state. If a x appears when in state 1, the FSM moves to state 2, which is non accepting and "stuck", since any input keeps the FSM in state 2 (because xy* rejects strings where a x comes after y-s). But what happens with other letters? For simplicity we'll now assume that for this FSM our language consists of solely x and y. If our input set would be larger (say the whole lowercase alphabet), we could define that each transition not shown (for instance, on input "z" in state 0) leads us into some "unaccepting" state.

I will now present the general algorithm for figuring out whether a given FSM recognizes a given word. It's called "FSM Simulation". But first lets define an auxiliary function: move(state, input) returns the state resulting from getting input in state state. For the sample FSM above, move(0, X) is 1, move (0, Y) is 0, etc. So, the algorithm goes as follows:

state = start_state
input = get_next_input
while not end of input do
  state = move(state, input)
  input = get_next_input
end
if state is a final state
  return "ACCEPT"
else
  return "REJECT"

The algorithm is presented in very general terms and should be well understood. Lets "run" it on the simple xy* FSM, with the input "xyy". We start from the start state - 0; Get next input: x, end of input? not yet; move(0, x) moves us to state 1; input now becomes y; not yet end of input; move(1, y) moves us to state 1; exactly the same with the second y; now it's end of input; state 1 is a final state, so "ACCEPT";

Piece of cake isn't it? Well, it really is! It's a straightforward algorithm and a very easy one for the computer to execute.

Let's go back to the regex we started with - (a|b)*abb. Here is the FSM that represents (recognizes) it:


Attached Image: AdvGameProg_FSMandRDP_Bendersky_3.jpg


Although it is much more complicated than the previous FSM, it is still simple to comprehend. This is the nature of FSMs - looking at them you can easily characterize the states they can be in, what transitions occur, and when. Again, note that for simplicity our alphabet consists of solely "a" and "b".

Paper and pencil is all you need to "run" the FSM Simulation algorithm on some simple string. I encourage you to do it, to understand better how this FSM relates to the (a|b)*abb regex.

Just for example take a look at the final state - 3. How can we reach it? From 2 with the input b. How can we reach 2? From 1 with input b. How can we reach 1? Actually from any state with input a. So, "abb" leads us to accept a string, and it indeed fits the regex.

Coding it the FSM way


As I said earlier, it is possible to generate code straight from any regex. That is, given a regular expression, a general tool can generate the code that will correctly recognize all strings that fit the regex, and reject the others. Let's see what it takes...

The task is indeed massive, but consider dividing it to two distinct stages:

  1. Convert the regex to a FSM
  2. Write FSM code to recognize strings

Hey, we already know how to do the second stage! It is actually the FSM Simulation algorithm we saw earlier. Most of the algorithm is the same from FSM to FSM (just dealing with input). The only part that changes is the "move" function, which represents the transition diagram of some FSM, and we learned how to code the transition function in the pvery basic, the technique is the same for any FSM!

Let's now write down the full code that recognizes (a|b)*abb.

#include <iostream>
#include <cassert>
#include <string>
using namespace std;
typedef int     fsm_state;
typedef char    fsm_input;
bool is_final_state(fsm_state state)
{
  return (state == 3) ? true : false;
}
fsm_state get_start_state(void)
{
  return 0;
}
fsm_state move(fsm_state state, fsm_input input)
{
  // our alphabet includes only 'a' and 'b'
  if (input != 'a' && input != 'b')
    assert(0);
  switch (state)
  {
    case 0:
      if (input == 'a')
      {
        return 1;
      }
      else if (input == 'b')
      {
        return 0;
      }
      break;
    case 1:
      if (input == 'a')
      {
        return 1;
      }
      else if (input == 'b')
      {
        return 2;
      }
      break;
    case 2:
      if (input == 'a')
      {
        return 1;
      }
      else if (input == 'b')
      {
        return 3;
      }
      break;
    case 3:
      if (input == 'a')
      {
        return 1;
      }
      else if (input == 'b')
      {
        return 0;
      }
      break;
      default:
        assert(0);
  }
}
bool recognize(string str)
{
  if (str == "")
    return false;
  fsm_state state = get_start_state();
  string::const_iterator i = str.begin();
  fsm_input input = *i;
  while (i != str.end())
  {
    state = move(state, *i);
    ++i;
  }
  if (is_final_state(state))
    return true;
  else
    return false;
}
// simple driver for testing
int main(int argc, char** argv)
{
  recognize(argv[1]) ? cout < 1 : cout < 0;
  return 0;
}

Take a good look at the recognize function. You should immediately see how closely it follows the FSM Simulation algorithm. The FSM is initialized to the start state, and the first input is read. Then, in a loop, the machine moves to its next state and fetches the next input, etc. until the input string ends. Eventually, we check whether we reached a final state.

Note that this recognize function will be the same for any regex. The only functions that change are the trivial is_final_state and get_start_state, and the more complicated transition function move. But move is very structural - it closely follows the graphical description of the FSM. As you'll see later, such transition functions are easily generated from the description.

So, what have we got so far? We know how to write code that runs a state machine on a string. What don't we know? We still don't know how to generate the FSM from a regex.

DFA + NFA = FSM


FSM, as you already know, stands for Finite State Machine. A more scientific name for it is FA - Finite Automaton (plural automata). Finite Automata can be classified into several categories, but the one we need for the sake of regex recognition is the notion of determinism. Something is deterministic when it involves no chance - everything is known and can be prescribed and simulated beforehand. On the other hand, nondeterminism is about chance and probabilities. It is commonly defined as "A property of a computation which may have more than one result".

Thus, the world of FSMs can be divided to two: a deterministic FSM is called DFA (Deterministic Finite Automaton) and a nondeterministic FSM is called NFA (Nondeterministic Finite Automaton).

NFA


A nondeterministic finite automaton is a mathematical model that consists of:

  1. A set of states S
  2. A set of input symbols A (the input symbol alphabet)
  3. A transition function move that maps state-symbol pairs to sets of states
  4. A state s0 that is the start state
  5. A set of states F that are the final states

I will now elaborate on a few fine points (trying to simplify and avoid mathematical implications).

A NFA accepts an input string X if and only if there is some path in the transition graph from the start state to some accepting (final) state, such that the edge labels along this path spell out X.

The definition of a NFA doesn't pose a restriction on the amount of states resulting in some input in some state. So, given we're in some state N it is completely legal (in a NFA) to transition to several different states given the input a.

Furthermore, epsilon (eps) transitions are allowed in a NFA. That is, there may be a transition from state to state given "no input".

I know this must sound very confusing if it's the first time you learn about NFAs, but an example I'll show a little later should make things more understandable.

DFA


By definition, a deterministic finite automaton is a special case of a NFA, in which

  1. No state has an eps-transition
  2. For each state S and input a, there is at most one edge labeled a leaving S.

You can immediately see that a DFA is a more "normal" FSM. In fact the FSMs we were discussing earlier are DFAs.

Recognizing regexes with DFAs and with NFAs


To make this more tolerable, consider an example comparing the DFA and the NFA for the regex (a|b)*abb we saw earlier. Here is the DFA:


Attached Image: AdvGameProg_FSMandRDP_Bendersky_3.jpg


And this is the NFA:


Attached Image: AdvGameProg_FSMandRDP_Bendersky_4.jpg


Can you see a NFA unique feature in this diagram? Look at state 0. When the input is a, where can we move? To state 0 and state 1 - a multiple transition, something that is illegal in a DFA. Take a minute to convince yourself that this NFA indeed accepts (a|b)*abb. For instance, consider the input string abababb. Recall how NFA's acceptance of a string is defined. So, is there a path in the NFA graph above that "spells out" abababb? There indeed is. The path will stay in state 0 for the first 4 characters, and then will move to states 1->2->3. Consider the input string baabab. Is there a path that spells out this string? No, there isn't, as in order to reach the final state, we must go through abb in the end, which the input string lacks.

Both NFAs and DFAs are important in computer science theory and especially in regular expressions. Here are a few points of difference between these constructs:
  • It is simpler to build a NFA directly from a regex than a DFA.
  • NFAs are more compact that DFAs. You must agree that the NFA diagram is much simpler for the (a|b)*abb regex. Due to its definition, a NFA doesn't explicitly need many of the transitions a DFA needs. Note how elegantly state 0 in the NFA example above handles the (a|b)* alternation of the regex. In the DFA, the char a can't both keep the automaton in state 0 and move it to state 1, so the many transitions on a to state 1 are required from any other state.
  • The compactness also shows in storage requirements. For complex regexes, NFAs are often smaller than DFAs and hence consume less space. There are even cases when a DFA for some regex is exponential in size (while an NFA is always linear) - though this is quite rare.
  • NFAs can't be directly simulated in the sense DFAs can. This is due to them being nondeterministic "beings", while our computers are deterministic. They must be simulated using a special technique that generates a DFA from their states "on the fly". More on this later.
  • The previous leads to NFAs being less time efficient than DFAs. In fact, when large strings are searched for regex matches, DFAs will almost always be preferable.
There are several techniques involving DFAs and NFAs to build recognizers from regexes:
  • Build a NFA from the regex. "Simulate" the NFA to recognize input.
  • Build a NFA from the regex. Convert the NFA to a DFA. Simulate the DFA to recognize input.
  • Build a DFA directly from the regex. Simulate the DFA to recognize input.
  • A few hybrid methods that are too complicated for our discussion.
At first, I was determined to spare you from the whole DFA/NFA discussion and just use the third - direct DFA - technique for recognizer generation. Then, I changed my mind, for two reasons. First, the distinction between NFAs and DFAs in the regex world is important. Different tools use different techniques (for instance, Perl uses NFA while lex and egrep use DFA), and it is valuable to have at least a basic grasp of these topics. Second, and more important, I couldn't help falling to the charms of the NFA-from-regex construction algorithm. It is simple, robust, powerful and complete – in one word, beautiful.

So, I decided to go for the second technique.

Construction of a NFA from a regular expression


Recall the basic building blocks of regular expressions: eps which represents "nothing" or "no input"; characters from the input alphabet (we used a and b most often here); characters may be concatenated, like this: abb; alternation a|b meaning a or b; the star * meaning "zero or more of the previous"; and grouping ().

What follows is Thompson's construction - an algorithm that builds a NFA from a regex. The algorithm is syntax directed, in the sense that it uses the syntactic structure of the regex to guide the construction process.

The beauty and simplicity of this algorithm is in its modularity. First, construction of trivial building blocks is presented.

For eps, construct the NFA:


Attached Image: AdvGameProg_FSMandRDP_Bendersky_6.jpg


Here i is a new start state and f is a new accepting state. It's easy to see that this NFA recognizes the regex eps.

For some a from the input alphabet, construct the NFA:


Attached Image: AdvGameProg_FSMandRDP_Bendersky_7.jpg


Again, it's easy to see that this NFA recognizes the trivial regex a.

Now, the interesting part of the algorithm: an inductive construction of complex NFAs from simple NFAs. More specifically, given that N(s) and N(t) are NFA's for regular expressions s and t, we'll see how to combine the NFAs N(s) and N(t) according to the combination of their regexes.

For the regular expression s|t, construct the following composite NFA N(s|t):


Attached Image: AdvGameProg_FSMandRDP_Bendersky_8.jpg


The eps transitions into and out of the simple NFAs assure that we can be in either of them when the match starts. Any path from the initial to the final state must pass through either N(s) or N(t) exclusively. Thus we see that this composite NFA recognizes s|t.

For the regular expression st (s and then t), construct the composite NFA NFA(st):


Attached Image: AdvGameProg_FSMandRDP_Bendersky_9.jpg


The composite NFA will have the start state of N(s) and the end state of N(t). The accepting (final) state of N(s) is merged with the start state of N(t). Therefore, all paths going through the composite NFA must go through N(s) and then through N(t), so it indeed recognizes N(st).

For the regular expression s*, construct the composite NFA N(s*):


Attached Image: AdvGameProg_FSMandRDP_Bendersky_10.jpg


Note how simply the notion of "zero or more" is represented by this NFA. From the initial state, either "nothing" is accepted with the eps transition to the final state or the "more than" is accepted by going into N(s). The eps transition inside N(s) denotes that N(s) can appear again and again.

For the sake of completeness: a parenthesized regular expression (s) has the same NFA as s, namely N(s).

As you can see, the algorithm covers all the building blocks of regular expressions, denoting their translations into NFAs.

An example


If you follow the algorithm closely, the following NFA will result for (our old friend,) the regex (a|b)*abb:


Attached Image: AdvGameProg_FSMandRDP_Bendersky_11.jpg


Sure, it is much larger than the NFA we saw earlier for recognizing the same regex, but this NFA was automatically generated from a regex description using Thompson's construction, rather than crafted by hand.

Let's see how this NFA was constructed:
First, it's easy to note that states 2 and 3 are the basic NFA for the regex a.

Similarly, states 4 and 5 are the NFA for b.

Can you see the a|b? It's clearly states 1,2,3,4,5,6 (without the eps transition from 6 to 1).

Parenthesizing (a|b) doesn't change the NFA

The addition of states 0 and 7, plus the eps transition from 6 to 1 is the star on NFA(a|b), namely states 0 - 7 represent (a|b)*.

The rest is easy. States 8 - 10 are simply the concatenation of (a|b)* with abb.

Try to run a few strings through this NFA until you convince yourself that it indeed recognizes (a|b)*abb. Recall that a NFA recognizes a string when the string's characters can be spelled out on some path from the initial to the final state.

Implementation of a simple NFA


At last, let's get our hands on some code. Now that we know the theory behind NFA-from-regex construction, it's clear that we will be doing some NFA manipulations. But how will we represent NFAs in code?

NFA is not a trivial concept, and there are full-blown implementations for general NFAs that are far too complex for our needs. My plan is to code as simple an implementation as possible - one that will be enough for our needs and nothing more. After all, the regex recognizing engine is not supposed to expose its NFAs to the outer world - for us a NFA is only an intermediate representation of a regular expression, which we want to simulate in order to "accept" or "reject" input strings.

My philosophy in such cases is the KISS principle: "Keep It Simple, Stupid". The goal is first to code the simplest implementation that fits my needs. Later, I have no problem refactoring parts of the code and inserting new features, on an as-needed basis.

A very simple NFA implementation is now presented. We will build upon it later, and for now it is enough just to demonstrate the concept. Here is the interface:

#ifndef NFA_H
#define NFA_H
#include <vector>
using namespace std;
// Convenience types and constants
typedef unsigned state;
typedef char input;
enum {EPS = -1, NONE = 0};
class NFA
{
  public:
    // Constructed with the NFA size (amount of
    // states), the initial state and the final state
    NFA(unsigned size_, state initial_, state final_);
    // Adds a transition between two states
    void add_trans(state from, state to, input in);
    // Prints out the NFA
    void show(void);
  private:
    bool is_legal_state(state s);
    state initial;
    state final;
    unsigned size;
    vector<vector<input> > trans_table;
};
#endif // NFA_H

As promised, the public interface is kept trivial, for now. All we can do is create a NFA object (specifying the amount of states, the start state and the final state), add transitions to it, and print it out. This NFA will then consist of states 0 .. size-1, with the given transitions (which are single characters). Note that we use only one final state for now, for the sake of simplicity. Should we need more than one, it won't be difficult to add.

A word about the implementation: I don't want to go deep into graph-theory here (if you're not familiar with the basics, a web search can be very helpful), but basically a NFA is a directed graph. It is most common to implement a graph using either a matrix or an array of linked lists. The first implementation is more speed efficient, the second is better space-wise. For our NFA I picked the matrix (vector of vectors), mostly because (in my opinion) it is simpler.

The classic matrix implementation of a graph has 1 in cell (i, j) when there is an edge between vertex i and vertex j, and 0 otherwise.

A NFA is a special graph, in the sense that we are interested not only in whether there is an edge, but also in the condition for the edge (the input that leads from one state to another in FSM terminology). Thus, our matrix holds inputs (a nickname for chars, as you can see). So, for instance, 'c' in trans_table[i][j] means that the input 'c' leads from state i to state j in our NFA.

Here is the implementation of the NFA class:

#include <iostream>
#include <string>
#include <cassert>
#include <cstdlib>
#include "nfa.h"
using namespace std;
NFA::NFA(unsigned size_, state initial_, state final_)
{
  size = size_;
  initial = initial_;
  final = final_;
  assert(is_legal_state(initial));
  assert(is_legal_state(final));
  // Initialize trans_table with an "empty graph",
  // no transitions between its states
  for (unsigned i = 0; i < size; ++i)
  {
    vector<input> v;
    for (unsigned j = 0; j < size; ++j)
    {
      v.push_back(NONE);
    }
    trans_table.push_back(v);
  }
}
bool NFA::is_legal_state(state s)
{
  // We have 'size' states, numbered 0 to size-1
  if (s < 0 || s >= size)
    return false;
  return true;
}
void NFA::add_trans(state from, state to, input in)
{
  assert(is_legal_state(from));
  assert(is_legal_state(to));
  trans_table[from][to] = in;
}
void NFA::show(void)
{
  cout < "This NFA has " < size < " states: 0 - " < size - 1 < endl;
  cout < "The initial state is " < initial < endl;
  cout < "The final state is " < final < endl < endl;
  for (unsigned from = 0; from < size; ++from)
  {
    for (unsigned to = 0; to < size; ++to)
    {
      input in = trans_table[from][to];
      if (in != NONE)
      {
        cout < "Transition from " < from < " to " < to < " on input ";
        if (in == EPS)
        {
          cout < "EPS" < endl;
        }
        else
        {
          cout < in < endl;
        }
      }
    }
  }
}

The code is very simple, so you should have no problem understanding what every part of it does. To demonstrate, let's see how we would use this class to create the NFA for (a|b)*abb - the one we built using Thompson's construction earlier (only the driver code is included):

#include "nfa.h"
int main()
{
  NFA n(11, 0, 10);
  n.add_trans(0, 1, EPS);
  n.add_trans(0, 7, EPS);
  n.add_trans(1, 2, EPS);
  n.add_trans(1, 4, EPS);
  n.add_trans(2, 3, 'a');
  n.add_trans(4, 5, 'b');
  n.add_trans(3, 6, EPS);
  n.add_trans(5, 6, EPS);
  n.add_trans(6, 1, EPS);
  n.add_trans(6, 7, EPS);
  n.add_trans(7, 8, 'a');
  n.add_trans(8, 9, 'b');
  n.add_trans(9, 10, 'b');
  n.show();
  return 0;
}

This would (quite expectedly) result in the following output:

This NFA has 11 states: 0 - 10
The initial state is 0
The final state is 10
Transition from 0 to 1 on input EPS
Transition from 0 to 7 on input EPS
Transition from 1 to 2 on input EPS
Transition from 1 to 4 on input EPS
Transition from 2 to 3 on input a
Transition from 3 to 6 on input EPS
Transition from 4 to 5 on input b
Transition from 5 to 6 on input EPS
Transition from 6 to 1 on input EPS
Transition from 6 to 7 on input EPS
Transition from 7 to 8 on input a
Transition from 8 to 9 on input b
Transition from 9 to 10 on input b


As I mentioned earlier: as trivial as this implementation may seem at the moment, it is the basis we will build upon later. Presenting it in small pieces will, hopefully, make the learning curve of this difficult subject less steep for you.

Implementing Thompson's Construction


Thompson's Construction tells us how to build NFAs from trivial regular expressions and then compose them into more complex NFAs. Let's start with the basics:

The simplest regular expression


The most basic regular expression is just some single character, for example a. The NFA for such a regex is:


Attached Image: AdvGameProg_FSMandRDP_Bendersky_7.jpg


Here is the implementation:

// Builds a basic, single input NFA
NFA build_nfa_basic(input in)
{
  NFA basic(2, 0, 1);
  basic.add_trans(0, 1, in);
  return basic;
}

Just to remind you about our NFA implementation: The first line of the function creates a new (with no transitions yet) NFA of size 2 (that is: with 2 states), and sets state 0 to be the initial state and state 1 to be the final state. The second line adds a transition to the NFA that says "in moves from state 0 to state 1". That's it - a simple regex, a simple construction procedure.

Note that this procedure is suited for the construction of an eps transition as well.

Some changes to the NFA class


The previous implementation of a simple NFA class was just a starting point and we have quite a few changes to make.

First of all, we need direct access to all of the class's data. Instead of providing get and set accessors (which I personally dislike), all of the class members (size, initial, final and trans_table) have been made public.

Recall what I told you about the internal representation inside the NFA class - it's a matrix representing the transition table of a graph. For each i and j, trans_table[i][j] is the input that takes the NFA from state i to state j. It's NONE if there's no such transition (hence a lot of space is wasted - the matrix representation, while fast, is inefficient in memory).

Several new operations were added to the NFA class for our use in the NFA building functions. Their implementation can be found in nfa.cpp (included in the source code attached to this article). For now, try to understand how they work (it's really simple stuff), later you'll see why we need them for the implementation of various Thompson Construction stages. It may be useful to have the code of nfa.cpp in front of your eyes, and to follow the code for the operations while reading these explanations. Here they are:

append_empty_state - I want to append a new, empty state to the NFA. This state will have no transitions to it and no transitions from it. If this is the transition table before the appending (a sample table with size 5 - states 0 to 4):


Attached Image: table.png


Then this is the table after the appending:


Attached Image: table2.png


The shaded cells are the transitions of the original table (be they empty or not), and the white cells are the new table cells - containing NONE.

shift_states - I want to rename all NFA's states, shifting them "higher" by some given number. For instance, if I have 5 states numbered 0 - 4, and I want to have the same states, just named 2 - 6, I will call shift_states(2), and will get the following table:


Attached Image: table3.png


fill_states - I want to copy the states of some other NFA into the first table cells of my NFA. For instance, if I take the shifted table from above, and fill its first two states with a new small NFA, I will get (the new NFA's states are darkest):


Attached Image: table4.png


Note that using fill_states after shift_states is not incidental. These two operations were created to be used together - to concatenate two NFAs. You'll see how they are employed shortly.

Now I will explain how the more complex operations of Thompson's Construction are implemented. You should understand how the operations demonstrated above work, and also have looked at their source code (a good example of our NFA's internal table manipulation). You may still lack the "feel" of why these operations are needed, but this will soon be covered. Just understand how they work, for now.

Implementing alternation: a|b


Here is the diagram of NFA alternation from earlier:


Attached Image: AdvGameProg_FSMandRDP_Bendersky_8.jpg


Given two NFAs, we must build another one that includes all the states of both NFAs plus additional, unified initial and final states. The function that implements this in nfa.cpp is build_nfa_alter. Take a look at its source code now - it is well commented and you should be able to follow through all the steps with little difficulty. Note the usage of the new NFA operations to complete the task. First, the NFAs states are shifted to make room for the full NFA. fill_states is used to copy the contents of nfa1 to the unified NFA. Finally, append_empty_state is used to add another state at the end - the new final state.

Implementing concatenation: ab


Here is the diagram of NFA concatenation from earlier:


Attached Image: AdvGameProg_FSMandRDP_Bendersky_9.jpg


Given two NFAs, we must build another one that includes all the states of both NFAs (note that nfa1's final and nfa2's initial states are overlapping). The function that implements this in nfa.cpp is build_nfa_concat. Just as in build_nfa_alter, the new NFA operations are used to construct, step by step, a bigger NFA that contains all the needed states of the concatenation.

Implementing star: a*


Here is the diagram of the NFA for a* from earlier:


Attached Image: AdvGameProg_FSMandRDP_Bendersky_10.jpg


Although the diagram looks complex, the implementation of this construction is relatively simple, as you'll see in build_nfa_star. There's no need to shift states, because no two NFAs are joined together. There's only a creation of new initial and final states, and new eps transitions added to implement the star operation.

Specialty of NFAs constructed by Thompson's Construction


You might have observed that all the NFAs constructed by Thompson's Construction have some very specific behavior. For instance, all the basic building blocks for single letters are similar, and the rest of the constructions just create new links between these states to allow for the alternation, concatenation and star operations. These NFAs are also special implementation-wise. For instance, note that in our NFA implementation, the first state is always the initial, and the last state is always final. You may have noted that this is useful in several operations.

A complete NFA construction implementation


With these operations implemented, we now have a full NFA construction implementation in nfa.cpp! For instance, the regex (a|b)*abb can be built as follows:

NFA a = build_nfa_basic('a');
NFA b = build_nfa_basic('b');
NFA alt = build_nfa_alter(a, b);
NFA str = build_nfa_star(alt);
NFA sa = build_nfa_concat(str, a);
NFA sab = build_nfa_concat(sa, b);
NFA sabb = build_nfa_concat(sab, b);

With these steps completed, sabb is the NFA representing (a|b)*abb. Note how simple it's to build NFAs this way! There's no need to specify individual transitions like we did before. In fact, it's not necessary to understand NFAs at all - just build the desired regex from its basic blocks, and that's it.

Even closer to complete automation


Though it has now become much simpler to construct NFAs from regular expressions, it's still not as automatic as we'd like it to be. One still has to explicitly specify the regex structure. A useful representation of structure is an expression tree. For example, the construction above closely reflects this tree structure:


Attached Image: AdvGameProg_FSMandRDP_Bendersky_13.jpg


In this tree: . is concatenation, | is alternation, and * is star. So, the regex (a|b)*abb is represented here in a tree form, just like an arithmetic expression.

Such trees in the world of parsing and compilation are called expression trees, or parse trees. For example, to implement an infix calculator (one that can calculate, for example: 3*4 + 5), the expressions are first turned into parse trees, and then these parse trees are walked to make the calculations.

Note, this is, as always, an issue of representation. We have the regex in a textual representation: (a|b)*abb and we want it in NFA representation. Now we're wondering how to turn it from one representation to the other. My solution is to use an intermediate representation - a parse tree. Going from a regex to a parse tree is similar to parsing arithmetic expressions, and going from a parse tree to a NFA will be now demonstrated, using the Thompson's Construction building blocks described in this article.

From a parse tree to a NFA


A parse tree in our case is just a binary tree, since no operation has more than two arguments. Concatenation and alternations have two arguments, hence their nodes in the tree have two children. Star has one argument - hence only the left child. Chars are the tree leaves. Take a good look at the tree drawn above, you'll see this very clearly.

Take a look at the file regex_parse.cpp from the source code archive on the book's companion website. It has a lot in it, but you only need to focus only on some specific things for now. First, let's look at the definition of parse_node:

typedef enum {CHR, STAR, ALTER, CONCAT} node_type;
// Parse node
struct parse_node
{
  parse_node(node_type type_, char data_, parse_node* left_, parse_node* right_) :
    type(type_),
    data(data_),
    left(left_),
    right(right_)
  {
  }
  node_type type;
  char data;
  parse_node* left;
  parse_node* right;
};

This is a completely normal definition of a binary tree node that contains data and some type by which it is identified. Let us ignore, for the moment, the question of how such trees are built from regexes (if you're very curious - it's all in regex_parse.cpp), and instead think about how to build NFAs from such trees. It's very straight forward since the parse tree representation is natural for regexes. Here is the code of the tree_to_nfa function from regex_parse.cpp:

NFA tree_to_nfa(parse_node* tree)
{
  assert(tree);
  switch (tree->type)
  {
    case CHR:
      return build_nfa_basic(tree->data);
    case ALTER:
      return build_nfa_alter(tree_to_nfa(tree->left), tree_to_nfa(tree->right));
    case CONCAT:
      return build_nfa_concat(tree_to_nfa(tree->left), tree_to_nfa(tree->right));
    case STAR:
      return build_nfa_star(tree_to_nfa(tree->left));
    default:
      assert(0);
  }
}

Not much of a rocket science, is it? The power of recursion and trees allows us to build NFAs from parse trees in just 18 lines of code...

From a regex to a parse tree


If you've already looked at regex_parse.cpp, you surely noted that it contains quite a lot of code, much more than I've show so far. This code is the construction of parse trees from actual regexes (strings like (a|b)*abb).

I really hate to do this, but I won't explain how this regex-to-tree code works. You'll just have to believe me it works (or study the code - it's there!). As a note, the parsing technique I employ to turn regexes into parse trees is called Recursive Descent parsing. It's an exciting topic and there is plenty of information available on it, if you are interested.

Converting NFAs to DFAs


The N in NFA stands for non-deterministic. Our computers, however, are utterly deterministic beasts, which makes "true" simulation of an NFA impossible. But we do know how to simulate DFAs. So, what's left is to see how NFAs can be converted to DFAs.

The algorithm for constructing from an NFA a DFA that recognizes the same language is called "Subset Construction". The main idea of this algorithm is in the following observations:
  • In the transition table of an NFA, given a state and an input there's a set of states we can move to. In a DFA, however, there's only one state we can move to.
  • Because of eps transitions, even without an input there's a set of states an NFA can be in at any given moment. Not so with the DFA, for which we always know exactly in what state it is.
  • Although we can't know in which state from the sets described above the NFA is, the set is known. Therefore, we will represent each set of NFA states by a DFA state. The DFA uses its state to keep track of all possible states the NFA can be in after reading each input symbol.
Take, for example, the familiar NFA of the (a|b)*abb regex (generated automatically by Thompson's Construction, with the code from the last column):


Attached Image: AdvGameProg_FSMandRDP_Bendersky_11.jpg


The initial state of this NFA is 0... or is it ? Take a look at the diagram, and count in how many states this NFA can be before any input is read. If you remember the previous columns where I explained how eps transitions work, you should have no trouble noticing that initially, the NFA can be in any of the states {0, 1, 2, 4, 7}, because these are the states reachable by eps transitions from the initial state.

Note: the set T is reachable by eps from itself by definition (the NFA doesn't have to take an eps transition, it can also stay in its current state).

Now imagine we received the input a. What happens next? In which states can the NFA be now? This should be easy to answer. Just go over all the states the NFA can be in before the input, and see where the input a leads from them. This way, a new set emerges: {1, 2, 3, 4, 6, 7, 8}. I hope you understand why: initially, the NFA can be in states {0, 1, 2, 4, 7}. But from states 0, 1 and 4 there are no transitions on a. The only transitions on a from that set are from state 2 (to state 3) and from state 7 (to state 8). However, the states {3, 8} is an incomplete answer. There are eps transitions from these states - to states {1, 2, 4, 6, 7}, so the NFA can actually be in any of the states {1, 2, 3, 4, 6, 7, 8}.

If you understand this, you understand mostly how the Subset Construction algorithm works. All that's left is the implementation details. But before we get to the implementation of the conversion algorithm itself, there are a couple of prerequisites.

eps-closure


Given N - an NFA and T - a set of NFA states, we would like to know which states in N are reachable from states T by eps transitions. eps-closure is the procedure that answers this question. Here is the algorithm:

algorithm eps-closure
inputs: N - NFA, T - set of NFA states
output: eps-closure(T) - states reachable from T by eps transitions
  eps-closure(T) = T
  foreach state t in T
    push(t, stack)
  while stack is not empty do
    t = pop(stack)
    foreach state u with an eps edge from t to u
      if u is not in eps-closure(T)
        add u to eps-closure(T)
        push(u, stack)
  end
  return eps-closure(T)

This algorithm iteratively finds all the states reachable by eps transitions from the states T. First, the states T themselves are added to the output. Then, one by one the states are checked for eps transitions, and the states these transitions lead to are also added to the output, and are pushed onto the stack (in order to be checked for eps transitions). The process proceeds iteratively, until no more states can be reached with eps transitions only.

For instance, for the (a|b)*abb NFA above, eps-closure({0}) = {0, 1, 2, 4, 7}, eps-closure({8, 9}) = {8, 9}, etc.

In the attached source code, the implementation of eps-closure is in the file subset_construct.cpp, function build_eps_closure. It follows the algorithm outlined above very closely, so you should have no trouble understanding it.

move - a new NFA member function


Given T - a set of NFA states, and A - an input, we would like to know which states in the NFA are reachable from T with the input A. This operation was implemented in the function move, in nfa.cpp (member of the NFA class). The function is very simple. It traverses the set T, and looks for transitions on the given input, returning the states that can be reached. It doesn't take into account the eps transitions from those states - there's eps-closure for that.

Keeping track of the input language of an NFA


For reasons that will soon become obvious, we must keep track of the input language used in the NFA. For example, for the regex (a|b)*abb the language is {a, b}. A new member was added to the NFA class for this purpose - inputs. Take a look at the implementation in nfa.cpp to see how it's managed.

DFA implementation


Since we intend to build DFAs in this column, we need a DFA implementation. A very basic implementation was coded in dfa.h - take a look at it now. The DFA's transition table is implemented with a map, that maps (state, input) pairs to states. For example, (t1, i) will be mapped to t2 if input i in state t1 leads to state t2. Note that it's not the same representation as the one I used for the NFA. There are two reasons for this difference:
  • I want you to see two different implementations of a graph (which is what a transition table is, as I told you before). Both are legitimate for certain purposes.
  • A little bit of cheating... I know which operations I'll need from the DFA, so I'm tailoring the representation to these operations. This is a very common programming trick - one should always think about the ways a data structure will be used before he designs its exact implementation.
So take a look at dfa.h - the DFA implementation is very simple - only a transition table, a start state and a set of final states. There are also methods for showing the DFA and for simulating it...

To remind you, this is the algorithm for DFA simulation :

algorithm dfa-simulate
inputs: D - DFA, I - Input
output: ACCEPT or REJECT
  s = start state of D
  i = get next input character from I
  while not end of I do
    s = state reached with input i from state s
    i = get next input character from I
  end
  if s is a final state
    return ACCEPT
  else
    return REJECT

Let's now finally learn how the DFA is built.

Subset Construction


In the Introduction, I provided some observations about following NFA states, and gave an example. You saw that while it's impossible to know in what state an NFA is at any given moment, it's possible to know the set of states it can be in. Then, we can say with certainty that the NFA is in one of the states in this set, and not in any state that's not in the set.

So, the idea of Subset Construction is to build a DFA that keeps track where the NFA can be. Each state in this DFA stands for a set of states the NFA can be in after some transition. "How is this going to help us?", you may ask yourself. Good question.

Recall how we simulate a DFA (if you don't feel confident with this material, read the 2nd part of Algorithmic Forays again). When can we say that a DFA recognizes an input string? When the input string ends, we look at the state we're left in. If this is a final state - ACCEPT, if it's not a final state - REJECT.

So, say that we have a DFA, each state of which represents a set of NFA states. Since a NFA will always "pick the correct path", we can assume that if the set contains a final state, the NFA will be in it, and the string is accepted. More formally: A DFA state D represents S - a set of NFA states. If (and only if) one or more of the states in S is a final state, then D is a final state. Therefore, if a simulation ends in D, the input string is accepted.

So, you see, it's useful to keep track of sets of NFA states. This will allow us to correctly "simulate" an NFA by simulating a DFA that represents it.

Here's the Subset Construction algorithm:

algorithm subset-construction
inputs: N - NFA
output: D - DFA
  add eps-closure(N.start) to dfa_states, unmarked
  D.start = eps-closure(N.start)
  while there is an unmarked state T in dfa_states do
    mark(T)
    if T contains a final state of N
      add T to D.final
    foreach input symbol i in N.inputs
      U = eps-closure(N.move(T, i))
      if U is not in dfa_states
        add U to dfa_states, unmarked
      D.trans_table(T, i) = U
  end

The result of this procedure is D - a DFA with a transition table, a start state and a set of final states (not incidentally just what we need for our DFA class...).

Here are some points to help you understand how subset-construction works:
  • It starts by creating the initial state for the DFA. Since, as we saw in the Introduction, an initial state is really the NFA's initial state plus all the states reachable by eps transitions from it, the DFA initial state is the eps-closure of the NFA's initial state.
  • A state is "marked" if all the transitions from it were explored.
  • A state is added to the final states of the DFA if the set it represents contains the NFA's final state
  • The rest of the algorithm is a simple iterative graph search. Transitions are added to the DFA transition table for each symbol in the alphabet of the regex. So the DFA transition actually represents a transition to the eps-closure in each case. Recall once again: a DFA state represents a set of states the NFA can be in after a transition.
This algorithm is implemented in the function subset_construct in subset_construct.cpp, take a look at it now. Here are some points about the implementation:
  • dfa_states from the algorithm is represented by two sets: marked_states and unmarked_states, with the obvious meanings.
  • Since DFA states are really sets of NFA states (see the state_rep typedef), something must be done about numbering them properly (we want a state to be represented by a simple number in the DFA). So, the dfa_state_num map takes care of it, with the numbers generated on-demand by gen_new_state.
  • The loop runs while the unmarked_states set is not empty. Then, "some" state is marked by taking it out from the unmarked set (the first member of the set is picked arbitrarily) and putting it into the marked set.
I hope an example will clear it all up. Let's take our favorite regex - (a|b)*abb, and show how the algorithm runs on the NFA created from it. Here's the NFA again:


Attached Image: AdvGameProg_FSMandRDP_Bendersky_11.jpg


Following the algorithm: The start state of the equivalent DFA is the eps-closure of NFA state 0, which is A = {0, 1, 2, 4, 7}. So, we enter into the loop and mark A. A doesn't contain a final state, so we don't add it to the DFA's final set. The input symbol alphabet of the regex (a|b)*abb is {a, b}, so first we compute eps-closure(move(A, a)). Let's expand this:

eps-closure(move({0, 1, 2, 4, 7}, a)) = eps-closure({3, 8}) = {1, 2, 3, 4, 6, 7, 8} 

Let's call this set B. B is not a member of dfa_states yet, so we add it there, unmarked. We also create the DFA transition D.trans_table(A, a) = B. Now we're back to the inner loop, with the input b. Of all the states in set A, the only transition on b is from 4 to 5, so we create a new set:

C = eps-closure((move(A, b)) = eps-closure({5}) = {1, 2, 4, 5, 6, 7} 

So C is added, unmarked, to dfa_states. Since all the alphabet symbols are done for A, we go back to the outer loop. Are there any unmarked states? Yes, there are B and C. So we pick B and go over the process again and again, until all the sets that are states of the DFA are marked. Then, the algorithm terminates, and D.trans_table contains all the relevant transitions for the DFA. The five different sets we get for DFA states are:

A = {0, 1, 2, 4, 7}
B = {1, 2, 3, 4, 6, 7, 8}
C = {1, 2, 4, 5, 6, 7}
D = {1, 2, 4, 5, 6, 7, 9}
E = {1, 2, 4, 5, 6, 7, 10}

A is the initial state of the DFA, since it contains the NFA initial state 0. E is obviously the only final state of the NFA, since it's the only one containing the NFA final state 10. If you follow the whole algorithm through and take note of the DFA transitions created, this is the resulting diagram:


Attached Image: AdvGameProg_FSMandRDP_Bendersky_14.jpg


You can easily:
  • See that this is a DFA - no eps transitions, no more than a single transition on each input from a state.
  • Verify that it indeed recognizes the regular expression (a|b)*abb

Conclusion


We've come a long way, and finally our mission is accomplished. We've created a real regular expression engine. It's not a complete engine like the one Lex or Perl have, but it's a start. The basis has been laid, the rest is just extensions. Let's see what we have:

  1. A regular expression is read into a parse tree (implemented in regex_parse.cpp) - I didn't actually explain how this part is done, but you can trust me (and I hope you verified!) that it works.
  2. An NFA is built from the regular expression, using Thompson's Construction (implemented in nfa.h/cpp)
  3. The NFA is converted to a DFA, using the Subset Construction algorithm (implemented in subset_construct.h/cpp and dfa.h)
  4. The resulting DFA is simulated using the DFA simulation algorithm (implemented in dfa.h)

A small main function is implemented in regex_parse.cpp. It reads a regex and a string as arguments, and says whether the string fits the regex. It does it by going through the steps mentioned above, so I advise you to take a look at it and make sure that you understand the order in which things are called.
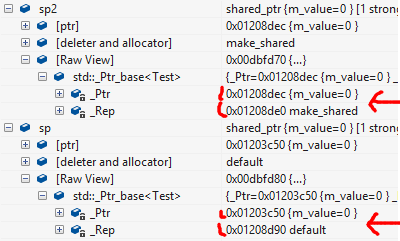
Lone Wolf Killers

$
0
0
In this great land of game development, I've seen more than my share of death. If I had one dollar for every game development team I've seen fail, I could fund the development of Duke Nukem Forever!

It's always a sad thing when a group goes down for the count, leaving only a half-baked demo that crashes on startup as the only reminder of their great game idea. It's too easy to say that every dead development team died because of "lack of dedication." There are many circumstances where all the dedication in the world won't help the situation. By carefully looking at my own experience with now-dead development teams (both amateur and professional – in my pro career I’ve worked on a couple of cancelled titles), I've come up with several ideas about why teams fail, and what can be done to prevent them from dying.

I’m presenting these ideas in “development order,” meaning design comes first because that’s what you do first when building a game, and implementation comes second.

Note:  
This article was originally a 2-part series published on GameDev.net back in 2000. It was combined and revised by the original author in 2008 and included in the book Business and Production: A GameDev.net Collection, which is one of 4 books collecting both popular GameDev.net articles and new original content in print format.


Design Document? What Design Document?


For a team to succeed it needs a common vision, that is, everyone on the team must know exactly what he or she is aiming for. The best way to get that common vision is by writing down your idea. In the original version of this article, published on GameDev.net, I wrote: “the best way to get that common vision is through a big, fat, detailed design document.” That’s misleading – while you certainly need something about your design written down, a “big fat design document” isn’t generally appropriate for indie teams.

The most important thing is to nail down the areas of ambiguity. You should be able to play your game in your mind and answer every question that starts with “what if the player does this.” You don’t need 800 pages detailing every option, but you do need to think about the big issues before you start developing.

Developing without a design document is like driving without a destination – ultimately, you'll burn a lot of fuel and end up somewhere you don't want to be. Learn to resist the "start developing it now!" impulse that always comes with a new idea, and instead concentrate on getting that idea fleshed out and on paper. NEVER start developing a game the same day you think up the idea for it. Wait, and write about it instead.

Also, continuing with the driving analogy, if your design document is your map, remember to follow your map. Don't develop technical features that your design doc doesn’t call for. As an example, if your design document doesn't specifically mention that you need seamless travel through your huge city, then don't spend time coding it. Many programmers go insane about creating functionality and “building an engine.” If that’s what you want to do, that’s awesome – making an engine can be just as rewarding as making a game - but if you want to release a game, you should realize up front that the game, not the engine, is the priority. Aim for developing only what you know you need.

Too Many Requirements, Not Enough Resources


History has proven that the people who think they're invincible are the ones who usually get clobbered. Game development is no different, so it's important to make sure that you keep your head out of the clouds. I'm not saying you should be forever content with making 2D Space Invader clones. I’m saying you should think about the scope of your game, and your own abilities. It’s OK to challenge yourself, and reach for a couple of features you’re not sure you can do, but in general, you shouldn’t be completely overwhelmed by your game design. Think realistically about the resources (number of people, tools, and amount of time) you have at your disposal, and don’t bite off more than you can chew.

Also, tasks that are technically easy can still take a lot of time. The fact that it's easy to make one level doesn't mean it will be easy to make ten levels. Numbers have a way of tricking developers into thinking something's easier than it is. Saying "this game will have 5 levels, with 5 different enemies on each level" makes it sound easier to do than saying "this game will have 25 different enemies." Be careful about such things, and be positive you know for sure what you're dealing with.

The "I Can Do Anything in a Week" Attitude


Along that same line - many indie game developers severely underestimate how long something will take, assuming an "I Can Do Anything in a Week" attitude. The vast majority of programmers significantly underestimate how long it will take them to code up a feature.

It may not seem very important at first, but if you can accurately estimate how long things will take, and design milestones around those estimates, good things will come to you. Your game will get done, your teammates will respect you, and your team will have a good reason to feel proud of themselves.

Good estimates, however, are very difficult to create. A good rule of thumb is to take your absolute worst-case estimate, double it, and then use that as your best-case estimate. You laugh now, but it's true.

Here are some additional tips for making better estimates. There are enough books written on this subject to fill a library – search for “software project management” – but here are some basic tenets:
  • Break down complex tasks. Say you’ve got a task like “create a renderer.” That’s huge. Break it down. What features do you need? Particle system? OK, maybe a week, but break that one down too. Mesh particles, sprite particles, both? How do they spawn? Do they collide? Continue breaking down complex tasks until you get an outline full of smaller, easy to estimate tasks, and then add up all the times. A good rule to follow is that no single task should take longer than 3 days. If a task looks like it’ll take longer, it can probably be broken down further. Software that creates Gantt charts - like Microsoft Project – can be helpful here.
  • Track your estimates. During development, revisit how long you thought it would take you to code that enemy vs how long it actually took. This will ground your future estimations, ideally giving you a “scaling factor” that you can apply. And of course, conduct post mortems on things fairly often to bring inefficiencies to light. For example, if creating those three levels took you way longer than you thought, is it because your editor sucks, or is crash-prone? If so, it may be worth fixing that problem to streamline the development of the remaining levels. That’s an oversimplified example, but you get the idea.
  • Find similarities in tasks. Relating a task you have to estimate to a task you’ve already done (or estimated) can give you better estimates. For example, if you have to estimate a task like “write an octree to speed up rendering,” think to yourself, “hmm, that’s a lot like that one time when I had to convert our renderer to using octrees. What did that take?” That’s an obvious parallel, but you get the idea – often times a task that seems very unique is similar to one you’re more familiar with, and comparing how it’s similar, or how it’s different, can bring to light subtasks or approaches you hadn’t initially considered.

The Ego War


There's another, more subtle danger related to the "I Can Do Anything in a Week" attitude – The War of Egos. Quite frequently, members of indie game development teams will start competing against one another, showing off how quickly they can get something done. Programmers might race against artists or other programmers to see who can get the most done over a weekend. With restraint, this can be helpful and inspiring, but if it gets even slightly out of hand, it can burn out your team, lower the quality of your game, and possibly jeopardize its completion. In an Ego War, otherwise-sane programmers will rush insanely through code without properly testing or integrating it, and artists will rush ahead with their creative work without first making sure it's within code requirements. People stop talking, and problems start appearing.

It's always better to spend time doing something right the first time. Keep team competition in check, curb your developer's egos (this is easier said than done), and remind everyone that they're all fighting on the same side of the battle.

The Dictatorship


A common symptom of a dictatorship is a team whose leader considers his fellow teammates "employees," even though he or she isn't paying them. Decisions are made on the "employee’s" behalf, reducing them to unpaid cogs in a very badly run machine. Truth is, team members are paid in two main ways: money, or enjoyment, and if you can't afford to pay money, you had better make sure that there's more than enough enjoyment to go around. Promising future royalty cuts is NOT the same thing as money; regardless of how great you feel about your team and your idea, the fact is that the odds for failure are so high that royalty cuts are useless. Unless you’re signing paychecks, your team does not work for you.

So, it’s imperative that your team is having fun. Your team members should be your friends. Your team should tackle tough decisions as a group, debate the design document as a group, and share in the grand game creation experience as a group. Developing games is fun. For some people, it's so much fun that they're willing to work 80-hour weeks for half their potential salary. If your team isn't having fun, there's something seriously wrong. Just because you've gathered everyone together doesn't mean that you can tell them what to do. The best teams are the ones where everyone is given equal input into things, and where everyone's considered an equal. The first rule managers learn is that they are enablers – their job is not to lord over everyone, their job is to clear obstacles and make sure that the team can move forward. They work for the team.

But in some cases, some people are more equal than others. If you've put hard cash in something, you deserve to say where you want your money to go. If I put up $1000, and my team members each chip in $50, then yep, it’s not a democracy, I get more say than everyone else. If I buy the snacks for the weekly meeting, I have final say over whether we're drinking Dr Pepper or Coke. But these are easy to spot exceptions; in general, the team should make the decisions, and make sure everyone has a reason to remain interested.

Exclusive Membership


Bad teams are more concerned about membership than creating games. If your team spends most of its time debating whether or not Johnny gets to join, you may want to get out of game development and go build a tree house instead.

The only good reason why you shouldn't let new people join your team is size – it's more difficult to lead a 50 person team than a 5 person one. In general, however, you should be very open about who joins. If you must rely on criteria, I would suggest that you focus on dedication and follow-through potential instead of raw talent. It's better to have an average programmer who's dedicated and excited about the project than a guru who "might find time for it in a few weeks." Keep your doors and minds open, and don't waste valuable development time debating whether someone new gets to join.

Of course, make sure that the people who are on the team – the people who are taking up a precious slot – are contributing. If someone’s just along for the ride, that’s a problem that the team needs to address.

Eating Dessert First, and the Infinite Alpha Syndrome


Beware the "Infinite Alpha" syndrome. This is where the project for some reason or another never manages to progress from alpha to beta (or, more rarely, from beta to gold). Far too often, it goes like this: an alpha version is made, showing off something cool. Six months later, another alpha version is made that shows off something else cool, but completely different. When asked about the change, the developers say something like, "Yeah, the old code was good, but it was a bear to work with. This new code is much better, much faster, and much cleaner." In effect, the game gets repeatedly rewritten, each time getting "faster" and "cleaner" than the last iteration, but never getting any closer to finished.

A common cause of the Infinite Alpha syndrome is that too many developers "eat dessert first." That is, too many developers think that game development is all about implementing cool things; they don't realize that a significant chunk of time on each project needs to go to mundane (and less-tasty) things: in-game menus, saving/loading games, resource management, compatibility, scalability, etc. The game developers ignore these more healthy dishes and insist on eating dessert first.

There are quite of few facets of game development that are flat-out boring, technical, complex, and arduous, and these facets do just as much (or more) for the game as the "cool" technology. Don't let your development team fill up on the tasty desserts of game development without also paying attention to the more bland (but essential) staples.

Burnout


Burnout is one of the greatest threats to the success of an indie project. All of a sudden a project that used to be fun to implement is now boring, hopeless, and arduous. Tired team members start to lose passion for the project, and they begin refocusing their efforts on other things. Developers say things like, "this project's become too complex; what we need is a really simple diversion game we can develop in a few weeks, so that we can ‘take a break’ from this project, and get back to it later." The sad truth is that 99.9% of the time, developers never return to a project they'd previously vowed to "get back to later."

It's important to realize that burnout can never be completely eliminated. Burnout occurs at different times for different teams, but eventually, it will happen on your project. However, there are several things you can do to subdue its effects. Most importantly, don't bite off more than you can chew. The best way to limit burnout is to make sure that by the time it starts to affect your team, you're finished (or nearly finished) with the project. Everyone likes to see the light at the end of the tunnel; if the game will soon be complete, team members won't get burned out as easily.

Hot/Cold


The symptoms of this are easy to spot – your team members will work on the game for two weeks straight without sleep, and then won't touch it for two months. Then, after two months, they'll work nonstop for another few days. They're impatient, yet oblivious to the fact that they spent so long not doing the game.

Hot/cold isn't the same thing as when your developers work all weekend on the game, and then ignore it during the week because they have other priorities (job, school, etc.). Developer focus doesn’t need to be constant day-after-day to be useful. But at the same time, if a developer ignores the game for two months, then takes a week off of work to do nothing but code… that's hot/cold, and that's something to watch out for.

Hot/cold developing leads to all sorts of problems. For starters, your team is much more likely to fall victim to burnout. Their attention will drift more easily, the things they produce will appear disjointed, and they may have problems seeing the big picture. Also, it’s hard to re-establish a context after you haven’t touched something in a long time, which makes it too easy to slip backwards and redo things you’d forgotten you’d already done, or to go around in circles, etc.

The best way to fight the hot/cold syndrome is by setting a good example for your team to follow. Stick to deadlines, and set realistic goals. Consider starting a blog – even if it’s private, it’ll force you to keep context, and will provide an excellent way to refresh your memory should you have to set your project aside for a while. This will be very helpful to any new members you pick up midway through development.

Tunnel Vision


Developers are notorious for what's known as tunnel vision. Tunnel vision is closely related to eating dessert first - someone has tunnel vision when they lack the ability to see the big picture. For example, if, two weeks before your beta release date, your programmer is obsessed with getting 10% more frames out of the rendering pipeline, and is ignoring the fact that there are no enemies, weapons, or powerups in the game, that’s tunnel vision. He or she is concentrating on one very small and often nonpriority aspect of the project, and ignoring the stuff that really matters.

Prevent tunnel vision by keeping a big prioritized list of everything that has to be done. Continually ask yourself "is there anything more important than what I'm working on right now?" If so, drop what you're doing and concentrate on it, instead.

Lack of Commitment


If you're trying to assemble a team, sooner or later you're going to run into people who are not dedicated, but are instead all talk. These people care more about impressing others than they do about getting things done; they're the ones who show a small sample of amazing work, but then fail to produce anything more. They often lie about the status of their work, using high-tech variants on the dog-ate-my-homework excuse, like "my drive crashed, and I lost everything," or "I accidentally deleted the folder."

Learning to recognize and avoid these people is easier said than done. It's very difficult to spot a lie in an email message, or in a chat room, and everyone makes mistakes; I've deleted stuff I've needed, and I've had hard drives crash on me. Knowing how to discern who's not dedicated to the project is tricky, but it gets easier over time – the people who are dedicated will have produced something, and the people who could care less will still be making excuses. After a few months of solid development, you'll be able to separate the people who walk the walk from the people who simply talk.

The best way to combat lack of commitment is for your team to brush the non-committed people off to the side of the project – have them do the lower priority tasks with fewer dependencies. Your team should demonstrate through example that the people who do the most work are the ones who are trusted when it comes to the big, fun stuff. Don't assign the task of developing your main character animations to the slacker artist; give him the background animations instead. The nice thing about this system is that the big projects are often also the exciting ones, so team members who work more get to do the fun stuff.

The Mutual Admiration Society


Lone wolf developers don't have the resources to do play-testing and market research like the pros. However, even the most "independent" game developer can take steps to ensure that the finished product is one that gamers, other than the people who developed it, actually want to play.

It's perfectly OK for developers to test the game, and of course the game should be dictated by what they want to do. But, simultaneously, it’s important to get outside opinions. The outside opinion can act as an arbitrator should the team get split about which approach would be more fun. Remember: as you develop something, you spend many hours playing it, and you naturally get good at it. This fundamentally skews your perception of the game’s difficulty and learning curve.

To get an accurate measurement of how fun your game is, think about your target audience, and recruit game players to play what you’ve created. Just watching them – seeing what they smile at, where they get lost, what awesome thing they never even tried - can be incredibly useful.

Conclusion


This is but a sketch of several issues that can arise for the lone wolf developer, or development team. There are many great books on the process of software development and project management. If you want to learn more about project management, check out some or all of the following:
  • Code Complete, by Steve McConnell. I can’t recommend this book highly enough. If you read it and follow its advice, you will become a better programmer, estimator, and software development team member. A must read.
  • The Mythical Man Month, by Fred Brooks. Considered by some to be one of the most important books on software project management.
  • Dynamics of Software Development, by Jim McCarthy. A collection of short tips and scenarios designed to highlight problems in software teams – simultaneously entertaining and informative, and one of my favorites. Don’t flip the bozo bit!
  • AntiPatterns: Refactoring Software, Architectures, and Projects in Crisis, by William J. Brown, Raphael C. Malveau, and Thomas J. Mowbray. In the same vein as the above, with the same mixture of entertainment and information, but from a slightly different angle.
If nothing else, remember that two main things influence the quality of your project – the quality of your vision, and your dedication, or the solidity and consistency of your team’s work. A shortcoming in either one will seriously jeopardize your project; good work can't make up for a lack of vision, and even the best idea can't make up for a lack of commitment and hard work.

Keep your expectations realistic, your team happy, and your nose to the grindstone, and Good Things your way will surely come.

Notes on GameDev: Maurine Starkey

$
0
0
Originally published on NotesonGameDev.net
August 19, 2008


Maurine Starkey is a founding member of Westwood Studios. She has worked as an art instructor, lead artist, art director, creative director, producer and game designer for over 24 years, plus continues to paint, sculpt, storyboard, and illustrate books, paper games, and comic books. As Producer/Designer at SkillJam Technologies Corporation, her primary responsibility is game design and redesign for “skill games,” by taking popular, casual games and preparing them for competitive play. She recommends games for download and skillifying while identifying which games need better artwork, score-tweaking, or retirement for future reevaluation.

Before being a Producer/Designer at SkillJam Technologies, you’ve been an art instructor, lead artist, and art director. When did your interest in art start and how did you meld it with a career in game industry?

I wanted to be an artist from when I was very small. I started to take it seriously when I was twelve years old and living in Alaska. I would visit the post library religiously, and check out any and all ‘how to’ books. Back then most of those were written by Andrew Loomis. It was a pivotal time for me as I think about it. It’s when I started going to the movies, collecting comics, and studying art. I remember being interested in so many things. But art and storytelling were the most important to me.

What do you feel gave you the drive to not only be an artist, but also take on lead roles directing team members?

Fundamentally, I’m a puzzle solver. That’s what attracted me to creating art for games and why I like games. Taking on lead roles has always been natural to me. I learned if you respect your teammates, you’ve made allies for the future.

How has being a woman influenced your projects and work experience?

What I’ve noticed over the years, myself and my female coworkers have actually brought a stabilizing influence to a studio. I know when I was away from a studio of all men for a year and came back, there was a lot of broken furniture around the place. No furniture ever flew while I was in the studio. For early Westwood days, I was their only artist and was instrumental in setting a high standard from which the studio was able to build on. I’m proud of that.

When you approach the artistic vision of a game, where do you seek inspiration?

The classics, myths and histories. When you break it down into its fundamental elements, it’s all storytelling. Even games. It’s not enough to know a software package or draw a pretty picture. You gotta’ read. Be well rounded. Comic Book story telling or what some call Sequential Art is the closest to game movement/story telling. Its ways of pointing your player to those things that keeps the story moving forward.

How has working with the casual games at SkillJam differed from your experience with other game design?

Early on in my career I was doing RPGs. But I’ve always had an interest in casual games.
I compare it this way; An RPG is like a big thick paperback trilogy. It takes an investment of time and concentration. A casual game is easy in and easy out, but if done right, has the entire gem like qualities of a really good short story. As an example, Luxor gives you a total experience--i.e. a feeling you are immersed in a movie. If you’ve played it, tell me, you started a story going on in your head, didn’t you? Great music too.

Where do your other artistic endeavors, such as comics, fit into your life? Hobby or possible franchise development?

I’ve been working a several projects, all influenced by popular media. I’ve done pirate and vampire comics, sci-fi illustrations and worked on animating a radio drama. Currently I’m focused on a personal project that I’ve wanted to do for years.

What advice do you have for artists who are just now emerging in game industry today?

Know your rights. Know your limits. No one person or company will take care of you. Remember, networking is vital. Respect your co-workers, even if you know they don’t respect you or deserve it. Deserving has nothing to do about anything... Oh, and don’t eat dirt.

What’s your favorite game that you’ve worked on?

Actually the next game I’m working on is my favorite. I know that’s why I never really moved into management. I have loads more fun creating.

We look up to Maurine for her amazing creativity and trueness to herself throughout her career and wish her the best as she continues to do what she loves!

Incorporating Search Algorithms into RTS Game Agents

$
0
0
David Churchill and Michael Buro
University of Alberta
Computing Science Department
Edmonton, Alberta, Canada, T6G 2E8

Abstract


Real-time strategy (RTS) games are known to be one of the most complex game genres for humans to play, as well as one of the most difficult games for computer AI agents to play well. To tackle the task of applying AI to RTS games, recent techniques have focused on a divide-and-conquer approach, splitting the game into strategic components, and developing separate systems to solve each. This trend gives rise to a new problem: how to tie these systems together into a functional real-time strategy game playing agent. In this paper we discuss the architecture of UAlbertaBot, our entry into the 2011/2012 StarCraft AI competitions, and the techniques used to include heuristic search based AI systems for the intelligent automation of both build order planning and unit control for combat scenarios.

Attached File  aiide12ws-search.pdf   164.82KB   40 downloads


References


Churchill, D., and Buro, M. 2011. Build order optimization in StarCraft. In Proceedings of AIIDE.

Churchill, D.; Saffidine, A.; and Buro, M. Fast heuristic search for RTS game combat scenarios. In Proceedings of AIIDE, (pre-print available at www.cs.ualberta.ca/mburo/ps/aiide12-combat.pdf).

Furtak, T., and Buro, M. 2010. On the complexity of two-player attrition games played on graphs. In Youngblood, G. M., and Bulitko, V., eds., Proceedings of AIIDE.

Jaidee, U.; Muoz-Avila, H.; and Aha, D. W. 2011. Case-based learning in goal-driven autonomy agents for real-time strategy combat tasks. In Proceedings of the ICCBR Workshop on Computer Games, 43–52.

McCoy, J., and Mateas, M. 2008. An integrated agent for playing real-time strategy games. In Proceedings of the AAAI Conference on Artificial Intelligence. Chicago, Illinois: AAAI Press, 1313–1318.

ORTS. 2010. ORTS - A Free Software RTS Game Engine.
http://www.cs.ualberta.ca/mburo/orts/.

Wintermute, S.; Xu, J.; and Laird, J. E. 2007. Sorts: A human-level approach to real-time strategy ai. In Proceedings of the Third AAAI Conference on Artificial Intelligence and Interactive Digital Entertainment, AIIDE 2007.

Using C# Managed DLL's in UDK

$
0
0
The following article is similar to articles that I have posted on the UDK forums and in my blog. This article has been updated to use the latest version of Visual Studio Express and the latest version of the Unreal Development Kit.

To follow this article you will need a copy of the Unreal Development Kit and Visual Studio 2012 Express. If for some reason you are unable to use Visual Studio 2012 Express I will briefly talk about potential options near the end of this article.

This article will be using the February 2013 UDK Beta.

The problem


So you want to use the DLLBind feature of UDK in order to add capabilities that you need for your particular project. However what if you are not a C guru or are more comfortable with using a managed language? Well you could say "I will simply create my DLL in C#!" however that will prove problematic as the C# DLL will be using managed code which is far different from an unmanaged DLL (managed code is not a direct binary file but gets turned into IL and then there are issues with export tables and all sorts of other fun technical bits that you can read in a number of much better-worded articles).

Possible solutions


If we had access to the C++ code of UDK we could use various schemes to interopt with our DLL like PInvoke or Com interop, however we are stuck with the DLLBind mechanism that UDK provides to us. We need to work within the confines of what it expects and so we are left with a few options.

The first is to write two DLL files. One that is our managed DLL and then write a C/C++ wrapper DLL that allows it to interact with DLLBind. This solution is a big pain because then we are forced to use C/C++ anyway! It makes writing the DLL in C# very unappetizing.

The second is to dissemble the DLL into IL code and manually add a VTable/VTable Fixups. This is possible but a ton of work and can be a bit nerve-wracking (for instance now you must learn IL and hope you don't screw something up).

The third (and the option I will present in this tutorial) is to use a template to allow unmanaged DLL exports from C# (using an MSBuild task that automates a lot of the work for us).

Getting started


The first step is to create a new Visual C# Class Library project in Visual Studio 2012 Express. In the Name field enter UDKManagedTestDLL and click OK.


Attached Image: newproject.jpg


We will see a workspace that looks like the following:


Attached Image: projectcreated.jpg


The next step is that we need to acquire the Unmanaged Exports Template from Robert Giesecek. His template will automate a lot of the work necessary for allowing our C# dll to be used in UDK. Essentially it will provide unmanaged exports that we can then call in DLLBind!

Following the directions we go to Tools->Library Package Manager->Package Manager Console


Attached Image: packagemanagerconsole.jpg


Run the command in the console:

Install-Package UnmanagedExports


Attached Image: unmanagedexportsinstalled.jpg


A simple example


I started with a very simple test DLL to test the capabilities of the approach. Here is the C# code I used:

using System;
using System.Runtime.InteropServices;
using System.Collections.Generic;
using System.Text;
using RGiesecke.DllExport;

namespace UDKManagedTestDLL
{
    internal static class UnmanagedExports
    {
        [DllExport("GetGreeting", CallingConvention = CallingConvention.StdCall)]
        [return: MarshalAs(UnmanagedType.LPWStr)]
        static String GetGreeting()
        {
            return "Happy Managed Coding!";
        }
    }
}

The MarshalAs LPWStr is a way to tell C# how to marshal the return string to the unmanaged code. An LPWStr is a 32-bit pointer to a string of 16-bit unicode characters. This is UTF-16 strings that the UDK DLLBind supports. See the limitations section here: DLLBind limitations.

The name of the function that our DLL is going to export is GetGreeting. We specify the stdcall calling convention because that is the one supported by UDK DLLBind.

We need to set the properties of this DLL to use x86 and to allow unsafe code.


Attached Image: allowunsafe.jpg


I compiled this DLL and copied it in to the User Code folder.

For me the User Code folder is at: C:\UDK\UDK-2013-02\Binaries\Win32\UserCode

Then I created a class in UnrealScript which was named TestManagedDll.uc.

I placed the file here: C:\UDK\UDK-2013-02\Development\Src\UTGame\Classes

class TestManagedDLL extends Object
	DLLBind(UDKManagedTestDLL);

dllimport final function string GetGreeting();


DefaultProperties
{
}

Here we are importing the GetGreeting function that we exported in our DLL. We specify that the return type of the function is a string. Currently the GetGreeting function does not take any parameters.

I then modified the UTCheatManager.uc file to include

exec function testdll()
{
	local TestManagedDLL dllTest;
	local PlayerController PC;
	dllTest = new class'UTGame.TestManagedDLL';
	foreach WorldInfo.AllControllers(class'PlayerController',PC)
	{
		PC.ClientMessage(dllTest.GetGreeting());
	}
}

We are looping through all of the player controllers and calling the ClientMessage method which will print a message to the UDK console. Calling the GetGreeting method of dllTest will return the "Happy Managed Coding!" message that we defined in our C# DLL.

I then used the Unreal Frontend to compile my scripts:


Attached Image: unrealfrontend.jpg


We can then see the results in the UnrealEd. Go to View->World Properties. We need to set the Default Game Type and the Game Type for PIE to utgame (since that is where we wrote our code).


Attached Image: gametype.jpg


Press F8 to launch the game, type ~ to launch the console, and then type testdll. You should see the following:


Attached Image: happycoding.jpg


Passing Parameters


To pass parameters we can do the following in C#:

[DllExport("GetGreetingName", CallingConvention = CallingConvention.StdCall)]
[return: MarshalAs(UnmanagedType.LPWStr)]
static String GetGreetingName([MarshalAs(UnmanagedType.LPWStr)] String msgName)
{
     return "Happy Managed Coding " + msgName + "!";
}

Here we have added a parameter and we specify that the parameter should be marshaled as a LPWStr. String concatenation is used to form the message that is returned to UDK.

Build the DLL, and copy the DLL into the UserCode folder.

Our TestManagedDLL.uc file now looks like:

class TestManagedDLL extends Object
	DLLBind(UDKManagedTestDLL);

dllimport final function string GetGreeting();
dllimport final function string GetGreetingName(string msgName);

DefaultProperties
{
}

The GetGreetingName function has been added and we specify the string parameter.

We update the UTCheatManager.uc file to use GetGreetingName:

exec function testdll(string greetName)
{
	local TestManagedDLL dllTest;
	local PlayerController PC;
	dllTest = new class'UTGame.TestManagedDLL';
	foreach WorldInfo.AllControllers(class'PlayerController',PC)
	{
		PC.ClientMessage(dllTest.GetGreetingName(greetName));
	}
}

Passing the parameter from the exec function to the GetGreetingName method of dllTest will mean that we can provide a string parameter in the cheat console and have it passed to the C# DLL.

Use the UDK Frontend to rebuild the scripts.

Testing in UnrealEd yields the following:


Attached Image: happycoding2.jpg


Reading files


I assume a lot of people will want to use this technique to write C# DLL's that use .NET for working with files, since the UDK support for reading various file formats is so low. In order to do that we need to get the directory that the DLL is in, so that we can locate our files appropriately. We can do this using Reflection.

[DllExport("ReadTxtFile", CallingConvention = CallingConvention.StdCall)]
[return: MarshalAs(UnmanagedType.LPWStr)]
static String ReadTxtFile([MarshalAs(UnmanagedType.LPWStr)] String fileName)
{
    string retVal = "";
    StreamReader test = null;
    try
    {
        test = new StreamReader(Path.Combine(GetAssemblyPath(), fileName));
        retVal = test.ReadToEnd();
    }
    catch (Exception ex)
    {
        retVal = ex.Message;
    }
    finally
    {
        if (test != null)
        {
            test.Close();
        }
    }
    return retVal;
}

You should then be able to put a file in the same folder as the dll and then load it up and get the contents.

It also needs:

using System.IO;
using System.Reflection;

So it should be perfectly possible with some rudimentary knowledge to make dlls that make use of XML (I have actually done this and put a link in the references).

Here are the contents of TestManagerDll.uc:

class TestManagedDLL extends Object
	DLLBind(UDKManagedTestDLL);

dllimport final function string GetGreeting();
dllimport final function string GetGreetingName(string msgName);
dllimport final function string ReadTxtFile(string fileName);

DefaultProperties
{
}

And the modification to UTCheatManager.uc:

exec function testdll(string fileName)
{
	local TestManagedDLL dllTest;
	local PlayerController PC;
	dllTest = new class'UTGame.TestManagedDLL';
	foreach WorldInfo.AllControllers(class'PlayerController',PC)
	{
		PC.ClientMessage(dllTest.ReadTxtFile(fileName));
	}
}

I placed a file called greeting.txt in the UserCode folder. The contents of greeting.txt are as follows:

Hello there! This is a test of reading files!

Here is the output:


Attached Image: readfile.jpg


Passing structures


Note:  The following content may or may not be the best way to approach this problem. I will share what I have so far as a starting point, however you may wish to investigate this matter further. The use of IntPtr can be error-prone and buggy but sometimes custom marshalling is the only way to solve particular problem domains when doing this sort of work. I have done some use of using "ref" and letting it handle this sort of marshalling for me, however it does not appear to work in all circumstances.


Here is the C# code:

private static IntPtr MarshalToPointer(object data)
{
    IntPtr buf = Marshal.AllocHGlobal(
        Marshal.SizeOf(data));
    Marshal.StructureToPtr(data,
        buf, false);
    return buf;
}

struct MyVector
{
    public float x, y, z;
}

[DllExport("ReturnStruct", CallingConvention = CallingConvention.StdCall)]
static IntPtr ReturnStruct()
{
    MyVector v = new MyVector();
    v.x = 0.45f;
    v.y = 0.56f;
    v.z = 0.24f;

    IntPtr lpstruct = MarshalToPointer(v);
    return lpstruct;
}

This code is populating a structure to pass to UnrealScript through DLLBind.

Here is the code for TestManagedDLL.uc

class TestManagedDLL extends Object
	DLLBind(UDKManagedTestDLL);

dllimport final function string GetGreeting();
dllimport final function string GetGreetingName(string msgName);
dllimport final function string ReadTxtFile(string fileName);
dllimport final function vector ReturnStruct();

DefaultProperties
{
}

Here are the modifications to UTCheatManager.uc:

exec function testdll()
{
	local TestManagedDLL dllTest;
	local PlayerController PC;
	local Vector v;
	dllTest = new class'UTGame.TestManagedDLL';
	foreach WorldInfo.AllControllers(class'PlayerController',PC)
	{
		v = dllTest.ReturnStruct();
		PC.ClientMessage(v.Y);
	}
}

Here is the output:


Attached Image: vector.jpg


Returning structures from UnrealScript


Here is code to pass a structure from UnrealScript to C#:

private static T MarshalToStruct<T>(IntPtr buf)
{
    return (T)Marshal.PtrToStructure(buf, typeof(T));
}

[DllExport("SumVector", CallingConvention = CallingConvention.StdCall)]
static float SumVector(IntPtr vec)
{
    MyVector v = MarshalToStruct<MyVector>(vec);
    return v.x + v.y + v.z;
}

Special thanks to Chris Charabaruk (coldacid) for the MarshalToStruct improvement.

Here is the line added to TestManagedDLL.uc:

dllimport final function float SumVector(Vector vec);

And the modification to UTCheatManager.uc:

exec function testdll()
{
	local TestManagedDLL dllTest;
	local PlayerController PC;
	local Vector v;
	v.X = 2;
	v.Y = 3;
	v.Z = 5;
	dllTest = new class'UTGame.TestManagedDLL';
	foreach WorldInfo.AllControllers(class'PlayerController',PC)
	{
		PC.ClientMessage(dllTest.SumVector(v));
	}
}

Here is the output:


Attached Image: sumvector.jpg


Using out keyword with custom UnrealScript structure


Note:  Using strings in structures is a tricky issue due to the way that UnrealScript deals with strings. This article will not talk about doing strings in structures, but if you get a working example please share it in the comments!


When passing a structure as an out parameter you can do the following:

struct TestStruct
{
    public int val;
}

[DllExport("OutTestStruct", CallingConvention = CallingConvention.StdCall)]
static void OutTestStruct(ref TestStruct testStruct)
{
    testStruct.val = 7;
}

Here are the contents of TestManagedDLL.uc:

class TestManagedDLL extends Object
	DLLBind(UDKManagedTestDLL);

struct TestStruct
{
	var int val;
};

dllimport final function string GetGreeting();
dllimport final function string GetGreetingName(string msgName);
dllimport final function string ReadTxtFile(string fileName);
dllimport final function vector ReturnStruct();
dllimport final function float SumVector(Vector vec);
dllimport final function OutTestStruct(out TestStruct test);

DefaultProperties
{
}

Here is the modification to UTCheatManager.uc:

exec function testdll()
{
	local TestManagedDLL dllTest;
	local PlayerController PC;
	local TestStruct s;
	dllTest = new class'UTGame.TestManagedDLL';
	dllTest.OutTestStruct(s);
	foreach WorldInfo.AllControllers(class'PlayerController',PC)
	{
		PC.ClientMessage(s.val);
	}
}

Here is the output:


Attached Image: seven.jpg


Full source listing


using System;
using System.Runtime.InteropServices;
using System.Collections.Generic;
using System.Text;
using System.IO;
using System.Reflection;
using RGiesecke.DllExport;

namespace UDKManagedTestDLL
{
    internal static class UnmanagedExports
    {
        [DllExport("GetGreeting", CallingConvention = CallingConvention.StdCall)]
        [return: MarshalAs(UnmanagedType.LPWStr)]
        static String GetGreeting()
        {
            return "Happy Managed Coding!";
        }

        [DllExport("GetGreetingName", CallingConvention = CallingConvention.StdCall)]
        [return: MarshalAs(UnmanagedType.LPWStr)]
        static String GetGreetingName([MarshalAs(UnmanagedType.LPWStr)] String msgName)
        {
            return "Happy Managed Coding " + msgName + "!";
        }

        public static String GetAssemblyPath()
        {
            string codeBase = Assembly.GetExecutingAssembly().CodeBase;
            UriBuilder uri = new UriBuilder(codeBase);
            string path = Uri.UnescapeDataString(uri.Path);
            return Path.GetDirectoryName(path);
        }

        [DllExport("ReadTxtFile", CallingConvention = CallingConvention.StdCall)]
        [return: MarshalAs(UnmanagedType.LPWStr)]
        static String ReadTxtFile([MarshalAs(UnmanagedType.LPWStr)] String fileName)
        {
            string retVal = "";
            StreamReader test = null;
            try
            {
                test = new StreamReader(Path.Combine(GetAssemblyPath(), fileName));
                retVal = test.ReadToEnd();
            }
            catch (Exception ex)
            {
                retVal = ex.Message;
            }
            finally
            {
                if (test != null)
                {
                    test.Close();
                }
            }
            return retVal;
        }

        private static IntPtr MarshalToPointer(object data)
        {
            IntPtr buf = Marshal.AllocHGlobal(
                Marshal.SizeOf(data));
            Marshal.StructureToPtr(data,
                buf, false);
            return buf;
        }

        struct MyVector
        {
            public float x, y, z;
        }

        [DllExport("ReturnStruct", CallingConvention = CallingConvention.StdCall)]
        static IntPtr ReturnStruct()
        {
            MyVector v = new MyVector();
            v.x = 0.45f;
            v.y = 0.56f;
            v.z = 0.24f;

            IntPtr lpstruct = MarshalToPointer(v);
            return lpstruct;
        }

        private static T MarshalToStruct<T>(IntPtr buf)
        {
            return (T)Marshal.PtrToStructure(buf, typeof(T));
        }

        [DllExport("SumVector", CallingConvention = CallingConvention.StdCall)]
        static float SumVector(IntPtr vec)
        {
            MyVector v = MarshalToStruct<MyVector>(vec);
            return v.x + v.y + v.z;
        }

        struct TestStruct
        {
            public int val;
        }

        [DllExport("OutTestStruct", CallingConvention = CallingConvention.StdCall)]
        static void OutTestStruct(ref TestStruct testStruct)
        {
            testStruct.val = 7;
        }
    }
}

class TestManagedDLL extends Object
	DLLBind(UDKManagedTestDLL);

struct TestStruct
{
	var int val;
};

dllimport final function string GetGreeting();
dllimport final function string GetGreetingName(string msgName);
dllimport final function string ReadTxtFile(string fileName);
dllimport final function vector ReturnStruct();
dllimport final function float SumVector(Vector vec);
dllimport final function OutTestStruct(out TestStruct test);

DefaultProperties
{
}

Known Issues


Cooking


According to this thread, cooking may prove problematic using the Unreal Frontend. The problem is that the Unreal Frontend does not want to cook an unsigned DLL. You could purchase a certificate or use a custom installer to package your game for release. The thread also mentions modifying the Binaries\UnSetup.Manifests.xml file in the GameFilesToInclude tag to have:

<string>Binaries/Win32/UserCode/(.*).dll</string>

I have not tested any of this but I wanted to point it out.

Alternatives to using Visual Studio 2012


The unmanaged export template used for this article is a NuGet package. If you are using Mono and want to use the unmanaged export template then you may be able to get it working by reading the following resource: nuget on mono. I have not tested this and it is not guranteed to work without issues.

For older versions of Visual Studio (such as 2010) NuGet may work for you if you download it. If you have trouble getting the extension to work then NuGet can also be used on the command line.

Conclusion


I hope that you learned something about using C# to create DLLs for UDK. Be sure to checkout the references for further reading and information.

I would like to thank GDNet Executive Producer Drew "Gaiiden" Sikora for requesting that I post this article. What started as a port of an old journal entry has ended up as a fairly significant edit of the previous work!

Thank you for reading!

Disclaimer


Note:   This method may have serious drawbacks and limitations. The methods presented in this article may leak memory. It is left up to the reader to ensure that such issues if present are addressed. I am merely providing a technical basis, but it will be up to you to assume the risks of the implementation for your particular project. I take no responsibility for the use or misuse of this information for any reason whatsoever.


References


Unreal Development Kit
Visual Studio 2012 Express
NuGet
DLLBind
Mastering Structs in C#
Getting Assembly Path
Unmanaged Exports Template
My original journal entry
An article by Mavrik Games which cites my original article
A forum thread that discusses the signing issue with cooking a DLL using Unreal Frontend
My UDK XML library which uses the methods in this article
NuGet on mono
Installing NuGet packages directly from the command line

Article Update Log


10 Jun 2013: Updated images to link to GameDev.net.
9 Jun 2013: Initial release

Why Is It Building So Long?

$
0
0
Most of Object Oriented guides revolve around the word encapsulation: we should hide implementation details of a class and reduce coupling between objects as much as possible. But in C++ (and also in other compiled languages) we also need to care about the physical side of the design. How can we do that?

Example


Here is a 'common' style of class declaration:

#include "Engine.h"
#include "Gearbox.h"
#include "..."
#include "Wheels.h"

class Car
{
private:
    Engine m_engine;
    Gearbox m_gearbox;
    Wheels m_wheels;
public:
    Car() { }
    virtual ~Car() { }
    void drive() { }
private:
    void checkInternals();
}

Assume the logic design is good. What are the problems related to physical side of such class?

First thing: what if we add a method in the Engine class? Not only the Car.cpp will have to be compiled again (this is expected of course), but clients of the Car class as well!

Second thing: what if we change/add some private method or a private field of the Car class? That way clients also have to be recompiled.

What is the point? Why is it important? For small projects there is almost no difference between good and bad physical design. But when a project is large the need for recompilation means long (very long and even longer) building time.

Do clients of a class need to be recompiled every time? Do they need to know its internal guts - private fields and methods?

Additionally, although clients can assume that the (public) interface of a class will not change, it is not the same as with the compiler. It depends on all information in header files, so even if a private implementation of a module is changed, than every dependent module is needed to be compiled again.

The tool that could help us in improving the physical side the design is called insulation, see below the result of applying that.

Isn't that a bit better?

class Engine;
class Gearbox;
class Wheels;

class Car
{
private:
    std::unique_ptr<Engine> m_engine;
    std::unique_ptr<Gearbox> m_gearbox;
    std::unique_ptr<Wheels> m_wheels;
public:
    Car();
    virtual ~Car();

    void drive();
private:
    void checkInternals();
}

Or even:

class Car
{
private:
    std::unique_ptr<class CarImpl> m_pImpl;
public:
    Car();
    virtual ~Car();

    void drive();

    // private methods 'moved' to source file...
}

Can you see the difference? Will it compile/build faster?

About the book


This article is a result of skimming (and some reading) of the book called "Large Scale C++ Software Design", by John Lakos. This is an advanced C++ book, but touches a unique topic in the area: how to design code not only from a logical perspective but from the physical side as well.

Sometimes the writing style is a bit 'academic' and hard to understand quickly. But all in all it is a great source for everyone involved in creating something bigger than, let's say, 10,000 lines of code.

Main flaw: it is a bit old: from 1996, and it even uses Booch diagrams... I wish there is a second, newer edition. But still a lot of theories are so general that even now we can use them.

Insulation definition


So what is this insulation? Let us see what author says about that:

A contained implementation detail (type, data, or function) that can be altered, added or removed without forcing clients to recompile is said to be insulated.

What can we do to reduce this physical coupling then?

Arguments


When we declare an argument in a method: void func(A a, B b); the compiler has to know the details of A and B. So the simplest way is to include A.h and B.h at the top of our header. But actually we need such details only in the implementation of func, it is not needed in (pre)declaration.

It is better to use const pointers or const references for such arguments (of course for built-in types there is no such need). When the compiler sees const A *a it has to know only the name, not the full definition of a particular type.

Members


As with methods' parameters, we can use a similar technique regarding class members. It can be easily seen in our Car class - the second version. This time we need only predeclarations of particular classes.

Unfortunately this comes at a price: we need to allocate those members somewhere on the heap in the implementation file (in constructor for instance). For large members it is even better, but for small classes (for instance like Vector3) it can be too tricky.

pImpl


One of the most radical methods is to use the pImpl pattern. It can be seen in the third version of the Car class. Everything private goes to a class named pImpl that is declared and implemented in the cpp file. That way the client of Car does not see its guts, and we do not have any additional includes and physical coupling.

Private methods


Keep private stuff private.

When we see a class and its private: block, we can assume how it works. It is better to diminish this block and move every method to an implementation file. How? It is not that easy unfortunately.

We can create a static free function in cpp file, but that way we have no access to private members of the class. It is pointless to create a static member function of the class because it is almost the same as the original method (we need to declare this in header file as well).

Sometimes it is good to go through all private methods and check if they really should be in this class? Maybe they should be removed or moved to some helper class, or even made a free function?

Problems


Insulation is not a silver bullet for everything. Is it good to insulate a small Point2D class? Probably not! We would cause more harm actually. Below there is a list of issues to consider before doing full, hardcore insulation:
  • Lower performance: when doing insulation lots of variables are placed on the heap, for small pieces of data it can be harmful.
  • It is not that easy to fully insulate a class. We need time (and skills) to do that.
  • Maybe our class is not used that often, maybe there will be no difference in compilation time whatsoever?
Below there is a picture that could suggest when to insulate (grabbed from the book):


Attached Image: insulate.png


Sum up


It is just a tip of an ice berg! As I mentioned earlier I did not cover include topic and some other stuff like: enums, protocol class, handles and opaque pointers. But I hope that this gives you motivation to look at your code from a slightly different perspective.


Reposted with permission from Bartłomiej Filipek's blog
logo comes from: openclipart

“I Don’t Know How” Is Not a Valid Excuse

$
0
0

When you say something like this:


I wish I could write better, but my writing skills aren’t very good.


… many intelligent, self-directed people are actually hearing this:


I wish I could write better, but I’m too lazy and undisciplined to do anything about it. I also have low self-esteem, which prevents me from believing I can correct this deficiency. You should probably avoid me and spend your time with someone more worthy.


As an adult you’re responsible for your own education. If you find it deficient in some area, educate yourself into proficiency.


Many people find their early education lacking when they reach adulthood. No one really knows what knowledge and skills will be important to you later in life. So they guess and they often guess wrong.


My early education was amazing in core subjects like English, math, science, and U.S. and European history. It also did a good job of teaching service to others, self-discipline, and character building. I’m lucky to have attended 12 years of private school, where the standards and quality of instruction were significantly higher than what my public school counterparts experienced. I don’t feel so lucky about all the religious nonsense that was drummed into me, but the secular subjects were taught in top-notch fashion.


As good as it was, my formal education was seriously lacking in other areas like computer programming, psychology, interpersonal communication, public speaking, how to set and achieve goals, how to build courage, and how to build and run a successful business.


Much of the technology I use today didn’t exist when I was in school. The first time I used the Internet was when I started college, and that was in the pre-Web days. I certainly didn’t learn how to make a website or build an Internet business while I was in school.


In order to achieve my goals in life, I had to fill in many gaps in my formal education. This required a disciplined approach to self education. To this day I maintain this same discipline. I regularly identify gaps in my knowledge and skills that could hold me back from achieving my goals. Then I set educational goals to fill in those gaps, and I work step by step to achieve those goals. Usually this involves a combination of reading, connecting with experts and learning from them, and my own experimentation.


Never whine about your lack of skills or your weak education. Never use a lack of know-how as an excuse for not being able to achieve a goal. That’s low class behavior, and it surely won’t help. It’s also a great way to repel successful people from your life. One of my friends refers to such irresponsible loser types as plankton. That’s not a particularly compassionate label, but nor is “I don’t know how” a particularly good reason for failure.


You may feel deficient in some areas. That’s normal. If you feel your schooling didn’t do a very good job, that’s a shame, but it is what it is.


If you don’t know how, learn how. Use that fancy brain that learned how to walk, talk, and read. It’s still capable of further learning, is it not? Of course it is!


If you’re going to get anywhere in life, you must assume 100% responsibility for your ongoing education. Maybe your parents and the school system got you off to a good start. Maybe they didn’t. Whatever happened in that regard, the past is the past. You must now look to the future. Whatever you didn’t learn back then, you can start learning today. A few years from now, you can have the equivalent of a Ph.D in a subject you never studied before. You can master a new language. You can become an expert on a subject in which you’re merely a novice today.


Using “I don’t know how” as an excuse is truly pathetic today. In the information age where you can begin searching for such answers in seconds, this tired excuse only makes you look foolish, lazy, and unworthy of success. Even young children wouldn’t be stopped by such a phony obstacle.


The next time you feel inclined to say “I don’t know how,” say instead, “I’m learning how.” At least have the sense to Google “how to ___.” The information you need to get started is already at your fingertips.


Think about an educational deficiency you’d like to correct, and set a new educational goal right now. What exactly do you wish to learn, and how soon? Then plan out some of the steps you’ll need to take. Identify books to read, courses to take, and experts to talk to. Now get to work and start learning. Start by picking one book, buying it, and reading the first chapter. No more feeble excuses!

GDC 2013 Interview with Justin Ma

$
0
0
How long does it take to develop a game? Justin Ma, co-developer of the award winning game, FTL: Faster Than Light, has been there and back. design3 got a chance to chat with Justin at GDC 2013, where he shared the details on his previous work in China, his unbelievable Kickstarter success, the work it took to create FTL, the design tools used, and more.


www.ftlgame.com


Ten Things to Achieve When Starting 3D Programming

$
0
0
Starting 3D programming is not an easy task to accomplish. There are a lot of new things that come into play, and they vary from choosing a programming language to selecting the correct 3D modeling software. These 10 goals are the things that when they are done, no matter in what language and with what rendering engine, you can consider yourself a semi-expert on this matter.

#1: Build your own custom graphic initialization function


Today with the great variety of 3D engines and platforms, this task is always delegated to those. I still remember the times when you had to initialize OpenGL with all the windows functions, and how you had to manage windows handles and resource loading yourself. This is useful to understand how things are managed internally and will give you more comprehension of what you are doing. My advice is to start looking at NEHE tutorials, it has a graphic initialization function written in C and with windows APIs in chapter one. If this is a lot for you to handle, you should look at C++ equivalent functions or try to port them to managed languages like C#, Java or Python. There are plenty of examples on the internet.

#2: Implement your own camera


You can copy and paste a camera code from the internet, and use it without major problems, but it is not until you make your own camera from scratch that you will fully understand some concepts like vector handling, translation matrices, angle conversion, etc. You should start by coding a FPS (First Person Shooter) camera; it has everything it needs to get you ready. Later if you want to make your own game and you can’t use it, I recommend you to read this article to find out the type of camera that best suits your needs.

#3: Understand primary 3D concepts


When I started, I began to hear a lot of new words like anti-aliasing, anisotropic filtering, occlusion testing, z-buffer, alpha testing, shader language, bump mapping, etc. Maybe if you are a gamer, you have seen some of them while configuring the graphic settings of your game. Make sure you spent some time reading about this, because it will give an overview of what 3D programming is.

#4: Learn everything you can about vectors and matrices


This is always underestimated, I strongly recommend that in order to correctly manage things like cameras, terrain following, ray tracing; you should know everything about this. You should also learn minimum trigonometry basis. Now I understand how easy my life would have been if I would had spent only a few hours studying this matter.

#5: Code yourself a 3D model loader


I recommend beginning with a .OBJ file or a .STL file because they have an ASCII format representation. Later, you can move to other more complex formats like .3DS. With this, you not only will understand more how 3D models are saved, you will have to draw it in its raw manner: triangles, and then you will understand how everything is drawn in a graphics engine.

#6: Successfully make your own collision algorithm


It is one thing to draw a world and another thing to manage its geometry. In a virtual 3D world, there are no physics laws, so you have to create them. If you want an object not to go through a wall, then you have to create an internal geometric representation of the wall and make all the calculations yourself. There are several approaches to handle collisions; I recommend starting with binary collisions with a labyrinth project. Try this link for more information.

#7: Implement a small particle engine


I was disappointed when I found out that fire, smoke, some lighting and other stunning effects that you see in 3D games are made by particles and that particles are in essence planes with textures facing the camera. The more particles you add, the more realistic the effect looks but the performance is more compromised. The first particle engine I made was for rocket smoke and I did it without looking at a particle engine tutorial. Later I realized I had reinvented the wheel but I was really into this. By carrying out this, you will understand concepts like particle emitters, particle behavior and bill boarding techniques, among others.

#8: Learn the basics in a 3D modeling software


In order to make changes to the 3D models you want to use in your application, you should at least know operations like translating, scaling, rotating, texturing, exporting to other formats and making simple models. If you don’t do that, you will suffer from depending on other people to do your first game. I’ve worked with a few modeling software and I strongly recommend 3D Max or Maya.

#9: Load and play an animation


Loading and correctly playing an animation was the most difficult thing in 3D that I ever did. I had to do reverse engineering to a 3D max .XAF file. I had to also learn stuff like bone hierarchy, matrix interpolation, among others. At the end, it was very gratifying to look at your own models moving by themselves. I recommend starting with animating a robot since models like animals and people require another technique called skinning.

#10: Code a 2D custom Graphic User Interface (GUI)


When I began programming in XNA; I was forced to build my own GUI because XNA does not have implemented any windows controls. This gave me two things, the first one was the ability to make my custom GUI controls and the other one was the understanding of concepts like event handling and event capturing. It is not easy, the most difficult control I have made is a listbox, but once it is made you can use it everywhere.

Conclusion


In this journey you will come across several issues. You will spend a lot of time trying your code to work no matter how smart you are. But I can tell you that from a programmer side of view there is nothing more comforting than seeing your own code working. I still remember the joy when I first coded an OBJ model loader. I was trying to load a face and after several hours on the task at 3:50am suddenly a very weird face appeared on the screen and scared the hell out of me, I laugh every time I remember that story.

I am sure when you manage to achieve these ten things, you can say you have the basic knowledge of 3D programming. I wrote this because I spent a lot of work and time to achieve them, and because I would like everyone to have a small guideline when starting in this world. My advice is to start making a small game and to try to adapt them on the go. I think this is the best way because trying to learn all this without the possibility to see it in action is not very motivating. You will see after a while that gaming won't be same for you, because you will spend some time trying to figure out how they solved some technical issues that you faced before. Thats all for now I tried to keep this article clear and understandable, if you liked it, you can visit my blog for more stuff like this.


Article image from 3D Programming - Weekly
Viewing all 17825 articles
Browse latest View live