Quantcast
Channel: GameDev.net
Viewing all 17825 articles
Browse latest View live

The Profit Potential of the Niches in App Development

$
0
0
App development is a fiercely competitive battlefield, with many developers now doing battle. With some expertise in software development it is easy to enter the battle. Apps can now simply be submitted to the App Store or Google Play and it is not difficult to get accepted. But while it is relatively simple to publish an app, it is harder to develop one that can generate profit. Here we will look at three popular niches within mobile app development.

Gaming Apps


This would definitely be the area of apps to perhaps possess the most creations. All manner of mobile gaming apps are in existence, paid or otherwise. However, it has to be the former of those categorisations that developers seek if they are to reap rich rewards. Quite simply, the margins are more lucrative for a paid app, whereas free apps don’t deliver any profit until significant advertising revenues start flooding in.

There are plenty of success stories out there, among the best being Angry Birds, Bejewled and Candy Crush. All of those offer a free version to act as an entry level to draw players in, then offering a paid version of special upgrades to help draw in the profits. But such a strategy can fail to deliver in the long-term as players get tired of the apps.

Apps for Gambling


Gambling apps is a relatively simple area to identify when considering profitable gaming applications, especially when players are wagering with real money. Mobile casinos and sports betting are the two most popular areas within gambling applications, but off the beaten track there are some other interesting options to be found.

Mobile bingo represents the advancement of the regular version of online bingo, which in turn took on the mantle of the classic format of the game found in bingo halls. sites such as www.bingoonmobile.co.uk report that their traffic is continuously growing as more and more players opt for the mobile versions of this classic game. Players now have the opportunity to play their mobile bingo games outside of their home, so that increases the potential for wagering opportunities. As a result, this thereby increases the profitability of such apps.

Everyday Apps


These are the apps which you could not live without. Some may use apps to help them in a navigational capacity, others listen to podcasts on their way to work, budding chefs acquire recipe advice, or others keep current with the latest news. Outside of those examples there are many more everyday apps in existence to help streamline your life.

A drawback of these apps, however, is that they are delivered to players in a free capacity, for the most part, so it is difficult to identify how they could deliver lucrative profits. The fact of the matter is that they don’t turn profit on their own, but instead call upon the help of advertising. Small sections within the app will display ads and the developers will generate their profits this way.

Summary


Gambling apps would definitely be the safe bet here, based on the analysis above, and who could argue? Everyday apps are limited because of how many flood the marketplace, therefore making it difficult to generate profit. Gaming apps only deliver significant profit when they are worth paying for.

Taptitude: two years of success on Windows Phone

$
0
0
It’s been two years since we launched Taptitude on Windows Phone, and we’re still going strong! Keeping with our tradition of openly sharing our download and revenue stats, we’d like to take a look back at the last two years to see how far we’ve come, and where we have room to improve.

This article will primarily focus on the Windows Phone version of Taptitude. We’ve recently ported Taptitude to Windows 8, Android (Google Play) and iOS, but we haven’t been out long enough to collect meaningful numbers. Later in the year we’ll do a follow up to see how those platforms are turning out.

Let’s start with some high level observations and then dig into the details.

  1. Windows Phone continues to be a great market for indie developers.
  2. The mini-game collection model continues to resonate with our users.
  3. There is significant headroom for future growth.

Downloads


We recently announced that Taptitude has broken the 1 million download mark on Windows Phone. Let’s take a look at how these were distributed.


Attached Image: fig1.png


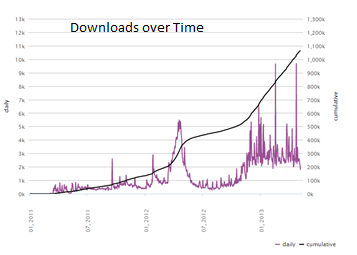
As you can see we had a fairly slow start with < 1,000 downloads per day for the better part of the first year. Near the end of the first year we saw a large spike which added over 200k downloads over a two month period. This spike (middle of the graph above) aligned well with a number of things that worked in our favor. The first was that Nokia started releasing solid Windows Phone devices and our daily downloads started to grow faster than normal, and second we worked our way up the top downloaded chart which has a feedback effect adding further to the download spike.

After the spike died down we went back to < 1,000 downloads a day for the rest of the summer. Around the time Windows Phone 8 came out (fall 2012) we started to see the numbers pick up again. We’ve had a relatively long stretch where 2,500+ downloads per day has been the norm. Let’s look closer at the last 5 months.


Attached Image: fig2.png


As you can see we haven’t dipped below 2k/day in quite a while. From time to time we get a spike over 5k and in some cases over 9k. The spikes correspond to getting featured in the marketplace, and the higher average is likely due in part by Windows Phone 8's growing marketshare. WP8 brought with it changes to the marketplace that feature top rated games. Taptitude is one of the highest rated games on the marketplace with over 26k ratings and a 4.7 star average.

Crashes


Microsoft provides crash reports in their Dev Center portal. We find it helpful to monitor these reports weekly and fix any obvious bugs before we ship the next update. Generally our crashes per day are reasonably low compared to our user base, but from time to time a bug will slip through and we’ll see a spike.


Attached Image: fig3.png


As you can see we generally have < 200 crashes per day. Around November of 2012 (a) we started seeing a huge number of crashes due to a bug with Bally Bounce (a popular mini-game). Unfortunately once a bad bug like this gets through our QA process, we have little hope of fixing it in a timely manner. The first day the bugged version was released we started getting reports and had a fix for the bug. We submitted the fix later that day, but since Microsoft’s cert process takes nearly a week we knew we were going to pay.

In a more mature platform, we would have been given the ability to roll back to the previous version instantly to stop the bleeding while the fix is in cert, but we weren’t that lucky. In the following week many of our users picked up the bad version and we were helpless until the fix went in. Even then, some residual set of users who didn’t update to the fixed version. It took over a month before our crashes were back down below 200 per day.

On the bright side, we’re now under 200 per day again, which is better than the 200 per day we were getting last year because our user base is considerably larger now. With 30,000+ active users, the 200 remaining crashes represents a broad spectrum of hardware malfunctions, hard to reproduce race conditions and memory leaks. We fix them as we isolate the problems but most of the low hanging fruit has been picked.

Advertising


Taptitude is still primarily an ad-supported game, and we’ve enjoyed considerable success pursuing this business model. We keep things simple; showing a single ad on the screen at all times, and cycling once every 30 seconds. Users can remove the ad by purchasing Taptitude Gold from the in-game store.

Over the last two years we’ve grown steadily up to ~40 million impressions per month.


Attached Image: fig4.png


We had a dip after falling out of the top downloaded chart, but have since worked our way back up to a new high of nearly 50m impressions per month. We haven’t increased the number of impressions per user per minute, so the growth is coming from an increase in both active users, and time-in-game.

While impressions are growing, unfortunately eCPM (dollars per 1000 impressions) has been on the decline. This has been widely reported by other users of Microsoft’s pubCenter Ads.


Attached Image: fig5.png


The data from the first year averaged in excess of $1 eCPM, however this was when we were first ramping up, so the revenue wasn’t ridiculous. The second half of this year has been netting us in the area of $0.35 eCPM, which some say is good compared to other games at the same time period.

The combination of increased impressions and decreased eCPM has almost exactly cancelled each other out.


Attached Image: fig6.png


You can see from the graph above that our monthly revenue from Taptitude is pretty steady around $15k/month. We peaked (a) at the end of our first year with a $40k month due to good eCPM (~$1) and great impressions (~40m). This dipped (b) mid last year due to a bug where we weren’t showing ads for over a week. Not our bug, mind you, but one Microsoft kindly left in the pubCenter control. When you submit an app to the store it scans your app and looks for certain things to trigger capabilities. One update (of the over 100 we've done so far) we removed an unused component that happened to load the web browser control, which caused us to lose the browser usage capability. That was expected, but unfortunately pubCenter manually checks for this even though the XNA version doesn't use the web browser. We worked around the bug, but not after losing substantial revenue.

The important thing to take away from the graph above is that games don’t have to have a hockey stick revenue graph. We’ve seen tons of games that have a good start, but don’t retain users and revenue dies off after a month or two. Many of them spike way higher than Taptitude, but the important thing is the area under the curve. We have optimized Taptitude to be the go-to game that you come back to every day for a long period. In-game stats show that many of our users haven’t missed a single day of play time in well over a year, and this has led to fairly steady income.

In App Purchase


We added IAP to Taptitude at the beginning of 2013 and have seen pretty steady uptake.


Attached Image: fig7.png


IAP still accounts for a very small fraction of our revenue (~5%), so we can't say we’ve nailed this business model yet. We feel like Taptitude’s rich virtual economy would mesh well with the IAP model; however we’re hesitant to push it too far for fear of turning off customers. We’ll dive deep into IAP in another article, but for now let's just say we're working on monetizing IAP better in a customer friendly way.

Summary


Now that we’ve seen the numbers, let’s look back at my original observations:

1. Windows Phone continues to be a great market for indie developers.


Taptitude has been more successful than we had ever dreamed, and even after two years we’re still bringing in significant revenue off of Windows Phone advertising. While eCPM has dropped, the market has grown, and we’re happy with the results. IAP was added in WP8, which opens up new revenue streams, but we've yet to fully realize this potential.

2. The mini-game collection model continues to resonate with our users.


Taptitude has grown from a small collection of only 5 mini-games to over 80 mini-games with increasing quality and complexity. We can see from in-game stats that our users are very sticky, some of which have put many days of in-game time into Taptitude. We have optimized for bite sized fun, getting users to come back every day, and continuously expanding the game so users stay engaged for months. This has yielded consistently high impressions per user.

3. There is significant headroom for future growth.


While Taptitude is doing well on Windows Phone, we’ve only just begun. We’ve recently ported Taptitude to iOS, Android, and Windows 8 and we look forward to having enough data to compare. By some reports, Windows Phone only has ~5% of the market share, so with the addition of Android and iOS we could be looking at substantial gains in the next 6 months to a year. We've nailed the ad-supported model, but we have a lot of work ahead to monetize IAP without impacting the game negatively.

Conclusion


We hope sharing this data will help other indies understand the market and make better decisions about how to roll out fantastic mobile games. It's too tempting for most developer to see huge numbers on iOS/Android and think that these are the only platforms worth targeting. We're living proof that Windows Phone, even with its smaller market share, is a great platform to kick start your game project while you get it ready for the big (and more competitive) markets. If your game isn't developed with a million dollar budget, you might consider a similar strategy.

Cross-Platform Game Development with Xamarin and MonoGame

$
0
0
FourBros Studio has been continuously developing Taptitude with weekly releases for over two years. Creating and testing updates at such high frequency has been a major challenge for us during this time, and recently we've expanded support for Taptitude from our home on Windows Phone to other platforms including Windows 8, Android, and iOS.

Creating and testing updates at the same frequency but across 4 different app stores and operating systems simultaneously required us to focus on building a cross-platform solution for Taptitude.

Goals of Cross-Platform Solution


Around November, 2012, we began making plans to port Taptitude to other operating systems and app stores. We knew this would be more than a simple "port job" because of Taptitude's continuously evolving nature. It wasn't sufficient to just get Taptitude running on these other platforms, we needed to create a sustainable cross-platform solution that would allow us to continue to evolve Taptitude.

Our primary goal was to have Taptitude running on Windows Phone, Windows 8, Android, and iOS with feature parity across all platforms. This means that when we add a new feature, it appears on all platforms at roughly the same time.

We also made it a goal to maintain our existing update frequency (about one update per week). We believe having frequent updates with new content and features has many benefits to our customers.

To accomplish these goals, we needed to use 99% identical code within all versions of Taptitude which meant targeting a common framework that behaves the same across platforms.

Xamarin and MonoGame to the Rescue


Given that Taptitude started out as a C# XNA game on Windows Phone, maintaining 99% shared code across all platforms would be out of the question without solutions provided by Xamarin and the MonoGame project.


Attached Image: fig1.png


Xamarin is a set of tools that allows a developer to write C# code and make use of .NET libraries while targeting iOS, Android, Mac, or even Windows. It is like an identical replacement for Microsoft's .NET platform but it's capable of targeting other operating systems. It also wraps the native iOS or Android APIs into C# libraries so you can make use of native OS capabilities if you do wish to have platform dependent code.

MonoGame is an open source implementation of Microsoft's XNA Framework. XNA framework is the library game developers have used on Xbox and Windows Phone for years. With MonoGame's implementation it is possible to have the same XNA code work across operating systems (in conjunction with Xamarin's cross-platform .NET replacement).

Combining Xamarin and MonoGame, we were able to establish Windows 8, iOS, and Android versions of Taptitude while sharing more than 99% of code between each version, including the Windows Phone version.

Our Experience with Xamarin


Overall we were very impressed with Xamarin. It provided essential capabilities that we needed to get Taptitude running on Android and iOS.

Xamarin for Android provides a multitude of key features that we relied on. It allowed us to compile C# code and use .NET base libraries while targeting Android. Xamarin also allowed us to debug live Android devices using Visual Studio. The Android app project type that Xamarin provides does a nice job of automatically generating your applications AndroidManifest file where things like permissions and other metadata are set up (something that is very easy to get wrong when done manually).

Xamarin for Android provides a very powerful way of accessing Java libraries from C#. It lets you create a new Binding project, point it at a .jar (Java library package) and it will automatically build and generate the C# API bindings allowing you to access native Java libraries from C#, such as Google AdMob APIs for advertising.

Finally, Xamarin for Android takes care of packaging your app to upload to the Google Play store. Once the app is ready to publish, it just takes a few clicks to create the final package that can be uploaded and made available to everyone on Google Play.

Later, we used Xamarin for iOS to port Taptitude to iPhone, iPad, and iPod Touch. This experience was a little rockier for us as the integration of the Xamarin tool chain definitely had some rough spots. To use Xamarin on iOS you have to have a Mac build server (this is more a limitation of the way iOS apps are built).

Xamarin's native iOS compiler had trouble building Taptitude due to how much code we have (80+ mini-games in one binary) and was never able to produce builds for iOS devices that could be debugged. We could produce "release" builds that ran on the device but without a debugger attached it made the development process much harder. We had to rely on the iOS simulator for debugging live code which was not ideal. Fortunately for us, Taptitude is 99% identical code on all platforms and so most of the debugging could be done on a non-iOS device but for the few iOS dependent features (advertisements and in-app purchase support) this limitation caused us some pain. Xamarin has an excellent support system for responding to these kinds of issues and providing work-arounds when available, and they actively update the software with fixes and improvements to the tool chain, so even by the end of our porting efforts things were improved and working more smoothly for us on iOS.

Despite the few problems we had initially with Xamarin for iOS, in the end we were able to use it to produce a version of Taptitude that simply would not have been possible without Xamarin.

While Xamarin is a very powerful cross platform development tool, it comes with a price. Current pricing ranges from Free (for small apps with limited features) to $1899.00 per developer, per platform, for full Enterprise level support. We opted to go with the "Business" license which is currently $999.00 per developer, per platform, and offers the set of features we need (in particular Visual Studio support and unlimited app size). The price wasn’t really an issue for us because we knew there wasn’t any other viable way of porting Taptitude to iOS and Android other than using Xamarin and at the same time Taptitude had already proven successful on Windows Phone so we were confident that the iOS and Android version would quickly recoup the costs of the Xamarin licenses.

Summary:
  • Xamarin was the key factor that allowed us to port Taptitude to iOS and Android
  • It provides powerful features for binding to native libraries and access to the native OS APIs
  • Integration with Visual Studio is a huge plus for any existing Windows Phone or Windows 8 developer looking to port to iOS or Android
  • There are some toolchain issues and limitations on the iOS version of Xamarin, but improvements appear to be coming rapidly.
  • The licence is priced reasonably with multiple tiers supporting indie/hobbyists up to professional enterprise teams.

Our Experience with MonoGame


While Xamarin provides the foundation for writing C# code in a cross-platform way, Taptitude also has a major dependency on Microsoft's XNA framework. The XNA framework provides a set of low level capabilities that any game would need, such as graphics rendering, gamepad/touch input, content pipeline, and primitive math types.

Unfortunately, Microsoft seems to have abandoned XNA going forward. Microsoft maintains support for XNA on Windows Phone but even in the most recent version of the operating system (Windows Phone 8), XNA is only available for "legacy" Windows Phone 7 applications. In other words, the new Windows Phone 8 features cannot be accessed through XNA as it is limited to Windows Phone 7 applications only, and Microsoft didn’t bring XNA into their Windows 8 app ecosystem.

This meant that we needed a replacement for XNA in order to even port to Microsoft's other platforms like Windows 8. Luckily for us, there is an active community of indie developers and enthusiasts who have created the MonoGame project which acts as a drop-in replacement for XNA and has support for Windows 8, iOS, and Android (amongst other platforms, including Windows Phone 8). MonoGame is an excellent way to take an XNA game and get it up and running on a number of other platforms.

MonoGame did, however, have some bugs and compatibility issues on some of the platforms we ported to. These were usually minor bugs, memory leaks, or performance bottle necks that Taptitude’s large code-base happened to expose. Fortunately, due to its open source nature, we were able to transparently disclose these issues, pick up fixes for them, and in a few cases contribute fixes of our own back into the project.

MonoGame continues to get better over time and there is a lot of potential for the framework to go beyond what XNA was ever able to do.

Summary:
  • MonoGame is a drop-in replacement for Microsoft’s XNA Framework
  • Allows XNA games to run on almost any platform with C# support (and with Xamarin that includes iOS and Android)
  • Free to use and open source

Conclusion


For anyone looking at cross platform game development on mobile platforms, Xamarin is an excellent consideration. If using C# is a priority, then using Xamarin is a no-brainer for these cross-platform scenarios. For game developers in particular, MonoGame is especially attractive as a lightweight cross-platform rendering solution (with the added benefits that come with the XNA framework such as input and math libraries).

When paired together, Xamarin and MonoGame provide a solid basis for building cross-platform games. Taptitude can now reach the full mobile market and we’re set up to continue evolving Taptitude rapidly in a platform independent way.

Taptitude - Designing for In App Purchase

$
0
0

What is Taptitude?


Taptitude is a free cross-platform mobile game that delivers over 80 unique mini-games all in one package. It started out as a small collection of relatively simple games, but over the last two years has come a long way. The games we ship in the latest versions have much more depth and replay-ability than the earlier counterparts. Each game has unique upgrade system which allows users to earn and buy virtual goods that change their game. These range from simple collectable items that are mostly decoration, to game changing abilities and items to help them earn better scores. Taptitude has over 600 of these upgrades for users to earn or purchase.

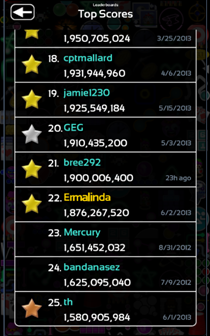
The cross-platform and worldwide leaderboards allow the users to compete for the highest scores in each mini-game. We also provide leaderboards on every individual statistic in the game, of which there are over 100! The stats range from simple measures like "Total Play Time" to very specific stats like "Most Fish" in a popular fish collecting game.

We designed Taptitude with In App Purchase in mind, allowing them to enhance the gameplay but not require it. In this article we will discuss different monetization options, how to enhance your application with IAP, and some examples that we chose to use in Taptitude.

Paid vs Free vs IAP


Assuming one of the goals of an application is to make money, deciding how to monetize is very important. The first decision, perhaps the most important one, is if the application should be free or paid. It helps to try and understand how you expect the application to be used, since this can impact how you monetize.

Paid Apps


Typically a paid app model works well for applications that perform a specific, perhaps rarely used, task. One example of an application that would fit into this category is a tip calculator app, where it is only going to be used when they are out to eat at a restaurant, and will only have the application open for a few seconds while the tip is calculated. In this situation, a free application that makes money from ads will get few impressions per user, and less total income.

Paid apps often have less downloads and spread less easily. We first released Taptitude as a paid application and found that it was very hard to get new users. This is because most users are not willing to try out a paid application, even if there is a trial. Similarly, it is difficult to tell your friend about a paid application and have them download it they are required to pay for it on the spot.

Free Apps (Ad supported)


Free apps work well if they are able to keep users in the app for large durations of time. During this time, the application is showing them relevant ads and giving the user the opportunity to click them. This results in more revenue for the application. Addicting games, eBook/comic readers, etc are good examples of apps that consume users time. A good way to think of it is more time = more money.


Attached Image: fig1.png


Free apps are much easier to attract new users. When we moved Taptitude from paid to free, we saw a dramatic increase in daily new users. This type of app spreads very easily via word of mouth, internet ads, Facebook, etc because it is so easy for anyone to install. Without having a paywall to try the app, more people are willing to download it.

In App Purchase


In app purchases are not mutually exclusive to either free or paid. They can be effectively used in combination with monetizing via paid application or ad revenue. Taptitude is a free application that makes money through ad revenue. Recently we added the option to spend money on In App Purchases as supplemental revenue. Unlike ads, which can vary day-to-day based on market demand, IAP is generally more stable.


Attached Image: fig2.png


Selling a single IAP can result in more profit than ad revenue from even a large set of users. Based on our data, it would take over 60 users using the application for 30 minutes each to equal a single 99c purchase (25c for 1000 ads, would take 4000 impressions to equal a dollar, showing 2 ads a minute that’s 2000 minutes of play time total. 2000 / 30min = 66 users).

The next section contains tips on how to use In App Purchases within an application.

+Enhance, -Restrict


The key takeaway we have gotten from Taptitude is to enhance the gameplay with in-app-purchases, and not to restrict it. We allow the users to earn nearly everything in our game without spending any money. Users can enhance the experience by purchasing the items without earning them, but are not required to do so.

With Taptitude, our goal is to get users hooked on our game without feeling like they have a hard time-limit on their fun. Many games and apps will put artificial restrictions unless you make in-app-purchases. This can restrict the amount of fun a user has, which in turn may result in less widespread adoption, less downloads, and ultimately less long-term money.


Attached Image: fig3.png


Another way to enhance your app without ruining the experience is to provide in-app-purchase customization options. This includes items that allow users to "show off" including: special icons, leaderboard name effects, outfits for characters, etc.

Lastly, try not to use in-app-purchases to create a "pay to win" environment. For games, this means the competitive leaderboards need to remain competitive to everyone including those who did not spend any money.

Cross Platform


Taptitude ships on all major mobile platforms. This includes Windows Phone 7, Windows Phone 8, Android, iPhone and iPad. To add to this complexity, we update the application every week with new content, games, upgrades, etc.

Because of the regular updates on multiple platforms, we had to design our game around code reuse. 90+% of our code compiles untouched with no special cases on the different platforms. The remaining 10% is abstracting out into different platform interfaces (certain threading APIs, email/web tasks, in-app-purchase, etc).

Although our store model and visuals are all the same across the different platforms, the APIs for in-app-purchase vary for each major platform. In-app-purchase feature sets are also not the same between platforms, and need to be thought out before going cross-platform.

Some differences include
  • Consumables (items which can be repurchased over and over, can have quantity) do not work the same way across different platforms. Specifically, Windows 8 does not have consumables but does have a time-based expiration on items which can simulate consumables.
  • Durables (items which are only purchased once and are owned forever) are not all the same across platforms. Again, some have expirations on the liscense others do not.
  • Subscriptions (monthy payments) are not supported on all platforms. Windows Phone does not support subscriptions at this time.
  • Free purchases (durable/consumable without a price) are not supported on all platforms. iOS and Android do not support free purchases.
  • Ways to store information like quantity are different per platform. On Windows Phone each item can include a blob of data (Tag) which can store arbitrary data. We used this to store JSON object containing the rewards and quantity of each. This is not available on iOS, Android, or Windows 8.

Examples


In-App-Purchases can be used in many different situations and application specific ways. In Taptitude we chose a simple set of upgrades which we will go over here.

Taptitude also provides a free Starter Pack for new users. Having a free purchase helps drive traffic into the store, and gets the users accustomed to purchasing things.


Attached Image: fig4.png


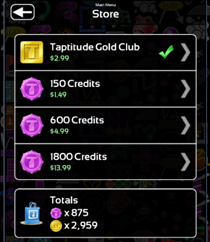
Our Taptitude Gold in-app-purchase is a durable which provides many benefits. By purchasing this upgrade, they are entered into the exclusive gold club which removes the ads from the game and customizes their leaderboard entries with a flashy gold effect. The price point on an upgrade which removes the ads needs to be well thought out, and depends on how "sticky" your application is. Although the average user will only provide a handful of ad impressions, the most hardcore users (those most likely to purchase this) can provide the most ad impressions. Taptitude's top 5 longest players have over 100 days of in-game time spent. Showing ads 2 times per minute, that's over 288,000 ads per user over the lifetime of Taptitude! Using the same math as before, this can equal upwards of 70 dollars for a single user.

Lastly, Taptitude sells in-game credits which can be used on any of the 600+ upgrades as well as other per-game specific enhancements.

GDC 2013: Interview with Beau Blyth

$
0
0
What does it take to develop video game hits? Only 8-bits! Design3 chatted with Beau Blyth at GDC 2013, where he told us all about what it's like to be a solo developer, his desire to make an NES game and the details on his hit-game, Samurai Gunn.


www.teknopants.com


GDC 2013: Interview with Jonatan "Cactus" Söderström

$
0
0
Does the thought of game development beat you up from the top down? Well, put on your chicken mask and hit back. Design3 got to speak with Jonatan "Cactus" Söderström of Dennaton Games, where he gave us the details on his hit-game, Hotline Miami, what tools he uses and the source of Hotline Miami's awesome music.


Watch more interviews and game tutorials FREE at www.design3.com


C++ Include test: full matrix

$
0
0
Finally I am able to present some include experiment results! Previously I wrote about Code Generator and now I can actually run this tool and get some numbers out of it. I compared VC11.0 (Visual Studio 2012 For Desktop) and GCC 4.7.2 (using MinGW32 4.7.2 and DevCpp).

Basics of experiment


  • VC11.0 - Visual Studio 2012 For Desktop, Release Mode, 32bit, no optimizations.
    • I turned build timings on to have detailed build performance.
  • GCC 4.7.2 32bit - MinGW 4.7.2 version and run from DevCpp 5.4.1
    • g++.exe -c testHeaders.cpp -o testHeaders.o -ftime-report
  • The machine: Core i5, 4 cores, 4GB RAM, Windows 8 64bit
    • compilation will probably take place only on one core only (there will be one translation unit only)
I run each test 3 times and then compute the average. At the end of post there is a link to detailed spreadsheet.

Code structure


The overall code structure is not a real case scenario. It was my first attempt to do such experiment and it was actually easy to create such hierarchy.


Attached Image: fig1.png

  • testHeader.cpp includes N header files
  • m-th header file includes N-1 other header files (so we have "cross" include)
  • each header file has its proper include guard

Note:  For 199 GCC will return an error "#include nested too deeply". You can read more about it in gamesfromwithin.com. In general GCC thinks that 199 include level is unreal and will block it.


Test N headers


A header can look like this in this tests:

#ifndef _INCLUDED_HEADER_HEADER_5_H
    #define _INCLUDED_HEADER_HEADER_5_H

    #include "header_0.h"
    #include "header_1.h"
    #include "header_2.h"
    #include "..."

generator.exe N 100 includeTestOutput/

N = 100

GCC3,95s
GCC Compilation2,99s
VC11.02,90s
VC11.0 Compilation2,68s

N = 132

GCC5,37s
GCC Compilation3,98s
VC11.04,31s
VC11.0 Compilation4,11s

N = 164

GCC6,49s
GCC Compilation4,92s
VC11.06,10s
VC11.0 Compilation5,91s

N = 192

GCC7,40s
GCC Compilation5,77s
VC11.07,98s
VC11.0 Compilation7,77s


Attached Image: fig2.png


Test N headers - additional ifDef


A header can look like this in this tests:

#ifndef _INCLUDED_HEADER_HEADER_5_H
    #define _INCLUDED_HEADER_HEADER_5_H

    #ifndef _INCLUDED_HEADER_HEADER_0_H
        #include "header_0.h"
    #endif
    #ifndef _INCLUDED_HEADER_HEADER_1_H
        #include "header_1.h"
    #endif
    #ifndef _INCLUDED_HEADER_HEADER_2_H
        #include "header_2.h"
    #endif
    #include "..."

generator.exe N 100 includeTestOutput/ ifDef

N = 100

GCC3,91s
GCC Compilation2,96s
VC11.01,44s
VC11.0 Compilation1,22s

N = 132

GCC5,35s
GCC Compilation3,91s
VC11.01,71s
VC11.0 Compilation1,51s

N = 164

GCC6,41s
GCC Compilation4,86s
VC11.01,98s
VC11.0 Compilation1,77s

N = 192

GCC7,31s
GCC Compilation5,69s
VC11.02,16s
VC11.0 Compilation1,96s


Attached Image: fig3.png


Test N headers - #pragma once


A header can look like this in this tests:

#pragma once
    #ifndef _INCLUDED_HEADER_HEADER_5_H
    #define _INCLUDED_HEADER_HEADER_5_H

    #include "header_0.h"
    #include "header_1.h"
    #include "header_2.h"
    #include "..."

generator.exe N 100 includeTestOutput/ pragmaOnce

N = 100

GCC4,02s
GCC Compilation3,08s
VC11.01,48s
VC11.0 Compilation1,28s

N = 132

GCC5,42s
GCC Compilation4,06s
VC11.01,84s
VC11.0 Compilation1,65s

N = 164

GCC6,64s
GCC Compilation5,08s
VC11.02,06s
VC11.0 Compilation1,86s

N = 192

GCC7,60s
GCC Compilation5,98s
VC11.02,39s
VC11.0 Compilation2,20s


Attached Image: fig4.png


Conclusion


  • The code structure is rather theoretical and does not represent 'common' structures that may appear in projects.
  • GCC and VC build code a bit different. GCC linker phase is much longer than in VC.
  • GCC uses lots of optimization for header files. There is almost no need to do any 'tricks' with includes. Header guards are enough.
  • VC likes header files 'tricks'!
    • There is above 2X to 3X speedup using additional include guards or pragma once
    • Pragma once for such code structure seems to be a bit slower than additional include guards: from 5% to even 10% slower.
  • All in all VC11.0 is faster than GCC.

What I have learnt

  • VC Release mode is not the same as GCC basic compilation
  • Make sure you set up proper experiment base
  • Automate as much as possible
  • Tool for spreadsheet is a must have-software :)
  • It is valuable to figure out how to break the compiler

Links


Link to repo
Link to spreadsheet
Article is posted also on the CodeProject

Reposted with permission from Bartłomiej Filipek's blog

Notes on GameDev: Raphael Lacoste

$
0
0
Originally published on NotesonGameDev.net
July 28, 2008


How would you like to travel the world for inspiration and research to create the art direction of a cross-console Next Gen game? That's just the kind of experience former UbiSoft Art Director Raphael Lacoste had exposure to while working on the beautiful Assassin's Creed. Although he's since decided to move into films, he reflects here on his final game work.

To start, could you explain your role in Assassin's Creed? How has the journey been in UbiSoft for the past seven years?

I was Art Director for Assassin's Creed. I arrived in the team after pre-production, so I mostly concentrated on the art of the levels and the overall Art Direction to ship the game!

Before that, I have been on and off in both Cinematics (pre-rendered) and Videogames like Prince of Persia: Sands of Time and Warrior Within. I won a VES Award in Hollywood for my work as Cinematic Art Director on Prince of Persia: The Two Thrones. My journey was great but now I have different goals, like working for the film industry.

How did your team decide on a direction for the art style? What forms of inspiration did you have? Were you influenced by your work on Prince of Persia?

We had to work on very historical references, so the part for improvisation and style was a bit limited. Even the topic is historical and we visited actual real cities like Damascus, Acre, and Jerusalem. We were really excited to create the world of Assassin’s Creed. Stylization in the picture treatment, lighting, and Image composition was a great challenge.

What challenges did you face working with Next Gen technology? How did your team resolve these challenges?

The cities are their real size--our environments are quite huge! We had to deal with a lot of LODs (level of detail modeling) and full interactivity. That means that you will never have a loading screen since you are in a city--you will be able to see the whole city from a tour, run in the streets, jump from rooftops to roofs... This is quite fun, but was a big challenge for us to make as a good-looking but also fun game.

What software did you use, and how did you decide what was best for Assassin's Creed?

I was not a technical person on Assassin’s Creed, but I do know we worked with 3DsMax--it is a tradition in Ubisoft.

How many team members did you have, and how was the teamwork managed?

The full team included up to 160 people. We had 50-80 people in the Art/Design team--quite a big team. Fortunately we had team leads and project managers for each team (characters, city levels, kingdom levels).

What are you most proud of in Assassin's Creed?

This game is fun, but I think it is also beautiful. I did my part and I can be proud of it!

Where are you headed from here?

I now work for Rodeo FX, a small VFX company in Montreal working on big projects. I’m doing production design for Film and Matte Paintings--I enjoy learning new stuff!

Creating a Business Plan

$
0
0
It’s true that you don’t need to create a formal business plan in order to start a business. You can kickstart a business very quickly without having to plan out every detail in advance.

That said, there can be tremendous value in planning. Thinking through a business in advance is hard work and requires deep concentration (if you want to do it well), but the payoff is a significant increase in clarity and a better shot at creating or expanding a successful enterprise.

I spent most of last week creating a new long-term plan for my business, which I just completed on Friday. I hadn’t done anything this thorough since 2005. It was incredibly tough mental work, and I put in many 12-16 hour days in a row, sometimes working so hard that I literally fell asleep at my desk. Then I’d wake up and work on it some more.

Since I’ve just been through this process, let me share some thoughts on creating a written plan for your own business.

Planning for Yourself vs. Planning for Investors


There’s a big difference between creating a business plan for your personal clarity vs. creating a plan to attract funding. Most of the business planning information I’ve seen in books or online is heavy on the latter side. If you don’t need outside funding, you can probably ignore 30-50% of the typical suggestions for what to include in a business plan.

There can be value in doing some of the work that it would take to impress an investor. Thinking through the financials is a good idea, but in practice a lot of what goes into an investor-based plan is actually persuasion as opposed to serious planning. Financial projections can be incredibly subjective, and you can’t predict with much accuracy what’s going to happen under real-world market conditions anyway. Overplanning is also a waste of time — you need to guard against filling your plan with irrelevant details that simply won’t matter one way or another.

I set financial goals for my business, but I don’t bother making predictions which are merely guesswork. Instead I spend more time planning how my business can adapt to whatever conditions may occur.

My business plan is created solely for me, and to a lesser extent, for those who work closely with me. I’ll never show it to an investor or banker because I’m confident I can continue to grow the business with a strategy that requires no outside financing.

Thinking Strategically


Business planning helps you think strategically about the road ahead. You only have so much time each day, month, and year to make decisions and take action. For many business owners those actions are chaotic and unfocused. They start projects they never finish. They miss opportunities by failing to act promptly. It’s very easy to hit a plateau and get stuck there for years.

A clear, committed strategy helps to cut through all of that. It sharpens your day to day choices. It provides an intelligent framework for action.

The problem, however, is that there are many valid strategies for growing a business. You will undoubtedly have more opportunities than you have time to pursue them. You can’t do everything well. If in the back of your mind, you’re oscillating between several different primary strategies, you’ll have a hard time growing your business if these strategies don’t mesh incredibly well.

I could grow my business in a variety of different ways. I could blog more often. I could write more books. I could expand into videos. I could expand my workshop offerings and begin doing them in different cities. I could invest in more marketing and PR. I could do guest blogging and accept more interview requests. I could get back into podcasting. I could start a membership site or paid subscription service. I could hire a few personal coaches and open a coaching program. I could turn my blog posts into products to sell. I could expand my social media presence. I could launch my own affiliate program (for workshops and future products). I could do more joint venture deals.

We could do any or all of these things, and many of them would be effective. But we can’t do all of them well. We might be able to do one or two of them well at any given time.

Thinking strategically requires deciding which fronts not to open. To create a practical and realistic business plan, I had to make some tough choices about which directions not to pursue. At first glance, almost everything looks golden. But with some deeper probing and a lot of analysis, I could discern which opportunities are truly the best relative to the others.

The Planning Process


Planning is an iterative process. In many areas you won’t know the best decision to make. At best you’ll be able to identify some options, but you won’t have much clarity about which possibilities make the most sense.

The way I resolve this is by taking a stab at each part. You can’t leave things in a wishy washy state, or you’ll end up with no workable plan at all. You have to keep pushing towards resolution and convergence. A good way to do this is to force a decision in a particular part of your plan. Then see how it fits. If it doesn’t feel right, yank it out, and try another possible solution. Repeat till you get it right.

Planning is an exploration of the potential solution space. To find the right combination of products, pricing, marketing strategies, staffing, and more, take some guesses and see what the big picture looks like. Then notice how those different elements mesh together.

It’s much like creating a song. Choose some notes and sequence them together. Then listen to the result. Does it sound harmonious? At first it probably won’t. But what’s creating the disharmony? Can you identify one misalignment? And can you fix that?

Then you keep tweaking and listening, tweaking and listening. Write out each new idea in great detail. Then read it back.

Sometimes you’ll get inspired ideas. Sometimes you’ll have to use a lot of perspiration, testing multiple ideas to find the right one.

My business plan is only 23 pages, but I probably wrote at least triple that to create it. For some parts of my business, intelligent solutions were fairly obvious. But in other areas, the right approach wasn’t obvious at all. My first stab produced a lot of text, but when I stepped back and read it within the context of the rest of the plan, it wasn’t harmonious. Perhaps my website would be delivering one message, but my products and pricing were likely to be incongruent with that message; the predicted consequence of that disharmony is that my business would end up attracting people who’d resist being customers — not a very sustainable approach.

This is a really important point to emphasize. To achieve convergence you can’t just sit and ponder until the right idea pops into your head. You have to take some guesses and run with them. Take a stab and fully document how it’s going to work, as if you’ve already made your final choice. Then look at it within the context of the rest of your plan. Does it seem harmonious? Does it support the other areas beautifully and elegantly?

My major rule here is that if it doesn’t feel elegant (or sound harmonious, or look beautiful — take your pick of modality analogies), it’s wrong. I know I have the right solution when a wave of awe washes over me, when I have to get up out of my chair and pace around so I can just be with that feeling for a while. Then I know I’ve figured out a key piece.

Deep Honesty


Deep honesty means being able to look at what you’ve planned and answer these questions:
  • Is this an intelligent approach?
  • Is this an honest approach?
  • Is this a loving approach?
  • Is this a strong plan, or am I caving to weakness and low standards?
  • Is this a harmonious plan? Is it elegant and beautiful?
  • Will this be a path of continued growth for me?
  • Is this a courageous path, or am I playing it safe?
This is akin to asking a musician after many days of hard work, What do you think of your finished song? Will you get a fair and honest assessment, or will the answer be overly biased by the musician’s personal investment in the song?

There’s a temptation, especially when you’re tired after working so hard, to capitulate to a flawed plan. At some point you’ll want to say, This is good enough. You’ll want to label weak as okay, okay as good, and good as great. You’ll want to turn in B-quality work hoping to get an A.

But if the plan isn’t harmonious and elegant… if it doesn’t knock you back in your chair… if it doesn’t quicken your pulse like a beautiful song… you’re not done. You mustn’t say “it’s good enough.”

Hold out for the truly elegant solution — not by waiting, but by continuing to diligently explore until you find it.

How do you know when you’ve found a beautiful solution? If you have to ask, you haven’t found it yet. When you find it, you’ll know. If you don’t know that you’ve found it, you haven’t.

Listen to your very favorite song, one that you’d consider a masterpiece. When you listen to it, ask how you know it’s beautiful. You probably can’t articulate exactly why. You know that it’s good by how it makes you feel. If you have to seriously ask yourself whether the song is beautiful, you already know that it isn’t. Beauty is recognized, not analyzed.

When Martin Gore wrote the song “It’s No Good,” he knew he’d created something good (ironic given the title). He called Depeche Mode bandmate Andy Fletcher and told him, “I think I’ve written a number one.” And in many countries, it did hit #1. (source: DM biography Stripped).

This is how it is with a good business plan. When it’s finally done, you’re compelled to take a deep breath and say something akin to, “I think I’ve written a number one.”

When you’ve created a song you know is amazing, you can’t wait to share it with people. Similarly, when you have a business plan that you truly love, you can’t wait to implement it. But if your song (or your plan) is weak, then moving forward is more difficult. You’re more likely to procrastinate because you know you haven’t done your best work.

If you don’t love it, you’re not done. A plan you don’t love isn’t finished. How do you know you love it? Again, if you have to ask the question, you’re not there yet. A great plan will excite you.

What to Include


There are many guides to creating a business plan, but so many of them are filled with fluff, or they may be inappropriate for your particular business. Most of the ones I’ve seen are ridiculously archaic. In doing some research, I came across a business planning tutorial from Entrepreneur Magazine. Their template appears to be based on a manufacturing business. Seriously… what percentage of entrepreneurs are starting new manufacturing businesses these days? Perhaps they should note what century this is.

If you need to create a plan for investors, then you may want to follow conventions that they expect. But if, like me, you’re just creating a plan for yourself and your team members, then make sure the plan fits your business. Feel free to take advantage of online templates, but adapt them to your needs. If a section seems irrelevant, it probably is.

My plan has the following sections:

Overview – What’s the basic concept of the business? What is its purpose?

Business Description – What does the business actually do? Who are its customers? What are its products and services? What value does it provide? How does it earn income? What’s special or unique about it?

Market Strategies – What’s the target market for the business? How will you position it? How will you get the word out and reach potential customers? Why should anyone care about what you can provide? What’s your distribution strategy? What kind of PR will you do? Who’s your competition in the marketplace? What’s your strategy for dealing with competition? What’s your search engine strategy?

Pricing – What’s your pricing strategy? Do the numbers make sense? How will this affect your market positioning? This can be one of the most challenging sections to get right.

Social Media Strategy - How will you leverage social media? How does social media mesh with the rest of your business? Can you use it intelligently without seeing it become a distracting diversion? I haven’t seen any business plan templates that include a separate section for social media, but I include it because it’s a part of my business (blog, forums, Google+, etc), and it’s a growing segment that will likely be around for at least the rest of the decade. StevePavlina.com’s own discussion forums will soon pass 1 million messages posted.

Development Plan – How will you take the business from where it is now to where you want it to go? This is where you linearly plan out the steps to go from A to B. Document the key processes your business will need to execute. Identify the major risks, and decide how you’ll manage them. I prefer to spin off separate documents for this section, so it doesn’t become too bloated. For instance, I have other planning docs for my staffing plans, my process for creating and delivering workshops, my process for creating new products, etc. Those plans are 2-7 pages each, so if I included them in the main doc, it would probably be around 50 pages in length. Expect to spend a lot of time on this part of the plan.

Business Finances - In this part of the plan you can include things like balance sheets, income statements, and cash flow statements. You can analyze your costs as well. For a new business these will be projections (which are often just guesses). For an existing business you can use historical data and also include projections if you so desire. I don’t bother to include this section in my plans because my business has been profitable for years (October 1st, 2011 was its 7-year anniversary). I’m not trying to impress any investors, and I can use my accounting software to review my financials whenever I desire. I don’t bother to make future projections since I think it’s largely a waste of time. Another reason this section is largely irrelevant to me is because my business has a very low cost structure. My growth plans don’t require spending much cash, and the existing cash flow will cover it. I also have plenty of ways to quickly adapt to a cash crunch, so I simply don’t need to pay as much attention to this area. This would be an important area to fill out if you’re investing a lot of capital into the business, and you need to convince yourself and/or others that you have a sound plan for recouping that investment. But if your projections ultimately amount to guessing, why bother?

Closing – I like to include a half-page closing of just a few paragraphs to summarize the key strategic decisions. Since I already have a business, my main focus here is about what I need to start doing differently in order to implement the plan. What do I need to start doing? What do I need to stop doing? What do I need to change about the ways I’m doing things?

Thinking Holistically


Each part of a business plan is like a puzzle piece, and the entire plan is the puzzle. Your puzzle may have 100 pieces to it. But you may be able to identify 500 puzzle pieces. Many of those pieces will look like they fit the puzzle, but when you include them, it will feel like the puzzle isn’t quite coming together.

A holistic plan is one where all of the pieces support each other to create a singular picture. When you have this picture, your business will seem much simpler. Without this picture all you have is a jumble of pieces, each one demanding your attention. You don’t have the capacity to give all 500 or even all 100 puzzle pieces your full attention. But you can give your attention to the big picture, and if those 100 pieces all fit together beautifully, you’ll be giving them the right level of attention when you focus on the big picture.

As I created my business plan, I realized that the process requires a lot of deleting and letting go. There were some puzzle pieces I was very attached to, pieces I’d assumed should be important components of my business, but when I included them, I had to conclude they didn’t fit the big picture.

Letting go of the unneeded bits requires a lot of self-awareness. I had to pause many times and admit to myself that I didn’t feel good about a particular aspect of my plan. Occasionally I worked through the math behind an idea, or I tried to project the idea forward in time to think about the long-term consequences. In some cases I could see that 5-10 years down the road, I’d be left with a very undesirable situation, even though the first year looked great. Other times my intuition would be the dissenting voice. If any part of me disagreed with the idea, I knew I had to rework it or let it go. My commitment was to create a plan that made logical sense, that felt good, and that satisfied my intuition.

One thing that helped me tremendously was to do a 7-day all raw no-fat cleanse before I began this planning process. I started with a 24-hour water fast, and then for the next 6 days I ate nothing but fresh fruits and vegetables. No salt. No spices. No oils. No sweeteners. No overt fat sources like avocados, nuts, seeds, or coconuts. Just raw, water-rich fruits and veggies, water, and some occasional herbal tea (no caffeine). I lost 4.5 lbs during that week, but that was nothing compared to the mental clarity I experienced. After about 3 days, my mind became super sharp, as if I had more working memory available for conscious thought. I wasn’t even going to make a business plan at this time, but when I started working on other planning documents, I couldn’t help but notice how sharp my thinking was. I blazed through a day’s worth of work in a couple hours. When I tackled really hard problems that had challenged me for months or years, simple solutions were suddenly obvious. I felt a bit stupid for not seeing them earlier.

I realized I had to take full advantage of this heightened clarity for as long as it lasted, so I dove into this business planning project and worked each day till I was ready to drop. I’m so glad I did because I think I was able to do a better job in a week than I probably would have been able to do in a month if I didn’t have this extra clarity. If you’ve seen the movie Limitless, the experience was almost like taking one of those pills — not quite that good, but enough to notice a difference.

I’m still feeling this heightened clarity now, but I can tell it’s not quite as high as it was near the end of the cleanse week (which ended last Sunday). I’m probably still enjoying 60-70% of that boost though. I’ve never done a cleanse like this before (I’ve done low fat but never no fat), so this was a new experience for me. I’ll very likely do more cleanses like this when I want to regain that mental boost. The productivity I’ve been enjoying these past couple weeks has been amazing. I’d love to learn how to create this level of mental performance permanently, but I’ve had problems with eating very low-fat in the past for more than 2-3 weeks (like having my skin become so dry that my knuckles were cracked and bleeding).

I’m not saying you have to do a similar cleanse to create a decent business plan, but I am suggeting that it makes sense to be at your mental and physiological best when you do it. The sharper your mind is, the better your plan will be. This is incredibly challenging work that will stretch your brain to its limits. Give yourself every advantage you can.

Competitive Advantage


One of the most important parts of a good business plan is identifying your business’ competitive advantages. Many planning templates have you start by doing market research and looking for market gaps. Then you deliberately target those gaps to position your business competitively relative to existing businesses. You look at what the other players are doing, and you target where they’re weak.

I prefer to approach this from a different angle, especially for small Internet businesses. Start by looking at your personal strengths. How are you different from others? What can you do better than most people? Or what could you eventually learn to do better than most if you worked at it?

If you start with a strengths-based approach, then you need to massage your strengths into a competitive advantage that people will care about. A strength is probably something that matters only to you. It may take some work to transform it into a benefit for your customers.

One of my strengths is that I can develop quality content on many topics much faster than most of my competitors can. I can create in an hour what takes many of them half a day to a day to do.

Being a prolific content creator isn’t necessarily a competitive advantage, but it can be turned into one. For instance, by using this strength to write lots of quality free content, I was able to build very high web traffic in just a couple years. This was largely under my direct control too. I didn’t need Oprah to host me on her show. I didn’t need outside investors to give me money. Now I’m able to leverage this traffic to do things that most of my competitors can’t, such as delivering workshops without spending any money on marketing or promotion. I can also develop workshops faster, which allows me to launch several new workshops simultaneously instead of doing the same one or two over and over.

While you may not like the idea of thinking competitively, it’s wise to view your business through this lens and give it some careful thought. People have an incredible array of choices today. Why on earth should they buy from you instead of from someone else? If you can’t come up with a good reason, don’t expect your customers to figure it out for you. They will indeed buy from someone else.

If you can’t think of any major strengths, then what makes you different? What sets you apart from other people? If you embrace your differences, you may see that you can turn them into strengths. For instance, I live in Las Vegas, which is different than where most people live but not necessarily better. However, I’m able to turn this into a strength by doing workshops on the Las Vegas Strip, which is a fun and lively place. I take full advantage of the location by inviting people to do special exercises in the casinos and on the Strip and by encouraging people to hang out socially after hours, see shows, etc. This provides them with fun, memorable experiences that they won’t have at other people’s workshops. Living in Las Vegas is merely different, but with a little creativity it can be made into a strength.

What’s different about you or your business but not necessarily better? Can you massage one or more of those differences into a strength for your customers? Is anyone else already using similar differences to create a competitive advantage?

Thinking Long-term


Business planning will challenge you to think long-term, years and decades ahead.

I use a time frame of 10-20 years for most aspects of my plan. If I think only 6-12 months ahead, I fail to see how particular paths can magnify into problems down the road, and I overlook major opportunities. If I try to think more than 10-20 years ahead, my plan becomes too speculative, although I can think further out for some aspects that are likely to remain stable.

A lot can change in 20 years. If you had a PC 20 years ago, you probably had a 386 or 486 running MS-DOS 5.0 and possibly Windows 3.0. Windows 3.1 didn’t ship till 1992, and Intel didn’t ship the Pentium processor till 1993. No smart phones. No iPods or iTunes. No web browsers. No Google or Yahoo. No YouTube. No social media unless you liked BBSing. You may have had email, but you probably checked it using a slow dial-up modem. If you did use the Internet, you may have accessed it via CompuServe, Prodigy, or AOL. If you owned a video game system, it was probably a NES, Super NES, Sega Genesis, Turbo Grafx, or Neo-Geo… or Game Boy or Game Gear for a handheld. If you went to the movies, you’d have be wowed by the 3D special effects in Terminator 2.

So if so much is going to change, how can you possibly create a long-term plan that makes sense? Isn’t planning pointless in light of such uncertainty?

The purpose of planning isn’t to predict the future. The purpose of planning is to sharpen your present day decisions and to give your business an intelligent basis for growth.

It’s true that you can’t know what’s going to happen even a few years from now. Surprises will occur. Some of those surprises will help your business. Others will throw you for a loop. No matter what, you’re going to have to adapt as you go along.

But some aspects of the future may be fairly predictable. I feel good in predicting that personal growth will still be important in 20 years. It’s been around for thousands of years. It will probably survive a few more decades. Actually I predict it will be even more important in 20 years than it is today. For at least the last few decades, this field has been trending towards expansion, growing by many billions of dollars in annual revenue within the past five years alone. People are spending more on personal growth than ever before. And as far as I can tell, this increase is expected to continue for many more years.

One of the reasons personal growth will become increasingly important is that change is accelerating, especially technological change. The job market will continue to shift. To be competitive workers, people will need to adapt more quickly than ever to changing circumstances. They won’t be able to trust that they can just get a job and keep it for decades.

I predict that traditional educational systems like universities will become increasingly less relevant, failing to adapt quickly enough to marketplace changes. By the time a student graduates from a 4-year degree program, so much of what they learned will already be obsolete. This is already a major issue today, but it will continue to get worse. College grads will enter the workforce wholly under-prepared for the competitive realities of the workforce. This creates tremendous opportunities for the personal growth field (which overlaps traditional education) to fill in the gaps. There will be increasing demand for faster, more intelligent, more practical sources of education — forms that can adapt their curriculums more quickly to changing circumstances. Archaic elements like tenure only make it harder for old systems to adapt, so if those structures aren’t replaced with more flexible systems, those institutions will be out-competed by smart entrepreneurs who are willing to embrace change. To some degree this is already happening, and I expect this sort of change to continue.

The business opportunities in education alone are staggering. I’ve lost track of how many millionaires I’ve met who built successful businesses teaching people important skills that aren’t normally taught at traditional universities. By leveraging the Internet, they can do it at much less cost for their students, they can do it faster, and they can keep their programs modern and practical under today’s conditions.

All this growth and expansion will create more confusion and stress. Self-discipline and focus will become increasingly important qualities for people to develop since distractions will surely keep expanding. The demand for better management of one’s life will increase significantly.

You don’t need to be a technologist to make some reasonable predictions about the future. Just look at some of the general trends that have been building for years, and project them forward. Smart phones will get smarter and will become even more common. Tablet computers will become more powerful and more common. Data transfer rates will increase. The Internet will become much bigger. New major players will emerge. There will be more interests competing for your attention than ever before.

Some major breakthroughs will occur, and human beings may begin integrating tech-based enhancements onto or into their bodies, but the concept of growth won’t go out of style. Very likely it will become even more important. The fastest growing, fastest adapting people will have a major competitive advantage over those who are slow to adapt. This remains true whether the world of the future becomes more abundant or more scarce.

By making some reasonable predictions about the needs of future humans (or cyborgs, or whatever we become down the road), you can make decisions today that set yourself and your business on a path to long-term success. You can avoid getting bogged down in short-term thinking that leads you astray. You can build a business to grow in alignment with the direction that the world is heading, not where it’s been.

I can see pretty clearly that people are going to need a lot more help with focus, self-discipline, and self-control over the next several years. I can see that many traditional educational institutions are going to get worse in terms of their ability to teach students skills they’ll need in today’s workplaces, especially as they have their budgets slashed. I can predict that more people are likely to access my work on devices that aren’t a desktop computer or a laptop. This helps me make intelligent choices about how my business can serve those needs while remaining flexible and adaptable.

It’s important to get clear on the difference between your medium and your message. Your message can remain fixed, even under changing circumstances, but your medium must remain flexible if you want to have a competitive business across decades in time. My message is conscious growth, and that message can adapt to many different media. I don’t need to worry that blogging may someday go out of style. Ten years from now, most of our interactions may occur through a medium other than blogging. Growth is my business, not blogging, and growth can be communicated in many forms. With a plan based on your message, you don’t need to fear change; rather, you can be excited by all the new opportunities change can bring. (For more on this notion, read The Medium vs. the Message.)

Clarifying the Core


When you finally complete your business plan and clarify the big picture, you may feel a newfound sense of excitement about it. Ultimately the core of your business will probably be something very simple, perhaps something so simple that you were inclined to overlook it.

In my case when I saw the big picture, I realized that it ultimately came down to one simple principle. In order to have a business that really works, I have to focus first and foremost on pursuing my own path of growth. Making money doesn’t work as the main focus. Creating products or doing workshops can’t be the main focus either. In order to succeed, I have to make sure the business is tough on me. I can’t allow it to become so easy that I no longer feel challenged.

When I feel challenged, I’m much more motivated, so I work harder, and my business thrives. When it gets too easy or repetitive, I lose interest. If I don’t feel I’m growing by running the business, that’s a problem. So I have to run it in a way that keeps me in that sweet spot of challenge. That sweet spot, however, is a moving target. It’s not a static spot. And so I came to realize that the only way I can make my business viable and successful in the long term is that I have to relate to it as a vehicle for my own growth and development.

If I stop growing, my business loses its value to me. I begin to check out from it. I’ll turn my attention elsewhere to keep growing. And the business will ultimately suffer for that.

Intuitively I’ve known this all along, but it was difficult to see it till I worked through all the details and finally understood it logically too. It may seem like an emotional or even an irrational choice to define the primary purpose of my business as serving as a vehicle for my own growth. But when I worked through the consequences of that focus, I understood that if I make this my primary focus, then many other intelligent choices flow smoothly from there. I have to help other people grow in order to grow faster for myself — I can’t grow much in a vacuum. I have to innovate. I have to make the business financially sustainable since going broke isn’t going to help me as much as creating more abundance will. I already did the going broke thing more than a decade ago and don’t see much point in repeating it.

This simple understanding helped me remove many puzzle pieces I might otherwise have kept. I now see with much greater clarity that it’s unwise to try to expand my business in directions that won’t help me grow.

I don’t think this is particularly unique though. I think the appeal of entrepreneurship for many people is the long-term personal growth that’s gained from this path. That’s what keeps a business fresh and exciting for the founder. That’s what got me out of bed at 5am this morning. When that growth is no longer present, it’s a good time to sell or leave, so you can move on to new growth experiences.

What’s really interesting about this is that even though I mainly used the objective perspective to develop this business plan, the end result is nicely congruent with the subjective perspective as well. What does a business matter in a dream world? The subjective value is how the business affects you, the business owner. It doesn’t matter how much dream money you accumulate or how many dream characters you can count as customers. What matters is the story you’re creating and how it affects your character’s development. This is of course perfectly in line with what we should expect from the Equivalency Principle, which I’ll be covering in more detail at the Subjective Reality Workshop in less than two weeks.

Completion vs. Perfection

$
0
0
There’s a big difference between completing a project and perfecting a project. Perfectionism frequently works against the drive for completion.

A final work product doesn’t have to be perfect to produce strong results. However, the project must be essentially complete.

A mediocre but complete film script can still be made into a movie. A beautifully crafted but half-finished script is largely worthless.

An unpolished but shippable software program can still provide value to customers and generate sales. A feature-rich but perpetually unshippable piece of software will usually generate zero sales (QuickBooks notwithstanding).

Completion generates results. Perfectionism delays or kills results.

Perfectionism vs. Polish


Perfectionism isn’t the same thing as polishing. Polishing a completed project can make it even better, as long as the polishing process doesn’t incur unreasonable delays or lead to the cancelation of the project. In many cases polishing can be done after the initial project is declared complete. A book can be revised in future editions. A song can be remixed. A website can be updated after it’s online.

I’ve done well as a blogger because I publish articles, not because I write them. I never feel that any article I post is perfect. But I push myself to publish what I write, even though the result is always less than perfect. This gets value into people’s hands, and it generates web traffic and income for me. My website is far from perfect as well, but it’s functional enough to deliver value to people. This is a better result than the perfect website with the perfect content with the launch delayed indefinitely.

Standards for Completion


While it’s great to have high standards for quality, how do those standards affect your ability to complete projects?

Are your standards for quality so unrealistic that they prevent you from being able to do the work necessary for completion?

If you claim to have high standards, but you aren’t producing much deliverable output, then I would suggest that your standards are lame. What good is a standard if it doesn’t produce results?

Make sure that your standards serve your drive for completion. When are you going to deliver something finished? How are you going to bring your project to a close and get it released?

Fantasy Standards


A fantasy standard is one that allows you to delude yourself into believing that you’re creating something of incredibly high quality or value, but you aren’t actually delivering the final work product within a reasonable period of time.

One reason people adopt fantasy standards is that they fear delivering their final work product.

It can be scary to deliver something that’s imperfect. As long as you’re still “working” on a project that hasn’t shipped, you can succumb to the delusion that when it finally does ship, everything will be rosy.

The truth is that whenever you do deliver your final work product into someone else’s hands, it will virtually never be received with 100% appreciation and gratitude. Someone will always find fault with it. This comes with the territory.

If you release a movie, people will give it negative reviews. If you publish a book, people will criticize it. If you launch a website, some people won’t like it.

Accepting the Consequences of Completion


If you expect that when you complete a project, the consequences will all be perfectly positive, this will fuel your sense of perfectionism, and you’ll suffer endless delays.

The truth is that completing a project will usually result in a mix of positive and negative consequences.

If your project is a good one, however, the best you can hope for is that the positive consequences will outweigh the negative consequences. But don’t be so naive as to presume that you’ll be able to avoid all the negative consequences.

I recently read a biography of Depeche Mode, which is my favorite music group. Given their immense popularity and their tens of millions of sales, they’ve been one of the most successful bands of all time. But whenever they release new material, some members of the music press always trash them. No matter what they do, some well-known reviewer will give them a rating like 1/5 or 2/5. The band constantly received scathing reviews.

Of course they received many positive reviews too, but there’s always someone willing to criticize their work. Some of their most popular songs like “Master and Servant” and “Blasphemous Rumours” were even banned in certain places due to being too controversial or racy, so they lost out on a lot of potential radio play.

And yet despite these and many other difficulties, they continued to publish more music, and they’ve been incredibly successful, and countless bands have said that DM has been a major influence on them.

The band has certainly had its ups and downs over the years (drug addiction, attempted suicide, divorces, depression, personality clashes, etc.), but despite all of those problems, they’ve been able to pull together and complete songs and get them released to the public. Their songs aren’t perfect (except for “Perfect” I suppose), but they’ve been very good at getting songs and albums finished. Sometimes it was very difficult for them, but they kept on publishing, as opposing to creating half-finished songs and setting them aside.

Many of of DM’s songs are only so-so, but by continuing to publish again and again, they’ve managed to create many solid hits along the way, such as “Enjoy the Silence”. And still for every hit, there’s some reviewer who’s willing to say, “That song is lame and here’s why…”

A More Realistic View of Success


Success in any venture is never 100% Smurfy. The roses always come with thorns.

When you do complete some great projects and you enjoy the success that comes as a result, you’ll invariably have to deal with some negative consequences that come along for the ride. Ultimately you’ll have to devote some time to thorn management.

This isn’t an untenable problem. Thorns can be managed. However, it’s important to accept that these thorns exist and that occasionally you’ll have to deal with them.

Perfectionism can be regarded as an unwillingness to deal with the thorns of success. But since the thorns are largely unavoidable, the only way you can realistically save yourself from having to deal with thorns is by preventing success itself. When you don’t consciously realize that you’re resisting success in this manner, it shows up as perfectionism. This gives you the impression that you’re working towards the results you desire, but in reality your projects always get sidetracked. Of course, you’re the one who’s subconsciously derailing them.

I have many friends who could be considered highly successful, and they all have thorns to deal with. Some are international bestselling authors. They’ve been on Oprah, and they enjoy a high standard of living. However, they also have to deal with the stress of busy travel schedules and lots of people wanting something from them. If you got to know them, you’d never say that their lives are perfect. But they do tend to be happier when they’re achieving new goals and getting projects completed. Most authors I know are quite radiant when they’ve just finished a new book.

Playfully Engaging With the Negative Aspects of Success


When you adopt a more realistic view of success, it becomes easier to complete projects. Perfectionism is less of a problem when you’re willing to accept the negative consequences that tag along with the positive ones.

Whenever I publish a new article, I know that some people won’t like it. Even when I feel I’ve shared some great insights, I know from experience that some people will think it sucks. Some people will criticize my article on their own blogs. Every now and then, someone actually launches a whole new blog just for the purpose of criticizing what I write. I accept all of that because it’s a side effect of success. These thorns come with the roses I receive. If I was failing, these thorns wouldn’t be arising.

What works for me is having a playful attitude towards the negative aspects of success. I think it’s unwise to take ourselves too seriously. If we fully and completely accept that success naturally includes some downsides, then we can relax and enjoy the creative process without undue stress or delay. It’s like accepting that if you win the lottery, you’ll lose a significant percentage of your winnings to taxes, and your old friends may start acting weird around you. If you accept that this is okay, then you can enjoy the win without stressing over the consequences.

Perfectionists fear the negative aspects of success, such as turning in a completed work project and having their boss criticize it, or releasing a book and seeing it get negative reviews. But if you turn towards this fear of negative results and engage with it playfully, the fear will greatly diminish. It’s easier to complete projects when you aren’t resisting completion due to fear of negative consequences.

One of the ways I’ve played with this in the past was to intentionally write some articles that I expected would generate mostly negative feedback. I still thought the articles were interesting and worthwhile, but at the time of publishing, I figured that most people wouldn’t like them very much. I wrote them partly as an act of courage for myself, so I could get past any lingering fears regarding negative feedback. I thought this would make me a better writer in the long run since I’d be more willing to take risks instead of playing it safe. As I expected, those pieces did generate plenty of critical feedback. But then again, some people loved them, and ironically one of those articles (10 Reasons You Should Never Get a Job) became my most popular article ever. By playfully embracing the negative aspects of success, I actually invited more of the positive aspects into my life as well.

In retrospect this was a healthy exercise because it helped me develop the willingness to publicly explore a broader range of topics.

Think of this process as immunizing yourself with respect to the negative aspects of success. If you playfully engage with the negative aspects, you probably won’t see them as such a big deal. Your reaction will become less resistant and more neutral. You might even come to enjoy what you once felt was negative. For example, you may learn to appreciate the extra publicity, links, and traffic your critics send you.

Loving the Finish Line


Whenever you cross the finish line, the result is never perfect. You’ll always look back at the days behind you and feel you could have done better. Celebrate and enjoy your finishes anyway.

Ten years ago I ran the L.A. Marathon. My performance sucked because I ran with a knee injury (which wasn’t such a good idea in retrospect), and I was in pain for most of the race. It also rained for the first two hours of the race, so I ran wearing a plastic bag, and my shoes got wet. But I still crossed the finish line and picked up my finisher’s medal. I couldn’t run for many weeks afterwards, but I’m glad to have actually completed a marathon.

It’s helpful to accept and embrace the negative aspects of success, so don’t resist success. But at the same time, we can still focus most of our attention on the positive aspects. Accept the presence of thorns, but let the rose inspire you.

Your results will never be perfect, but a pretty good result is better than no result.

Overcoming Procrastination

$
0
0
Procrastination, the habit of putting tasks off to the last possible minute, can be a major problem in both your career and your personal life. Side effects include missed opportunities, frenzied work hours, stress, overwhelm, resentment, and guilt. This article will explore the root causes of procrastination and give you several practical tools to overcome it.

The behavior pattern of procrastination can be triggered in many different ways, so you won't always procrastinate for the same reason. Sometimes you'll procrastinate because you're overwhelmed with too much on your plate, and procrastination gives you an escape. Other times you'll feel tired and lazy, and you just can't get going.

Let's now address these various causes of procrastination and consider intelligent ways to respond.

1. Stress


When you feel stressed, worried, or anxious, it's hard to work productively. In certain situations procrastination works as a coping mechanism to keep your stress levels under control. A wise solution is to reduce the amount of stress in your life when possible, such that you can spend more time working because you want to, not because you have to. One of the simplest ways to reduce stress is to take more time for play.

In his book The Now Habit, Dr. Neil Fiore suggests that making time for guaranteed fun can be an effective way to overcome procrastination. Decide in advance what blocks of time you'll allocate each week to family time, entertainment, exercise, social activities, and personal hobbies. Then schedule your work hours using whatever time is left. This can reduce the urge to procrastinate because you work will not encroach on your leisure time, so you don't have to procrastinate on work in order to relax and enjoy life. I caution against overusing this strategy, however, as your work should normally be enjoyable enough that you're motivated to do it. If you aren't inspired by your daily work, admit that you made a mistake in choosing the wrong career path; then seek out a new direction that does inspire you.

Benjamin Franklin advised that the optimal strategy for high productivity is to split your days into one third work, one third play, and one third rest. Once again the suggestion is to guarantee your leisure time. Hold your work time and your play time as equally important, so one doesn't encroach upon the other.

I'm most productive when I take abundant time for play. This helps me burn off excess stress and enjoy life more, and my work life is better when I'm happier. I also create a relaxed office environment that reduces stress levels. My office includes healthy plants, a fountain, and several scented candles. I often listen to relaxing music while I work. Despite all the tech equipment, my office has a very relaxed feel to it. Because I enjoy being there, I can work a full day without feeling overly stressed or anxious, even when I have a lot to do. For additional tips to make your work environment more peaceful and relaxing, read the article 10 Ways to Relaxify Your Workspace.

2. Overwhelm


Sometimes you may have more items on your to-do list than you can reasonably complete. This can quickly lead to overwhelm, and ironically you may be more likely to procrastinate when you can least afford it. Think of it as your brain refusing to cooperate with a schedule that you know is unreasonable. In this case the message is that you need to stop, reassess your true priorities, and simplify.

Options for reducing schedule overwhelm include elimination, delegation, and negotiation. First, review your to-dos and cut as much as you can. Cut everything that isn't truly important. This should be a no-brainer, but it's amazing how poorly people actually implement it. People cut things like exercise while leaving plenty of time for TV, even though exercise invigorates them and TV drains them. When you cut items, be honest about removing the most worthless ones first, and retain those that provide real value. Secondly, delegate tasks to others as much as possible. Ask for extra help if necessary. And thirdly, negotiate with others to free up more time for what's really important. If you happen to have a job that overloads you with more work than you feel is reasonable, it's up to you to decide if it's worthwhile to continue in that situation. Personally I wouldn't tolerate a job that pushed me to overwork myself to the point of feeling overwhelmed; that's counterproductive for both the employer and the employee.

Be aware that the peak performers in any field tend to take more vacation time and work shorter hours than the workaholics. Peak performers get more done in less time by keeping themselves fresh, relaxed, and creative. By treating your working time as a scarce resource rather than an uncontrollable monster that can gobble up every other area of your life, you'll be more balanced, focused, and effective.

It's been shown that the optimal work week for most people is 40-45 hours. Working longer hours than this actually has such an adverse effect on productivity and motivation that less real work gets done. This is especially true for creative, information age work.

Don't just take my word for it though; test this concept for yourself. Many years ago I ran a simple experiment to determine how efficiently I was working. I measured my efficiency ratio as the number of hours I spent doing important work divided by the number of hours I spent in my office each week. The first time I did this I was shocked to find that I only got 15 hours of real work done while spending 60 hours in my office, an efficiency ratio of 25%. Can you believe that? Over the following weeks, I increased my productivity dramatically while spending far fewer hours in my office. By limiting my work hours, I actually got more done. You can read the details in the article Triple Your Personal Productivity. I now know that working long hours is huge mistake, and I challenge you to discover this truth for yourself.

3. Laziness


Often we procrastinate because we feel too physically and/or emotionally drained to work. Once we fall into this pattern, it's easy to get stuck due to inertia because an object at rest tends to remain at rest. When you feel lazy, even simple tasks seem like too much work because your energy is too low compared to the energy required by the task. If you blame the task for being too difficult or tedious, you'll procrastinate to conserve energy. But the longer you do this, the more your resolve will weaken, and your procrastination habit may begin spiraling toward depression. Feeling weak and unmotivated shouldn't be your norm, so it's important to disrupt this pattern as soon as you become aware of it.

The solution is straightforward: get off your butt and physically move your body. Exercise helps to raise your energy levels. When your energy is high, tasks will seem to get easier, and you'll be less resistant to taking action. A fit person can handle more activity than an unfit person, even though the difficulty of the tasks remains the same.

Through trial and error, I discovered that diet and exercise are critical in keeping my energy consistently high. I went vegetarian in 1993 and vegan in 1997, and these dietary improvements gave me a significant ongoing energy boost. When I exercise regularly, my metabolism stays high throughout the day. I rarely procrastinate due to laziness because I have the energy and mental clarity to tackle whatever comes my way. Tasks seem easier to complete than they did when my diet and exercise habits were poor. The tasks are the same, but I've grown stronger. A wonderful side benefit of the diet/exercise habit is that I was able to get by with less sleep. I used to need at least 8-9 hours of sleep per night to feel rested, but now I function well on about 6.5 hours.

The most energizing foods are raw fruits and vegetables. Make your diet abundant in these foods, and you'll likely see a marked improvement in your energy levels. The first week or two, however, you may temporarily feel worse as your body takes the opportunity to detox. Erin and I each lost seven pounds the first week we went vegan. Once the dairy clog finally got cleaned out, our intestines were better able to metabolize everything we ate from then on. We later learned that this is actually quite common. There's a good reason baby cows need four stomachs to digest their mother's milk. Human beings can't metabolize dairy products properly, so the partially digested cow proteins float through the bloodstream and must be eliminated as toxins (i.e. poisons). This requires even more energy, which can leave you feeling more tired than you otherwise would.

You'll have to decide for yourself how far you want to take this. I suggest you try different dietary changes for only 30 days at first to see how it affects you. That's how I went vegetarian and later vegan. In each case I went into the challenge fully expecting to revert back at the end of the 30 days, but I liked the results so much that I couldn't fathom going back. Don't take my word for this. Experiment for yourself, and discover what health habits work best for you. For more tips see the article How to Find the Best Diet for You.

4. Lack of Motivation


We all experience temporary laziness at times, but if you suffer from chronically low motivation and just can't seem to get anything going, then it's time for you to let go of immature thought patterns, to embrace life as a mature adult, and to discover your true purpose in life. Until you identify an inspiring purpose, you'll never come close to achieving your potential, and your motivation will always remain weak.

For more than a decade I ran a computer game publishing company. That was a dream of mine in my early 20s, and it was wonderful to be able to fulfill that dream. However, as I entered my 30s, I began feeling much less passionate about it. I was competent at what I did, the business was doing well financially, and I enjoyed plenty of free time. But I just didn't care that much about entertainment software anymore. As my passion faded, I started asking, "What's the point of continuing with this line of work?" Consequently, I procrastinated on some projects that could have moved the business forward. I tried to boost my motivation using a variety of techniques but to no avail. Finally I recognized what I really needed was a total career change. I needed to find a more inspiring career path.

After much soul searching, I retired from the gaming industry and launched StevePavlina.com. What an amazing change that was! I found renewed passion in helping people grow, so I didn't have to use motivation-boosting techniques to get going. I was naturally inspired to work. I still feel totally inspired. Best of all I procrastinated less on non-work tasks too -- my passion spread across all areas of my life.

Center your work around an inspiring purpose, and you'll greatly reduce your tendency to procrastinate. If you haven't already done so, listen to Podcast #15 - What Is Your Purpose?. Finding your purpose is a powerful way to defeat procrastination problems because you won't procrastinate on what you love to do. Chronic procrastination is actually a big warning sign that tells us, "You're going the wrong way. Take a different path!"

Once you've centered your life around an inspiring purpose, then you can take advantage of certain motivational techniques to boost your motivation even higher. For some specific motivational tips, read the article Cultivating Burning Desire.

5. Lack of Discipline


Even when motivation is high, you may still encounter tasks you don't want to do. In these situations self-discipline works like a motivational backup system. When you feel motivated, you don't need much discipline, but it sure comes in handy when you need to get something done but really don't want to do the work. If your self-discipline is weak, however, procrastinating will be too tempting to resist.

I've written a six-part series on how to develop your self-discipline, so I'll simply refer you there: Self-Discipline Series. I know this is a lot of reading, but my goal isn't to write a cutesy article you'll read once and soon forget. If you really want to overcome procrastination, you must release any attachment to the fantasy of a quick fix, and commit to making real progress. Hopefully you have the maturity to recognize that reading a single article won't cure your procrastination problems overnight, just as a single visit to the gym won't make you an athlete.

6. Poor Time Management Habits


Do you ever find yourself falling behind because you overslept, because you were too disorganized, or because certain tasks just fell through the cracks? Bad habits like these often lead to procrastination, often unintentionally.

The solution in this case is to diagnose the bad habit that's hurting you and devise a new habit to replace it. For example, if you have a problem oversleeping, take up the challenge of becoming an early riser. To de-condition the old habit and install the new one, I recommend the 30-day trial method. Many readers have found this method extremely effective because it makes permanent change much easier.

For tasks you've been putting off for a while, I recommend using the timeboxing method to get started. Here's how it works: First, select a small piece of the task you can work on for just 30 minutes. Then choose a reward you will give yourself immediately afterwards. The reward is guaranteed if you simply put in the time; it doesn't depend on any meaningful accomplishment. Examples include watching your favorite TV show, seeing a movie, enjoying a meal or snack, going out with friends, going for a walk, or doing anything you find pleasurable. Because the amount of time you'll be working on the task is so short, your focus will shift to the impending pleasure of the reward instead of the difficulty of the task. No matter how unpleasant the task, there's virtually nothing you can't endure for just 30 minutes if you have a big enough reward waiting for you.

When you timebox your tasks, you may discover that something very interesting happens. You will probably find that you continue working much longer than 30 minutes. You will often get so involved in a task, even a difficult one, that you actually want to keep working on it. Before you know it, you've put in an hour or even several hours. The certainty of your reward is still there, so you know you can enjoy it whenever you're ready to stop. Once you begin taking action, your focus shifts away from worrying about the difficulty of the task and toward finishing the current piece of the task which now has your full attention.

When you do decide to stop working, claim and enjoy your reward. Then schedule another 30-minute period to work on the task with another reward. This will help you associate more and more pleasure to the task, knowing that you will always be immediately rewarded for your efforts. Working toward distant and uncertain long-term rewards is not nearly as motivating as immediate short-term rewards. By rewarding yourself for simply putting in the time, instead of for any specific achievements, you'll be eager to return to work on your task again and again, and you'll ultimately finish it. You may also want to read my article on Timeboxing.

If you find that clutter and disorganization are hurting you, I suggest you read the article Getting Organized. For a compelling overview of effective time management principles, read Time Management. And for a giant list of specific time management tips you can apply right away, read Do It Now.

7. Lack of Skill


If you lack sufficient skill to complete a task at a reasonable level of quality, you may procrastinate to avoid a failure experience. You then have three viable options to overcome this type of pattern: educate, delegate, or eliminate.

First, you can acquire the skill level you need by training up. Just because you can't do something today doesn't mean you'll never be able to do it. Someday you may even master that skill. For example, when I wanted to create my first website in 1995, I didn't know how to do it because I'd never done it before. But I knew I could learn to do it. I took the time to learn HTML, and I experimented. It didn't take long before I launched a functional web site. In the years since then, I continued to apply and upgrade that skill. If you can't do something, don't whine about it. Educate yourself to gain skill until you become proficient.

A second option is to delegate tasks you lack the skill to do. There are far too many interesting skills for you to master, so you must rely on others for help. You may not realize it, but you're already a master at delegation. Do you grow all your own food? Did you sew your own clothes? Did you build your own house? Chances are that you depend on others for your very survival. If you want a certain result but don't want to acquire the skills to get that result, you can recruit others to help you. For example, I don't want to spend my days trying to understand the details of the U.S. tax code, so I delegate that task to my accountant. This frees me to spend more time working from my strengths.

Thirdly, you may conclude that a result isn't needed badly enough to justify the effort of either education or delegation. In that case the smart choice is to eliminate the task. Sometimes procrastination is a sign that a task needn't be done at all.

When I was in college, I felt that certain assignments were pointless busywork, and I couldn't justify the effort required to do them. If the impact on my grade wasn't too great, I'd decline to do those assignments. Nobody cares that I received an A- instead of an A in a class because I declined to write an essay on gestural languages. If an employer or graduate school screener ever did care, I'd have turned the experience to my advantage by using it to demonstrate that I could set priorities.

8. Perfectionism


A common form of erroneous thinking that leads to procrastination is perfectionism. Believing that you must do something perfectly is a recipe for stress, and you'll associate that stress with the task and thus condition yourself to avoid it. So you put the task off to the last possible minute until you finally have a way out of this trap. Now there isn't enough time to do the job perfectly, so you're off the hook because you can tell yourself that you could have been perfect if you only had more time. But if you have no specific deadline for a task, perfectionism can cause you to delay indefinitely.

The solution to perfectionism is to give yourself permission to be human. Have you ever used a piece of software that you consider to be perfect in every way? I doubt it. Realize that an imperfect job completed today is always superior to the perfect job delayed indefinitely.

Perfectionism also arises when you think of a project as one gigantic whole. Replace that one big "must be perfect" project in your mind with one small imperfect first step. Your first draft can be very, very rough. You're always free to revise it later. For example, if you want to write a 5000-word article, allow your first draft be only 100 words if it helps you get started.

Some of these cures are challenging to implement, but they're effective. If you really want to tame the procrastination beast, you'll need something stronger than quick-fix motivational rah-rah. This problem isn't going away on its own. You must take the initiative. The upside is that tackling this problem yields tremendous personal growth. You'll become stronger, braver, more disciplined, more driven, and more focused. These benefits will become hugely significant over your lifetime, so recognize that the challenge of overcoming procrastination is truly a blessing in disguise. The whole point is to grow stronger.

image credit: Rene Jansa

A Closer Look At Parallax Occlusion Mapping

$
0
0

Introduction


Parallax occlusion mapping is a technique that reduces a geometric model’s complexity by encoding surface detail information in a texture. The surface information that is typically used is a height-map representation of the replaced geometry. When the model is rendered, the surface details are reconstructed in the pixel shader from the height-map texture information.

I recently read through the GDC06 presentation on parallax occlusion mapping titled “Practical Parallax Occlusion Mapping for Highly Detailed Surface Rendering” by Natalya Tatarchuk of ATI Research Inc. In the presentation, an improved version of Parallax Occlusion Mapping is discussed along with possible optimizations that can be used to accelerate the technique on current and next generation hardware. Of course, after reading the presentation I had to implement the technique for myself to evaluate its performance and better understand its inner workings. This chapter attempts to present an easy to understand guide to the theory behind the algorithm as well as to provide a reference implementation of basic parallax occlusion mapping algorithm.

This investigation is focused on the surface reconstruction calculations and what parameters come into play when using this technique. I have decided to implement a simple Phong lighting model. However, as you will see shortly this algorithm is very flexible and can easily be adapted to just about any lighting model that you would like to work with. In addition, a brief discussion of how to light a parallax occlusion mapped surface is also provided.

The reference implementation is written in Direct3D 10 HLSL. A demonstration program is also available on the book’s website that shows the algorithm in action. The demo program and the associated effect files that have been developed for this chapter are provided with it and may be used in whatever manner you desire.

Note:  
This article was originally published to GameDev.net in 2006. It was revised by the original author in 2008 and published in the book Advanced Game Programming: A GameDev.net Collection, which is one of 4 books collecting both popular GameDev.net articles and new original content in print format.


Algorithm Overview


So what exactly is parallax occlusion mapping? First let’s look at an image of a standard polygonal surface that we would like to apply our technique to. Let’s assume that this polygonal surface is a cube, consisting of six faces with two triangles each for a total of twelve triangles. We will set the texture coordinates of each vertex such that each face of the cube will include an entire copy of the given texture. Figure 1 shows this simple polygonal surface, with normal mapping used to provide simple diffuse lighting.


Attached Image: AdvGameProg_ACloserLook_Zink_1.jpg
Figure 1: Flat polygonal surface


The basic idea behind parallax occlusion mapping is relatively simple. For each pixel of a rendered polygonal surface, we would like to simulate a complex volumetric shape. This shape is represented by a height-map encoded into a texture that is applied to the polygonal surface. The height-map basically adds a depth component to the otherwise flat surface. Figure 2 shows the results of simulating this height-mapped surface on our sample cube.


Attached Image: AdvGameProg_ACloserLook_Zink_2.jpg
Figure 2: Flat polygonal surface approximating a volumetric shape


The modification of the surface position can also be visualized more clearly with a grid projected onto the simulated volume. This shows the various contours that are created by modifying the surface’s texture coordinates. Figure 3 demonstrates such a contour pattern.


Attached Image: AdvGameProg_ACloserLook_Zink_3.jpg
Figure 3: Gridlines projected onto the simulated surface


We will assume that the height-map will range in value from [0.0,1.0], with a value of 1.0 representing the polygonal surface and 0.0 representing the deepest possible position of the simulated volumetric shape. To be able to correctly reconstruct the volumetric shape represented by the height map, the viewing direction must be used in conjunction with the height map data to calculate which parts of the surface would be visible at each screen pixel of the polygonal surface for the given viewing direction.

This is accomplished by using a simplified ray-tracer in the pixel shader. The ray that we will be tracing is formed from the vector from the eye (or camera) location to the current rasterized pixel. Imagine this vector piercing the polygonal surface, and travelling until it hits the bottom of the virtual volume. Figure 4 shows a side profile of this intersection taking place.


Attached Image: AdvGameProg_ACloserLook_Zink_4.jpg
Figure 4: View vector intersecting the virtual volume


The line segment from the polygonal surface to the bottom of the virtual volume represents the ‘line of sight’ for our surface. The task at hand is to figure out the first point on this segment that intersects with our height-map. That point is what would be visible to the viewer if we were to render a full geometric model of our height-map surface.

Since the point of intersection between our line segment and the height-map surface represents the visible surface point at that pixel, it also implicitly describes the corrected offset texture coordinates that should be used to look up a diffuse color map, normal map, or whatever other textures you use to illuminate the surface. If this correction is carried out on all of the pixels that the polygonal surface is rendered to, then the overall effect is to reconstruct the volumetric surface – which is what we originally set out to do.

Implementing Parallax Occlusion Mapping


Now that we have a better understanding of the parallax occlusion mapping algorithm, it is time to put our newly acquired knowledge to use. First we will look at the required input texture data and how it is formatted. Then we will step through a sample implementation line by line with a thorough explanation of what is being accomplished with each section of code. The sample effect file is written in Direct3D 10 HLSL, but the implementation should apply to other shading languages as well.

Before writing the parallax occlusion map effect file, let’s examine the texture data that we will be using. The standard diffuse color map is provided in the RGB channels of a texture. The only additional data that is required is a height-map of the volumetric surface that we are trying to simulate. In this example, the height data will be stored in the alpha channel of a normal map where a value of 0 (shown in black) corresponds to the deepest point, and a value of 1 (shown in white) corresponds to the original polygonal surface. Figure 5 shows the color texture, alpha channel height-map, and the normal map that it will be coupled with.


Attached Image: AdvGameProg_ACloserLook_Zink_5.jpg
Figure 5: Sample color map, normal map, and height map.


It is worth noting that the normal map is not required to implement this technique – it is used here for simplified shading purposes, but is not required to perform the parallax occlusion mapping technique.

With a clear picture of the texture data that will be used, we will now look into the vertex shader to see how we set up the parallax occlusion mapping pixel shader.

The first step in the vertex shader is to calculate the vector from the eye (or camera) position to the vertex. This is done by transforming the vertex position to world space, and then subtracting its position from the eye position. The world space vertex position is also used to find the eye vector and the light direction vector.

float3 P = mul( float4( IN.position, 1 ), mW ).xyz;
float3 N = IN.normal;
float3 E = P - EyePosition.xyz;
float3 L = LightPosition.xyz - P;

Next, we must transform the eye vector, light direction vector, and the vertex normal to tangent space. The transformation matrix that we will use is based on the vertex normal, binormal, and tangent vectors.

float3x3 tangentToWorldSpace;

tangentToWorldSpace[0] = mul( normalize( IN.tangent ), mW );
tangentToWorldSpace[1] = mul( normalize( IN.binormal ), mW );
tangentToWorldSpace[2] = mul( normalize( IN.normal ), mW );

Each of these vectors is transformed to world space, and are then used to form the basis of the rotation matrix for converting a vector from tangent to world space. Since this is a rotation only matrix, then if we transpose the matrix it becomes its own inverse. This produces the world to tangent space rotation matrix that we need.

float3x3 worldToTangentSpace = transpose(tangentToWorldSpace);

Now the output vertex position and the output texture coordinates are trivially calculated.

OUT.position = mul( float4(IN.position, 1), mWVP );
OUT.texcoord = IN.texcoord;

And finally, we use the world to tangent space rotation matrix to transform the eye vector, light direction vector, and the vertex normal to tangent space.

OUT.eye	= mul( E, worldToTangentSpace );
OUT.normal	= mul( N, worldToTangentSpace );
OUT.light	= mul( L, worldToTangentSpace );

That is all there is for the vertex shader. Now we move on to the pixel shader, which contains the actual parallax occlusion mapping code. The first calculation in the pixel shader is to determine the maximum parallax offset length that can be allowed. This is calculated in the same way that standard parallax mapping does it. The maximum parallax offset is a function of the depth of the surface (specified here as fHeightMapScale), as well as the orientation of the eye vector to the surface. For a further explanation see “Parallax Mapping with Offset Limiting: A Per-Pixel Approximation of Uneven Surfaces” by Terry Welsh.

float fParallaxLimit = -length( IN.eye.xy ) / IN.eye.z;
fParallaxLimit *= fHeightMapScale;

Next we calculate the direction of the offset vector. This is essentially a two dimensional vector that exists in the xy-plane of the tangent space. This must be the case, since the texture coordinates are on the polygon surface with z = 0 (in tangent space) for the entire surface. The calculation is performed by finding the normalized vector in the direction of offset, which is essentially the vector formed from the x and y components of the eye vector. This direction is then scaled by the maximum parallax offset calculated in the previous step.

float2 vOffsetDir = normalize( IN.eye.xy );
float2 vMaxOffset = vOffsetDir * fParallaxLimit;

Then the number of samples is determined by lerping between a user specified minimum and maximum number of samples.

int nNumSamples = (int)lerp( nMaxSamples, nMinSamples, dot( E, N ) );

Since the total height of the simulated volume is 1.0, then starting from the top of the volume where the eye vector intersects the polygon surface provides an initial height 1.0. As we take each additional sample, the height of the vector at the point that we are sampling is reduced by the reciprocal of the number of samples. This effectively splits up the 0.0-1.0 height into n chunks where n is the number of samples. This means that the larger the number of samples, the finer the height variation we can detect in the height map.

float fStepSize = 1.0 / (float)nNumSamples;

Since we would like to use dynamic branching in our sampling algorithm, we must not use any instructions that require gradient calculations within the dynamic loop section. This means that for our texture sampling we must use SampleGrad instruction instead of a plain Sample instruction. In order to use SampleGrad, we must manually calculate the texture coordinate gradients in screen space outside of the dynamic loop. This is done with the intrinsic ddx and ddy instructions.

float2 dx = ddx( IN.texcoord );
float2 dy = ddy( IN.texcoord );

Now we initialize the required variables for our dynamic loop. The purpose of the loop is to find the intersection of the eye vector with the height-map as efficiently as possible. So when we find the intersection, we want to terminate the loop early and save any unnecessary texture sampling efforts. We start with a comparison height of 1.0 (corresponding to the top of the virtual volume), initial parallax offset vectors of (0,0), and starting at the 0th sample.

float fCurrRayHeight = 1.0;
float2 vCurrOffset = float2( 0, 0 );
float2 vLastOffset = float2( 0, 0 );

float fLastSampledHeight = 1;
float fCurrSampledHeight = 1;

int nCurrSample = 0;

Next is the dynamic loop itself. For each iteration of the loop, we sample the texture coordinates along our parallax offset vector. For each of these samples, we compare the alpha component value to the current height of the eye vector. If the eye vector has a larger height value than the height-map, then we have not found the intersection yet. If the eye vector has a smaller height value than the height-map, then we have found the intersection and it exists somewhere between the current sample and the previous sample.

while ( nCurrSample < nNumSamples )
{
  fCurrSampledHeight = NormalHeightMap.SampleGrad( LinearSampler, IN.texcoord + vCurrOffset, dx, dy ).a;
  if ( fCurrSampledHeight > fCurrRayHeight )
  {
    float delta1 = fCurrSampledHeight - fCurrRayHeight;
    float delta2 = ( fCurrRayHeight + fStepSize ) - fLastSampledHeight;

    float ratio = delta1/(delta1+delta2);

    vCurrOffset = (ratio) * vLastOffset + (1.0-ratio) * vCurrOffset;

    nCurrSample = nNumSamples + 1;
  }
  else
  {
    nCurrSample++;

    fCurrRayHeight -= fStepSize;

    vLastOffset = vCurrOffset;
    vCurrOffset += fStepSize * vMaxOffset;

    fLastSampledHeight = fCurrSampledHeight;
  }
}

Once the pre- and post-intersection samples have been found, we solve for the linearly approximated intersection point between the last two samples. This is done by finding the intersection of the two line segments formed between the last two samples and the last two eye vector heights. Then a final sample is taken at this interpolated final offset, which is considered the final intersection point.

float2 vFinalCoords = IN.texcoord + vCurrOffset;

float4 vFinalNormal = NormalHeightMap.Sample( LinearSampler, vFinalCoords ); //.a;

float4 vFinalColor = ColorMap.Sample( LinearSampler, vFinalCoords );

// Expand the final normal vector from [0,1] to [-1,1] range.
vFinalNormal = vFinalNormal * 2.0f - 1.0f;

Now all that is left is to illuminate the pixel based on these new offset texture coordinates. In our example here, we utilize the normal map normal vector to calculate a diffuse and ambient lighting term. Since the height map is stored in the alpha channel of the normal map, we already have the normal map sample available to us. These diffuse and ambient terms are then used to modulate the color map sample from our final intersection point. In the place of this simple lighting model, you could use the offset texture coordinates to sample a normal map, gloss map or whatever other textures are needed to implement your favorite lighting model.

float3 vAmbient = vFinalColor.rgb * 0.1f;
float3 vDiffuse = vFinalColor.rgb * max( 0.0f, dot( L, vFinalNormal.xyz ) ) * 0.5f;

vFinalColor.rgb = vAmbient + vDiffuse;

OUT.color = vFinalColor;

Now that we have seen parallax occlusion mapping at work, let’s consider some of the parameters that are important to the visual quality and the speed of the algorithm.

Algorithm Metrics


The algorithm as presented in the demonstration program’s effect file runs at faster than the 60 Hz refresh rate of my laptop with an Geforce 8600M GT at a screen resolution of 640x480 with the minimum and maximum number of samples set to 4 and 20, respectively. Of course this will vary by machine, but it will serve as a good metric to base performance characteristics on since we know that the algorithm is pixel shader bound.

The algorithm is implemented using shader model 3.0 and later constructs – specifically it uses dynamic branching in the pixel shader to reduce the number of unnecessary loops after the surface intersection has already been found. Thus relatively modern hardware is needed to run this effect in hardware. Even with newer hardware, the algorithm is pixel shader intensive. Each iteration of the dynamic loop that does not find the intersection requires a texture lookup along with all of the ALU and logical instructions used to test if the intersection has occurred.

Considering that the sample images were generated with a minimum sample count of 4 and a maximum sample count of 20, you can see that the number of times that the loop is performed to find the intersection is going to be the most performance critical parameter. With this in mind, we should develop some methodology for determining how many samples are required for an acceptable image quality. Figure 6 compares images generated with 20 and then 6 maximum samples respectively.


Attached Image: AdvGameProg_ACloserLook_Zink_6a.jpg
Attached Image: AdvGameProg_ACloserLook_Zink_6b.jpg
Figure 6: A 20-sample maximum image (top) and a 10-sample maximum image (bottom)


As you can see, there are aliasing artifacts along the left hand side of the 6-sample image where the height map makes any sharp transitions. Even so, the parts of the image that do not have such a sharp transition still have acceptable image quality. Thus, if you will be using low frequency height map textures, you may be able to significantly reduce your sampling rate without any visual impact. It should also be noted that the aliasing is more severe when the original polygon surface normal is closer to perpendicular to the viewing direction. This allows you to adjust the number of samples based on the average viewing angle that will be used for the object being rendered. For example, if a wall is being rendered that will always be some distance from the viewer then a much lower sampling rate can be used then if the viewer can stand next to the wall and look straight down its entire length.

Another very important parameter that must be taken into consideration is the height-map scale, named fHeightMapScale in the sample effect file. If you imagine a 1-meter by 1-meter square (in world space coordinates), then the height-map scale is how deep of a simulated volume we are trying to represent. For example, if the height-map scale is 0.04, then our 1x1 square would have a potential depth of 0.04 meters. Figure 7 shows two images generated with a scale height of 0.1 and 0.4 with the same sampling rates (20 samples maximum).


Attached Image: AdvGameProg_ACloserLook_Zink_7a.jpg
Attached Image: AdvGameProg_ACloserLook_Zink_7b.jpg
Figure 6: A 0.1 height map scale image (top) and a 0.4 height map scale image (bottom)


It is easy to see the dramatic amount of occlusion caused by the increased scale height, making the contours appear much deeper than in the original image. Also notice toward the bottom of the image that the aliasing artifacts are back – even though the sampling rates are the same. With this in mind, you can see that the height scale also determines how ‘sharp’ the features are with respect to the eye vector. The taller the features are, the harder they will be to detect intersections with the eye vector. This means that we would need more samples per pixel to obtain similar image quality if the height scale is larger. So a smaller height scale is “a good thing”.

In addition, let’s look deeper into how the algorithm will react when viewing polygonal surfaces nearly edge on. Our current algorithm uses a maximum of 20 samples to determine where the intersections are. This is already a significant number of instructions to run, but the image quality is going to be low when viewed from an oblique angle. Here’s why. If your height map is 256x256, and you view our 1m x 1m square from the edge on, then in the worst case you can potentially have a single screen pixel be required to test 256 texels for intersections before it finds the surface of the height map. We would need ~12 times more samples than our maximum sampling rate to get an accurate intersection point! Figure 8 shows an edge on image generated with 50 samples and 0.1 height-map scale.


Attached Image: AdvGameProg_ACloserLook_Zink_8.jpg
Figure 7: A 60-sample 0.04 height-map scale image from an oblique angle


Mip-mapping would help this situation by using a smaller dimension version of the texture when at extreme angles like this, but by each level of mip-map reducing the resolution of the height-map it could potentially introduce additional artifacts. Care must be taken to restrict the number of situations where an object would be viewed edge on, or to switch to a constant time algorithm like bump mapping at sharp angles.

The ideal sampling situation would be to have one sample for each texel that the eye vector could possibly pass through during the intersection test. So a straight on view would only require a single sample, and an edge on view would require as many samples as there are texels in line with the pixel (up to a maximum of the number of texels per edge).

This is actually information that is already available to us in the pixel shader. Our maximum parallax offset vector length, named fParallaxLimit in the pixel shader, is a measure of the possible intersection test travel in texture units (the xy-plane in tangent space). It is shorter for straight on views and longer for edge on views, which is what we want to base our number of samples on anyways. For example, if the parallax limit is 0.5 then a 256x256 height-map should sample, at most, 128 texels. This sampling method will provide the best quality results, but will run slower due to the larger number of iterations.

Whatever sampling algorithm is used, it should be chosen to provide the minimum number of samples that provides acceptable image quality. Another consideration should be given to how large an object is going to appear on screen. If you are using parallax occlusion mapping on an object that takes up 80% of the frame buffer’s pixels, then it will be much more prohibitive than an object that is going to take 20% of the screen. So even if your target hardware can’t handle full screen parallax occlusion mapping, you could still use it for smaller objects.

Conclusion


I decided to write this article to provide some insight into the parallax occlusion mapping algorithm. Hopefully it is easy to understand and will provide some help in implementing the basic algorithm in addition to giving some hints about the performance vs. quality tradeoff that must be made. I think that the next advance in this algorithm is probably going to be making it more efficient, most likely with either a better sampling rate metric, or with a data structure built into the texture data to accelerate the searching process.

If you have questions or comments on this document, please feel free to contact me as ‘Jason Z’ on the GameDev.net forums or you could also PM me on GameDev.net.

HLSL: Greyscale Shader Tutorial

$
0
0
In most modern games, colour rendering is definitely the best way to portray the richness of the 3D graphics and lighting effects achievable on current hardware. However, as games such as L.A. Noire have successfully demonstrated, playing a game in old-style black and white graphics can completely transform the way in which the player percieves the same scene. This small article will show one way (of many!) to render your 3D geometry using a greyscale pallette rather than in full colour, using HLSL and DirectX. The following image shows a scene rendered in full colour:


Attached Image: colour.png


...and this image shows the same scene, but this time rendered using the greyscale colour conversion explained in this article:


Attached Image: greyscale.png


Neither of these images have been converted or tweaked in an external graphics program - they are rendered purely using Direct3D.

The concept


If you've experimented with even basic 3D programming, you will know that a pixel typically contains four channels of information: R (red), G (green), B (blue) and A (alpha). Of course, the exact nature of the information held by each pixel on a render surface depends on the format you choose, but RGB will almost always be a part of it. You may also know that the colour value of each channel typically ranges from 0 to 255. Combinations of the numbers assigned to each colour channel will produce a mixture of the overall colour specified for each pixel. Here are some examples (given in the [R,G,B] format - we will disregard the alpha channel because it codes for transparency, not raw colour):

[255,0,0]
[0,200,200]
[200,255,0]
[100,100,100]


You may notice that the last colour, [100,100,100], is a shade of grey. You may also notice that all of the colour channel values are the same, that is, each one carries a value of 100 for R, G and B. This is the key to achieving a greyscale effect - in order to avoid rendering in true colour, all of the colours must carry a similar weight, meaning that none will dominate over the others, and the result will be a shade of grey ranging from total blackness (given as [0,0,0]) to pure white (given as [255,255,255]). Achieving this effect is relatively simple, especially if you already have a shader to render in true colour.

Converting from colour to greyscale


It is a simple matter to create a greyscale effect given colour information for each pixel. Let's say we have calculated a colour of [0,100,200] for a given pixel, again in the [R,G,B] format, excluding alpha. To ensure that each colour channel has the same value while also choosing a greyscale shade which is representative of the brightness of the original colour, there are two steps to take, all of which can easily be achieved in a HLSL pixel shader:

  1. Take an average of the R, G and B channels for the pixel
  2. Assign a new colour to the pixel by entering this calculated average into each colour channel while preserving the original alpha value

That's all there is to it! If we wanted to calculate the greyscale equivalent of our [0,100,200] pixel, we would arrive at an average of 100 (because (0 + 100 + 200) / 3 = 100), and so our final pixel colour would be [100,100,100].

Putting it into a shader


Let's consider the following effect file designed to simulate diffuse and ambient lighting in black and white:

//Greyscale rendering shader, created by George Kristiansen

////////////////////
//Global variables//
////////////////////
float4x4 World;
float4x4 WorldViewProjection;

float LightPower;
float LightAmbient;

float3 LightDir;

Texture xTexture;


//////////////////
//Sampler states//
//////////////////
sampler TextureSampler = sampler_state 
{
texture = <xTexture>;
magfilter = LINEAR;
minfilter = LINEAR;
mipfilter = LINEAR;
AddressU = Wrap; 
AddressV = Wrap;
};


//////////////////
//I/O structures//
//////////////////
struct PixelColourOut
{
    float4 Colour        : COLOR0;
};

struct SceneVertexToPixel
{
    float4 Position             : POSITION;
    float2 TexCoords            : TEXCOORD0;
    float3 Normal               : TEXCOORD1;
    float4 Position3D           : TEXCOORD2;
};


///////////////////////////////////////////////////////////////////////
//TECHNIQUE 1: Shaders for drawing an object using greyscale lighting//
///////////////////////////////////////////////////////////////////////
SceneVertexToPixel GreyscaleVertexShader(float4 inPos : POSITION, float2 inTexCoords : TEXCOORD0, float3 inNormal : NORMAL)
{
    SceneVertexToPixel Output = (SceneVertexToPixel)0;

    Output.Position = mul(inPos, WorldViewProjection);

    Output.Normal = normalize(mul(inNormal, (float3x3)World));
    Output.Position3D = mul(inPos, World);
    Output.TexCoords = inTexCoords;

    return Output;
}

PixelColourOut GreyscalePixelShader(SceneVertexToPixel PSIn)
{
    PixelColourOut Output = (PixelColourOut)0;

    float4 baseColour = tex2D(TextureSampler, PSIn.TexCoords);

    float diffuseLightingFactor = saturate(dot(-normalize(LightDir), PSIn.Normal))*LightPower;

    float4 trueColour = baseColour*(diffuseLightingFactor + LightAmbient);

    float greyscaleAverage = (trueColour.r + trueColour.g + trueColour.b)/3.0f;
    Output.Colour = float4(greyscaleAverage, greyscaleAverage, greyscaleAverage, trueColour.a);

    return Output;
}


technique GreyscaleObject
{
    pass Pass0
    {
        VertexShader = compile vs_2_0 GreyscaleVertexShader();
        PixelShader = compile ps_2_0 GreyscalePixelShader();
    }
}

As you can see, the vertex shader simply deals with transformations and matrix-based calculations. These are not dependent on whether the scene is drawn in greyscale or colour. The pixel shader comprises of lighting calculations which are present in pretty much every 'general' lighting shader. The texture applied to the object being drawn is sampled, a diffuse lighting contribution is calculated based on the normal and light direction, and the colour of the pixel (trueColour in the pixel shader) is found based on diffuse and ambient light. However, the final colour of the pixel is calculated using the averaging method desribed above to create a shade of grey where each colour channel has the same value. This ensures that any geometry drawn with the shader appears in greyscale rather than true colour.

Conclusion


This is one of many methods for drawing in greyscale. It is also possible to render the entire scene to a texture in colour, and present the scene after applying a similar calculation to this offscreen render target. This ensures that the entire scene is simultaneously converted to black and white post-render, rather than individual objects in realtime. There are also other formulae and calculation methods for doing the conversion, but this is possibly the simplest method, and it produces very respectable results.

Top image is a raw capture from SimCity set to Film Noir graphics filter

USB Base Custom Hardware Interface for Unity3D

$
0
0
This is a simple project to demonstrate the USB custom hardware interfacing with Unity3D game engine on top of Microsoft Windows operating system(s).

The custom hardware unit used in this demo is build around Microchip’s PIC18F2550 MCU. This custom USB controller consists of 4 push buttons and a linear potentiometer. In the supplied demo, the user needs to control the aircraft with those buttons and the potentiometer. According to the game logic 4 buttons are used to control the flying direction and flying angle of the aircraft and the potentiometer is used to control the speed of the aircraft.


unityhwfunction.png


As illustrated in figure above, the host environment consists of 2 main applications such as Session Controller and Unity3D game. Session Controller is responsible for USB communication and data conversions. It’s a native application written using Delphi and it gets started with Unity game project. Communication between Session controller and Unity game project is happening through an OS level shared memory location. In this demo both Session Controller and Unity game project are heavily dependent on Windows API functions, and also both the applications require administrative privileges to execute.

In this demo project MCU firmware is developed using MikroC PRO 5.0. Session controller is developed using Embarcadero Delphi XE3 and all the Unity scripts are in C#. HID interface of this project is based around J.W. Beunder’s Delphi HID library.

The microcontroller firmware consists of a simple port scanner and ADC (Analog to Digital Converter) scanner. When the scanner dectects some change in input, it transmits all the "port values" and "ADC value" to the USB HID buffer.

Microcontroller firmware is listed below and it is specially designed for PIC18F2550 MCU, but it can be used with PIC18F2455, PIC18F4455 and PIC18F4550 MCUs with slight modifications.

#define USB_BUFFER_SIZE 64
#define USB_LINK_SIGNATURE 0x3E
#define ADC_NOISE_OFFSET 5

unsigned char usb_readbuff[USB_BUFFER_SIZE] absolute 0x500;
unsigned char usb_writebuff[USB_BUFFER_SIZE] absolute 0x540;
unsigned char button_buffer = 0x0;
unsigned int speed_val, speed_buffer = 0x0;

//handle MCU interrupts
void interrupt()
{
  USB_Interrupt_Proc();
}

//function to clear USB write buffer
void clear_write_buffer()
{
  unsigned char wpos;
  for(wpos = 0; wpos < USB_BUFFER_SIZE; wpos++)
    usb_writebuff[wpos] = 0x0;
  usb_writebuff[0] = USB_LINK_SIGNATURE;
}

void init_system()
{
  clear_write_buffer();
  //enable MCU's USB connectivity and init HID module.
  HID_Enable(&usb_readbuff, &usb_writebuff);
  ADC_Init();
  //setup microcontroller I/O configuration
  INTCON2 = 0x0;
  ADCON1 = 0xE;
  PORTB = 0;
  TRISB = 0x0F;
  PORTA = 0;
  TRISA = 0x1;
  Delay_ms(10);
}

//function to write scanned port values and ADC value to USB data buffer
void tx_usr_inputs()
{
  usb_writebuff[1] = button_buffer;
  usb_writebuff[2] = (speed_val & 0xFF);
  usb_writebuff[3] = (speed_val >> 8);
  while(!HID_Write(&usb_writebuff, 64));
  asm nop;
}

void main() 
{
  init_system();
  while(1)
  {
    speed_val = ADC_Get_Sample(0);
    //check for port or ADC value changes
    if((button_buffer != (PORTB & 0xF)) || (abs(speed_val - speed_buffer) > ADC_NOISE_OFFSET))
    {
      //port or ADC value is changed...
      button_buffer = (PORTB & 0xF);
      speed_buffer = speed_val;
      tx_usr_inputs();
    }
  }
}

As described earlier, interface between the game and USB HID peripheral is made using a Delphi application. This application creates named shared memory and writes all the processed data to that space. Because of this techinique multiple game instances can read the USB controller's data and it also reduces the synchronization issues between the game and hardware device. This interface code is listed below:

unit ufMain;

interface

uses
  Winapi.Windows, Winapi.Messages, System.SysUtils, System.Variants, System.Classes, Vcl.Graphics,
  Vcl.Controls, Vcl.Forms, Vcl.Dialogs, uCommon, HIDctrlIntf, Vcl.ExtCtrls;

const
  USB_CNTLR_VID = $8462;
  USB_CNTLR_PID = $0004;
  USB_CNTLR_SIGNATURE_CODE = $3E;

  SPEED_ADC_MIN = $08C;
  SPEED_ADC_MAX = $384;

type
  TfrmMain = class(TForm)
    tmrUSB: TTimer;
    procedure FormCreate(Sender: TObject);
    procedure FormDestroy(Sender: TObject);
    procedure tmrUSBTimer(Sender: TObject);
  private
    IsDevInUse: Boolean;
    IPCPntr: PIPCDataset;
    MemMapHandler: THandle;
    USBDevList: THIDdeviceList;
    procedure InitIPCDataSet();
  public
    procedure InitUSBDeviceScan();
    procedure TxHIDData(BtnCode: Byte; ADCInput: Word);
  end;

var
  frmMain: TfrmMain;
  ADCSpeedPos: Word;

implementation

{$R *.dfm}

//capture USB library events (including USB attach and deattach events)
procedure OnUSBEvent; stdcall;
begin
  TfrmMain(Application.MainForm).InitUSBDeviceScan;
end;

//function to read data from HID buffer
procedure OnHIDRead(Data: THIDbuffer); stdcall;
begin
  if((SizeOf(THIDbuffer) > 3) and (Data[0] = USB_CNTLR_SIGNATURE_CODE)) then
  begin
    //recreate 10bit ADC value
    ADCSpeedPos := Data[2] + (Data[3] shl 8);
    if(ADCSpeedPos < SPEED_ADC_MIN) then
      ADCSpeedPos := 0
    else
      ADCSpeedPos := Round(((ADCSpeedPos - SPEED_ADC_MIN)/SPEED_ADC_MAX) * 100);
    TfrmMain(Application.MainForm).TxHIDData((not Data[1]) and $0F, ADCSpeedPos);
  end;
end;

//module's init point
procedure TfrmMain.FormCreate(Sender: TObject);
begin
  try
    USBsetEventHandler(@OnUSBEvent);
    HIDsetEventHandler(@OnHIDRead);
    IsDevInUse := false;
    //create shared memory space
    MemMapHandler := CreateFileMapping(INVALID_HANDLE_VALUE, nil, PAGE_READWRITE, 0, $100, COMLINK_NAME);
    Win32Check(MemMapHandler > 0);
    IPCPntr := MapViewOfFile(MemMapHandler, FILE_MAP_ALL_ACCESS, 0, 0, $100);
    Win32Check(Assigned(IPCPntr));
    InitIPCDataSet();
    //check for USB game controller...
    InitUSBDeviceScan;
  except
    MessageBox(0, 'Unable to create shared memory to initiate the communication link'#10#10'Is this application running with administrative privileges?', Pchar(Application.Title), MB_OK + MB_ICONHAND);
    if(MemMapHandler > 0) then
      CloseHandle(MemMapHandler);
    Application.Terminate;
  end;
end;

procedure TfrmMain.FormDestroy(Sender: TObject);
begin
  if(MemMapHandler > 0) then
    CloseHandle(MemMapHandler);
end;

procedure TfrmMain.InitIPCDataSet();
begin
  IPCPntr^.SignatureCode := COMLINK_SIGNATURE;
  TxHIDData(0, 0);
end;

procedure TfrmMain.TxHIDData(BtnCode: Byte; ADCInput: Word);
begin
  if(MemMapHandler > 0) then
  begin
    IPCPntr^.ControlInputs := BtnCode;
    IPCPntr^.SpeedInput := ADCInput;
  end;
end;

procedure TfrmMain.InitUSBDeviceScan();
var
  USBDevCount : Byte;
begin
  //Searching for USB game controller...
  HIDscanForDevices(USBDevList, USBDevCount, USB_CNTLR_VID, USB_CNTLR_PID);
  if((USBDevCount > 0) and (not IsDevInUse)) then
    tmrUSB.Enabled := true
  else
  begin
    try
      HIDcloseDevice(USBDevList[0]);
    finally
      IsDevInUse := false;
    end;
  end;
end;

//timer module is used to avoid multipal high frequency USB events
procedure TfrmMain.tmrUSBTimer(Sender: TObject);
begin
  tmrUSB.Enabled := false;
  IsDevInUse := HIDopenDevice(USBDevList[0]);
end;

end.

In Unity, the above mentioned shared memory is accessed using the same Windows API functions and its implementation is available in the UHWComLink.cs file. GetHIDControlData is the function to get all the shared memory data and it's listed below:

public bool GetHIDControlData(out UHWComData ComDataSet)
{
  ComDataSet.SignatureCode = 0;
  ComDataSet.ControlInputs = 0;
  ComDataSet.SpeedControl = 0;	
  ShMemFileHandler = OpenFileMapping(FileRights.AllAccess, false, COMLINK_NAME);
  if (ShMemFileHandler == IntPtr.Zero)
    return false;
  IPCMapPntr = MapViewOfFile(ShMemFileHandler, FileRights.AllAccess, 0, 0, 0x100);
  if (IPCMapPntr == IntPtr.Zero)
    return false;
  //read values from shared data structure  
  ComDataSet.SignatureCode = Marshal.ReadByte(IPCMapPntr);
  ComDataSet.ControlInputs = Marshal.ReadByte(IPCMapPntr, 1);
  ComDataSet.SpeedControl = Marshal.ReadInt16(IPCMapPntr, 2);		
  CloseHandle(ShMemFileHandler);
  return true;
}

A schematic of the USB game controller is illustrated in the next figure. This can be constructed using breadboard, stripboard or PCB (Printed Circuit Board). Recommended platform to build this controller is a PCB and the complete PCB design pattern is available at the project repository.


unityhw_sch.png


The supplied PCB design of this project is based on commonly-available SMD components. Please note that this hardware setup is quite sensitive to external noises, so it is recommended to use some properly-grounded shield with this controller. If the USB connection between the host and the controller is more than 1.5m, it is advisable to use a USB cable with ferrite bead(s).

All the source code and design documents of this project are available to download at github.com/dilshan/unityusb. A demonstration video of the prototyped system can be viewed here

Gentle Introduction to Google Analytics for Flash

$
0
0

Introduction


Being able to check out how many players play your game, from what countries, for how long, on which levels they have problems, how much points do they score, even do they ever visit your precious Credits screen or the average FPS number - that sounds incredibly useful, doesn't it? Fortunately, in web browser games, there's a way to get such informations. In this post I'm going to describe the process for Flash (ActionScript 3), because I've recently implemented it in my released game, and can share some experiences.

Possibilities


And there are even many ways. First, some time ago you could use Playtomic.com - however they had notorious problems with reliability, and are now out of bussiness. Then, the second try could be Mochimedia - they have many services, and one of them is statistics. Unfortunately, it is very simple and unable to give you such detailed data as in the first paragraph. You could also google and find few other services... and among few smaller ones, Google Analytics for Flash project (later shortened to GAF).

That's true - you can use the well known, very powerfull, complex, free, reliable and spied service from Google to process the statistics from your own Flash games. And it's actually pretty easy to use. Sadly, the documentation is rather cryptic, sparse, ambigous and hard to follow. So, here goes a quick, practical tutorial for you + code samples :)

Let's dive in


First, download the files from their site (latest version haven't been updated for a long time) and put it in some directory like lib/gaf, alongside other game libraries. Inside your IDE link to the one of the .swc files: analytics.swc (codebased IDE like FlashDevelop) or analytics_flash.swc (component for Flash CS). Code snippet from Ninja Cat:

package
{

	import com.google.analytics.AnalyticsTracker;
	import com.google.analytics.GATracker;
	import flash.display.DisplayObject;
	
	public class Analytics
	{
		
		public function Analytics()
		{
		}
		
		CONFIG::stats
		{
			private var tracker:AnalyticsTracker;
		}
		
		public function Init( stage : DisplayObject ) : void
		{
			CONFIG::stats
			{
				// UA-google-api-code has to be replaced by your ID, taken from GA page
				// fourth parameter is visual_debug - its described later in post
				tracker = new GATracker( stage, "UA-google-api-code", "AS3", false );
				PageView("Home");
			}
		}
		
		public function PageView( URL : String ) : void
		{
			CONFIG::stats
			{
				// google wants to have slashes before names of pages
				tracker.trackPageview( "/" + URL );
			}
		}
		
		public function LinkOpen( name : String, URL : String ) : void
		{
			PageView( name );
		
			// could also automatically open link
			// Link.Open(URL, name, "Links");
		}
		
		public function TrackEvent( category : String, action : String, label : String, value : int = 0 ) : void
		{
			CONFIG::stats
			{
				tracker.trackEvent(category, action, label, value );
			
				trace("GAF event: " + category + " | " + action + " = " + value + " ( " + label + " )" );
			}
		}
	}
}

Before anything: what is CONFIG::stats? It's a way of conditionally including code in AS3 (a kind of #ifdef macrodefinitions for you C++ buffs). It's very useful - by toggling one variable in IDE, you can build a significantly different version of game. So, if CONFIG::stats is not defined, all that is between braces will be ignored. In this case, it might be useful to disable statistics ie. for local testing. Here you can read more about this technique.

So, what I've done here, is estabilished interface for using GAF in my game. Create the object of type Analytics somwhere near the start of your game, call the Init method, and you're ready to go. Then the question arises: how to use it?

GAF gives you two ways of tracking user behaviour: page views and events. Simply speaking, page views are like in the web browser - navigation between different URL locations. User views your /blog subpage, your /about, your /games etc. Events are for user interactions with elements of the page, which don't result in changing of the page - so for www that would be ie. movie controls, downloading files, clicking on polls etc. With events you can log more informations; pages only log the name of the visited pages.

Note:  Google Analytics doesn't process everything instantly. For more detailed data you will at least need to wait till the next day. There's a Real time mode which shows pages and events that happend within last 30 minuts, altough it's with limited functionality. For example, one thing which it doesn't show is the values of events.


In case of games, you'd want to use this duo like that: pages are for game states and menu screens (MainMenu, Options, Credits, Level1, StatsScreen), while events are used for detailed statistics (I'll get to that later on). From the code above you can also see that I decided to have LinkOpen be treated as page views, altough it could also work as an event.

Basic Results


So, when you add this kind of code to your game, add the function calls in appropriate places (ie. analytics.PageView("MainMenu");, and turn debug mode on (fourth parameter to GATracker is true), you'll see some debugging info appear:


Attached Image: gaf-debug.jpg


With this you can quickly confirm that things work as expected. Having this, you can go to your Google Analytics dashboard and start peeking at the statistics. Here's how GA looks with the data from Ninja Cat and Zombie Dinosaurs (I cut out only the interesting bits):


Attached Image: gaf-stats1.png


What is interesting here, is the incredibly small Bounce rate of 0.03% - it means that 99,97% of users who load the game and see menu, continue to start the first level. Compare that to Bounce rate of anywhere between 40-70% for normal websites. Huge win for me.


Attached Image: right_now_21.png


Google Analytics has this nice feature of showing some stats in a realtime preview. And so at that thursday afternoon over 20 actual people were playing my game, and from the map below I saw that they were from all around the world. For the creator it's humbling :)


Attached Image: gaf-stats3.png


Last of screenshots shows the details on which "pages" were viewed the most. We can see ie. that players are not interested in me (Credits) or sponsors (links), and they even very rarely visit Options. Hmmm. When I play new games, first thing I do is look into options and credits. Oh well.

According to Mochimedia, my game so far (beginning of june) had around 28k displays of ads - which is almost the same amount as /Main views in Google. So both systems confirm each others reliablity (or both are wrong ;). As for an online flash game, almost 30k plays (and 1-2k per day) is very small number. I think after maybe 2 months I'm going to write a separate post about how Ninja Cat succeeded in the "internets".

Apart from the dashboard, you can find useful data a bit burried in Content -> Site content -> Content drilldown and Content -> Events -> Overview. I would really recommend to spend few hours reading Google Analytics help, to get a good understanding of the platform (goal completions, funnels, conversions, intelligence events, how to filter, learning UI) - there's lots of stuff.

Here I'll briefly mention three features:

  1. Traffic sources - where you can see the URLs that people are playing your game on... at least theoretically, because I don't see the URLS of most sites, just some part of it. What works much better for me is the Ads section in developer dashboard on MochiMedia.
  2. Intelligence events - starts working if you have more data, for at least few weeks. Then GA will analyse it and point out for any unusual events ie. sudden increase or decrease of people coming from a certain country, or decrease of avg play time. It's mostly targeted at website owners, who can then make some adjustments to their site.

  3. Goal completions - on commercial websites they're used to track how far the user is along the path to goal, which is typically buying something. Landing page -> catalog -> add to cart -> checkout -> payment - you get the idea. In our case, they could be used to track how much has user progressed in game: level 1 -> level 2 -> ..., and the goal would be last level of game. In this way GA will show you how many people have finished your game. How cool is that? :) In order to have it, you'll need to specify a funnel - sequence of page views, which lead to your goal. More on that in GA documentation.

Logging detailed statistics


Coming back to the beginning of post - how about original requirement? My game (which is typing game inspired by Typing of the Dead) collects detailed statistics about player progress - they are displayed after finishing a level. Those are things like number of points, enemies killed, katana kills, how much time (in seconds) did it take to finish it, accuracy, number of keystrokes etc. Those are natural things to log. Here's the code of function in some StatsScreen class that I used:

public function LevelEnd(
        level_index : int, level_time : int,
        enemies_killed : int, katana_kills : int, score_points : int,
        total_keystrokes : int, accuracy : int,
        avg_kill_time : int, avg_kill_score : int,
        collected_powerups : int, stars : int, health_loss : int,
        player_name : String,
        _result : int // 1 for died, 2 for won
    ) : void
{
    CONFIG::stats
    {
        var cat : String = "Level_" + level_index; // cat is for category

        analytics.TrackEvent(cat, "time", null, level_time ); // I won't shorten analytics though

        analytics.TrackEvent(cat, "enemies_killed", player_name, enemies_killed );
        analytics.TrackEvent(cat, "katana_kills", player_name, katana_kills );
        analytics.TrackEvent(cat, "score", player_name, score_points );

        analytics.TrackEvent(cat, "keystrokes", player_name, total_keystrokes );
        analytics.TrackEvent(cat, "accuracy", player_name, accuracy );

        analytics.TrackEvent(cat, "avg_kill_time", player_name, avg_kill_time );
        analytics.TrackEvent(cat, "avg_kill_score", player_name, avg_kill_score );

        analytics.TrackEvent(cat, "powerups", player_name, collected_powerups );
        analytics.TrackEvent(cat, "stars", player_name, stars );
        analytics.TrackEvent(cat, "health_loss", player_name, FlxU.abs(health_loss) );

        analytics.TrackEvent(cat, "player_name", player_name );

        analytics.TrackEvent(cat, "music_volume", player_name, int(FlxG.music.volume * 100) );
        analytics.TrackEvent(cat, "sound_volume", player_name, int(FlxG.volume * 100) );

        var result : String =(_result == StatsScreen.FINISHED_LEVEL ? "win" : "lost");

        analytics.TrackEvent(cat, "difficulty", result, Game.difficulty );
    }
}

As you can see, there's also music and sound volume - who knows, maybe I'll see some interesting trend here, ie. most players disable music? I also collect FPS informations (min, max, avg) and player name, because I am curious what players will write there :) You can also log capabilities of players system, just like Valve is doing with steam - I log only flash player version.

The reason behind passing player_name as label values is that then you should be able to drill down and view statistics coupled with specific players. Of course 90% of players won't change the default "Ninja Cat", but it will work for those who do. However, I'm not entirely sure whether my category/action/label naming convention is any good, and would seriously advise to read few informative articles about the topic.

If you'd like to see the values of those events, here's the breadcrumb path in GA dashboard jungle: Content -> Events -> Top events, then in the list of categories you choose which level you want, just by clicking the name. On the new screen, under graph click Event action as the Primary dimension. Then you'll see the detailed stats.


Attached Image: gaf-stats4.png


The Avg. Value column holds the date we're interested in. The Event Value will contain sum of all the values... not really useful, unless you want to know how many dinosaurs have killed all your players on level 1. Hmmm, that sounds like a great marketing information, "Ninja Cat and Zombie Dinosaurs players so far have killed one million and 200 thousand zombie dinosaurs... wanna help getting rid of the plague?".

Note:  For a long time I had this problem of not being able to see the values of events in GA reports. I looked everywhere there, I checked code - GIFs were sent, other things worked. I asked on internet but no one answered. I thought maybe it's just one thing you can't do from Flash code, and so I released game without this working. Later, when preparing this article, I wanted to try it one more time, so I made a simple test application and started experimenting. To my positive surprise, it worked!

The thing that was blocking it, was the lack of label value sent in event. Though the documentation says label is optional, appareantly if you want to see the actual values, it's not optional. Also worth mentioning is that the value (last parameter) has to be positive integer. Because of that, all percents should be multiplied by 100, miliseconds by 1000 etc. It would even be sensible to use proper hungarian notation and postfix the units in action names.


Conclusion


So, there you have it: a way to track player behaviour, and to look into some interesting facts about usage of your game. A natural question arises: could it be done with other technologies on other platform, specifically: C++ on desktop games?

Technically yes, and that's even possible in many ways. First, as this and this Stack Overflow answer shows, you could make a http request to the GA page - yet the list of parameters is quite long and it would be nice to have a library for that. There is a project UsageAnalytics which tries to close this functionality in one codebase, yet from my quick look, code is quite complicated. Then there's DeskMetrics - looks good from the outside, but the pricing is really steep, and free trial is only 14 days. So the situation for "traditional", C++ desktop games/applications in regard of statistics is not that good. Perhaps your search for "google analytics C++" will be luckier.

But even if you had that magic tool, you'd steel need to ask user for permision - offline applications are not expected to freely contact internet services. Web games have it easier here - user is obviously connected and in his browser when he's playing, so there's little difference to tracking user behaviour in game embedded on page, versus tracking user behaviour on page. The latter is usually taken for granted, since most websites collect statistics, and Google Analytics is one example of such a system. So web games should also be accepted.

If you still have technical questions regarding usage of Google Analytics in Flash/AS3, you may read a similiar, but more thorough (and more oriented towards Flash CS users) tutorial over here, ask question in comment below, or do a search in your favourite search engine :)


Article Update Log


1 July 2013: First version

Considering the Implications of Player Choice, Player Freedom, and Game Purpose in Modern Game Design

$
0
0

I. Introduction


Recently I encountered an article on Arstechnica by Peter Bright concerning the failure of storytelling in modern videogames. Peter Bright, The Failure of Bioshock: Writing Games Like Movies (June 14). The shortcoming of storytelling in modern videogames is a matter I have also given some consideration, and in doing so I came up with a rudimentary framework for thinking about game design and its implications for storytelling. In an effort to continue the discussion that Mr. Bright initiated with the publication of his article, I offer my framework as a tool (albeit, an imperfect one) to be used in this debate.

The foundation of my framework rests on what I perceive as the three primary purposes of modern videogames. After a brief discussion of those purposes, I will turn to explaining my framework and providing several examples of where I believe games fall within it. Finally, I will conclude this article by considering the implications of the analysis and what should be considered by game designers early in the development process.

II. General Purposes of Videogames


Speaking in very general terms, there are at least three primary purposes that a videogame can serve: (1) to entertain, (2) to tell a story, and (3) to allow the player to “live another life.”[1] The first purpose, to entertain, bears little additional discussion, because the purpose is fairly self-evident. Likewise, the second purpose is self-explanatory — it comes as no surprise that videogames can be used to tell stories in the same way that literature and cinema can. The third purpose, however, requires additional discussion.

I refer to it as “living another life,” but what I am really referring to is an application of what Tolkien calls the creation of “Secondary Belief.” See J.R.R. Tolkien, On Faerie-Stories, Tree and Leaf 37–46 (HarperCollins 2001). Videogames can be used to create another world that is entirely consistent within itself, a world that inspires “Secondary Belief” in the player and allows an escape thereto. The game designer is a “sub-creator” and the efficacy of his or her sub-creation is judged by the degree to which it inspires “Secondary Belief.” In my view this is, perhaps, the noblest application to which videogames can be put.

These purposes are not mutually exclusive, and, indeed, all videogames (arguably) serve the purpose of entertainment. In other words, the purposes of telling a story and allowing the player to live another life necessarily aim to entertain — to tell a story is to entertain, after all. Similarly, a videogame that seeks to tell a story can also facilitate the player in living another life. As Tolkien recognized, the telling of many stories requires Secondary Belief by the reader in order to fully enjoy them. See id.

While these purposes are largely compatible with one another, they can become incompatible under certain circumstances. In assessing whether purposes are incompatible in a particular game, I propose a framework whereby the degrees to which each purpose is pursued are weighed against one another. This exercise provides valuable insights into game design and the implications of promoting one purpose over another. For purposes of this analysis, I will exclude the purpose of entertainment, as it is presumed present in both storytelling and facilitating the player in living another life.

III. The Framework


The framework I propose focuses on the use of two separate continuums, one for each purpose discussed above. For the storytelling purpose of videogames, the continuum represents the degree of player choice within the story. Alternately, the living another life continuum represents the degree of player freedom within the story or world. I will discuss each continuum in greater detail below, provide examples of where particular games fall along each continuum, and finally conclude by discussing the implications of where a game falls along each.

A. The Storytelling Continuum: Degree of Player Choice


For present purposes, the degree to which player choice is permitted to impact a story is perhaps the single most important characteristic that distinguishes one game from another. As I alluded to, by player choice I mean the player’s ability to act within the confines of the story, most notably by impacting or changing the outcome. This continuum represents a dichotomy with a complete lack of developer-defined story on one end and an entirely linear story on the other. In between these two extremes are games that (1) allow choices of consequence, including those that change the ultimate outcome, and finally (2) allow only inconsequential choice within the story. Below is a simple diagram illustrating the continuum:


rnnc1hs.png


The category that restricts player choice the most is where the developer has imposed a completely linear story. The line between this category and the following one is difficult to draw, because even the most linear story will include at least some player choice. Regardless, the “campaigns” of many first-person shooters are the obvious example here, where the player is simply an actor in a course of events set in motion by the developer.

Next we have games that allow nominal player choice, but that choice is either completely inconsequential or has so little impact on the story that it is rendered meaningless. Again, this is a broad category and many games come within its definition. Most games in the Final Fantasy series are a prime example of this category along the continuum.

Games where there is a story and the player can make significant choices within it constitute the third category. This is a relatively broad category, because meaningful player choice can manifest in a variety of different ways. Most importantly, player choice can influence specific events within the game, or even change the entire outcome. Notable examples here are games such as Fallout, Dragon Age, Mass Effect (criticisms of the ending aside), Heavy Rain, and The Walking Dead. These games all allow player choice to impact the story in a substantial and meaningful way.

Finally, the last category represents games with so much player choice that there is no developer-imposed story at all. Common examples of games without any developer-defined story are what have come to be referred to as pure “sandbox” games, such as Minecraft. There is no developer-defined story within these games. Instead, players are free to create their own story or narrative in the game. Put differently, the player has unlimited choice, and the story can be whatever (s)he imagines.

B. The “Living Another Life” Continuum: Degree of Player Freedom


When a game’s purpose is to facilitate the player in living another life, the most important characteristic is the amount of freedom the player is given. In this context, freedom primarily denotes the player’s physical freedom — the player’s ability to explore and engage with the world on his or her own terms. As such, factors bearing heavily on a player’s freedom are the extent to which the player can interact with the world (simply look at it vs. directly change it) and how much the player may explore the world (“on rails” vs. open world).

Again, the continuum here represents a dichotomy, with games that do not permit the player to explore or interact with the world on one end, and completely open “sandbox” games on the other. However, it is more difficult to create categories between the two extremes on this continuum. The matter is further complicated by the fact that many games fall in different places along the continuum at different parts of the game. Regardless, there are at least two points along the continuum that we can tentatively place: (1) where the player can engage in nominal exploration or interaction with the world, and (2) where the player can meaningfully engage or interact with the world. Below is an illustration of this continuum:


YAfgcaX.png


The first, and most restrictive category when it comes to player freedom, is where the game does not allow any interaction with the world or exploration thereof. Games that truly fall into this category are rare, because almost all games allow at least token interaction or exploration. At the very least, most games permit the player to look around, but it is not impossible to imagine a game without any player freedom. A game in this category would be more akin to a movie than a videogame, and would not be properly exploiting the medium.

Next are games where the player can engage in nominal exploration or token interaction with the world, but little more. A game that keeps the player on a limited, fairly linear path would fall in this category along this continuum. Numerous games fit this definition, including most platformers, first-person shooters, and action games. Even a number of roleplaying games, traditionally affording more freedom to the player, could properly be placed in this category.

Games where the player is allowed to meaningfully interact with and explore the world make up the third category along the player freedom continuum. Rather than simply allowing the player to explore within a limited area, these games will let the player explore expensive areas and may use this ability to explore as an important gameplay mechanic. In terms of interaction, these games will often let the player change the world in some way, either directly or indirectly. Most games in the Zelda series, Final Fantasy series, and Baldur’s Gate I & II are examples of this category. While the Elder Scrolls series arguably belongs in this category, I believe they fall somewhere between this category and the next.

Finally, games giving the most freedom for players are “sandbox” games with a completely open world. Such games give the player virtually unrestricted access to exploring the world and let the player change the world in significant ways. Minecraft perfectly embodies this extreme, and grants the player almost complete freedom. In terms of exploration, the Elder Scrolls series imposes few limits on exploration, but does not permit limitless changes to the world, so does not fit perfectly at the far end of the continuum.

IV. Implications


A cursory look at the above framework leaves little question that there are important implications for a game’s ability to achieve a given purpose, depending on where it falls along each continuum. As a general rule, the opposing extremes of each continuum are not compatible with one another. A game with a linear story cannot simultaneously permit the player unbridled freedom to explore and change the world without undermining the game’s chosen method of storytelling. Likewise, a game that does not give the player any freedom cannot also include little or no story — such a thing would be no game at all.

The above observations are obvious, but matters become more nuanced when considering what it means for a game that is somewhere in the middle of a continuum. Although a game that gives a large amount of player agency in one area is not necessarily limited in the amount of agency it should give in another area, a significant disconnect may be ill advised. The more player freedom is granted, the more a player will be allowed to deviate from a developer’s vision of the story (s)he wishes to tell. Likewise, the more player choice a developer grants the player, the more the player will want to interact with and explore the world.

For game designers, when designing a game it is important to consider the purpose of your game at the outset and how much player freedom and choice you envision granting. If the purpose of your game is to tell a very specific story, it may not be wise to give the player too much freedom or choice. However, if you want to tell a story that the player can change, you should also give the player some freedom to explore and interact with the world, because it is becoming a world they are truly part of. Concerning games whose purpose is to let the player live another life, severe restrictions on player choice and freedom would obviously undermine the game’s objective.

These are my initial observations and I welcome additional thoughts on the interaction between player freedom, player choice, and the various purposes for videogames. It is an important discussion that needs to be had, particularly given recent blunders. Finally, I want to make it clear that this is only a rudimentary framework for thinking about game design as it relates to game purpose, and I have no illusion about it being all-encompassing. It is simply a starting point, a foundation that can be built upon.

 
[1] I recognize that this list of purposes does not satisfactorily account for strategy and competitive games. Though I am conscious of this deficiency, such games are beyond the scope of this framework and their omission does not compromise its utility.

Getting Started with Duality

$
0
0
All beginnings are difficult. Taking first steps in the realms of a new software library can be pretty rough, especially when you're new to programming or your development environment. This tutorial is here to make things a little bit easier and guide you through your first project setup using the Duality framework.

What is Duality?


Answering this question extensively isn't really in the scope of this tutorial - but you probably should know what we're dealing with. You can read all about it on the official website, here's a short version however:
  • It's an extensible 2D game engine.
  • It comes with a visual editor.
  • Free and Open Source.
  • Based on C# and OpenTK.
  • Built around a plugin system.
  • Allows fast prototyping.
Enough with the feature circus. Let's begin.

Installing Duality


Your first steps should be to check whether your system meets all the requirements for developing using Duality. Don't worry. There aren't many:
  • Make sure that the .Net Framework 4.0 (or higher) is installed on your system. It usually is, since it comes with Windows Update and is a requirement for a lot of modern applications. If you're not sure whether to get it or not, you may just download it and let the installer decide.
  • Next, you're going to need Visual Studio, which will be your main tool for writing source code. If you happen to have a professional version of it laying around, you can use that one. Otherwise, you can get a free version from Microsoft, just look for Visual C# Express. Download it and install it.
  • Now get the latest binary package of Duality. It should be a .zip file. Extract it and run DualityEditor.exe. You should see a splash screen followed by the Duality environment.
That's it! You have successfully installed Duality.

Attached Image: DualitorSplash.png


Setting up a Project


Each application handles its files and projects differently, but most of them detach project from application. Duality doesn't do that. Each project you set up comes with its own version of engine and editor and there is no central location in which the "Duality Editor Application" resides.

While this approach may sound ridiculous at first, there is a practical reason for it: Duality is still under development and backwards compatibility can not always be guaranteed. Looking at long term development, it can't be entirely ruled out that there are updates that will break projects set up in previous versions of Duality. By carrying its own version of engine and editor, each project will remain safely play- end editable. Although you can still update them manually, old projects can live on without issues.

A Duality project spans the folder in which editor and engine application are located, as well as all of its subfolders. Thus, the folder to which you've extracted the binary package during installation already is a Duality project! It hasn't been set up specifically, but still: Nothing prevents you from developing your game right there. While setting up a new project can be as easy as copying a folder, Duality also has a New Project dialog that allows you to do some more advanced setup. Select File / New Project... to create a new project:


Attached Image: NewProjectMenu.png


You will see the following dialog. Select Empty Project as project template, select a destination folder and enter a name for your new project. It will be used for several purposes such as the name of your project folder, the default namespace of source code, etc.

Attached Image: NewProjectDialog.png


After clicking the Ok button, Duality will configure the new project and launch the project-local editor application.

Editor Layout


There you are, sitting in front of your computer screen and staring at some grey-ish thing named Dualitor. What next? Where is the game content going to be? When do you get to write some code? What are all these areas and why are they all empty? Well. May I Introduce?

Attached Image: DualitorViews.png

  • Project View: This area is essentially a filtered file system browser rooted at your project's Data folder. In other words: This is where all your game content goes. It shows all the Resources your project has and the ones that are embedded in Duality itself. The latter ones are called Default and are always available.
  • Scene View: While the Project View deals with Resources, the Scene View deals with Gameobjects and Components. It shows the contents of the currently active Scene as a hierarchial scene graph.
  • Camera View: Shows the currently active Scene from a camera objects viewport. You can navigate by turning the Mouse Wheel or holding Middle or Right Mouse Button. Try it! If you don't quite get a feel for this kind of navigation, there is also an alternative set of camera controls: When holding the Space Bar, you can drag and turn the scene around using both Mouse Wheel and Left / Right Mouse Buttons. In the upper right of the Camera View, you can select a single Editing State and multiple View Layers. By default, the Scene Editor should be active, as well as the Grid Layer. Note that you can open as many Camera Views as you like, just select View / Camera View.
  • Object Inspector: As in most other applications, you will occasionally select objects. The Object Inspectors job is to show their properties and allow you to edit them. If you open multiple Object Inspectors using View / Object Inspector, selection changes will be split among them.
  • Advisor: Especially useful for beginners, the Advisors job is to provide helpful information about whatever your Mouse Cursor is currently hovering over. If you want to know what a specific Button, Property or Object does, try hovering over it and take a look at what the Advisor tells you. For more detailed information, press F1 while hovering over something - it will open an external help file whenever such topic is available. If you accidently close the Advisor, you'll find it under Help / Advisor.
  • Log View: Logging is a powerful debugging device and the Log View provides a clean look at what your game, engine and editor are writing to their logs. If expected errors occur, they will be logged. If unexpected errors occur, they will be logged as well. Ideally, both shouldn't happen - but you know how it is. The Log View helps you keep an eye on problems.

Building a Scene


Time to get your hands on actual development. Let's start with something simple, a space shooter maybe. Space has the advantage of being completely empty, which naturally ressembles the state of a new project, so we're authentic right from the beginning. All we need to do now is fill the void with stuff. Here's a background and a space ship. Download them:

Attached Image: SpaceBg.png

Attached Image: ShipOne.png


Grab the image files you downloaded, drag them onto the Dualitor and drop them at the Project View. Two new Pixmap Resources will appear; Pixmap is short for pixel map and represents an image as it has been imported into Duality's Resource file format. Resources are project-global data that represent your game's content. Note that, once imported, Resources are quite self-sufficient and never rely on external files to get their data from. You can safely delete the two files you downloaded and those Pixmaps just don't mind.

Attached Image: ImportResources.png


However, Resources are just some static data and space certainly isn't filled with data. It's filled with objects, so let's construct some. Select the two Pixmaps in the Project View and dragdrop them onto the Camera View or Scene View. You will see two objects appear: A space ship and the background. You can move, rotate or scale them around in the Camera View.

Attached Image: CreateObjects.png


Before proceeding we should take a closer look at what just happened. It was a single dragdrop action to create two Gameobjects from two Pixmaps, but Dualitor did a lot of things in the background to make that possible. First, look at the Project View: You'll notice that there now are six Resources instead of two! The thing is, plain, raw pixel data isn't sufficient for being used during the rendering process. It needs to be configured and transferred to the graphics card, which is what a Texture Resource represents. But a single Texture isn't enough either, since one might use multiple textures and additional data to display a single object. Describing how to display a single object is the job of Material Resources.

Attached Image: AutoGenResources.png


When you dragged your newly created Pixmaps into the Scene or Camera View, Duality recognized that you were about to create some objects using them - so it quickly provided the appropriate Textures and Materials as well. You could have created them yourself beforehand, but since you didn't, Duality did.

Editing Gameobjects


Now take a look at the Gameobjects that have been created by your dragdrop action. They are displayed as yellow boxes in the Scene View. Expand them and you will see that each of those objects in fact seems to consist of two pieces: Transform and SpriteRenderer.

Attached Image: AutoGenGameObjects.png


These pieces are called Components and they are what all Gameobjects get their behavior and properties from. Each Component carries one single bit of functionality and cares for nothing else: Transform provides Position, Rotation and Scale properties to locate an object in space. SpriteRenderer displays an object as a sprite. A Gameobjects job is to take a group of distinct Components and pack them together into one entity, so the resulting objects are both located in space and rendered as a sprite. Since each Gameobject is composed dynamically, adding or removing functionality to existing objects is easy, as it purely depends on what Components it carries.

If you navigate through the current Scene (Remember: Mouse Wheel / Right Mouse Button) you will notice that both ship and background are placed on the same layer: The background doesn't really seem far away and it might even show up in front of the ship! That's not how it should look like, so let's change it. Select the SpaceBg Gameobject and the Object Inspector will display its properties, tabbed by Component. Open the Transform tab by clicking the plus sign on its left. Set the Position property to (0, 0, 9500). These coordinates describe the object's location in X (left to right), Y (top to bottom) and Z (near to far).

Attached Image: MoveSpaceBg.png


When moving the Camera View now, the background has the appropriate distance but is far too small to cover our view. Set the Scale property to 25 in order to compensate. Move again to see if it looks good and adjust Position and Scale until you're content.

Attached Image: ScaleSpaceBg.png


To prevent us from accidently selecting, moving or scaling the background object from now on, right-click on it in the Scene View and select Lock / Hide object. This is a pure editor setting that will have no effect on the actual game environment. Locked objects will appear greyed out in the Scene View and cannot be selected by hovering or clicking inside the Camera View.

Attached Image: LockSpaceBg.png


Physics and Collision Detection


After configuring the background, we should do the same for the player ship. Right now, it isn't different from the background object at all: A sprite located somewhere in space, not able to do anything useful. Our goal is to make it fly around based on user input. There are at least two methods to achieve that - both require some programming, but are based on different concepts:
  • In the first approach, we might just listen for user input and directly interfere with the Transform properties Position and Rotation, which is very easy to handle and allows us direct control over all the math behind player movement. This is good if we don't require physically "correct" behavior and don't want physics to interfere with the game code.
  • On the other hand, there is the physics-driven approach. Instead of doing the math ourselves, we can just define the object's physical shape and apply forces to it like a thruster would. The main advantage is flexibility towards physical object interaction and a believable collision response right from the beginning.
For this tutorial, we'll use the second approach. Right-click on the player ship Gameobject and select New / Physics / RigidBody. A RigidBody defines an object's shape and other physical properties like mass, friction or restitution. Rigid bodies can collide and interact with each other. Note that Duality physics is purely two-dimensional. An object's Z value is simply ignored during simulation.

Attached Image: AddRigidBody.png


By default, RigidBody Components assume a circular shape. Since our space ship isn't a ball, we should fix that. Click on the Camera View combobox that says Scene Editor and switch it to RigidBody Editor.

Attached Image: SwitchToRigidBodyEditor.png


You should see the ship object and an overlay that shows its physical shape - a circle. Select and delete it to make way for a more accurate representation. Now use the shape tools in the toolbar above to define a new shape. (Keep in mind that you can always zoom in using the Mouse Wheel.) It doesn't matter how many primitives you add or how you configure them - as long as they belong to a single RigidBody, they will act as one physical object.

However, there are two things to keep in mind:
  • By default, an object's mass is calculated based on the total area occupied by all of the primitive shapes. Overlapping shapes might make an object appear unusually heavy - you might want to avoid (or use) that. If you aren't content with the automatic mass calculation, you can always enter an explicit value in the respective RigidBody property.
  • Each shape adds a little complexity to the physical simulation. For performance reasons, you should always use the simplest shape that you can get away with. When defining polygons, each edge adds complexity. Circles are generally easiest to calculate but aren't always suitable.

Attached Image: DefineShipShape.png


Testing the Scene Setup


After defining the ship's shape, be sure to switch back to the Scene Editor mode. Let's see what happens when we run the game. In Duality, you don't need to actually run the game to see that: The editing environment has a built-in testing mode called Sandbox, which allows you to see the game in action while at the same time being able to use full editing functionality. The current Scene's state is saved when entering the Sandbox and restored after exiting it. However, the current Scene has never been saved anywhere, so we better do it now. Click on the Save Scene button in the Scene View and a new Scene Resource will appear in the Project View. Enter a suitable name and hit return to accept.

Attached Image: SaveScene.png


The current Scene is now safely stored in the Resource file that you've just named. A Scene Resource represents a single level or stage of your game. When double-clicking a Scene Resource in the Project View, it will be opened for editing. You don't need to do that now, because the Scene you just saved is still open. Let's see what happens when entering the Sandbox. Click Enter Sandbox mode in the toolbar and watch. Here's a hint: Zoom out a little before you do it.

Attached Image: EnterSandboxMode.png


As you will notice, the ship falls down. Why? Because by default, Duality applies gravity to all physical objects. In space, however, there shouldn't be any gravity. To fix that, exit the Sandbox mode (This is important - otherwise, your changes will be reset after doing so later on), select the Scene Resource in the Project View and adjust its GlobalGravity property to (0, 0). When you hit Play again, the space ship will no longer fall down.

The Sandbox is a good way to test how certain things behave when running the game, and you can use all of Dualitor's editing functionality during debug sessions. You can even go one step further and actually play the game inside the editor. The Camera View has a special mode for that. It's called Game View and can be selected the same way you selected the RigidBody Editor before. However, we don't want to lose the Scene Editor so it'll be best to open a second Camera View. Click on View / Camera.

Attached Image: CreateCamView.png


A new Camera View will open tabbed to the existing one. Grab the tab and and drag it onto the bottom of the screen to lay them out next to each other.

Attached Image: LayoutCamView.png


Now that we have both views aligned vertically, switch the new one from Scene Editor to Game View. It will now show you the current Scene view the same way it would when running the game. But why is it all black? Did we miss something?

Yes, we actually did: While each Camera View provides its own internal Camera object to observe the Scene for editing purposes, we never created an actual Camera object for the game itself. When using the Game View mode, we see the Scene through the eyes of its observer - but there is none! Only the two Gameobjects for player ship and background, but neither of them carries a Camera Component. So let's create a Camera object for our Scene.

Attached Image: CreateCamera.png


Right-click on an empty spot in the Scene View and select New / Graphics / Camera. You will notice that the Game View now shows our background image, but not the space ship. That's because it is too near to be seen. Select the newly created Camera object and set its Position to (0, 0, -500). You should now see both background and space ship in the Game View.

Attached Image: GameViewWithCamera.png


To be complete, right-click on the Camera Gameobject in the Scene View and select New / Sound / SoundListener. This will allow our Camera object to not only receive visuals, but also audio of any kind.

Attached Image: CreateSoundListener.png


Writing Code


Enough with all the preparations. Time to write some code! Click on the Open Sourcecode button in the upper left to bring up Visual Studio (or Visual C# Express) with the game plugin project open. While other game frameworks are referenced and used by your own code, Duality does the reverse: In a Duality game, it's not your code that is using the engine - the engine is using your code! Every custom Component, each and every feature you implement is compiled to a Plugin .dll file, which Duality will load and use as it sees fit. The Visual Studio solution that is opened using that button contains a new project that is a fully configured Duality Plugin - ready to be filled with your code.

Attached Image: OpenSourcecode.png


In the Solution Explorer you will see two code files are already part of the project: CorePlugin.cs and YourCustomComponentType.cs. The first one identifies your Duality plugin and provides an interface for global logic. For now, leave it alone. Instead, rename YourCustomComponentType.cs to Player.cs and do the same to the class that is defined within this file. Open it and you should see the following code:

using System;
using System.Collections.Generic;
using System.Linq;
using System.Text;

using Duality;

namespace YourFirstProject
{
    [Serializable]
    public class Player : Component
    {

    }
}

It defines a class named Player that derives from the Component base class. This is the primary way to introduce new logic to Duality: By defining custom Components that can then be added to Gameobjects in the editor. Let's implement some basic player ship logic step by step:
  • First add using directives for the namespaces Duality.Components.Physics, OpenTK and OpenTK.Input. That way we won't have to call all those classes we'll be using by their full name.
  • Right after the [Serializable] attribute, add a new [RequiredComponent(typeof(RigidBody))] attribute. This will tell engine and editor that our player logic will always require its Gameobject to also have a RigidBody. We'll need it to apply user input forces to it.
  • Let Player not only derive from Component, but also implement the ICmpUpdatable interface. It will allow us to do one update per frame cycle by providing a suitable method definition. Your class definition line should look like this: public class Player : Component, ICmpUpdatable.
  • Click on ICmpUpdatable and a tiny blue square will appear to its left. When hovering over it, a context menu will appear. Open it and select Implement interface explicitly. Visual Studio will add some lines of code for you. Remove throw new NotImplementedException(); from its body so we can insert our own implementation.
  • Before checking user input or applying forces, we'll need to retrieve the RigidBody Component to work on. The best way to obtain a reference to it is to ask our Gameobject: RigidBody body = this.GameObj.RigidBody;.
  • Now that we are prepared, we can check for user input. if (DualityApp.Keyboard[Key.Left]) (If the player presses the left key), body.ApplyLocalForce(-0.0001f); (apply a small counter-clockwise rotation force).
  • Implement the same for the right key and a small clockwise rotation force.
  • If neither the left nor the right key is pressed, we want the ongoing rotation to stop: body.AngularVelocity -= body.AngularVelocity * 0.1f * Time.TimeMult;. Each frame, a tenth of the current velocity is subtracted. We'll need to multiply that value by Time.TimeMult to account for Duality's variable time step: Not all frames take the same amount of time. A game might run fast on one machine (many frames per second) and slow on the next (few frames per second). To be sure that the underlying logic always executes at the same speed, there is Time.TimeMult to compensate: At 60 FPS, it will equal exactly 1.0f, leaving all calculations as they are. If we run at 120 FPS (i.e. twice as fast), it becomes 0.5f so each frame is doing half the work and everything adds up roughly the same it does at 60 FPS. When running at 30 FPS (half as fast), it will be 2.0f to compensate in the other direction. You get the idea.
  • Check for more user input! if (DualityApp.Keyboard[Key.Up]) (If the player presses the up key), body.ApplyLocalForce(Vector2.UnitY * -0.2f * body.Mass); (apply a small local upward force). By multiplying that force with the bodies mass, we prevent the movement from behaving different for differently weighted objects: For heavier object we simply apply more force, for lighter ones less.
  • Implement the same for the down key and a small local downward force.
By now, your custom Player Component should look something like this:

using System;
using System.Collections.Generic;
using System.Linq;
using System.Text;

using Duality;
using Duality.Components.Physics;

using OpenTK;
using OpenTK.Input;

namespace YourFirstProject
{
    [Serializable]
    [RequiredComponent(typeof(RigidBody))]
    public class Player : Component, ICmpUpdatable
    {
        void ICmpUpdatable.OnUpdate()
        {
            RigidBody body = this.GameObj.RigidBody;

            if (DualityApp.Keyboard[Key.Left])
                body.ApplyLocalForce(-0.0001f);
            else if (DualityApp.Keyboard[Key.Right])
                body.ApplyLocalForce(0.0001f);
            else
                body.AngularVelocity -= body.AngularVelocity * 0.1f * Time.TimeMult;

            if (DualityApp.Keyboard[Key.Up])
                body.ApplyLocalForce(Vector2.UnitY * -0.2f * body.Mass);
            else if (DualityApp.Keyboard[Key.Down])
                body.ApplyLocalForce(Vector2.UnitY * 0.2f * body.Mass);
        }
    }
}

That's all we need for now. Right-click on the CorePlugin project (not the .cs file) in the Solution Explorer and select Build to compile the Plugin. Now switch back to the Dualitor - it will notice that you recompiled and automatically reload the Plugin. Now right-click on the player ship Gameobject in the Scene View and select New / YourFirstProject / Player. Enter the Sandbox mode. Fly using the arrow keys.

Run, Debug and Publish


Running your game in the editor is fine as a first test - but sooner or later, you'll want to publish your game, or run it as a standalone application. That application is called DualityLauncher.exe and is also available through the editor UI. Click on the Run Game button in the toolbar.

Attached Image: RunGameButton.png


You will see a Console window popping up (this won't show up when running outside the editor), followed by your game (it runs windowed). After a few moments of tense anticipation, you will see.. nothing. Black emptiness. Why doesn't it show the Scene we just tested in the editor? Easy: Because we never told it to do so. In general, Duality applications can be configured in various ways: While UserData holds anything you'd expect to appear in a games Options or Setup menu, there is also the so called AppData which carries everything else: Version numbers, author names, universal constants - and the starting Scene. To assign our new Scene as starting Scene, click on Settings / Application Data.

Attached Image: EditAppData.png


Then, grab our test Scene Resource from the Project View and drag it onto the StartScene property in the Object Inspector. When clicking Run Game again (or running DualityLauncher.exe manually), you should see the test Scene and be able to fly around using your space ship. In case you want to do it in fullscreen mode, click on Settings / Default User Data and set the GfxMode property to Native. Beware: We didn't yet implement any way to end the game, so you'll probably need the task manager to shut down the game from fullscreen.

There is also a third way to run the game and it is especially useful for debugging: Switch to Visual Studio and click Start Debugging or press F5. Not only will it run the game as standalone application, it will also attach the debugger. Try it! Set a breakpoint in your custom Player Component code and step through it.

Attached Image: DebugGameBreak.png


If you happen to use a professional version of Visual Studio, you can also attach the debugger manually - to both the standalone app and the editor. However, the express version might not support this, so you'll only be able to debug as described above.

Publishing your game is as easy as cloning your project folder and deleting a couple of unnecessary files, depending on what you want the end user to have access to. The following files can be safely deleted before packing a Release version of your game:
  • logfile.txt: The launcher application's log file. Will be rewritten after each start.
  • logfile_editor.txt: The editor's log file. Will be rewritten after each start.
  • perflog.txt: The launcher application's performance report file. Will be rewritten after each start.
  • perflog_editor.txt: The editor's performance report file. Will be rewritten after each start.
  • Backup: An automatically generated backup folder while editing project Resources. Never accessed.
  • Source/Media: A temporary folder that holds source media files while editing them. Can be safely deleted without losing any data.
  • Source/Code: Holds the project's source code. It's your choice whether you deliver it or not.
In case you don't want to deliver the editor application with your game, you can also remove the following:
  • DualityEditor.exe: The editor.
  • DualityEditor.exe.config: Some runtime configuration for the editor app.
  • DualityEditor.pdb: Debug symbols for the editor.
  • DualityEditor.xml: XML documentation for Visual Studio Intellisense.
  • Duality.xml: More XML documentation.
  • OpenTK.xml: Even more XML documentation.
  • DDoc.chm: API reference for Duality.
  • editoruserdata.xml: Editor layout and settings.
  • designtimedata.dat: Design-time data for GameObjects such as their locked / hidden state.
  • Aga.Controls.dll: Some Editor user interface library.
  • CustomPropertyGrid.dll: Some Editor user interface library.
  • VistaBridgeLibrary.dll: Some Editor user interface library.
  • WeifenLuo.WinFormsUI.Docking.dll: Some Editor user interface library.
  • Windows7.DesktopIntegration.dll: Some Editor user interface library.
  • Plugins/*.editor.dll: Duality editor plugins.
  • Plugins/*.xml: XML documentation of Duality plugins.
Although it might be tempting to hide your precious source code and game Resources from public access, delivering both editor and source code is highly encouraged! Everyone who plays your game will be able to create mods using the same tools you had - which will be a great contribution to your game's community.

What next?


If you're reading this, you've probably completed this tutorial. So far so good - but what you've got is hardly a game. There may be a lot of open questions, more than a quick intro article like this can cover. How to proceed? First of all, there is the integrated help system (called "Advisor", as you may recall) and the API reference you can invoke via F1 or by opening DDoc.chm from the Duality installation package. It explains a lot of vital concepts and may prove to be a helpful source of information. When encountering problems that you can't seem to solve by yourself or just want to ask some questions, a visit to the Duality forums might pay off. There are also some blog entries that might prove helpful.

Other than that - learning by doing is a really powerful concept and Duality does its best to nudge you in the right direction. Explore the possibilities. Click all the buttons and use all the API methods. Create a game prototype. Even better: Create a lot of game prototypes. And most importantly: Have fun! :)

2 Jul 2013: Initial release

Reinforcement Learning for Games

$
0
0
Neural networks are often overlooked when considering game AI. This is because they once received a lot of hype but the hype didn't amount to much. However, neural networks are still an area of intense research, and numerous learning algorithms have been developed for each of the 3 basic types of learning: supervised, unsupervised, and reinforcement learning.

Reinforcement learning is the learning algorithm that allows an agent to learn from its environment and improve itself on its own. This is the class of learning algorithms we will focus on in this article. This article will discuss the use of genetic algorithms as well as an algorithm the author has researched for single-agent reinforcement learning. This article assumes that the neural networks are simple integrate and fire, non-spiking sigmoidal activation neural networks.

Genetic Algorithms


The concept


Genetic algorithms are one of the simplest but also one of the most effective reinforcement learning methods. It does have one key limitation though: It has to operate on multiple agents (AI's). Nevertheless, genetic algorithms can be a great tool for creating neural networks via the process of evolution.
Genetic algorithms are part of a broader range of evolutionary algorithms. Their basic operation proceeds as follows:

1. Initialize a set of genes
2. Evaluate the fitnesses of all genes
3. Mate genes based on how well they performed (performing crossover and mutation)
4. Replace old genes with the new children
5. Repeat steps 2 - 4 until a termination criterion is met

NEAT


The code accompanying performs the genetic algorithm following the NEAT (Neuro-Evolution of Augmenting Topologies) methodology created by Kenneth Stanley. As a result, the neural network genes are encoded by storing connections between neurons as index pairs (indexed into the neuron array) along with the associated weight, as well as the biases for each of the neurons.

This is all the information that is needed to construct a completely functional neural network from genes. However, along with this information, both the neuron biases and connection genes have a special "innovation number" stored along with them. These numbers are unique, a counter is incremented each time an innovation number is assigned. That way, when network genes are being mated, we can tell if connections share a heritage by seeing if their innovation numbers match. These can then be crossed over directly, while the genes without innovation number matches can be assigned randomly to the child neural networks.

This description is lacking in detail, but intends to simply provide an overview of the way the genetic algorithm included in the software package functions.

While this genetic algorithm works very well for many problems, it requires that many agents are simulated at a time rather than one just learning by itself. So, we will briefly cover another method of neural network training.

Local Dopamine Weight Update Rule with Output Traces


The concept


This method quite possibly has already been invented, but I could not find a paper describing the same method so far. This method applies to how neuron weights are updated when learning in a single agent scenario. This method is entirely separate from network topology selection. As a result, the included software package uses a genetic algorithm to evolve a topology for use with the single agent reinforcement learning system. Of course, one could also simply grow a neural network by randomly attaching new neurons over time.

Anyways, I discovered this technique after a lot of trial and error while trying to find a weight update rule for neural networks that operates using information available at the neuron/synapse level. It therefore could be biologically plausible. The method uses a reward signal, dopamine, to determine when the network should be punished. That's right; this network only feels pain, not pleasure. Well, its pleasure is the lack of pain. Either way, in order to make this method work, one needs to add a output trace (floating point variable) to each neuron. Other than that, one only needs the reward signal dopamine, which ranges from 0 (utter failure) to 1 (complete success). When one has this information, all one needs to do is update the neural network weights after every update cycle using the following code:

float outputSigned = 2.0f * m_output - 1.0f;

m_outputTrace += -traceDecay * m_outputTrace + outputSigned;

// Weight update
for(size_t i = 0; i < numInputs; i++)
    m_inputs[i].m_weight += -Sign(m_outputTrace) * Sign(m_inputs[i].m_pInput->m_outputTrace) * (1.0f - dopamine);

// Bias update
m_bias += -Sign(m_outputTrace) * (1.0f - dopamine);

Where m_output is the output of the neuron, traceDecay is a value that defines how quickly the network forgets (ranges from [0, 1]), and m_inputs is an array of connections.

This code works as follows:

The output trace is simply an average output over time that decays if left untouched. The weight update simply moves the weight if dopamine is < 1 (it doesn't have perfect fitness yet) in the direction that would cause it to output its average output less often.

This method is able to solve the XOR problem with considerable ease (it easily learns an XOR gate).

Use in Games?


These methods seem like total overkill for games. But, they can do things that traditional methods can't. For instance, with the genetic algorithm, you can create a physics-based character controller like this one.

The animation was not made by an animator; rather the AI learned how to walk by itself. This results in an animation that can react to the environment directly. The AI in the video was created using the same software package this article revolves around (linked below).

The second discussed technique can be used to have game characters or enemies learn from experience. Enemies can for instance be assigned a reward for how close they get to a player, so that they try to get as close as possible to the player given a few sensory inputs. This method can also be used by virtual pet type games, where you can reward or punish a pet to achieve the desired behavior.

Using the Code


The software package accompanying this article contains a manual on how to use the code.

The software package can be found at: https://sourceforge.net/projects/neatvisualizers/

Conclusion


I hope this article has provided some insight and inspiration for the use of reinforcement learning neural network AI in games. Now get out there and make some cool game AI!

Article Update Log


2 July 2013: Initial release

Building a First-Person Shooter: Part 1.3 Keyboard Inputs

$
0
0
Having a player that just stands watching the world go by isn’t much of a game so let’s add in some movement. We will start by adding a few new variables to the constructor:

move = 0.0;
strafe = 0.0;
cameraypositionsmoothing = 3.0;
maxacceleleration = 0.5;
movementspeed = 3.0;

The player UpdateControls function will be added to the start of the player Update and will manage user inputs via the keyboard and mouse:

UpdateControls();

Inside UpdateControls we get the current window and detect if any of the W,A,S,D keys are currently pressed. We will track forward and backward movements in the variable called move and left and right movements in the variable called strafe. KeyDown() will return a Boolean value of true or false, but in C++ these values are essentially the integers 1 (true) and 0 (false). So if you look at the code for move pressing the ‘W’ key would translate to move = 1 – 0 which results in 1.

Window* window = Window::GetCurrent();
//Get inputs from the controller class
move = window->KeyDown(Key::W) - window->KeyDown(Key::S);
strafe = window->KeyDown(Key::D) - window->KeyDown(Key::A);

Now that we have values for move and strafe we need to normalize them so that moving while strafing doesn’t move the character faster than normal. Then after normalizing we scale the movement to the correct movespeed:

float maxaccel = this->maxacceleleration;
float movespeed = this->movementspeed;
normalizedmovement.z = move;
normalizedmovement.x = strafe;
normalizedmovement = normalizedmovement.Normalize() * movespeed;

We now call the entity SetInput with the normalizedmovement the z axis being forward and backwards movement and the x axis being left and right. We also make use of the maxaccel value set earlier:

entity->SetInput(0,normalizedmovement.z,normalizedmovement.x,0,false,maxaccel);

Finally we set the camera position to the same position as the entity and make sure to set it at the correct height of where a head would sit:

cameraposition = entity->GetPosition();
camera->SetPosition(cameraposition.x, cameraposition.y + cameraheight, cameraposition.z );

Running the resulting code will allow you to move around using the W,A,S,D keys:

#include "MyGame.h"
using namespace Leadwerks;
Player::Player()
{
//Create the entity
entity = Pivot::Create();
entity->SetUserData(this);

//Initialize values
move = 0.0;
strafe = 0.0;
cameraypositionsmoothing = 3.0;
maxacceleleration = 0.5;
movementspeed = 3.0;
standheight=1.7;
crouchheight=1.2;
cameraheight = standheight;
smoothedcamerapositiony = 0;

//Create the player camera
camera = Camera::Create();
camera->SetPosition(0,entity->GetPosition().y+cameraheight,0,true);
//Set up player physics
entity->SetPhysicsMode(Entity::CharacterPhysics);
entity->SetCollisionType(Collision::Character);
entity->SetMass(10.0);
//Player position
entity->SetPosition(0,0,0,true);

}

Player::~Player()
{
if (camera)
{
camera->Release();
camera = NULL;
}
}

void Player::UpdateControls()
{
Window* window = Window::GetCurrent();
//Get inputs from the controller class
move = window->KeyDown(Key::W) - window->KeyDown(Key::S);
strafe = window->KeyDown(Key::D) - window->KeyDown(Key::A);
}

//Update function
void Player::Update()
{
UpdateControls();
float maxaccel = this->maxacceleleration;
float movespeed = this->movementspeed;
//Make sure movements are normalized so that moving forward at the same time as strafing doesn't move your character faster
normalizedmovement.z = move;
normalizedmovement.x = strafe;
normalizedmovement = normalizedmovement.Normalize() * movespeed;

//Set player input
entity->SetInput(0,normalizedmovement.z,normalizedmovement.x,0,false,maxaccel);

//Set the camera position
cameraposition = entity->GetPosition();
camera->SetPosition(cameraposition.x, cameraposition.y + cameraheight, cameraposition.z );
}

Building a First-Person Shooter: Part 1.4 Mouse Inputs

$
0
0
Now it’s time to let the player look around using mouse movements. We start again by adding variables for mouse controls into the constructor:

sensitivity=1.0;
cameralooksmoothing = 2.0;
cameraypositionsmoothing = 3.0;
smoothedcamerapositiony = 0;

In UpdateControls we will need access to the games context which is the renderable area of the window, which is essentially the area of the game window inside the windows border. We use this context to find the center of the screen and store the coordinates as sx and sy.

Context* context = Context::GetCurrent();
//Get the mouse movement
float sx = context->GetWidth()/2;
float sy = context->GetHeight()/2;

Next we save the current mouse position and then return the mouse to the center of the screen:

//Get the mouse position
Vec3 mouseposition = window->GetMousePosition();
//Move the mouse to the center of the screen
window->SetMousePosition(sx,sy);

Now that we know where the center of the screen is and the current mouse position we can figure out the difference between the two which tells us which direction to look:

//Get change in mouse position
float dx = mouseposition.x - sx;
float dy = mouseposition.y - sy;

We want to set the mouse speed by smoothing between the previous mouse speed and the distance from the center of the screen.

//Mouse smoothing
mousespeed.x = Math::Curve(dx,mousespeed.x,cameralooksmoothing/Time::GetSpeed());
mousespeed.y = Math::Curve(dy,mousespeed.y,cameralooksmoothing/Time::GetSpeed());

Using the mouse speed we increment the player’s rotation and scale it by sensitivity, thus the higher the sensitivity the quicker the mouse movements:

//Adjust and set the camera rotation
playerrotation.x += mousespeed.y*sensitivity / 10.0;
playerrotation.y += mousespeed.x*sensitivity / 10.0;

To prevent the player from inhuman neck movements we clamp the y rotation values at -90 and 90:

//Prevent inhuman looking angles
playerrotation.x = Math::Clamp(playerrotation.x,-90,90);

In the player Update function we rotate the camera by the playerrotation value finally allowing for our character to look around:

//Set camera rotation
camera->SetRotation(playerrotation,true);

At this point the player character can move around with keyboard inputs and look around using the mouse:

#include "MyGame.h"
using namespace Leadwerks;
Player::Player()
{
//Create the entity
entity = Pivot::Create();
entity->SetUserData(this);

//Initialize values
sensitivity=1.0;
cameralooksmoothing = 2.0;
move = 0.0;
strafe = 0.0;
cameraypositionsmoothing = 3.0;
maxacceleleration = 0.5;
movementspeed = 3.0;
standheight=1.7;
crouchheight=1.2;
cameraheight = standheight;
smoothedcamerapositiony = 0;

//Create the player camera
camera = Camera::Create();
camera->SetPosition(0,entity->GetPosition().y + cameraheight,0,true);

//Set up player physics
entity->SetPhysicsMode(Entity::CharacterPhysics);
entity->SetCollisionType(Collision::Character);
entity->SetMass(10.0);

//Player position
entity->SetPosition(0,0,0,true);
}

Player::~Player()
{
if (camera)
{
camera->Release();
camera = NULL;
}
}

void Player::UpdateControls()
{
Window* window = Window::GetCurrent();
Context* context = Context::GetCurrent();

//Get inputs from the controller class
move = window->KeyDown(Key::W) - window->KeyDown(Key::S);
strafe = window->KeyDown(Key::D) - window->KeyDown(Key::A);

//Get the mouse movement
float sx = context->GetWidth()/2;
float sy = context->GetHeight()/2;

//Get the mouse position
Vec3 mouseposition = window->GetMousePosition();

//Move the mouse to the center of the screen
window->SetMousePosition(sx,sy);

//Get change in mouse position
float dx = mouseposition.x - sx;
float dy = mouseposition.y - sy;

//Mouse smoothing
mousespeed.x = Math::Curve(dx,mousespeed.x,cameralooksmoothing/Time::GetSpeed());
mousespeed.y = Math::Curve(dy,mousespeed.y,cameralooksmoothing/Time::GetSpeed());

//Adjust and set the camera rotation
playerrotation.x += mousespeed.y*sensitivity / 10.0;
playerrotation.y += mousespeed.x*sensitivity / 10.0;

//Prevent inhuman looking angles
playerrotation.x = Math::Clamp(playerrotation.x,-90,90);
}

//Update function
void Player::Update()
{
UpdateControls();

float maxaccel = this->maxacceleleration;
float movespeed = this->movementspeed;

//Make sure movements are normalized so that moving forward at the same time as strafing doesn't move your character faster
normalizedmovement.z = move;
normalizedmovement.x = strafe;
normalizedmovement = normalizedmovement.Normalize() * movespeed;

//Set camera rotation
camera->SetRotation(playerrotation,true);
entity->SetInput(playerrotation.y,normalizedmovement.z,normalizedmovement.x,0,false,maxaccel);

//Set the camera position
cameraposition = entity->GetPosition();

camera->SetPosition(cameraposition.x, cameraposition.y + cameraheight, cameraposition.z );
}
Viewing all 17825 articles
Browse latest View live


<script src="https://jsc.adskeeper.com/r/s/rssing.com.1596347.js" async> </script>