Quantcast
Channel: GameDev.net
Viewing all 17825 articles
Browse latest View live

Adventures in PR…

$
0
0

Context


This isn't going to be much use to an established company or developer, it might be a little more interesting to students looking to start a company or newly founded devs. Also my spelling and grammar are shocking so apologies in advance!

Lost Zombie Studio consists of two people: myself (Jody Gallagher) and Matt Sharpe. We have both worked on games projects in the past including a few pretty big games that I won't bother to list here. We have been working on Away Team for roughly a year with a spattering of contracts in between. The game has changed pretty dramatically over that time into something much bigger than originally planned. This meant we had to make the choice of building it ourselves with little money or just scrapping it and continuing with the contracts. There just isn't enough time in the day for both!

We obviously decided to push on with the game as it's something we both deeply believe in and we started LZS to do cool projects like this in the first place.. Also who needs money!?

We are both complete novices when it comes to marketing or PR which meant we just ignored it, also marketing is boring right!? So the first incarnation of the LZS site was pretty terrible. It was a plain old site with some hyperlinks, I would show a screenshot of it but, thankfully, it has been sent to the farm. We had thought that if we build it they shall come, surely if we have a place for people to come see the game that's about all we really need to do… Potential customers will be flooding in, press will get wind of the game and we can put all this “suit” work behind us.

Obviously that was wrong! we realized pretty quickly no one knew who we were or cared about our little indie game. Other than my mum, no one was going to buy this thing once we finished it. So we decided to listen to the experts yelling at everyone to share what they are actually doing (Brian Baglow) and come up with some sort of plan to do that.

So this is a breakdown of what went right and wrong over the 24 hours from relaunching the site and also some info on what we did as far as planning to get to that. I should also note this is all stuff you can do for free, other than my own personal time we didn't spend a penny.

Preparation and what went "right"


sprint-screenshot-267x300.jpg


We do the game development to a rough scrum style so we decided to add the marketing, PR and other neglected tasks to the sprint for that week. We are both used to working like this (or at least probably should be) by now so it made sense and meant we wouldn't procrastinate. as a bonus it also meant we did some research into different vectors for selling and marketing the game. People have tons of different ways of planning this stuff out but I've found a simple shared Google spreadsheet does the job fine. Trello is also really useful and free!

WordPress! “Middleware” is something most developers use every day in our projects and saves a massive amount of time and money, so instead of building a site from scratch again we decided to use WordPress. This was an excellent choice and only took a few days to set up. There are probably other solutions out there but WordPress just worked for us. It also has great integration with Google analytics, something which needed to be set up if we planned to try and track what effect we were having. Seriously it's pointless putting up a site without it, and the real time view makes you feel like an NSA spy!

Thinking about aesthetics and design is another thing that comes naturally to all of us when making games but not so much when we build sites (at least for us in the past) so we put a bit more thought into design and colour schemes for this site. Going with a more punchy neon flash colour and more subtle charcoal and white for the rest. We also planned out call to action buttons and general layout a lot more meaning, theoretically at least, the general bounce rate for the site should be improved.


site-image-300x152.jpg


Super fun Databases! I spent a whole day, around 10 hours, trawling the internet to find journalists email and twitter addresses. This is without a doubt the single most boring thing I have ever done... maybe ever! But it's a huge help, we now have a great, up to date and current list of 200 or so people we can harass with our game updates. I made sure to make a note of their personal sites as well as where they work so I can tailor emails to people. I have heard press don't link blanket cc'ed emails! There are pre made lists online you can find if you search but most are outdated or just links to contact pages.

As with the contact database, I spent some time searching the interwebs for forums and fan sites for subjects that related to our game. In this case Away Team is a SciFi strategy game, so I googled "scifi game fans forum" and other similar variations on that. I got a ton of sites we can now go to and post info on the game. I would say you have to be careful with posting on random forums as you do not want to come across as a spammer and obviously the forum should be relevant, you should also be adding something. These people are about as close to the "target demo" I could think of so it's perfect and they are literally just sitting there waiting for you to show them stuff! Brilliant. I'm also making a note to keep checking the sites and reply to any questions folks there might have. (ProTip: This can be done by subscribing to the threads you create.)

A good description of the game was something we were lacking so sitting down for an evening and getting all the blurb written up gave us a half decent "about" page and also meant we had something to post to all the wonderful links we had collected! This blurb is shared across the site's game description and the press release email. I kinda cheated with this and used Press Friendly which is a site that you can join for free which will give you a step by step process for creating what is basically a pitch for you product. They will also give you a 15 minute skype chat to go over it at no cost. It gives you a very good base to work from, I say a base as it does need to be changed a bit to work as a games blurb. Still, it's a great start.

IndieDB is a perfect companion site to your main one, for indie devs at least. It has a huge amount of users and does a pretty good job of showing your game and website details clearly. We somehow got pretty popular for a few hours on IndieDB as well. I have no idea how this is calculated but was a nice morale boost.


indiedb-pop-300x66.jpg


Dev Blog. To make sure there was something other than just a description of the game and a few screenshots on the site when we launched it we decided to start a Blog talking about subjects related to game design or the game itself. We are going to try and "blog" every week or two, keeping up a momentum of info on the game and a good reason for people to come back to the site. (also this may improve my dreadful spelling and grammar)

What went wrong or could be improved?


Well, I spent way too much time on this - over 24 hours. Hardly left the computer the whole time and slept maybe 4 or 5 hours in between. This isn't counting the time spent preparing during the week. This can all eat into development time and cause issues as well as being bad for your health and posture. It has proved to me that this isn't a side job you can just leave till you have some spare time and is probably a full time job in its own right.

We didn't spend a penny doing any of this. We increased hits to the site from roughly 5 a week to around 500 in a few hours. I can only imagine the amount of scope using facebook paid posts, or similar on google etc, could generate would be multiples of that. So I think spending a little money (not too much) is a good step even at an early stage.

Hire someone to do all this stuff if you have the money, it's a LOT of work. I hadn't realized just how much time this would eat into. I now have a better respect for marketing folks! There is a lot to be said for doing it yourself though as you'll have a much more intimate approach to the task at hand.

MOAR! we need to keep up the web trawling, finding fan sites relevant to the game and getting more press contacts. I don't know how much time you can realistically spend doing this as it is a huge time sink, but a few hours a week is probably fair.

We should have done this earlier! I think with hindsight we could have been doing all this stuff last year sometime and would probably be in a slightly better position right now. There is certainly a time and a place for everything, you can't launch a massive campaign with nothing to show. But we still should have done more earlier.

Kickstarter and Greenlight look like great places not only to make cash but also to build an audience! Kickstarter alone is definitely something we are going to look into if only to try and generate a bit of a buzz. Again both of these involve spending some money so fell outside the zero spend initial plan.

We (or should I say "I") can do with a little more research into marketing practices. I dread reading a book on marketing or PR but it's probably something that needs to be done.

In Conclusion


Right! so all of this was done and I'm sitting in front of the computer on Sat night at about 8pm, desperately trying to fix a borked WordPress after trying to just copy paste it to another directory on our server... oops. Anyway I eventually got it working and started posting links to it around the internet, using the template and lists I had created. This took a couple of hours to do and I spent the rest of the night and most of Sunday replying to emails which were now coming in... the forum posts people were replying to and Facebook and Twitter etc.

Jump to Sunday night I'm sitting feet up, a little bit of a sore head, cat on my lap and "reward" beer opened. It was a productive experiment, we have some people at least who now know what our game is all about and who we are. We also have a couple of news sites wanting to feature the game.

Even a little marketing and PR is definitely a must do even for tiny indie devs like us!

Please! share your thoughts on this with us and let us know if we can improve what we are doing at all.

Algo-Bot: lessons learned from our kickstarter failure

$
0
0
Previous article: When a game teaches you

DISCLAIMER: Before reading this article I’d like to make you understand that every Kickstarter campaign is different. I can’t guarantee that my pieces of advice are success’ keys when a Kickstarter depends in part on luck factor.

If you'd like to help us, upvote our game on our Steam Greenlight page here (before Valve decides to drop the service).

ABOUT ALGO-BOT


Giving you a bit of context, Algo-Bot is a challenging 3D puzzle game in where programming logic is the player's weapon.

Players don’t directly control the robots (yes you can control several ones) but instead, players manipulate sequential commands to order them around and complete the level objectives. In the beginning, players are limited to telling the robots where to go: straight, left, right… But as players progress in the game, it gets much more complicated with the introduction of more advanced elements such as functions, variables, conditions, and other, more advanced, programming principles.

OK now you know what kind of game is it and how different / similar we are to other games. Now let's move on the Kickstarter topic.

GAME OVER


In January Fishing Cactus launched Algo-Bot on Kickstarter. It was our first experience on the platform and we were pretty confident about the success of our game. Why wouldn’t it be a success? Even as a niche game, everyone who played it liked it. We were ready. Our Kickstarter page was nice, our video looked very pro. Moreover we read all about “how to run a successful Kickstarter” annnnnd we failed... Things happen!

When I say that we failed it’s not completely right. Less than two weeks after the launch day, all of us secretly knew that it wouldn’t make it but when you worked so hard on something it’s even harder to admit your defeat. We had two solutions: run it to the end and fail or cancel it. After analyzing the situation, the second option looked more appropriate and more in control of our fate.

Step 1: Cancel a Kickstarter


To cancel your project you have to push that cancel button on the page. I noticed that it felt a bit like pushing the green button to launch your project. You feel excited, insecure and full of doubts. You ask your team twice if they are really sure they want to cancel it. It’s like: “ok I’m doing it” “I’m really doing it! Is everyone sure about it?” “I mean it, I’ll do it”. Then you press it and it feels so wrong and so right at the same time. You failed but you learnt so much from it.

Step 2: Analyze the situation


When you are running a Kickstarter you have access to quite a complete dashboard. You can see who your backers are, where your traffic comes from, your funding progress and what pledges are the most popular. You can’t see how many people have visited your page but you can evaluate it by seeing how many times people clicked on your video. This dashboard is really helpful during and after the Kickstarter.

The first day, our backers were mostly people living in our country which is not a lot when you live in Belgium. They were friends, family members, people from our network or people who simply found us via the geo-localization on Kickstarter’s home page. The others found our project thanks to the fact that they are Kickstarter regulars and they probably sorted the game category by launch date. Or, you suddenly appeared in the by default “sorted by magic", which, according to Kickstarter, shows you what's bubbling up right now across categories and subcategories.

“It’s not about money. It’s about backers”


That first day we raised 2% of our goal which is clearly not enough. According to many sources, if you haven’t reached 10% within the first 24 hours you’re screwed unless you’re Notch… or Tim Schafer. Are you Notch? No you’re not-ch. Anyway, what experience taught us is that your success is not about money, it’s about backers. Of course, the money you raise that first day is important but less than the number of your backers. Having two backers at $500 is way less powerful than one hundred backers at $10. It shows that your project is valuable and it helps you catch the staff attention to potentially become featured. That first day, your goal is not to raise money but to raise a community.

There are approximately 20 new game projects on Kickstarter every 24 hours and the “discover” page sorted by launch date, contains 20 projects on it. It means that the shelf life of your project lowers every time there’s a new project on the page. Of course, backers are still able to find your project by scrolling down and press “load more” but it requires involvement from the backer and a very catchy picture ;) So, these first 24 hours are crucial and won’t give you a single breathing space.

One more thing: keep in mind that Kickstarter is extremely viral. If backers love your project, make sure they will spread the word around them. So, past the first day, unless you’re featured, don’t count on Kickstarter to drive a huge traffic towards your page. Same thing happens with magazines. If you are not on a big one like Mashable, Forbes or Rock Paper Shotgun don’t believe you’ll create a buzz with one isolated article. It will drive 10 maybe 20 backers but that won’t be enough compared to what Facebook, Twitter, and blogs can generate.

With all these elements in hands, we were able to spot some of our mistakes: Message and visibility

Step 3: Spot the errors


The visibility


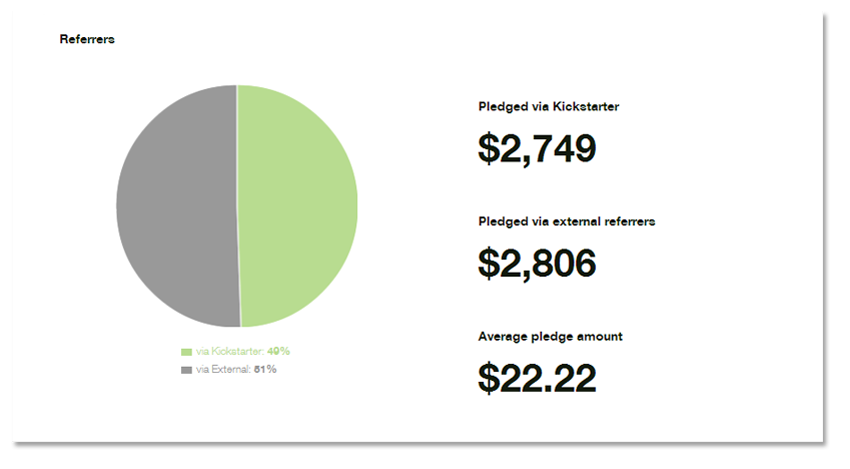
The first error we made was to think that our network was enough to bring backers. You can see on the picture below that our network drove 2% more money than Kickstarter. But it only says that our friends are generous. Like I said earlier, money is not our goal. We want to know who our backers are and where they come from. Like many Kickstarter we built a small community around the game, approx. 600 people but clearly not enough to support the launch of the campaign.

Kickstarter_dashboard_referrers_1.png

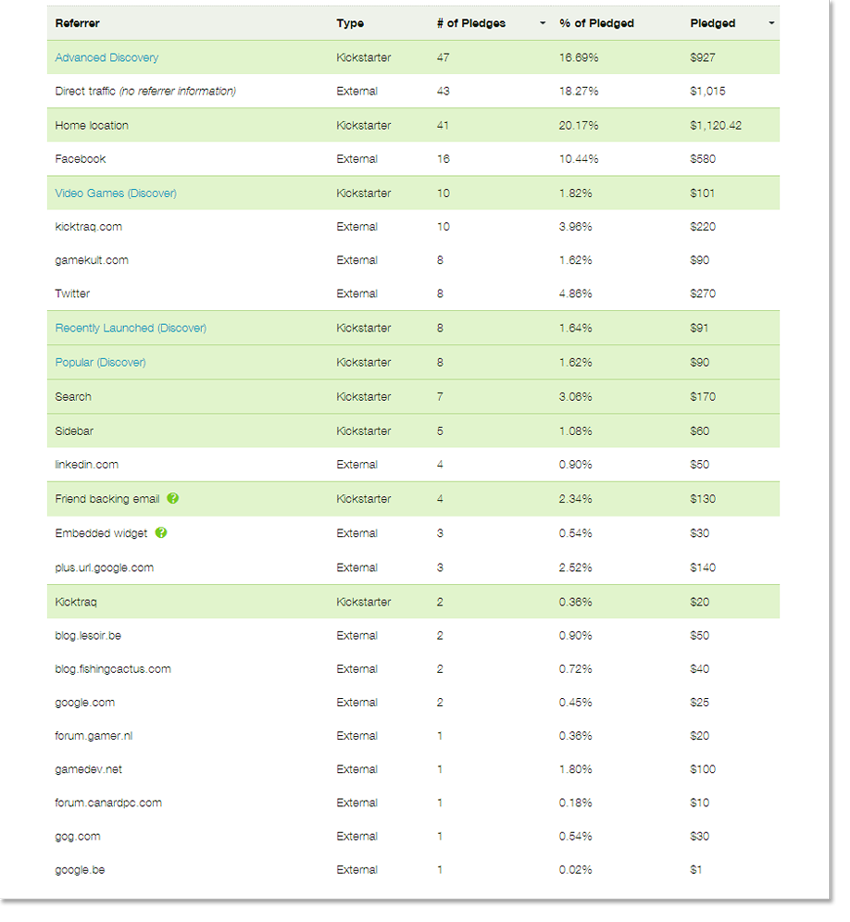
According to the tab below, our backers mainly come from Kickstarter, social networks only come at the second place and videogame websites at the third place. It proves us that our social networking has really gone wrong. What’s funny is remembering us being glad to see that more and more backers found us via Kickstarter when it clearly meant that nobody was talking about our game outside of Kickstarter. Ouch!

Kickstarter_dashboard_referrers_2.png

The message


Preview

Talking about Kickstarter traffic, one of our biggest error was to broadcast the wrong message about our game.


project_tumb_presa.png


On the preview of our game you can read “Code smarter. Not Harder” It doesn't say anything about the game. It only says that it’s something about coding, targeted for a niche. Moreover, it makes the target confusing. Is this game for programmers? Is this even a game?

Then you read the small description. “Awards winning 3D game in which you achieve your missions using Code Logic. No developers were harmed during the making of this”

What the description tells us about the project?


  • It’s an awards winning game
  • It’s a game and it’s 3D


For the moment, we are just right with our message and it’s not confusing at all. It brings value to the game and helps to justify the $60,000 goal.

  • Achieve your missions using Code Logic
  • No developers were harmed during the making of this (...)


The third message confirms that this game is about coding. But, it doesn’t say more than the title already told us. Does this game teach you code logic? Is it for beginners or experts? Is it for kids? And what exactly “code logic” is?

The little joke at the end shows that we are funny or try to be. But it’s not relevant here because it says nothing about the game.

You have 130 characters (136 but fit to 130 to avoid display issues), use them wisely!

Project page

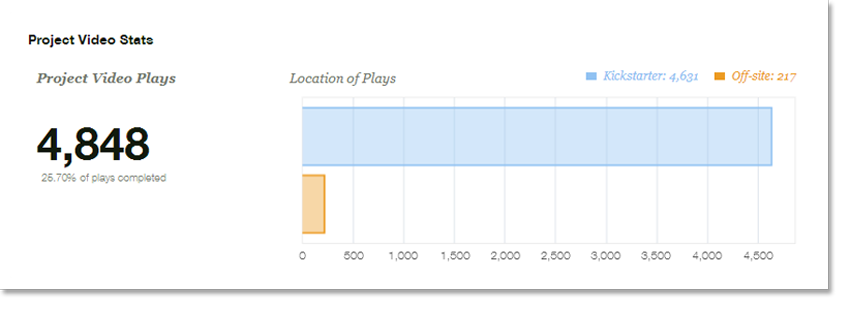
As said earlier, you can’t see how many people have visited your page but you can estimate it by knowing how many people played your video.

Kickstarter_dashboard_videostats.png

4,848 people played our video. That’s cool but that’s not what is important to us right now. Playing a Kickstarter video requires an investment from the potential backer. Before playing it, he will scroll down your page to get an overview of your project and see if it’s of interest.

To stay faithful to the theme “coding”, we found nice code related titles for our paragraphs. I said code related but it wasn’t really coding. It just looked like it and we kept it simple enough to be accessible to non-programmers. So, “Genesis” became “cmd starts Algo-Bot 1.0” and “Gameplay” became “bool Algo-Bot (string world, string characters, string controls)”. We keep thinking that it was funny but it was a very bad idea.

Private jokes are PRIVATE jokes and we lost a lot of potential backers here because they were lost and didn’t know what it was about. They just couldn’t find their way through the “coding” mess. Seeing titles like that is scary when you are not use to it. At that moment we lost all the puzzle lovers, parents who wanted to teach programming to their kids and only kept the programmers. When a programmer made us notice about the issue, we made the required amends but it was just too late because the 24 first hours were such a long time ago.

The more fearless from them maybe read the first paragraph and certaintly came with this: “that teaches basic coding and logic skills: aha! Game that teaches stuff.... hmmm.... many of teaching games suck!” and in the best case “but it sounds interesting enough. So let's see how it looks and what it is all about”. According to the backers who read our texts, they were way too long so, instead of reading what it is about they would rather to play the video.

Video

Our backers really enjoyed our video. One said that it was the best Kickstarter video ever. We thank him for that but obviously our video wasn’t that good because it didn’t describe the product well enough. Gameplay is the key.

Our video starts with an animated sequence that runs for 1:30 but it is too long especially because it is placed directly at the start and fails to show gameplay prominently. You have to wait 2:10 to see 40 seconds of gameplay which is not enough to understand how the gameplay exactly works. Come to the point as quickly as possible. Show how the actual game looks and what the gameplay is like straight away.

I’ll add that our video doesn’t communicate if coding knowledge is required which is very important for noobies and puzzle-lovers. Again, it doesn't tell the viewer who the target audience of the game is.

At the very end we say where the game is going when it gets funding, what is already finished and what is still needed, most of our backers missed it, we should have placed it well before as it was a key element.

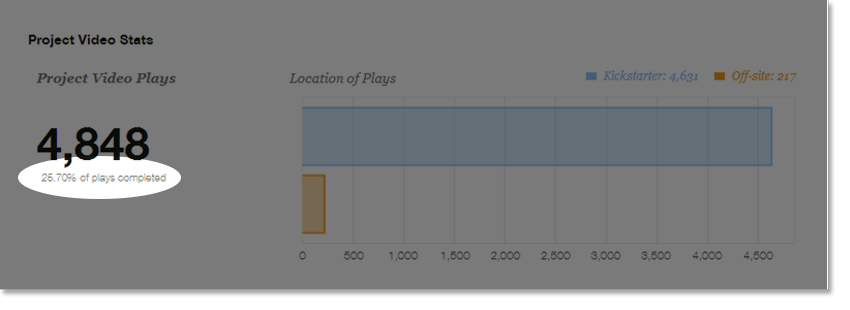
To finish with our video, I’ll highlight that 4:56 minutes (including the irrelevant 10 seconds of ending) wasn’t a clever length for a Kickstarter. When you are not going straight to the point people will skip some part or just stop the video which isn’t good at all. We now know that one of the statistics that Kickstarter uses to determine who gets featured on the main page is the number of “Finished plays” which means the number of time your video has been entirely seen. So, keep your video simple, stupid and SHORT.

Kickstarter_dashboard_videostats2.png

One last thing, about the gameplay video this time, comment it or attach a background music. We did a gameplay video with no sound and it was awfully boring to watch. Many of our potential backers stopped it after a few seconds.

Goal and Stretch-Goals

We set our goal at $60,000. For this sum of money we promised to deliver several features such as a level editor, the ability to code in-game and a lot of polish. While the gameplay is in an OK state and rather well defined now, the overall aspects of the game require more improvements: sounds, UI, integrate a better lighting system, more life with some particle FX, user friendly interface, increase the reactivity of the game and finally extend the story and plot of the game to make it more interesting for the long run.

After considering it, we should have lowered our goal and put more features as stretch-goals.

Rewards

For this part we asked our 250 backers some feedback. According to their judgment, the prices were quite good but the pledges looked messy because there were too many superfluous rewards between interesting ones.

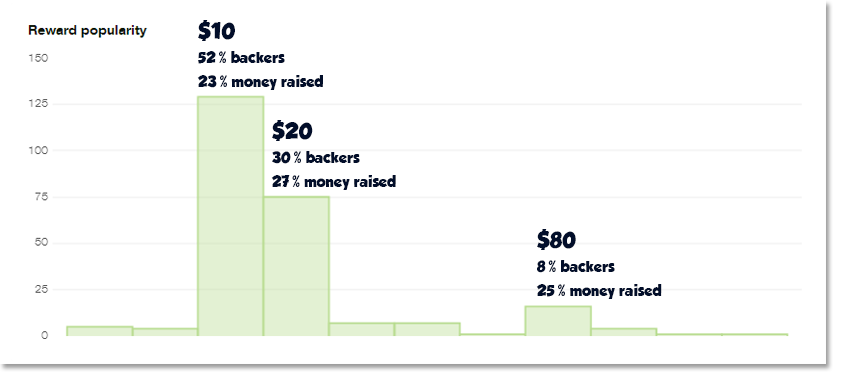
Let’s see what our dashboard says about our rewards and compare it with what our backers say.

Kickstarter_dashboard_rewardpopularity2.

You can see on the tab our three most popular rewards. 52% of our backers pledged for the digital downloadable copy for PC. They told us that they didn’t care about rewards. This pledge was an early bird limited at 800 which was a too high number for an early bird when you are not famous.

Then, 30% pledged another early bird limited at 500. For $20 they would have received the following digital rewards (in bold the rewards that really interested them):

  1. Exclusive wallpapers
  2. Infinite gratitude
  3. Digital downloadable copy for PC
  4. Algo-Bot papercraft
  5. Your name in the credits
  6. Participate in project development surveys
  7. Vote for the future programming language the game will support

What does it tell us? Our niche wanted to be part of it! They wanted to influence the development and not just have their names in the credits. It brings us back to the core of Kickstarter. It’s not about selling your game. It’s about sharing a dream.

“It’s not about selling your game. It’s about sharing a dream.”


The last pledge confirms it well. For $80 they would have an early access to our level editor and submit their levels for the final version of the game. They didn’t care about the t-shirt or the poster. What they really wanted was to participate!

To sum up what backers really want:

  1. Participate in your project (surveys, level editor, vote, design an element of the game,…)
  2. Alpha/Beta access with a decent price
  3. Multiple copies of the game
  4. Physical rewards

“Well what? But you just say that they didn’t care about your goodies!” Calm down, I said that OUR NICHE didn’t care about goodies but it’s important to have some physical rewards for people outside your niche. Imagine an uncle wanted to offer the game to his niece. He thinks that it’s a really good idea but he’s afraid that his niece won’t appreciate the gift at first sight but… Oh wait! What is this? A cute plushie of the robot! That would complete the gift nicely! See?

Another problem was the way we presented it. Each time we wrote the entire previous pledge plus the new rewards. I don’t say that it’s bad. It’s actually good to do it… when you have a decent number of rewards in the pledge. So, prefer to write it like that “previous pledge + new gifts” if you plant to have a lot more.

To finish, don’t just tell your rewards on the rewards column. Add a more visual description of your pledges on the page and a tab because some people are more comfortable with it.

PRESS START TO CONTINUE


One possible next article will talk about the reboot plan.

Meanwhile, we launched the game on Steam Greenlight with the wish to build a strong community on it. Never forget that building a community before running a Kickstarter is very important.

Post Mortem: Da Boom!

$
0
0
Da Boom! was developed over the course of the last half year in my spare time. It is a classical bomb laying game with a retro art style, but with the ability that you can play the game over the network. Not only can you play the game over the internet, but you can mix local multiplay and network play, you can for example have stwo player on one end and two on the other.

The focus of this project was mostly centered around developing technologies and development strategies. This is the first hobby project that I ever completed. I went out and said, either I complete this project or I give up on game development.

What Went Right


Limited Scope


From the start I knew that I had to pick a small project and severely limit the scope. I can only invest around 20 hours on a good week and this means that I had to remove as much gold plating as possible.

The actual choice of the game type was triggered by a good friend complaining about that lack of bomb laying games that worked properly over the internet. This game type with its limited scope fit the bill quite nicely.

But even here the scope was reduced to only have 3 power ups and a restricted art style.

Art Direction


Although the art is technically speaking “programmer” art, it is not at the level I can produce. I specifically aimed at a severely reduced and retro looking art style. This art style meant that I could quickly get something on screen and play around with the game mechanics.


Attached Image: DaBoom-0.1.0-sc1.jpg


Pivotal Tracker


I almost by chance started to try out Pivotal Tracker. Originally I wanted to use no planing software at all. I have come to the conclusion, at least for my hobby projects, that the more you plan the less you actually do. The problem comes from the fact that when I see the mountain of work to do and miss a deadline that this can deal a final blow on my motivation.

But I found two things that were awesome about Pivotal Tracker. It allows you to easily reorder work. This is important since I tend to plan things that are not needed now or even ever. This gold plating can then simply be pulled out of the plan, when you notice that everything will take forever.

The second thing is that deadlines or rather milestones are estimated by the work already done and how much there is to do. Although you can assign a date to a milestone, there is no kidding you about the chance that you will make the milestone on time, when that is not the case.

Technology


I have a bone to pick with most graphics libraries that are available to me. They either make really simple things hard to achieve or lack focus and maturity.

Over the years I have amassed a large body of code that does most of what I needed. The only problem was that it was not packaged in an easy to use fashion.

I invested some time into building and packaging pkzo, spdr and glm. Not only do I now have usable libraries for rendering, sound and networking, I gained a significant productivity boost. I'm not trying to integrate unwieldy libraries that waste my time, because they do not build from the get go, they have weird intrusive interfaces or the setup overhead is huge.

On the other hand I did not rewrite everything from scratch. Being able to build upon awesome libraries like SDL and the companion libraries SDL_image, SDL_ttf and SDL_mixer really cut the development time in half.

Excessive Refactoring


One thing that I can simply not stand is ugly and bad code. This might be a character flaw, but I have given up working on projects because the code felt wrong. This time around I was determined to keep the code in the best shape possible.

It sounds easy at first, but some things just sneak up on you. For example, the class handling the menu logic went from being small and well defined to a huge jumble of special cases. But even here it was possible to break up the code and remove most duplication.

It takes severe discipline to refactor code. The problem is that it feels like you are making no progress at all while doing it. But it was worth the effort.


Attached Image: DaBoom-0.1.0-sc2.jpg


What Went Wrong


Lack of Discipline


We are all humans and it is often hard to muster the strength to do all the little tedious things. The project was on a great start, what what do you expect, this is my passion. But after the first two months went by I started to not put in the desired time. This was especially true that I also started to pick the interesting thing to do instead of the really necessary ones. It is interesting how much time you can spend choosing music when the game does not even have the means to play it.

Rewrites and Gold Plating


I am proud to say that I only rewrote the entire rendering and networking systems about one and a half times each. Although this is a record low for me it remains one of my biggest stumbling stones.

The first most obvious gold plating was that I migrated my rendering code from immediate mode OpenGL 2.0 to OpenGL 3.2. Although the old code was inefficient, it did fully and totally not matter. The scene is so simple that any decent PC is able to render it without breaking a sweat.

The second gold plating and unnecessary effort was in making the network system asynchronously multi-threaded. Although the networking code worked fine, the game logic broke in very subtle ways and I ended up falling back in synchronous single threaded code.


Attached Image: DaBoom-0.1.0-sc3.jpg


Technological Blunders


The biggest lack of foresight was the game logic and especially the interaction with the presentation layer. Although the two were weakly bound, through the help of an event based system, it turned out to be fatal when integrating the networking layer. The multi-threaded nature of the networking system indirectly forced the presentation layer to be multi-threaded. But as it goes with OpenGL, manipulating resources from multiple threads is not a good idea.

The real problem was that implementing mitigation strategies, such as call marshalling or locking strategies, were a significant unplanned effort. In the end I ended up calling the networking system in the main even loop.

In future designs I must think about multi-threading from the start, especially if I want to get the most out of multicore systems. Then again, on such a small game, this is a wasted effort.

Missing Features


Unfortunately I was not able to implement all features I wanted. These being notably character animation, scoring and AI. My focus was on the core experience and unfortunately I did not find the time and energy to implement them. I will maybe add them in on another go around.

External Conditions


On of the biggest dampers was my professional situation. Normally I am working 4 day weeks. This gives me at least one entire day to work on such hobby projects. But as the project at my day job approached its release date and things got a bit hectic, I worked 3 months for 5 days a week. This reduction in time meant that I could simply not get so much done.

Path Finding for Innovative Games: Object Avoidance and Smoothing Movement

$
0
0
This article concludes the topic of Path Finding for innovative games. The model described is based on scientific evidences which assert that human intelligence is not made only by logic. The Biological Path Finding approach is still in the research phase, even if the writer already adopted it in a couple of games.

Dynamic Object Avoiding


Nowadays, some game developers force their AI implementation to recalculate the best path when an object is intersecting the current path of an NPC. Fortunately, not all developers use this approach. The outcomes of that action, speaking in terms of credibility of the NPC and about performance, are definitely negative.

Dynamic Objects in Path Finding is a strange issue, and in my opinion is a non-problem. We should first divide the issue into two main cases:

1. an object is moving toward the current path of an NPC

2. an object has moved and been placed along the current path of an NPC

The way to react to these two cases should be different. In fact, if an object is moving, we have to worry about the possibility of a collision with this object. A possible collision, though, never should lead us to change the path, unless there is a high amount of moving objects in the same place. If this case happens, you shall check your game or simulation setup. In fact, a place in which there can be multiple moving objects should have lines of the graph with a higher weight.

When an object (or another NPC) is moving toward a line of a path used by an NPC, the only problem to face with is avoiding it. This though must not change anything in the decision, already taken, of the path to follow. A similar problem you’ll have with an object that has moved and placed along a line of the path used by an NPC. In this case, unless the object is so wide to block completely the passage, you need to treat it with the Object Avoidance algorithm.

How should be a proper Object Avoidance algorithm for the BPF? There is no preference or precaution to consider. You should use the algorithm ‘only’ to avoid object. When the NPC has avoided the object, the algorithm must go to its end. After that, the Path Finding system will be active again, and the NPC will go straight toward its next focal point.

What if the object that is blocking the path is so wide that makes impossible any trial to turn it? Do we need to find another path? I absolutely prefer avoiding this solution. Humans, when inside a real and physical problem, are not dominated by logic. Even if it’s difficult to understand, emotions manages our actions. Only after having filtered events with emotions, we may think and then use logic.

A human, when started on a path, if there is a problem along it, tries to imagine (not calculate!) a sub-path that helps him to turn the problem and continue along the same path. It’s too complicated considering to change path, and the time is never enough for a human walking along the road. Only a danger can change this way to do, but it's something that has not to do directly with the path finding system.

So, even in the worst case, there is no need to start the path finding calculation from the current position to the target. The correct solution for a proper human simulation is finding the “simplest” sub-path from the current position to the first focal point beyond the object, or using the Object Avoidance algorithm.

In the human approach to the PF problem, there is never a sort of calculation, but rather estimations. Estimations consider the number of turns and the number of focal points: in our mind there is no continuous registration (like a video, for example) of the path, but only flashes about the focal points. Thus, if the human saw a map, he will have a better chance to make a better estimation of the length of each path.

Any focal point is close to a micro-environment. This helps us, because it's impossible that an object occupies more than one micro-environment (unless is a giant object!).

Smoothing Movements


Especially in case of complex or wide and open paths, I reckon that grid and mesh navigation don’t give enough NPC credibility because of the number of nodes in the map. There are, substantially, four grades of quantities of nodes in a path:

  1. Too few nodes, or/and placed in senseless positions: it's not possible for the NPC to walk as a human, and then it will have unpredictable results; [possible with the Waypoint approach]
  2. Few nodes placed in the “focal points”: the NPC reacts like humans do; [currently proposed only by Biological Path Finding];
  3. Many nodes: the behaviour of the NPC is far from being similar to the one of humans. Without a good (and sometimes time-expensive) smoothing algorithm, the NPC will have a behaviour similar to one of a drunken man [can happen with the current navigation solutions].
  4. Too many nodes (from dozens to hundreds of times more than the focal points): the behaviour of the NPC comes back to seem similar to the one of humans. The off-line and run-time calculations, though, become really expensive [can happen with NavGrid].

Take the example below.


Attached Image: Image4.jpg
Figure 1


You can see here the number of convex polygons (squares) made with the Navigation Grid and, below, the same map treated with the Mental Navigation, the Navigation made with the Biological Path Finding approach. You can see the number of nodes and relative lines that Navigation Map will create is higher in the current navigation approach in respect to the new one.


Attached Image: Image3.jpg
Figure 2


Another problem, for the current navigation approaches, is the need to make use of the smoothing algorithm almost for any line. For an approach that develops a high amount of nodes, this worsens performance.

Mental Navigation needs the smoothing algorithm for any passage among focal points too. Nevertheless, the cost is minimal if referred to the overall time of execution of the current path finding approaches, because of the small number of focal points.

There is now the need to cite another postulate of the BPF: if there is a static object or a ravine between two focal points referred to non-contiguous micro-environments, NPCs will use the Object Avoidance algorithm to move between those focal points (see the previous paragraph).

This rule could even be substituted by another that, instead of using the Object Avoidance algorithm, moves one or both focal points in order to overcome the issue.

The Mental Map


Mental Map is the approach for building a Navigation map that takes into account how humans (and animals) actually build the mental maps in their mind. In the previous section I already treated the most important part of this part of the module. Nonetheless, there are some factors you should consider before thinking how to implement the BPF.

As I've written several times in some different places, human intelligence is not only logic. It's rather the contrary. Into the cauldron of intelligence there are other ingredients with an importance higher than logic. As the evidences of several findings made in biology and neuroscience can witness, intelligence is not owned only by humans.

All primates have a high intelligence. Despite what you may think, a chimpanzee for example may use a language with 250 words! Other animals have a moderate intelligence, like dolphins and dogs. The base of intelligence is nearly equal among all these species. The human species, though, developed a multitude of “psychological adaptations” that animals don’t have, or have in a simpler version.

What I want to say is that logic is only the diamond tip of the biological intelligence, but it’s far from being the unique ingredient. Emotions and several other factors are the very basic ingredient of intelligence, and without them we could not understand the world that surrounds us.

What are the outcomes of this reasoning? Two facts: A) Humans, when the arousal* of one or more emotions is high or too low, tend to have non-logic behaviours; B) Animals, in terms of path finding approach, have almost the same way of doing things when faced with a path selection or an object avoidance.

(*) - Arousal is, for emotions, something similar to the volume for a radio receiver.

There has not been, so far, any complete model able to represent the whole world of intelligence. I mean, for whole world of intelligence, a module containing emotions, moods, sentiments, beliefs and personality traits, not to mention the age differences, social rules and hormones. This leads us to think that, at least for a while, BPF could not be implemented at its best.

Conclusion


So, is it already possible to treat emotions in the Path Finding, in order to better simulate human behaviours? Maybe not immediately, I think, but soon. There are some guys trying to build a solid AI model (and I’m one of them, even if I follow a different, in some ways easier road than others). I reckon the time for a solution which simulates humans and animals behaviour with a higher reliability is coming.

Anyway, you can even build an implementation of the BPF that makes no use of emotions. For the rest, you can find in the first and the second article the main ingredients of the Mental Map Navigation.

The topic of the Biological Path Finding still belongs to the field of research, even if in these articles you can find the base for making successful implementations too. It’s my intent to put on an Open Source project about BPF, to speed up the development of this new approach.

Article Update Log


20 Mar 2014: An updating
19 Mar 2014: Initial release

Visual Studio Graphics Content Pipeline for C# Projects

$
0
0
In this article we will look at how to use the graphics content pipeline for C# in both Visual Studio 2012 and Visual Studio 2013 for Desktop and Windows Store apps.

Since Visual Studio 2012 there has been a new graphics content pipeline and graphics debugger – including a DirectX frame debugger and HLSL debugger. The graphics content pipeline provides a number of build targets for converting common 3D and graphics assets into a usable format for DirectX applications, this includes the compilation of common mesh formats such as Collada (.dae), AutoDesk FBX (.fbx), and Wavefront (.obj) into a compiled mesh object (.cmo) file, and converting regular images into .DDS files.

Unfortunately the graphics content pipeline tasks don’t work out-of-the-box with C# because the MSBuild targets are not compatible.

Graphics content pipeline for C#


Thankfully it is quite simple to get this to work for our C# projects by making a few minor tweaks to the MSBuild target XML definitions. These build targets are defined in files named *Task.targets within the directories
  • C:\Program Files (x86)\Microsoft Visual Studio 12.0\Common7\IDE\Extensions\Microsoft\VsGraphics
    OR
  • C:\Program Files (x86)\Microsoft Visual Studio 11.0\Common7\IDE\Extensions\Microsoft\VsGraphics
You can download the updated graphics content tasks that work with C# projects for Visual Studio 2012 and Visual Studio 2013 for both Desktop apps and Windows Store apps that are attached to this article.

After extracting the contents of the archive we can use the content tasks by right clicking our project in the solution explorer and select Unload Project, then select Edit yourprojectname.csproj. At the end of the project file insert the following:

<Project ...>
...
  <Import Project="ImageContentTask.targets" />
  <Import Project="MeshContentTask.targets" />
  <Import Project="ShaderGraphContentTask.targets" />
</Project>

Reload your project, select a graphics resource such as a 3D model and then apply the appropriate Build Action, as shown in the following screenshot.


Attached Image: MeshContentTask.png


This will result in a Character.cmo file being generated in the project’s build output directory.

Controlling the graphics content pipeline task properties


In order to pass through options to the task for C# projects it is necessary to edit the associated *.props file. This contains a section for default settings. For example the ImageContentTask allows you to determine whether or not to generate mip levels. The following XML shows the available ImageContentTask parameters found in ImageContentTask.target

<ImageContentTask
Source = "%(ImageContentTask.Identity)"
ContentOutput = "%(ImageContentTask.ContentOutput)"
Compress = "%(ImageContentTask.Compress)"
GeneratePremultipliedAlpha = "%(ImageContentTask.GeneratePremultipliedAlpha)"
GenerateMips = "%(ImageContentTask.GenerateMips)"
TLogDir = "$(ProjectDir)obj\$(ConfigurationName)"
IsDebugBuild = "$(UseDebugLibraries)"
 />

And the following XML extract shows the appropriate section within ImageContentTask.props that you would need to update.

<ImageContentTask>
    <!--Enter Defaults Here-->
    <ContentOutput Condition="'%(ImageContentTask.ContentOutput)' == '' and !$(DefineConstants.Contains('NETFX_CORE'))">$(OutDir)%(RelativeDir)%(Filename).dds</ContentOutput>
    <ContentOutput Condition="'%(ImageContentTask.ContentOutput)' == '' and $(DefineConstants.Contains('NETFX_CORE'))">$(OutDir)AppX\%(RelativeDir)%(Filename).dds</ContentOutput>
</ImageContentTask>

Conclusion


Visual Studio 2012 brought with it some significant improvements for graphics / Direct3D programming for the C++ world, however it left C# developers a little short. By integrating the graphics content pipeline with your C# project you can then make use of these great features.

Further reading


Direct3D Rendering Cookbook by Justin Stenning and published by Packt Publishing provides further examples of how to work with Direct3D in C# using SharpDX and the Visual Studio graphics content pipeline.

Article Update Log


20 Mar 2014: Initial release

Math for Game Developers: Fragment Shaders

$
0
0
Math for Game Developers is exactly what it sounds like - a weekly instructional YouTube series wherein I show you how to use math to make your games. Every Thursday we'll learn how to implement one game design, starting from the underlying mathematical concept and ending with its C++ implementation. The videos will teach you everything you need to know, all you need is a basic understanding of algebra and trigonometry. If you want to follow along with the code sections, it will help to know a bit of programming already, but it's not necessary. You can download the source code that I'm using from GitHub, from the description of each video. If you have questions about the topics covered or requests for future topics, I would love to hear them! Leave a comment, or ask me on my Twitter, @VinoBS

Note:  
The video below contains the playlist for all the videos in this series, which can be accessed via the playlist icon in the bottom-right corner of the embedded video frame once the video is playing. The first video in the series is loaded automatically


Fragment Shaders


T4 Code Generation in Unity

$
0
0
Many Unity APIs use a string identifier, such as the game object’s tag for various things (e.g: checking for a collision with “player”). In this article I explore a different, safer and automated technique that achieves the same result, without using strings.

The String Problem


Consider the following code:

var player = GameObject.FindWithTag("Player");

The code is not type safe: it relies on a string identifier to perform an object lookup. This identifier may change, making this code “out of sync” with the project, or be misspelled, making the code fail. In addition, this string might be used in many different locations of the code, increasing the risk of previous mentioned concerns.

A Solution “Sketch”


A possible solution to this issue is to create a static helper class that will expose all tags as public (static) fields. When needed, instead of using a string, we’d use the class’s static fields:

public static class Tags
{
    public static readonly string Player = "Player";
}

Accessing this tag is safer now, since we’re not (directly) relying on the string representation of the tag:

var player = GameObject.FindWithTag(Tags.Player);

Effectively, the code will operate the same as before, but now we have a single location where the tag is declared.

There are 2 main issues with this approach:

  1. In case there are many tags defined in the project, creating the helper class can be a somewhat tedious task (creating a field per tag).
  2. In case a tag’s name changes in the Unity editor, you have to also remember to replace its corresponding value in the helper class.

It seems that this solution is a step in the right direction, but we need some extra “magic” to make it perfect.

Code Generation To The Rescue


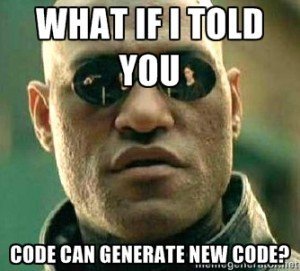
Code generation is an (oftentimes) overlooked practice, where code is being automatically generated by some other code, a template or some tool. In particular, code generation really shines in cases where we want to generate long, repetitive code from an underlying data source.

Translating this to the problem described above, we would like to generate a static helper class with many static fields from an underlying data source (a collection with all of the project’s tags).


Attached Image: 46974122-300x271.jpg


To achieve this, we’ll use one particular implementation of a code generation engine called T4, which is a template engine that comes with Visual Studio (which also heavily relies on it for various tasks), and also comes out of the box with Mono (yes, the same one that is installed with Unity).

A T4 template is a file (with a .tt extension) that mixes a body of text with special directives. The template generates a single output file (usually, a code file, although it can generate any other file format).

T4 Templates


In order to add a T4 template to your project, right click on your code project in MonoDevelop, and select: Add->New File. T4 Templates can be found under Text Templating on the left:


Attached Image: t41.png


T4 Template Types


There are 2 types of available templates (ignore Razor templates as they’re irrelevant for this discussion):
  • T4 Template – a template file that gets transformed during compilation time into the output file. This type of template is used to generate code files that are needed at design time (e.g: think of Microsoft’s Entity Framework, where a set of classes can be generated at design time from a database, instead of being created manually by the developer).
  • Preprocessed T4 Template – a template file that creates an “intermediate” class that can later be used to generate the output code file.

Unity Bug


Unity currently does not support adding T4 templates (.tt files) to scripting code – after compilation, all .tt files will be dropped from the code project (I reported this bug here.

This forces us to use option #2 – creating a one-time “intermediate” class. This class will be used by a Unity edior extension, from which we can generate the class we want and add it to the project.

Show Me the Code!


Here is the preprocessed T4 template that will generate the Tags class for us (although the provided sample uses the same template to generate a Layers class in exactly the same manner):


Attached Image: t4_example.png


A few things that should be noted:

  1. Any text not contained within <# #> tags is being output as is.
  2. The template is a preprocessed template. This means it does not generate an output code file directly. Instead, it generates an intermediate (partial) class with a TransformText() method that returns the template final output (the text with the generated class).
  3. The code prints out a header (the class declaration with some comments), then it iterates all elements in source and outputs a public static read-only field for each item (does a small manipulation to make sure the field name does not have spaces in it).
  4. The variables classname, item and source are actually implemented in a code file (a partial class with the same name as the template class. Remember I said the template generates a partial class? this allows mixing the template with some custom code. For more clarity, see the full code in the link below).

In Conclusion


This article aimed to open a hatch to the wonderful world of code generation (and T4 in specific), while showing how it can solve real world problems in a short and simple way. I did not dive into T4 syntax or more advanced topics (leaving it for you to explore, or as a subject for future articles). For more information regarding T4 – see the links below.

Links

A Critique of the Entity Component Model

$
0
0
The entity component model is all the rave for the last decade. But if you look at the design it opens more issues than it solves.

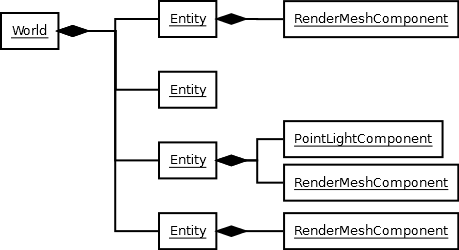
Broadly speaking the entity component model can be summarized as the following: An entity is composed of components who each serve a unique purpose. The entity does not contain any logic of its own but is empowered by said components.

Attached Image: ecm-intro.png

But what does the entity component model try to solve?

Each and every illustration of the entity component model starts with a classic object oriented conundrum: a deep inheritance hierarchy with orthogonal proposes. For example you have a Goblin class. You form two specialisations of the Goblin class, the FylingGoblin who can fly and the MagicGoblin who uses magic spells. The problem is that it is hard to create the FylingMagicGoblin.


Attached Image: dreaded-diamond.png


Even with C++ and its multiple inheritance, you are not in the clear as you still have the dreaded diamond and virtual inheritance to solve. But most languages simply do not support a concise way to implement it.

When solving the issue with components, the components GroundMovement, FlyingMovment, MeleAttack and MagicAttack are created and the different types of goblins are composed from these.


Attached Image: flying-magic-goblin.png


Good job, now we went from one anti-pattern (deep inheritance hierarchy) to a different anti-pattern (wide inheritance hierarchy). The central issue is that the inheritance hierarchy tries to incorporate orthogonal concepts and that is never a good idea. Why not have two object hierarchies, one for attack modes and one for movement modes?


Attached Image: goblin-sanity.png


As you can see from an object oriented standpoint the entity component model fares quite poorly. But that is not the only problem the entity component model tries to solve.

In many cases you see the concept of a data driven engine. The idea is that you can cut down on development time by moving the object composition out of the code and into some form of data. This allows game designers to "build" new objects by writing some XML or using a fancy editor. Although the underlying motivation is valid, it does not need to use an entity component model, as a few counter examples show quite well.

Putting the structural criticism aside, a naive implementation of the entity component model can in no way be efficient. In most cases the components are not such high concepts as moving or attacking, they are more along the lines of rendering and collision detection. But unless you have additional management structures, you need to look at each and every entity and check if it has components that are relevant for the rendering process.


Attached Image: inefficient.png


The simplest way to resolve the issue, without altering the design too radically, is the introduction of systems. In this case the actual implementation is within the systems and the components are just indicating the desired behaviour. The result is that a system has all the relevant data in a very concise and compact format and as a result can operate quite efficiently.


Attached Image: better-graphics.png


But if you look closely you can see that we have all these useless components. What if you removed the components and just used properties on the components and the systems just look for appropriately named properties? Now you have duck typing.


Attached Image: duck-typing.png


Duck typing is a concept that is used allot in weakly typed languages, like for example JavaScript or Python. The main idea here is that the actual type is irrelevant, but specific properties and function are expected on a given object within a specific context. For example it is irrelevant if it is a file stream, a memory stream or a network socket - if it has the write function it can be used to serialize objects to.

The problem with duck typing is that is does not lend itself easily to native languages. You can cook up some solution using some varying type but in no way is this an elegant solution.

Chances are you already have a scripting system, in this case the solution is quite straight forward, you implement the core game logic in scripts and underlying systems look at this definition and implement any heavy lifting in native code. The idea of alternating hard and soft layers is nothing new and should be considered where flexibility and performance is needed.

You may think that implementing the game logic in scripts is an inefficient way to do it. In cases where you are building a simulation-oriented game this may be quite true. In these cases is makes sense to extract your logic and reduce it to its core concepts, a simulaiton if you will. Then implement the presentation layer and control layers externally directly against the simulation layer.


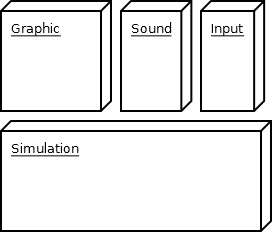
Attached Image: totally-not-mvc.png


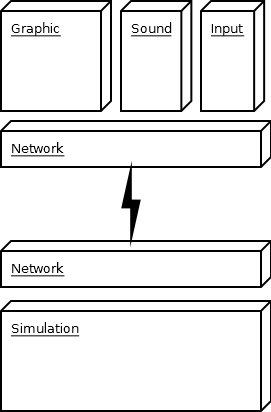
The nice thing about this design is that you can split the presentation layer and simulation so far that you can put one of them on one computer and the other on a different one.


Attached Image: mvc-network.png


Wait, did you just describe MVC? Um... No... Stop changing the subject.

When looking into scalability you get interesting requirements. One very clever implementation of the entity component system was make it scale in an MMO setting. The idea here is that entities and components do not exist in code, but are entries in a database. The systems are distributed over multiple computers and each work at their own pace and read and write to the dabase as required.


Attached Image: mmo-ecm.png


This design addresses the need of a distributed system and reminds me of the High Level Architecture][10] used by NASA and NATO to hook up multiple real-time simulations together. Yes this design approach even has its own standard, the IEEE 1516.

Ok, oh wise one, what should we do?

If you read about these issues you are either building a game engine or a game. Each and every game has different requirements and game engines try to satisfy a subset of these different requirements. Remember what you are developing and the scope of your requirements. If your current design sucks, you do not need to go overboard with your design, because chances are you aren't gonna need it. Try to make the smallest step that will solve the problem you are facing. It pays out to be creative and look at what others have done.

Tracking Player Metrics and Views in Flash Games with Google Analytics

$
0
0
This article was originally published on Wolfgang's blog All Work All Play, and is replublished here with kind permission from the original author.

What is Google Analytics for Flash?


It gives you amazing in-depth information on your game’s players, like this (click to enlarge):

Attached Image: GA_Dashboard_Large.jpg

This is the actual data from one of my older games on 17/03/2014. I won’t tell you which game though. :)

Read on, and I will show you exactly how to set up the same metrics for your game.


Why Bother Tracking Metrics?


Tracking metrics in your games is important because it allows you to answer questions like:

“How many people played my game?”

  • More plays means more ads are being viewed by players. If you can say my games get X players, you can use that when negotiating license sales or sequels.

“What sites is my game played on?”

  • You can use this information to expand to sites that have not yet hosted your game, or target sites on which your previous games did well when selling your next game.

“What causes players to stop playing?”

  • Maybe you will find out something that went unnoticed during testing and you can fix to keep players playing.
There are a lot more questions analytics can help you answer, but those are the main ones I look for.

With so many competing analytics services, it can be hard to pick one.


Which Analytics Service is Best?


In my personal opinion, Google Analytics. I much prefer it over everything else I tried. Why? It’s reliable, easy to set up, tracks common metrics such as views & hosts, supports custom metrics, and the data can be shared with others. That’s basically everything I need from an analytics service. The only downside I have encountered is that it takes 24 hours for the data to update, although there is a real-time view which shows you what is going on right now.

Others

Before settling on Google’s service, I tried a lot of others but found them all lacking in some important way or other:

  • I tried Playtomic, but you have to host the server yourself which takes a lot of resources.
  • I tried Mochibot, but it’s shutting down.
  • I tried Scoreoid, but it requires extra work to set up since they don’t provide an actionscript API.
  • I tried GamerSafe, but it only tracks some basic metrics and has no support for custom ones.
  • I tried my own custom PHP+MySQL solution, but it takes a long time to re-invent the wheel and I was worried my host would shut me down if my games become too popular.
  • Did I miss any good ones? Please leave me a comment so I can go check it out!

Is there any reason not to use Google’s service? Yes, there are a couple things Google Analytics doesn’t do because they’re not analytics: leaderboards, saving player savegames, level sharing, or anything that requires data to be sent from the server->client. If you need any of those features then I would still use Google for everything it can do, and chose one of the alternatives for the bits and pieces it can’t.

Have I convinced you? Then you’re probably wondering…


How do I add Google Analytics to my Game?


This step-by-step tutorial is for FlashDevelop. If you use Adobe Flash, or FlashBuilder you can still use GAForFlash and the steps are similar but I’m not going to cover it because it’s not what I use.

Set Up your Google Analytics Account

Start off by going to Google Analytics and registering for an account as a website. Just enter whatever as a url, for example mygame.com.

Add Google Analytics to your Project

1. Download GAForFlash from here: https://code.google.com/p/gaforflash/downloads/list

Attached Image: GA_Download.jpg

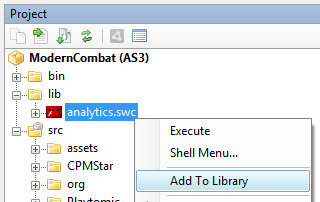
2. Copy the lib\analytics.swc file from the zip archive you just downloaded into your project’s lib folder, then right-click it and select ‘Add to Library’.

Attached Image: GA_AddToLib.jpg

Start Tracking!

1. Connect to Google Analytics from your code as early as possible. You need to do this before doing any other tracking. (Tip: For my games, I connect during the preloader. I can then calculate how many visitors left during the preloader by comparing it to the number of people that reached the main menu.)

var tracker:AnalyticsTracker = new GATracker(DisplayObject, TrackingID, "AS3");

DisplayObject is your highest level Flash Display Object. Typically you can just use ‘this’ from the place you are creating it.

Tracking ID looks something like “UA-XXXXXXXX-X” and can be found for your site in Google Analytics under Admin -> Tracking Info.

2. Use pageviews to track the player’s journey throughout your game.

tracker.trackPageview("/page");

For page, make up something descriptive. Eg “/main_menu” or “/level_2_failed”.

I track:

  • When the player reaches the main menu. By subtracting this from the number of players that connected, I know how many decided to leave during the preloader.
  • Every time the player navigates to an important screen (eg upgrades, or credits). This shows you if players are finding their way to those important screens. If a screen is getting less attention that you would like it to, you may have to do something to make it more obvious.
  • Every time the player starts a level. This will show you where players stop playing. It’s natural for you to lose players between levels, but if you notice a sudden sharp dropoff, consider reworking the next level, maybe there’s something you could improve.
  • Every time the player wins or loses a level. This is useful for balancing difficulty. Levels that are too hard are a common cause of players leaving. Compare it to the ‘player started a level’ metric. Does the rate of players quitting your game match the rate of players losing levels? If yes, consider making those hard levels a little easier.
  • Do you have any suggestions for interesting things to track? Leave a comment.

3. Use events to track actions players take within your game.

tracker.trackEvent(category, action, label);

Category can be used to categorize events, eg “Link Clicked”.

Action is a more specific version. I chose to still include the category name in the action manually because I prefer the way it shows up in Google Analytics this way.

Labels are optional, but very useful if you want to distinguish between several version of the same event. Eg if they were done from different screens.

To give you a concrete example, this is how I track player’s clicking the sponsor’s logo on the main menu:

tracker.trackEvent("Click Link", "Click Link: Sponsor", "Main Menu");

I track:

  • All clicks on external links such as sponsor & developer logos. I also always specify on which screen it was clicked so I know which are most effective.
  • How many players muted the music & sfx. I assume if a lot of players mute it, they don’t like it or find it annoying.
  • Tutorials and cinematics skipped.
  • Anything else game specific that you can think of that you could use to improve your game, eg powerups used or upgrades bought.
  • Do you have any ideas for important events to track? Leave a comment.

Test It

It takes 24 hours for new data to appear, so don’t fret if you just started sending data and it isn’t showing up on the analytics site yet!

Thankfully Google included a method to test that everything is working smoothly without having to wait for the data to update. Just set the visualDebug parameter in your GATracker creation to true.

var tracker:AnalyticsTracker = new GATracker(DisplayObject, TrackingID, "AS3",
true);

As long as visualDebug is turned on, you will see Google Analytics overlay a debug log over your game that looks like this:
Attached Image: gatrackervisualdebug.jpg

Test your game and make sure that all your page views and events show up.

Configure Your Dashboard

Switch back to the Google Analytics site. You can look at the default Dashboard, or poke around the various options on the right, but I like to set up a custom dashboard that has all the information important to me in one place.

Attached Image: GA_Dashboard_Large-700x373.jpg

If you want your Dashboard to look exactly like mine, you can simply click my template link and it will be created for you. However you will probably want to customize it to fit your tracking. For example my levels played bar graph will only work if you are tracking page views as ‘/level_x_win’.

My Dashboard Template: https://www.google.com/analytics/web/template?uid=saxKoPTBTMmsORUgOUcwlA

If you don’t want to import the whole thing, select Dashboard -> New Dashboard -> Blank Canvas. You can then add any widgets you feel like. If you want to know how I configured my individual widgets, check out the image below.

Attached Image: GA_Dashboard_Large_WithMethod.jpg

Now, Wait 24 Hours

This step is important! It takes 24 hours for data to start appearing. So don’t complain if you just added Google Analytics and nothing is showing up yet in your dashboard!

Advanced Tips

There is a limit of 500 metrics recorded per connection. That’s quite a lot so it’s unlikely that you will hit it, and even if you the game will just keep running as normal (but metrics will stop being reported). Just in case, I count the number of things sent in my code and when it reaches 499 I send a special event to let me know the limit has been reached.

If your game is super popular, anything over 10,000,000 hits per month may not be processed. However I have exceeded this limit before and my hits continued to be counted accurately (which I determined by comparing the data to a 2nd tracking system I had in place). So I guess there’s no guarantee it will work, and none that it won’t either.

To make things a little more convenient, I have put together a little helper class over time. The main thing it does is automate the 500 requests per connection checking. Just enter your tracking id, then use GATracking.init(displayObject) to connect, and GATracking.trackAndCountEvent and GATracking.trackAndCountPage to track things.

package
{
	import com.google.analytics.AnalyticsTracker;
	import com.google.analytics.GATracker;
	import flash.display.DisplayObject;

	public class GATracking
	{
		public static const TRACKING_ID:String = "UA-XXXXXXXX-X";
		public static const MAX_REQUESTS:uint = 500;
		public static const DEBUG:Boolean = false;

		public static var tracker:AnalyticsTracker;
		public static var requests:uint = 0;

		public static function init(DO:DisplayObject):void
		{
			tracker = new GATracker(DO, TRACKING_ID, "AS3", DEBUG);
			requests = 0;
		}

		public static function trackAndCountEvent(category:String, action:String, label:String = null):void
		{
			requests++;
			if (requests == MAX_REQUESTS - 1)
			{
				tracker.trackEvent("Requests", "Maximum Reached");
			}
			else if (requests < MAX_REQUESTS - 1)
			{
				tracker.trackEvent(category, action, label);
			}
		}

		public static function trackAndCountPage(pageURL:String=""):void
		{
			requests++;
			if (requests == MAX_REQUESTS - 1)
			{
				tracker.trackEvent("Requests", "Maximum Reached");
			}
			else if (requests < MAX_REQUESTS - 1)
			{
				tracker.trackPageview(pageURL);
			}
		}
	}
}

Hope that helped! Questions, Suggestions, Feedback?Leave me a comment!


Article Update Log


1 April 2014: Initial release

Composing Music For Video Games: Chords

$
0
0
As with previous articles this article does not aim to cover this area in depth but to provide a rudimentary understanding to aid individuals looking for such material. The material is intended to help not just composers new to the field but also give developers a better understanding of audio.


Major and Minor Chords


Chords come in all shapes, sizes and flavours. The most common though is the major or minor triad. A major triad consists of the root note, the major 3rd and the perfect 5th intervals with relation to the root note. To keep it simple, if we are in C major then the C major triad is C, E and G. The minor triad is exactly the same except that the third is flattened and therefore a semitone lower. So a C minor triad will contain an Eb rather than an E. If you have a positive, happy scene on screen and the story needs positive reinforcement then a major chord is going to help this. A minor chord, with its ‘sad’ tones will not suit it. Going further than the minor chord we can then flatten the fifth interval and arrive at a diminished chord. The diminished chord isn’t a pleasant construction at all. Take a listen to the three examples:

C - Cm - Cdim

The dissonance created of the diminished chord leaves us feeling very uneasy. Although these diminished chords don’t have much use in today’s chart music, they can be used in certain settings. For example creating tense music for a suspense scene. It is that flattened 5th interval that causes so much tension. The diminished chord also always appears more intense when played on instruments with a lot of harmonic content, such as brass and bowed string instruments. Listen to the examples of the following instruments playing a C diminished;

Brass

Strings

Xylophone

Compared to the xylophone the brass and strings portray greater power, emphasising the diminished chord. The less complex harmonic content of the xylophone is not as brash, and therefore less aggressive. We won’t go into too much detail here regarding instrumentation when composing, as that will be covered in a later article. But this is a good example of how using different instruments for different chord sections can help emphasise the feeling of a chord.

Suspended Chords


In the first tutorial key words were discussed to help plan out the emotional and tonal feel of a scene. These reference words are key when thinking of chord choice and chord progressions. A happy, uplifting, romantic environment will benefit more from major chords than minor chords. As long as the storyline calls for it. Sometimes juxtaposing what is happening visually with the music can help lead the consumer to feel differently towards the visuals. For instance introducing and uneasy and uncertain tone to a scene where two people appear happy. Therefore providing an undertone to some other area of the overall storyline. As just mentioned, this can be useful when undertones to the storyline need to be portrayed.

This is always good for themes where things are ‘too good to be true’. Composing music that creates uneasiness and suspense will encourage consumers to listen to their ‘gut feeling’ that something isn’t right, and not just rely on the visuals for how they feel. It is when composing such cues that suspended chords can be very useful.

A suspended chord is a chord whereby one interval in the chord, we’ll use a triad to keep it simple, is replaced by another interval. For instance a C major chord will become a Csus4 if the third (E) is removed and replaced with the fourth interval (F). Likewise a Csus2 is created by removing the third and playing a D in its place. Take a listen to both of them in the examples.

Csus4 - Csus2

As you can hear from these two chord examples they both have different feels to them. The Sus 4 chord reinforces a more major tone. This is due to the fact that the suspended 4th interval is closer to the major 3rd than it is the minor 3rd. And if in root position this chord contains both perfect 4th and perfect 5th intervals relative to the root note. The only chord this doesn’t correspond to is the diminished chord, as there is no perfect 5th interval in a diminished chord. The Sus 2 chord however leans towards a more minor feel, as the suspended 2nd interval is closer to the minor 3rd than the major 3rd.

Now you can hopefully see how these chord constructions can be useful. By utilising suspensions you can help guide emotions by not overly emphasising the happy or sad tones of the chord. Another example (just to reinforce some more) in the key of C we have the chord A minor, by changing the third © to a suspended fourth (D), it softens the blow of the minor chord, or maybe opens up an avenue to modulate. Modulation will however will be covered in another article.

Suspended chords are great to end with as they give a great cliff hanger. In other words, the composition does not feel like it has fully resolved because of no reference to a major or minor key. As referenced in the video this is perfect when composing for video games. It is common in video games for sections of music to loop seamlessly. If using the same two or three chords over and over the music could get boring and repetitive very quickly. However, utilising a suspended chord at the end of a progression, or at various points throughout, can help make the transition of a repeat better. It also helps add interest as the chord tones give a different flavour.

Chord Extensions & Compounds


This is a subject which is very extensive within itself. Extensions and compounds are additions to chords beyond the basic triads. For example, a Major 7th is an extension on a major triad. As different genres of music utilise different extensions for different flavours, it is too large of a subject to cover in simplicity. However, they are worth reading into further if you have the time as they can help add lots of character to existing progressions.

Movement & Inversions


One very important aspect of composition is how chords work and progress together. Chord progressions are staple part of songwriting and composition. It is vital to be able to piece together chords in coherent progressions in order to create an overall piece of music. Before discussing chord progressions though it is useful to mention inversions.

An inverted chord is made when a note from the chord tones other than the root is played in the root position. For example, a C major chord in root position is played C-E-G. 1st inversion would be E-G-C. And 2nd inversion would be G-C-E. Third inversions do exist but only for chords that contain more than three notes (extensions & compounds). For example, having a CMaj7 chord and putting the B (major 7th interval) in the bass. We will keep it simple for the purpose of not getting overly complicated at this point. If you would like to read more, there is plenty of material elsewhere on the internet.

How can inversions be used when composing you ask? Well let’s consider a very simple chord progression, the good old I - IV - V (1 - 4 - 5). If this progression was to be played with all of the chords in root position the movement would be disjointed and not flow particularly well. Yes it would still work, but if playing on the piano your hand would be all over the shop. This is because the root is always at the bottom of the chord. So you will be moving from C up to F, then to G and then down to C again. Take a listen to the following example so you can hear for yourself.

Root Position Movement

How can this be played in a manner whereby the hand moves less and therefore the chords flow better? Let’s try the two options below.

OPTION 1 - C in root position (C - E - G), followed by F in 2nd inversion (C - F - A,) and finally G in 2nd inversion (D - G - B). Let’s hear what that sounds like...

OPTION 2 - C in 2nd inversion (G - C - E), followed by F in 1st inversion (A - C - F), and finally G in 1st inversion (B - D - G)

As you can hear in both cases you are minimising the movement between not only the bass notes of the chords, but also of the other intervals. Take a look at some of the midi from these and this will be even clearer.

The above examples give testament to how utilising inversions can help make the movement of chords easier. This knowledge I (Joe) have found to be very useful when composing pieces for a string section for example. The string parts flow better when the chords are closer together.

- Joe Gilliver & Dan Harris (Ocular Audio)

Character Development in Video Games

$
0
0
When designing game mechanics, it is important to firstly consider what the central idea of your game is about (aka the themes). Is it a game about hacking? About action? Whatever your game is about, the goal of the mechanics is to convey these themes and allow the player to take the perspective of the main character (perspective taking). One way to achieve this effect is through character growth of the main character (the player). Similarly to how themes change in the storyline (e.g. from 'evil triumphs' to 'justice triumphs'), character growth is the same: your main character can start of by being a beginner hacker, or maybe a assassin doing his first mission and at the end of your game they become an experienced hacker or an elite killer.

ninja.png


The mechanics are a perfect tool to use to convey this change. At the beginning of the game, the player knows nothing or very little about the mechanics and they are provided with a little tutorial on how to play the game. Note: Don't bombard the player with information on how to play the game at the very beginning, rather, teach them step by step as the game progresses. So let's say the player learns about the first mechanic of the game, then after a while they become better at it (they learnt a new skill); now is the time to introduce a new mechanic into the game and force the player to learn it. Repeat this process until the end of the game, and the skills they learnt must add up and become useful in the end.

Just like how in a movie, all the moments build up into the climax, the mechanics in a game should also build up into the final test which the player must undertake. It might be a huge powerful boss they have to fight, or a hacker from the pentagon that they have to face, whatever the case is, this will allow the player to feel a sense of growth. Everything they've been through should allow them to challenge this boss. The player should start off the game feeling like a newb hacker or the timid assassin, but at the end of the game, they should really feel like they've become an expert hacker or an absolute killer. Here's an example to make things clearer:

As an assassin, the first thing that your master teaches you is how to equip and change weapons - how to wield the most basic weapon which is the short sword. You first learn about doing stealth kills which simply involve just sneaking behind someone and pressing a button to kill them. Next, you might learn something more difficult such as aiming vital points in the target's body and perhaps even learn how to throw the sword. Finally, you might learn how to engage in combat with another sword wielder - you learn different types of attacks, evading and blocking their attacks. In the end, you will really feel like a swordsman after this learning experience.

Unlocking Gameplay Limitations


Another way for the player to experience character growth is through unlocking restrictions. RPGs tend to do this a lot where you can't weild a certain weapon or armor until you reach a certain level or you can't buy certain items until you have enough money. These level restrictions will serve as milestones for character growth. The player will feel like: "After all this hard work, I went from wearing leather armor to this full plate mail which is much more expensive and heavier. I'm a much stronger and better fighter now." The problem with this approach is that games tend to bore the players by making them just grind levels or gold until they reach the next level. Yes, it's important that the player must work for these milestones, however, making them go through repetitive gameplay isn't the way to go.


hacklock.jpg


Instead, there can be several other ways that you can make the player work to advance to the next levels. So long as the milestones are in place, grinding isn't necessary. The grinding aspect only serves as the work that the player must do in order to achieve their next milestone, however, we all know that most people hate grinding and it's a huge waste of time. As game designers, if you know this much, the only thing you have to do is just set the milestones and create the 'work' that the player must do to achieve these milestones - but avoid things such as boring gameplay. Instead of grinding, they can do missions instead and here's an example:

If your game is about hacking, then allow certain features to be 'locked' and the player must complete tasks in order to earn enough points (or gold) to unlock these features. The tasks can include little story snippets (or side stories) such as 'a man is angry at his boss and wants to get him back by hiring you to wreck all the workplace computers with a virus.' Once they finish this task, they might earn 50 points, and this allows them to unlock a better hacking program which in turn allows you to do more difficult missions.

So this 'milestone approach' isn't just limited to fighting games and grinding levels, you can do it for many sorts of games (possibly every sort of game ranging from love simulator to detective adventure games). And the good thing about this approach is that, it isn't limited to just the main character itself (i.e. the player). In fact, you can use restrictions to show growth in the other characters. In Persona 4, as you improve your social link with certain characters, they will start doing things such as taking a lethal blow for you during battle so you don't lose. As you max your social link, their Persona 'evolves' into a more powerful one, signifying an irreversible bond that has been formed between you and that person.

Persona-4-yosuke.png


This is the reason why people loved the Persona games so much and especially the characters. The mechanics aided in the portrayal of character and bonds formed. And for those who've played the game, look at the ending of Persona 3/4 and notice how the unlocking of certain 'limitations' aided in portrayal of the ending. I'm talking about the part AFTER you get the boss' HP down to zero. I won't spoil anything for those who haven't played the game, but this is what made the ending so great - instead of the ending being entirely cutscenes, it transitioned very well between cutscene and gameplay. They used this feature of unlocking gameplay limitations in order to portray one of the final changes that occurs.

So as you can see, 'limitations' doesn't just involve 'level limitations' otherwise I would've called it that. It can be any type of mechanical change in the game that involves unlocking a new feature. The new feature can be absolutely anything: from a new spell you learn to having a new group member. Mechanics are a great tool to use to imply 'change' in a game, so be creative on how you use it and you'll discover novel ways to portray narrative - something which is unique only to our medium.

Reposted from my website. Make sure you give me a visit.

Social Value: Measuring the True Value of a User

$
0
0
What is "Social Value", and why does it matter? In gaming, Social Value is the measurement of player behavior and impact through several metrics such as play sessions, page views and in-app purchases.

Here's a simple example of the impact of Social Value: As you're playing Candy Crush, you share your achievements and game requests via Facebook. In response, chances are that a few of your friends will start playing the game and investing through in-app purchases. The Social Value is how much money you helped contribute to the game's bottom line through these social and sharing efforts.

Measuring True Total Value


To find the "True Total Value", the Social Value is combined with the "LTV" or Lifetime Value (which is how much behavior you can expect from a person, usually in dollars, before they quit investing).

For example, imagine a person has an LTV of $43 (how much they're expected to spend), and that same person has a social value of $53 thorough interaction with their friends that causes them to spend $53. $43 LTV + $53 Social Value = $96 True Total Value.

The True Total Value is important because it can give you a better estimate on how much players will affect your bottom line, all thanks to the increasing popularity of analytics and Big Data. You can then take this data as a whole (or break it down) to target your players in specific ways or change the way your game works for the better.

Finding Social Whales


Once you can find the Social Value, LTV and True Total Value of users through a variety of metrics, you can start finding out who your "Social Whales" are - which are some of your most important customers. Social Whales are the players who spend the most money and time on your game, and who hold the most influence.

When Social Whales play, others play more - and when they buy, others buy. By understanding your user's social networks and spending habits, you can start targeting these Social Whales and determining what drives your game to success. Usually, Social Whales will comprise of 10% of your total users, but 10-40% of your total spending.

Ninja Metrics, a Social Analytics engine that helps game and app developers, created a great looking Infographic below which provides some more information on how to measure Social Value. What are some of the best metrics that have helped you determine the Social Value, LTV and True Total Value?


Attached Image: Untitled.png
click for full infographic

Hacking the monolithic entity system

$
0
0
Hi and welcome back! This time I’m going to talk about a trick I used on the old PS2 game ’24 The Game’ to save over 30% of a frame by hacking the game’s monolithic entity system.

The monolithic entity system


You’ve probably all seen this design before:

  1. Entity manager, stores a list of all entities
  2. Each entity implements an Update() function
  3. Every frame, the manager loops through all entities and calls Update() on each one

The primary problem with this design is it’s polling nature; each entity is polled to do work, even when that entity may not have any work to do. This doesn’t start out being a problem at the beginning of the development of a game when there are only a handful of entities, but it sure is when the game is full of 1000s of them!

In ’24 The Game’, entities were any object which you could interact with, which included: doors, characters, cars, guns, pick-ups, boxes and any other physics objects. They soon started stacking up in numbers, especially when you consider the game’s draw distance.

Attached Image: 24_Snipe_4_3.jpg

Event driven


In an ideal world, the system wouldn’t have been designed like this in the first place. Something event driven would have been more appropriate for the majority of entities – so entities just sleep until they are acted upon by an incoming event, such as being shot, or collided with. While asleep an entity would have done no work and therefore taken no CPU time.

However, this was not to be since the game was in beta and rewriting the entire entity system seemed like a bad idea(!)

Hacking the monolithic entity system


So a more achievable method was needed, one which could be plugged right into the existing system without breaking everything.

The solution was discovered after making a key observation about the nature of the variable time-step we were already using in game.

In a game where the time-step varies from frame to frame (like nearly every game in the world), entities must adjust their behaviour to cope with a differing frame rate – for example, animations move forward a differing number of frames, characters move across the ground differing amounts per frame and so on.

This being the case, calling Update() on ‘unimportant’ entities every 2nd or 4th frame wouldn’t break anything and would save a bunch of CPU time.

Unimportant entities


So, what is an unimportant entity? From the point of view of this system, an unimportant entity is one which is not currently interacting with the player, or is very small on screen, or completely off-screen.

Mitigating edge cases


Unimportant entities could temporarily have their importance increased after receiving an event, such as being shot, or collided with. This mitigated the problem of ‘dumb entities’ which would take a long time to react to events in this new system.

Screen-space size should be used rather than just plain distance when calculating importance, otherwise zooming in on a far away moving character would reveal jerky animation, as the animation controller only got updated every other frame.

Importance overrides will always be needed in some cases, like if you have a bunch of AI companion team-mates who are following behind the player.

Very unimportant entities could volunteer themselves to be excluded from Update() completely if they did no work there, such as most physics objects.

Results


In the end this system saved 30% of a frame in general across all levels, sometimes a lot more which was a definite result. However, if possible don’t design a monolithic system in the first place!

That’s all folks

Thanks for reading, hope this post gives you some ideas!


Article Update Log


10 Aprl 2014: Initial release

Entities-Parts II: Interactions

$
0
0
The previous article in the series, Game Objects, gave a broad overview of entities and parts, an implementation for the Entity and Part class, and a simple example showing a lopsided fight between a monster Entity and a helpless villager Entity. It was basic enough to demonstrate how to use the Entity and Part classes but it didn't address entity management or interaction in detail. In addition to addressing these topics, the example will be expanded so that the villager's friends will join the battle against a mob of monsters.

The previous article focused more on how entities and parts were structured. In this article, I will focus on ways to handle interactions between high-level classes, entities, and parts. Some examples of interactions are A.I. to target enemies or support allies, spell effects such as healing and summoning, and dealing damage to another character. I will also introduce a new class to the Entity-Parts framework: EntityManager, and an event system. The implementation of the framework will be provided in Java and C++ w/boost.

Handling Interactions


Interactions between Parts of the same Entity


Putting logic in parts is a good idea when you want to model interactions between parts of the same entity. For example, a part for health regeneration could simply get the health part of its parent entity and increase the health every update step. In the Entities-Parts framework you add logic to parts by overriding the initialize, update, or cleanup methods.

Interactions between Multiple Entities


Putting logic in high-level classes such as systems and managers is a good idea when you want to model interactions between entities. For example, an Entity such as a warrior will need a list of enemy entities to attack. Implementing all of this logic in parts is difficult because the parts would be responsible for finding references of enemy entities to damage. As seen in the previous article's MonsterControllerPart, it is difficult to pass in references to other entities to parts without issues appearing. A better approach is to have a high-level class, e.g. a BattleSystem, go through the list of all characters in the battle and find ones that are marked as enemies. It can then find a suitable enemy from the list and use the entity's weapon to deal damage to it.

Events


Events are commonly used in programming and are not restricted to games. They allow objects to immediately perform actions when something interesting happens. For example, when a missle receives a collision event, its collision event handler method makes it explode. In this fashion, the missle doesn't have to check each frame if it collided with anything, only when the collision happened. Events can sometimes simplify interactions between multiple objects.

Event managers allow an object to wait on a certain event to happen and then act upon it while being decoupled from objects publishing the event. An event manager is a centralized hub of event publication/subscription that allows entities or other systems to simply subscribe to the event manager instead of the individual objects who are publishing the events. Likewise, the publishers can just publish an event to the event manager and let the event manager do the work of notifying the subscribers of the event.

For example, the entity manager listens for an event where a new entity is created. If a new entity is spawned, say by a summon spell, the entity manager receives the event from the event manager and adds the new entity. It doesn't have to contain a reference to the summon spell.

RPG Battle Example (continued)


Now that we've discussed a high-level overview of handling interactions between high-level classes, entities, and parts, let's continue the example from the previous article.

The RPG Battle Example has been completely refactored to support a larger battle between two teams of characters: Monsters vs. Villagers. Each side will have a Meleer, Ranger, Flying Ranger, Support Mage, and Summoner. Monster names start with M. and villager names start with V. Here is output of a round of combat in the updated example. Each character's information is displayed as well as the action it took during the current simulation time:

SIMULATION TIME: 3.0
M.Meleer1 is dead!
M.Ranger1 - Health: 89.25 - Mana: 0.0
	Attacking with Bow.  34.0 damage dealt to V.Ranger1
M.FlyingRanger1 - Health: 100.0 - Mana: 0.0
	Attacking with Bow.  23.0 damage dealt to V.Ranger1
M.SupportMage1 - Health: 100.0 - Mana: 56.0
	Casting Light Heal.  Healed 30.0 health on M.Ranger1
M.Summoner1 - Health: 100.0 - Mana: 39.0
	Attacking with Staff.  14.0 damage dealt to V.Ranger1
V.Ranger1 - Health: 28.25 - Mana: 0.0
	Attacking with Bow.  29.0 damage dealt to M.Ranger1
V.FlyingRanger1 - Health: 100.0 - Mana: 0.0
	Attacking with Bow.  21.0 damage dealt to M.Ranger1
V.SupportMage1 - Health: 100.0 - Mana: 34.0
	Casting Light Heal.  Healed 30.0 health on V.Ranger1
V.Summoner1 - Health: 100.0 - Mana: 39.0
	Attacking with Staff.  12.0 damage dealt to M.Ranger1
Demon - Health: 100.0 - Mana: 0.0
	Attacking with Claw.  28.0 damage dealt to V.Ranger1
Demon - Health: 100.0 - Mana: 0.0
	Attacking with Claw.  21.0 damage dealt to M.Ranger1

Now, let's walk through key sections of the example code.

Character Creation


In the updated example, characters of differing roles are created using a CharacterFactory.

The following is a helper method to create a base/classless character. Note the parts that are added. They provide an empty entity with attributes that all characters should have such as name, health, mana, stat restoration, alliance (Monster or Villager), and mentality (how the AI reacts to certain situations).

	private static Entity createBaseCharacter(String name, float health, float mana, Alliance alliance, 
			Mentality mentality) {
		// create a character entity that has parts all characters should have
		Entity character = new Entity();
		character.attach(new DescriptionPart(name));
		character.attach(new HealthPart(health));
		character.attach(new ManaPart(mana));
		character.attach(new RestorePart(0.01f, 0.03f));
		character.attach(new AlliancePart(alliance));
		character.attach(new MentalityPart(mentality));
		return character;
	}

Then, there are methods for creating specific characters such as the flying ranger. The method to create the flying ranger calls createBaseCharacter method to create a base character with 100 health, 0 mana, and an Offensive Mentality that tells it to attack with its weapon and ignore defense or support. We add the equipment part with a bow weapon that does 15-35 damage and the flying part to make a base character a flying ranger. Note that weapons with an AttackRange of FAR can hit flying entities.

	public static Entity createFlyingRanger(String name, Alliance alliance) {
		Entity ranger = createBaseCharacter(name, 100, 0, alliance, Mentality.OFFENSIVE);
		Weapon bow = new Weapon("Bow", 15, 35, AttackRange.FAR);
		ranger.attach(new EquipmentPart(bow));
		ranger.attach(new FlyingPart());
		return ranger;
	}

As you can see, it is relatively easy to create numerous character roles or change existing character roles through reuse of parts. Take a look at the other CharacterFactory methods to see how other RPG classes are created.

Entity Management


The EntityManager is a centralized class for entity retrieval, addition, and removal from the game world. In the example, the EntityManager keeps track of the characters battling eachother. The list of characters is encapsulated in the Entity Manager to prevent it from being accidentally altered or replaced.

The game loop uses the entity manager to retrieve all the entities and update them. Then, update is called on the entityManager so that it updates its entity list according to recently created or removed entities.

Main.java:
			for (Entity entity : entityManager.getAll()) {
				entity.update(delta);
			}
			entityManager.update();

Events


To create a summoner with a summon spell, we need to find a way to notify the EntityManager that a new entity has been summoned so the EntityManager can add it to the battle. This can be accomplished with events. The EventManager is passed to the summon spell's use method and it calls the notify method on the EventManager to notify the EntitySystem to add the summoned Entity. In the entity manager's constructor, it called a method to listen for the EntityCreate event.

The classes that make up the event are the EntityCreateEvent and the EntityCreateListener. I didn't create the original event manager class so I can't take credit for it. See Event Manager for the original implementation and details on creating event listener and event classes.

Note: The C++ version of the EventManager works differently using function bindings instead of event listeners. The comments in the file 'EventManager.h' will show you how to use it.

Summon spell:
public class SummonSpell extends Spell {

	private Entity summon;
	
	public SummonSpell(String name, float cost, Entity summon) {
		super(name, cost);
		this.summon = summon;
	}

	public void use(EventManager eventManager) {
		HealthPart healthPart = summon.get(HealthPart.class);
		healthPart.setHealth(healthPart.getMaxHealth());
		eventManager.notify(new EntityCreatedEvent(summon));
		System.out.println("\tCasting " + name);
	}

}

Event for entity create:
public class EntityCreateEvent implements Event<EntityCreateListener> {

	private Entity entity;
	
	public EntityCreateEvent(Entity entity) {
		this.entity = entity;
	}
	
	@Override
	public void notify(EntityCreateListener listener) {
		listener.create(entity);
	}
	
}

EventListener for entity created:
public interface EntityCreateListener {

	public void create(final Entity entity);
	
}

Stat Restoration


In the example, characters regenerate health each timestep. The RestorePart increases the health and mana of its parent Entity every time its update method is called. As you can see, it interacts with other parts and updates their state.

public class RestorePart extends Part {
	
	private float healthRestoreRate;
	private float manaRestoreRate;

	public RestorePart(float healthRestoreRate, float manaRestoreRate) {
		this.healthRestoreRate = healthRestoreRate;
		this.manaRestoreRate = manaRestoreRate;
	}
	
	@Override
	public void update(float dt) {
		HealthPart healthPart = getEntity().get(HealthPart.class);
		float newHealth = calculateRestoredValue(healthPart.getMaxHealth(), healthPart.getHealth(), healthRestoreRate * dt);
		healthPart.setHealth(newHealth);
		
		ManaPart manaPart = getEntity().get(ManaPart.class);
		float newMana = calculateRestoredValue(manaPart.getMaxMana(), manaPart.getMana(), manaRestoreRate * dt);
		manaPart.setMana(newMana);
	}
	
	private float calculateRestoredValue(float maxValue, float currentValue, float restoreRate) {
		float manaRestoreAmount = maxValue * restoreRate;
		float maxManaRestoreAmount = Math.min(maxValue - currentValue, manaRestoreAmount);
		float newMana = currentValue + maxManaRestoreAmount;
		return newMana;
	}
	
}

Battle System


The BattleSystem is where high-level interactions between entities are implemented, e.g. targeting and intelligence. It also contains rules of the game such as when an entity is considered dead. In the future, we might want to create an AI System to handle targeting and just have the Battle System control the rules of the game. But, for a simple example it's fine as it is.

In the following code snippet of the BattleSystem, note that it is using each character's Mentality part to specify how it will act in the current turn. The BattleSystem also resolves the issue from the last example of providing potential targets for attacking and supporting.

	public void act(Entity actingCharacter, List<Entity> characters) {
		Mentality mentality = actingCharacter.get(MentalityPart.class).getMentality();
		
		if (mentality == Mentality.OFFENSIVE) {
			attemptAttack(actingCharacter, characters);
		}
		else if (mentality == Mentality.SUPPORT) {
			boolean healed = attemptHeal(actingCharacter, characters);
			if (!healed) {
				attemptAttack(actingCharacter, characters);
			}
		}
		else if (mentality == Mentality.SUMMON) {
			boolean summoned = attemptSummon(actingCharacter);
			if (!summoned) {
				attemptAttack(actingCharacter, characters);
			}
		}
	}

In addition to managing AI, it contains the game rules, such as when a character should be removed from the game using the helper method isAlive and the EntityManager remove method.

		for (Entity character : characters) {
			if (!isAlive(character)) {
				entityManager.remove(character);
				System.out.println(character.get(DescriptionPart.class).getName() + " is dead!");
			}

Conclusion


Handling interactions between entities can become complex in large-scale games. I hope this article was helpful in providing several approaches to interactions by using high-level classes, adding logic to parts, and using events.

The first and second articles addressed the core of creating and using entities and parts. If you want, take a closer look at of the example code or change it to get a feel of how it manages interactions between entities.

Though the CharacterFactory is fine for small and medium-sized games, it doesn't scale well for large games where potentially thousands of game object types exist. The next article will describe several approaches to mass creation of game object types using data files and serialization.

Article Update Log


16 April 2014: Initial release

All the Boring Bits of Paperwork you have to do as an Indie Developer

$
0
0
Everyone knows that being an indie dev is the best job in the world. When you’re not just playing games on the sofa in your underpants surrounded by Crunchy Nut Cornflakes, you’re idly making guns and things that explode.

Sadly, once in a while, the fun and games turns to drudgery and you have to do paperwork. Here’s a quick guide to the boring paperwork you can expect as an indie dev, and how to do it as quickly as possible.

Note:  Quick plug - If you're interested in keeping up to date with my dev happenings then you can get more info via 'The Twitter' at twitter.com/danthat


Note:  Specifics of this article are geared towards the UK, but in general all these things apply to developers regardless of what country they reside in. - Ed.


Setting up a company


This is important, because if you’re even remotely successful you need to have an official company in order to pay taxes. Not paying taxes is, apparently, against the law, and the last thing you need is the police popping round when you’re half-naked and surrounded by Crunchy Nut Cornflakes. “’Ello ‘ello ‘ello, what’s all this then?” they’ll say as you stare up at them with bits of cereal half up your bottom. Doesn’t bear thinking about.

Fortunately, setting up a company is easy. You can do it online, quickly and for about £30. Think long and hard about your company name, you don’t want it to be shit and have to rename the company.

While you’re setting things up, nab a Company Bank Account. You need to keep your personal beer money and your Official Funds very, very separate. Your friendly bank manager will be only too happy to set one up for you. It’s a boring job, and comes with paperwork as heavy as a brick, but only needs doing once.

Accountants


It is absolutely, 100% worth your time to get an accountant. Working out how much tax you have to pay and filing all the forms is both HARD and BORING. What’s more, accountants are so good at it that they basically pay for themselves. Even if they charge you £1000/year, they’re probably saving you more than that by knowing the ins-and-outs of the system, AND it’s freeing you up to design guns.

Accountants will also be able to discuss the best way of paying yourself, to make sure you’re still paying National Insurance and all your personal taxes properly. I suggest you pay yourself once a month. You need to pay rent and mortgages and food and all that real-life stuff.

Keep an Excel document of your costs, every penny that goes into and out of your company account. Yes, every. Single. Penny. Each month, log in to your online banking and just copy-paste everything over, and have a special column to let your accountant know what it was (ie “£139.99 to Chairs-R-Us”, you’d add “replacement office chair :(” in a little column so they know it’s tax-deductible). It’s worth doing once a month, not only so you can just send it on when your accountant needs it and forget about it, but also in order to keep on top of your finances and make sure you’re not going bankrupt. YAWN, right?

Freelancers


If you’re working with other people, it tends to be a good idea to get them to sign a little bit of paper confirming that the work they do for you is yours, and you can do what you like with it. Boring, but it doesn’t take long. Get yourself a decent release form that covers all eventualities, and get everyone who helps on the game to sign it. If you don’t have a release form you can use, you can ask a lawyer to send you one. Talking of lawyers:

Lawyers


Lawyers are good and important because they stop bad things happening when other lawyers get in touch. I’ve seen every episode of Suits (season 1 and 2) and have no desire to have to think as hard about things as those lawyers do. Sheridans are the default go-to lawyers for indie devs, and with good reason. They’re really nice and friendly and frequently buy beer for indie developers, so the very least you could do is to drop them a line if you find yourself in legal trouble.

Before it gets to all that, drop Alex Tutty a line and introduce yourself. Just say hello, let him know who you are. His email’s right on that page, look. He’ll help you out however he can and it’s probably a good idea to introduce yourself BEFORE the police come a-knocking.

Contracts


Most contracts are fairly straight forward. For simple distribution deals, have a read through and you’ll probably understand it just fine. You’re a smart kid, it’s only reading.

If it’s something serious, like for one of the Big Console Guys, or if it’s remotely out of the ordinary, or if there’s ANYTHING you want clarification on, contact your lawyer and get them to look over it for you. The good thing about getting a lawyer to do it, is it’ll save you a lot of time and heartache down the road.

Invoices


With any luck, people will pay you money for your games. If possible, get things set up so any funds go directly into your bank account, because otherwise you’re going to have to write “invoices”. Get yourself a template, slap all your company information on it, and then hopefully it’s just a case of filling in some basic info and emailing it on.

Invoices don’t take long, individually, but when you’ve got four or five coming in a month it all racks up. Get them to pop it into your account directly, explain that you’re too busy designing explosions to write invoices all the time.

To Summarize


That’s it! That’s all the boring paperwork you’ll have to deal with. It’s preposterously dull, which is why it’s smart to have systems in place to get it out of the way as quickly as possible.

The Ultimate Dream is to sell enough copies of a game that you can afford to hire someone else, give them an officeManager@yourcompany.com email address, and get them to do all the above for you.

Until then, do it smart, and do it properly.

Article Update Log


13 Apr 2014: Initial release

A Long-Awaited Check of Unreal Engine 4

$
0
0
On March 19, 2014, Unreal Engine 4 was made publicly available. Subscription costs only $19 per month. The source codes have also been published at the github repository. Since that moment, we have received quite a number of e-mails, twitter messages, etc., people asking to check this game engine. So we are fulfilling our readers' request in this article; let's see what interesting bugs the PVS-Studio static code analyzer has found in the project's source code.

image1.png

Unreal Engine


The Unreal Engine is a game engine developed by Epic Games, first illustrated in the 1998 first-person shooter game Unreal. Although primarily developed for the first-person shooters, it has been successfully used in a variety of other genres, including stealth, MMORPGs, and other RPGs. With its code written in C++, Unreal Engine features a high degree of portability and is a tool used by many game developers today.

The official website: https://www.unrealengine.com/

The Wikipedia article: Unreal Engine.

Analysis methodology for an nmake-based project


There exist certain difficulties regarding analysis of the Unreal Engine project. To check it, we had to use a new feature recently introduced in PVS-Studio Standalone. Because of that, we had to postpone the publication of this article a bit so that it would follow the release of the new PVS-Studio version with this feature. I guess many would like to try it: it allows programmers to easily check projects that make use of complex or non-standard build systems.

PVS-Studio's original working principle is as follows:
  • You open a project in Visual Studio.
  • Click the "Start" button.
  • The Visual Studio-integrated plugin collects all the necessary information: which files need to be analyzed, which macros are to be expanded, where the header files location, and so on.
  • The plugin launches the analyzer module itself and outputs the analysis results.
What's special about Unreal Engine 4 is that it is an nmake-based project, therefore it can't be checked by the PVS-Studio plugin.

Let me explain this point. Unreal Engine is implemented as a Visual Studio project, but the build is done with nmake. It means that the plugin cannot know which files are compiled with which switches. Therefore, analysis is impossible. To be exact, it is possible, but it will be somewhat of an effort (see the documentation section, "Direct integration of the analyzer into build automation systems").

And here's PVS-Studio Standalone coming to help! It can work in two modes:

  1. You obtain preprocessed files in any way and let the tool check them.
  2. Its monitoring compiler calls and get all the necessary information.

It is the second mode that we are interested in now. This is how the check of Unreal Engine was done:

  1. We launched PVS-Studio Standalone.
  2. Clicked "Compiler Monitoring".
  3. Then we clicked "Start Monitoring" and made sure the compiler call monitoring mode was on.
  4. We opened the Unreal Engine project in Visual Studio and started the project build. The monitoring window indicated that the compiler calls were being tapped.
  5. When the build was finished, we clicked Stop Monitoring, and after that the PVS-Studio analyzer was launched.

The diagnostic messages were displayed in the PVS-Studio Standalone window.

Hint. It is more convenient to use Visual Studio instead of the PVS-Studio Standalone's editor to work with the analysis report. You only need to save the results into a log file and then open it in the Visual Studio environment (Menu->PVS-Studio->Open/Save->Open Analysis Report).

All that and many other things are described in detail in the article "PVS-Studio Now Supports Any Build System under Windows and Any Compiler. Easy and Right Out of the Box". Do read this article please before you start experimenting with PVS-Studio Standalone!

Analysis results


I found the Unreal Engine project's code very high-quality. For example, developers employ static code analysis during the development, which is hinted at by the following code fragments:

// Suppress static code analysis warning about a
// potential comparison of two constants
CA_SUPPRESS(6326);
....
// Suppress static code analysis warnings about a
// potentially ill-defined loop. BlendCount > 0 is valid.
CA_SUPPRESS(6294)
....
#if USING_CODE_ANALYSIS

These code fragments prove that they use a static code analyzer integrated into Visual Studio. To find out more about this tool, see the article Visual Studio 2013 Static Code Analysis in depth: What? When and How?

The project authors may also use some other analyzers, but I can't say for sure.

So their code is pretty good. Since they use static code analysis tools during the development, PVS-Studio has not found many suspicious fragments. However, just like any other large project, this one does have some bugs, and PVS-Studio can catch some of them. So let's find out what it has to show us.

Typos


static bool PositionIsInside(....)
{
  return
    Position.X >= Control.Center.X - BoxSize.X * 0.5f &&
    Position.X <= Control.Center.X + BoxSize.X * 0.5f &&
    Position.Y >= Control.Center.Y - BoxSize.Y * 0.5f &&
    Position.Y >= Control.Center.Y - BoxSize.Y * 0.5f;
}

PVS-Studio's diagnostic message: V501 There are identical sub-expressions 'Position.Y >= Control.Center.Y - BoxSize.Y * 0.5f' to the left and to the right of the '&&' operator. svirtualjoystick.cpp 97

Notice that the Position.Y variable is compared to the Control.Center.Y - BoxSize.Y * 0.5f expression twice. This is obviously a typo; the '-' operator should be replaced with '+' in the last line.

Here's one more similar mistake in a condition:

void FOculusRiftHMD::PreRenderView_RenderThread(
  FSceneView& View)
{
  ....
  if (View.StereoPass == eSSP_LEFT_EYE ||
      View.StereoPass == eSSP_LEFT_EYE)
  ....
}

PVS-Studio's diagnostic message: V501 There are identical sub-expressions 'View.StereoPass == eSSP_LEFT_EYE' to the left and to the right of the '||' operator. oculusrifthmd.cpp 1453

It seems that the work with Oculus Rift is not well tested yet.

Let's go on.

struct FMemoryAllocationStats_DEPRECATED
{
  ....
  SIZE_T  NotUsed5;
  SIZE_T  NotUsed6;
  SIZE_T  NotUsed7;
  SIZE_T  NotUsed8;
  ....
};

FMemoryAllocationStats_DEPRECATED()
{
  ....
  NotUsed5 = 0;
  NotUsed6 = 0;
  NotUsed6 = 0;  
  NotUsed8 = 0;  
  ....
}

PVS-Studio's diagnostic message: V519 The 'NotUsed6' variable is assigned values twice successively. Perhaps this is a mistake. Check lines: 86, 88. memorybase.h 88

Structure members are initialized here. A typo causes the NotUsed6 member to be initialized twice, while the NotUsed7 member remains uninitialized. However, the _DEPRECATED() suffix in the function name tells us this code is not of much interest anymore.

Here are two other fragments where one variable is assigned a value twice:
  • V519 The HighlightText variable is assigned values twice successively. Perhaps this is a mistake. Check lines: 204, 206. srichtextblock.cpp 206
  • V519 The TrackError.MaxErrorInScaleDueToScale variable is assigned values twice successively. Perhaps this is a mistake. Check lines: 1715, 1716. animationutils.cpp 1716

Null pointers


I pretty often come across null pointer dereferencing errors in error handlers. No wonder: these fragments are difficult and uninteresting to test. In Unreal Engine, you can find a null pointer dereferencing error in an error handler too:

bool UEngine::CommitMapChange( FWorldContext &Context )
{
  ....
  LevelStreamingObject = Context.World()->StreamingLevels[j];
  if (LevelStreamingObject != NULL)
  {
    ....
  }
  else
  {
    check(LevelStreamingObject);
    UE_LOG(LogStreaming, Log,
           TEXT("Unable to handle streaming object %s"),
           *LevelStreamingObject->GetName());
  }
  ....
}

PVS-Studio's diagnostic message: V522 Dereferencing of the null pointer 'LevelStreamingObject' might take place. unrealengine.cpp 10768

We want to print the object name when an error occurs. But the object doesn't exist.

Here's another fragment with null pointer dereferencing. It's all much more interesting here. Perhaps the error appeared because of an incorrect merge. Anyway, the comment proves that the code is incomplete:

void FStreamingPause::Init()
{
  ....
  if( GStreamingPauseBackground == NULL && GUseStreamingPause )
  {
    // @todo UE4 merge andrew
    // GStreamingPauseBackground = new FFrontBufferTexture(....);
    GStreamingPauseBackground->InitRHI();
  }
}

PVS-Studio's diagnostic message: V522 Dereferencing of the null pointer 'GStreamingPauseBackground' might take place. streamingpauserendering.cpp 197

A few more words about null pointers


Almost in every program I check, I get a pile of V595 warnings (examples). These warnings indicate the following trouble:

A pointer is dereferenced first and only then is checked for being null. That's not always an error, but this code is highly suspicious and needs to be checked anyway!

The V595 diagnostic helps us reveal slip-ups like this:

/**
 * Global engine pointer.
 * Can be 0 so don't use without checking.
 */
ENGINE_API UEngine* GEngine = NULL;

bool UEngine::LoadMap( FWorldContext& WorldContext,
  FURL URL, class UPendingNetGame* Pending, FString& Error )
{
  ....
  if (GEngine->GameViewport != NULL)
  {
    ClearDebugDisplayProperties();
  }

  if( GEngine )
  {
    GEngine->WorldDestroyed( WorldContext.World() );
  }
  ....
}

PVS-Studio's diagnostic message: V595 The 'GEngine' pointer was utilized before it was verified against nullptr. Check lines: 9714, 9719. unrealengine.cpp 9714

Notice the comment. The global variable GEngine may be equal to zero, so it must be checked before it can be used.

And there is such a check indeed in the function LoadMap():

if( GEngine )

Unfortunately, this check is executed only after the pointer has been already used:

if (GEngine->GameViewport != NULL)

There were quite a number of V595 warnings for the project (about 82). I guess many of them are false positives, so I won't litter the article with the samples and cite them in a separate list: ue-v595.txt.

Excess variable declaration


This error is pretty nice. It is about mistakenly declaring a new variable instead of using an already existing one.

void FStreamableManager::AsyncLoadCallback(....)
{
  ....
  FStreamable* Existing = StreamableItems.FindRef(TargetName);
  ....
  if (!Existing)
  {
    // hmm, maybe it was redirected by a consolidate
    TargetName = ResolveRedirects(TargetName);
    FStreamable* Existing = StreamableItems.FindRef(TargetName);
  }
  if (Existing && Existing->bAsyncLoadRequestOutstanding)
  ....
}

PVS-Studio's diagnostic message: V561 It's probably better to assign value to 'Existing' variable than to declare it anew. Previous declaration: streamablemanager.cpp, line 325. streamablemanager.cpp 332

I suspect the code must look like this:

// hmm, maybe it was redirected by a consolidate
TargetName = ResolveRedirects(TargetName);
Existing = StreamableItems.FindRef(TargetName);

Errors in function calls


bool FRecastQueryFilter::IsEqual(
  const INavigationQueryFilterInterface* Other) const
{
  // @NOTE: not type safe, should be changed when
  // another filter type is introduced
  return FMemory::Memcmp(this, Other, sizeof(this)) == 0;
}

PVS-Studio's diagnostic message: V579 The Memcmp function receives the pointer and its size as arguments. It is possibly a mistake. Inspect the third argument. pimplrecastnavmesh.cpp 172

The comment warns us that it is dangerous to use Memcmp(). But actually it all is even worse than the programmer expects. The point is that the function compares only a part of the object.

The sizeof(this) operator returns the pointer size; that is, the function will compare the first 4 bytes in a 32-bit program and 8 bytes in a 64-bit program.

The correct code should look as follows:

return FMemory::Memcmp(this, Other, sizeof(*this)) == 0;

But that's not the only trouble with the Memcmp() function. Have a look at the following code fragment:

D3D11_STATE_CACHE_INLINE void GetBlendState(
  ID3D11BlendState** BlendState, float BlendFactor[4],
  uint32* SampleMask)
{
  ....
  FMemory::Memcmp(BlendFactor, CurrentBlendFactor,
                  sizeof(CurrentBlendFactor));
  ....
}

PVS-Studio's diagnostic message: V530 The return value of function 'Memcmp' is required to be utilized. d3d11statecacheprivate.h 547

The analyzer was surprised at finding the Memcmp() function's result not being used anywhere. And this is an error indeed. As far as I get it, the programmer wanted to copy the data, not compare them. If so, the Memcpy() function should be used:

FMemory::Memcpy(BlendFactor, CurrentBlendFactor,
                sizeof(CurrentBlendFactor));

A variable assigned to itself


enum ECubeFace;
ECubeFace CubeFace;

friend FArchive& operator<<(
  FArchive& Ar,FResolveParams& ResolveParams)
{
  ....
  if(Ar.IsLoading())
  {
    ResolveParams.CubeFace = (ECubeFace)ResolveParams.CubeFace;
  }
  ....
}

PVS-Studio's diagnostic message: V570 The 'ResolveParams.CubeFace' variable is assigned to itself. rhi.h 1279

The ResolveParams.CubeFace variable is of the ECubeFace type, and it is cast explicitly to the ECubeFace type, i.e. nothing happens. After that, the variable is assigned to itself. Something is wrong with this code.

The nicest of all the errors


image2.png
I do like the following error most of all:

bool VertInfluencedByActiveBone(
  FParticleEmitterInstance* Owner,
  USkeletalMeshComponent* InSkelMeshComponent,
  int32 InVertexIndex,
  int32* OutBoneIndex = NULL);

void UParticleModuleLocationSkelVertSurface::Spawn(....)
{
  ....
  int32 BoneIndex1, BoneIndex2, BoneIndex3;
  BoneIndex1 = BoneIndex2 = BoneIndex3 = INDEX_NONE;

  if(!VertInfluencedByActiveBone(
        Owner, SourceComponent, VertIndex[0], &BoneIndex1) &&
     !VertInfluencedByActiveBone(
        Owner, SourceComponent, VertIndex[1], &BoneIndex2) && 
     !VertInfluencedByActiveBone(
        Owner, SourceComponent, VertIndex[2]) &BoneIndex3)
  {
  ....
}

PVS-Studio's diagnostic message: V564 The '&' operator is applied to bool type value. You've probably forgotten to include parentheses or intended to use the '&&' operator. particlemodules_location.cpp 2120

It's not that easy to spot it. I'm sure you've just scanned through the code and haven't noticed anything strange. The analyzer warning, unfortunately, is also strange and suggests a false positive. But in fact, we are dealing with a real and very interesting bug.

Let's figure it all out. Notice that the last argument of the VertInfluencedByActiveBone() function is optional.

In this code fragment, the VertInfluencedByActiveBone() function is called 3 times. The first two times, it receives 4 arguments; with the last call, only 3 arguments. And here is where the error is lurking.

It is only from pure luck that the code compiles well, the error staying unnoticed. This is how it happens:

  1. The function is called with 3 arguments: VertInfluencedByActiveBone(Owner, SourceComponent, VertIndex[2]);
  2. The '!' operator is applied to the function result;
  3. The !VertInfluencedByActiveBone(...) expression evaluates to a bool value;
  4. The '&' (bitwise AND) operator is applied to it;
  5. All this is compiled successfully because there is a bool expression to the left of the '&' operator and an integer variable BoneIndex3 to the right.

The analyzer suspected something was wrong on discovering one of the '&' operator's arguments to have the bool type. And that was what it warned us about - not in vain.

To fix the error, we need to add a comma and put a closing parenthesis in the right place:

if(!VertInfluencedByActiveBone(
      Owner, SourceComponent, VertIndex[0], &BoneIndex1) &&
   !VertInfluencedByActiveBone(
      Owner, SourceComponent, VertIndex[1], &BoneIndex2) && 
   !VertInfluencedByActiveBone(
      Owner, SourceComponent, VertIndex[2], &BoneIndex3))

A break operator missing


static void VerifyUniformLayout(....)
{
  ....
  switch(Member.GetBaseType())
  {
    case UBMT_STRUCT:  BaseTypeName = TEXT("struct"); 
    case UBMT_BOOL:    BaseTypeName = TEXT("bool"); break;
    case UBMT_INT32:   BaseTypeName = TEXT("int"); break;
    case UBMT_UINT32:  BaseTypeName = TEXT("uint"); break;
    case UBMT_FLOAT32: BaseTypeName = TEXT("float"); break;
    default:           
      UE_LOG(LogShaders, Fatal,
        TEXT("Unrecognized uniform ......"));
  };
  ....
}

PVS-Studio's diagnostic message: V519 The 'BaseTypeName' variable is assigned values twice successively. Perhaps this is a mistake. Check lines: 862, 863. openglshaders.cpp 863

The break; operator is missing in the very beginning. I guess no comments and explanations are needed.

Microoptimizations


The PVS-Studio analyzer offers a small set of diagnostic rules that help carry out microoptimizations of the code. Though small, they may prove pretty useful at times. Let's take one assignment operator as an example:

FVariant& operator=( const TArray<uint8> InArray )
{
  Type = EVariantTypes::ByteArray;
  Value = InArray;
  return *this;
}

PVS-Studio's diagnostic message: V801 Decreased performance. It is better to redefine the first function argument as a reference. Consider replacing 'const .. InArray' with 'const .. &InArray'. variant.h 198

It's not a very good idea to pass an array by value. The InArray can and must be passed by a constant reference.

The analyzer generated quite a few warnings related to microoptimizations. I don't think many of them will be really useful, but here you are a list of these fragments just in case: ue-v801-V803.txt.

Suspicious sum


uint32 GetAllocatedSize() const
{
  return UniformVectorExpressions.GetAllocatedSize()
    + UniformScalarExpressions.GetAllocatedSize()
    + Uniform2DTextureExpressions.GetAllocatedSize()
    + UniformCubeTextureExpressions.GetAllocatedSize()
    + ParameterCollections.GetAllocatedSize()
    + UniformBufferStruct
        ?
        (sizeof(FUniformBufferStruct) +
         UniformBufferStruct->GetMembers().GetAllocatedSize())
        :
        0;
}

PVS-Studio's diagnostic message: V502 Perhaps the '?:' operator works in a different way than it was expected. The '?:' operator has a lower priority than the '+' operator. materialshared.h 224

This code is pretty complicated. To make the explanation clearer, I have composed a simplified artificial sample:

return A() + B() + C() + uniform ? UniformSize() : 0;

A certain size is being calculated in this code. Depending on the value of the uniform variable, either UniformSize() or 0 should be added. But the code actually works in quite a different way. The priority of the addition operators '+' is higher than that of the '?:' operator.

So here's what we get:

return (A() + B() + C() + uniform) ? UniformSize() : 0;

A similar issue can be found in Unreal Engine's code. I suspect the program calculates something different than the programmer wanted it to.

Mess-up with enum


I didn't feel like describing this case at first as I would have to cite quite a large piece of code. But then I overcame my laziness, so please be patient too.

namespace EOnlineSharingReadCategory
{
  enum Type
  {
    None          = 0x00,
    Posts         = 0x01,
    Friends       = 0x02,
    Mailbox       = 0x04,
    OnlineStatus  = 0x08,
    ProfileInfo   = 0x10,  
    LocationInfo  = 0x20,
    Default       = ProfileInfo|LocationInfo,
  };
}

namespace EOnlineSharingPublishingCategory
{
  enum Type {
    None          = 0x00,
    Posts         = 0x01,
    Friends       = 0x02,
    AccountAdmin  = 0x04,
    Events        = 0x08,
    Default       = None,
  };

  inline const TCHAR* ToString
    (EOnlineSharingReadCategory::Type CategoryType)
  {
    switch (CategoryType)
    {
    case None:
    {
      return TEXT("Category undefined");
    }
    case Posts:
    {
      return TEXT("Posts");
    }
    case Friends:
    {
      return TEXT("Friends");
    }
    case AccountAdmin:
    {
      return TEXT("Account Admin");
    }
    ....
  }
}

The analyzer generates a few V556 warnings at once on this code. The reason is that the switch operator has a variable of the EOnlineSharingReadCategory::Type type as its argument. At the same time, case operators work with values of a different type, EOnlineSharingPublishingCategory::Type.

A logical error


const TCHAR* UStructProperty::ImportText_Internal(....) const
{
  ....
  if (*Buffer == TCHAR('\"'))
  {
    while (*Buffer && *Buffer != TCHAR('\"') &&
           *Buffer != TCHAR('\n') && *Buffer != TCHAR('\r'))
    {
      Buffer++;
    }

    if (*Buffer != TCHAR('\"'))
  ....
}

PVS-Studio's diagnostic message: V637 Two opposite conditions were encountered. The second condition is always false. Check lines: 310, 312. propertystruct.cpp 310

The programmer intended to skip all text in double quotes. The algorithm was meant to be like this:
  • Once the program comes across a double quote, a loop is started.
  • The loop keeps skipping characters until stumbling across the next double quote.
The error is about the pointer failing to be referenced to the next character after the first double quote is found. As a result, the second double quote is found right away, too, and the loop doesn't start.

Here is simpler code to clarify the point:

if (*p == '\"')
{
  while (*p && *p != '\"')
      p++;
}

To fix the error, you need to change the code in the following way:

if (*p == '\"')
{
  p++;
  while (*p && *p != '\"')
      p++;
}

Suspicious shift


class FMallocBinned : public FMalloc
{
  ....
  /* Used to mask off the bits that have been used to
     lookup the indirect table */
  uint64 PoolMask;
  ....
  FMallocBinned(uint32 InPageSize, uint64 AddressLimit)
  {
    ....
    PoolMask = ( ( 1 << ( HashKeyShift - PoolBitShift ) ) - 1 );
    ....
  }
}

PVS-Studio's diagnostic message: V629 Consider inspecting the '1 < (HashKeyShift - PoolBitShift)' expression. Bit shifting of the 32-bit value with a subsequent expansion to the 64-bit type. mallocbinned.h 800

Whether or not this code contains an error depends on whether the value 1 needs to be shifted by more than 31 bits. Since the result is saved into a 64-bit variable PoolMask, it seems highly probable.

If I am right, the library contains an error in the memory allocation subsystem.

The number 1 is of the int type, which means that you cannot shift it by 35 bits, for example. Theoretically, it leads to undefined behavior (find out more). In practice, an overflow will occur and an incorrect value will be computed.

The fixed code looks as follows:

PoolMask = ( ( 1ull << ( HashKeyShift - PoolBitShift ) ) - 1 );

Obsolete checks


void FOculusRiftHMD::Startup()
{
  ....
  pSensorFusion = new SensorFusion();
  if (!pSensorFusion)
  {
    UE_LOG(LogHMD, Warning,
      TEXT("Error creating Oculus sensor fusion."));
    return;
  }
  ....
}

PVS-Studio's diagnostic message: V668 There is no sense in testing the 'pSensorFusion' pointer against null, as the memory was allocated using the 'new' operator. The exception will be generated in the case of memory allocation error. oculusrifthmd.cpp 1594

For a long time now the new operator has been throwing an exception in case of a memory allocation error. The if (!pSensorFusion) check is not needed.

I usually find quite a lot of such fragments in large projects, but Unreal Engine's code contains surprisingly few of them: ue-V668.txt.

Copy-Paste


The code fragments below have most likely appeared through the Copy-Paste method. Regardless of the condition, one and the same code branch is executed:

FString FPaths::CreateTempFilename(....)
{
  ....  
  const int32 PathLen = FCString::Strlen( Path );
  if( PathLen > 0 && Path[ PathLen - 1 ] != TEXT('/') )
  {
    UniqueFilename =
      FString::Printf( TEXT("%s/%s%s%s"), Path, Prefix,
                       *FGuid::NewGuid().ToString(), Extension );
  }
  else
  {
    UniqueFilename =
      FString::Printf( TEXT("%s/%s%s%s"), Path, Prefix,
                       *FGuid::NewGuid().ToString(), Extension );
  }
  ....
}

PVS-Studio's diagnostic message: V523 The 'then' statement is equivalent to the 'else' statement. paths.cpp 703

One more example:

template< typename DefinitionType >            
FORCENOINLINE void Set(....)
{
  ....
  if ( DefinitionPtr == NULL )
  {
    WidgetStyleValues.Add( PropertyName,
      MakeShareable( new DefinitionType( InStyleDefintion ) ) );
  }
  else
  {
    WidgetStyleValues.Add( PropertyName,
      MakeShareable( new DefinitionType( InStyleDefintion ) ) );
  }
}

PVS-Studio's diagnostic message: V523 The 'then' statement is equivalent to the 'else' statement. slatestyle.h 289

Miscellaneous


What's left is just diverse subtle issues which are not very interesting to discuss. So let me just cite a few code fragments and corresponding diagnostic messages.

void FNativeClassHeaderGenerator::ExportProperties(....)
{
  ....
  int32 NumByteProperties = 0;
  ....
  if (bIsByteProperty)
  {
    NumByteProperties;
  }
  ....
}

PVS-Studio's diagnostic message: V607 Ownerless expression 'NumByteProperties'. codegenerator.cpp 633

static void GetModuleVersion( .... )
{
  ....
  char* VersionInfo = new char[InfoSize];
  ....
  delete VersionInfo;
  ....
}

PVS-Studio's diagnostic message: V611 The memory was allocated using 'new T[]' operator but was released using the 'delete' operator. Consider inspecting this code. It's probably better to use 'delete [] VersionInfo;'. windowsplatformexceptionhandling.cpp 107

const FSlateBrush* FSlateGameResources::GetBrush(
  const FName PropertyName, ....)
{
  ....
  ensureMsgf(BrushAsset, TEXT("Could not find resource '%s'"),
             PropertyName);
  ....
}

PVS-Studio's diagnostic message: V510 The 'EnsureNotFalseFormatted' function is not expected to receive class-type variable as sixth actual argument. slategameresources.cpp 49

Conclusions


Using the static analyzer integrated into Visual Studio does make sense but it is not enough. The authors should consider using specialized tools in addition to it, for example our analyzer PVS-Studio. If you compare PVS-Studio to VS2013's analyzer, the former detects 6 times more bugs. Here you have the proof:

  1. Comparison of static code analyzers: CppCat, Cppcheck, PVS-Studio and Visual Studio;
  2. Comparison methodology.

I invite all those who want their code to be high-quality to try our code analyzer.

P.S. I should also mention that the errors described in this article (except for microoptimizations) could theoretically have been found by the lightweight analyzer CppCat as well. A one-year license for CppCat costs $250; annual renewal costs $200. But it wouldn't do in this particular case because it is lightweight and lacks the necessary functionality to monitoring compiler launches, which is a crucial requirement when checking Unreal Engine. However, the CppCat analyzer may well satisfy the authors of small projects.

Animating Characters with DirectX

$
0
0
DirectX 9 is good! It allows you to import .x files into your game projects unlike newer versions of DirectX. Why not ask yourself, "What do I want in my game?" well, the answer for me is 3D game characters and a nice 3D scene. I am writing this tutorial so that you may follow the steps required to create such a scene. Well at least the characters. I’ll leave the scene up to you. The scene will serve as an area for our characters to walk around. Unfortunately 3D studio max is not free for many people. I have no answer for this because I was unsuccessful in using Blender for animations; maybe now that I have experience I'd manage however if you are able to get hold of max, then great! There's nothing stopping you. There are plugin exporters available that do the job. And the aim of this tutorial is purely for teaching you how to create 3D DirectX games using any of the exporters available and as a refresher course for myself. DirectX is not easy but it is a lot of fun. So let's get started!

Note:  If you are familiar with the basics of setting up DirectX and Win32 applications, then you can skip straight to discussions of loading and animating models


Setting up Direct3D


Note:  if you are using a unicode character set for your projects, be sure to place an L before strings e.g. L"my string";


Let's start from the beginning: Creating a window. Setup a new empty Win32 project in Visual Studio; you will need a version of the DirectX SDK and to link in the include and library directories of the SDK into your project. This is done via project properties. In the linker->Input Additional dependencies add d3d9.lib and d3dx9.lib.

First we will include <windows.h> and create a WinMain() function and a Windows procedure WinProc(). WinMain is the entry point of the program that is executed first in a standard Windows application. Our WinMain function is outlined as:

int WINAPI WinMain(HINSTANCE hInstance, HINSTANCE hPrevInstance, PSTR cmdLine, int showCmd);

And the outline of our WndProc is:

LRESULT CALLBACK WndProc(HWND hWnd, UINT msg, WPARAM wParam, LPARAM lParam);

Place these declarations at the top of the cpp file after includes so that they can be referenced throughout other functions.

Now we will want an object to handle various application events such as game initialization, updating the game and cleaning of resources. We will create a simple Game object for this. Within the Init() function we will create a window and hold a handle to it, m_mainWindow:

class Game{
public:
	Game();
	~Game();

	HRESULT Init(HINSTANCE hInstance);
	void Update(float deltaTime);
	void Cleanup();
	
private:
	HWND m_mainWindow;
};

Don't forget the semi-colon after class declaration.

We create the window class that describes our window and register it with the operating system in the Game::Init() function. We will use a basic window class for this:

	WNDCLASS wc;
	//Prepare class for use
	memset(&wc, 0, sizeof(WNDCLASS));
	
	wc.style=CS_HREDRAW | CS_VREDRAW; //Redraws the window if width or height changes.
	//Associate the window procedure with the window
	wc.lpfnWndProc=(WNDPROC)WndProc;

	wc.hInstance=hInstance;
	wc.lpszClassName="Direct3D App";

Register the window class with the OS:

	if(FAILED(RegisterClass(&wc))){
		return E_FAIL;
	}

And finally, create the window; We use WS_OVERLAPPEDWINDOW for a standard minimize, maximize and close options:

m_mainWindow = CreateWindow("Direct3D App", //The window class to use
			      "Direct3D App", //window title
			      WS_OVERLAPPEDWINDOW, //window style
			      200, //x
			      200, //y
			      CW_USEDEFAULT, //Default width
			      CW_USEDEFAULT, //Default height
			      NULL, //Parent Window
			      NULL, //Menu
			      hInstance, //Application instance
			      0); //Pointer to value parameter, lParam of WndProc
if(!m_mainWindow){return E_FAIL;}
	And after CreateWindow, add:
ShowWindow(m_mainWindow, SW_SHOW);
UpdateWindow(m_mainWindow);

//Function completed successfully
return S_OK;

In the WinMain function we must create an instance of Game and call the Init function to initialize the window:

	Game mygame;

	if(FAILED(mygame.Init(hInstance))){
		MessageBox(NULL, "Failed to initialize game", NULL, MB_OK);
		return 1;
	}

Every Windows application has a message pump. The message pump is a loop that forwards Windows messages to the window procedure by "looking" or peeking at the internal message queue. We "look" at a message within our message pump, remove it from the queue with PM_REMOVE and send it to the window procedure typically for a game. PeekMessage is better than GetMessage in the case where we want to execute game code because it returns immediately. GetMessage on the other hand would force us to wait for a message.

Now for our message pump; place this in the WinMain function:

MSG msg;
memset(&msg, 0, sizeof(MSG));
while(WM_QUIT != msg.message){
	while(PeekMessage(&msg, 0, 0, 0, PM_REMOVE) != 0){
		//Put the message in a recognizable form
		TranslateMessage(&msg);
		//Send the message to the window procedure
		DispatchMessage(&msg);
	}

	//Update the game
	//Don't worry about this just now
}

At the end of WinMain, call the application cleanup function and return with a message code:

mygame.Cleanup();
return (int)msg.wParam;

Now for our window procedure implementation; We will use a basic implementation to handle messages:

LRESULT CALLBACK WndProc(HWND hWnd, UINT msg, WPARAM wParam, LPARAM lParam){
	//Handle window creation and destruction events
	switch(msg){
	case WM_CREATE:
		break;
	case WM_DESTROY:
		PostQuitMessage(0);
		break;
	}

	//Handle all other events with default procedure
	return DefWindowProc(hWnd, msg, wParam, lParam);
}

Check that the program works so far. You should be able to build the project and run it and display the window. If all goes well, we can start with Direct3D.

Now that we have created a window, let's setup Direct3D and render a background colour to the screen. We will add to our Game object so we can easily work with different parts of our application in a clear and secure manner such as creation, updating the game and application destruction. With our game object we can intialize Direct3D in an Init() function and update our game with Game::Update() and clean up DirectX resources with Game::Cleanup(). Name this class to suit your preference. I will call it Game. The m_ prefix is Hungarian notation and was developed by someone called Charles Simonyi, a Microsoft programmer. It is short for member variable. Other prefixes might be nCount, n for number, s_ for static variables. Anyway here is the Game object with added functions and variables specific to Direct3D:

#include "d3d9.h"
#include "d3dx9.h"

class Game{
public:
	Game();
	~Game();

	HRESULT Init(HINSTANCE hInstance);
	void Update(float deltaTime);
	void Render();
	void Cleanup();
	
	void OnDeviceLost();
	void OnDeviceGained();
private:
	HWND m_mainWindow;
	D3DPRESENT_PARAMETERS m_pp;
	bool m_deviceStatus;
};

Further reading recommended: Character Animation with Direct3D - Carl Granberg

We could do with a helper function to release, free up memory used by DirectX COM objects in a safe manner. We use a generic template class for this or you could create a macro for the same purpose:

dxhelper.h
template<class T>
inline void SAFE_RELEASE(T t)
{
	if(t)t->Release();
	t = NULL;
}

Don't forget to include it in your main cpp file. #include "dxhelper.h"

In our Init function we fill out the present parameters and setup Direct3D;

HRESULT Game::Init(){
	//... Window Creation Code Here
	//...

	//Direct3D Initialization

	//Create the Direct3D object
	IDirect3D9* d3d9 = Direct3DCreate9(D3D_SDK_VERSION);

	if(d3d9 == NULL)
		return E_FAIL;

	memset(&m_pp, 0, sizeof(D3DPRESENT_PARAMETERS));
	m_pp.BackBufferWidth = 800;	
	m_pp.BackBufferHeight = 600;
	m_pp.BackBufferFormat = D3DFMT_A8R8G8B8;
	m_pp.BackBufferCount = 1;
	m_pp.MultiSampleType = D3DMULTISAMPLE_NONE;
	m_pp.MultiSampleQuality = 0;
	m_pp.SwapEffect = D3DSWAPEFFECT_DISCARD;
	m_pp.hDeviceWindow = m_mainWindow;
	m_pp.Windowed = true;
	m_pp.EnableAutoDepthStencil = true;
	m_pp.AutoDepthStencilFormat = D3DFMT_D24S8;
	m_pp.Flags = 0;
	m_pp.FullScreen_RefreshRateInHz = D3DPRESENT_RATE_DEFAULT;
	m_pp.PresentationInterval = D3DPRESENT_INTERVAL_IMMEDIATE;

	if(FAILED(d3d9->CreateDevice(D3DADAPTER_DEFAULT,
			     D3DDEVTYPE_HAL,
			     m_mainWindow,
			     D3DCREATE_HARDWARE_VERTEXPROCESSING,
			     &m_pp,
			     &g_pDevice)))
		return E_FAIL;

	//We no longer need the Direct3D object
	SAFE_RELEASE(d3d9);

	//Success the Direct3D device was created
	return S_OK;
}

Let's go over the parameters quickly; BackBufferWidth specifies the width of the offscreen buffer, the back buffer. The offscreen buffer is a memory segment that we render a scene to and it becomes the on-screen buffer, what we actually see on the screen when it is flipped with the front buffer, the on-screen buffer. Similarly with the BackBufferHeight. We specify 8 bits for alpha, 8 bits for red, 8 bits for green and 8 bits for blue so this is 32-bit true colour allocated for our buffer. We specify that there will only be one back buffer; the reason we might have two back buffers is to speed up the rendering to the screen e.g. while the onscreen buffer is diplayed you could prepare two offscreen buffers so you could flip one and then the next is ready to be displayed so you could flip the other immediately. Multisampling is a technique that improves the quality of an image but takes up more processing time. So we specify D3DMULTISAMPLE_NONE. We specify SWAPEFFECT_DISCARD to remove the oncreen buffer when it is swapped with a backbuffer; so the backbuffer becomes the front and the old front is deleted. m_pp.hDeviceWindow is the window to render to. Windowed can be true, displaying the scene in a window, or false to display the scene fullscreen. We set m_pp.EnableAutoDepthStencil to true to enable depth bufferring; where a depth buffer is used effectively causes 3D objects in the world to overlap correctly; a z value will be specified for each pixel of the depth buffer and this will effectively enable depth testing which is basically a test comparison of the z value of each pixel; If a pixel's z value is less, nearer to the screen, than another pixels z value, it is closer to the screen so will be written to the offscreen buffer. We use a default refresh rate and immediate buffer swapping. The other type of buffer swapping could be D3DPRESENT_INTERVAL_DEFAULT, default interval, which might be the screen refresh rate.

Next we create the device with a call to d3d9->CreateDevice().

We need to specify a global Direct3D device object so that we can use the device anywhere in the program.

IDirect3DDevice9* g_pDevice = NULL;

Then the CreateDevice() function will create the device object. We use the default display adapter and then D3DDEVTYPE_HAL to use the hardware abstraction layer, hardware graphics acceleration for our rendering of the scene. This is much faster as opposed to software rendering. Hardware means the graphics card in this case. We specify to use hardware vertex processing too. And then we pass the present parameters structure that describes properties of the device to create. And lastly we pass the g_pDevice variable to retrieve a handle to the newly created device.

Now, before we continue with animation we must do a bit of device handling. For example if the user does ALT+TAB our device might be lost and we need to reset it so that our resources are maintained. You'll notice we have onDeviceLost and onDeviceGained functions in our game object. These will work hand-in-hand with the deviceStatus variable to handle a device lost situation. After a device has been lost we must reconfigure it with onDeviceGained().

To check for a lost device we check the device cooperative level for D3D_OK. If the cooperative level is not D3D_OK then our device can be in a lost state or in a lost and not reset state. This should be regularly checked so we will put the code in our Game::Update() function.

#define DEVICE_LOSTREADY 0
#define DEVICE_NOTRESET 1
HRESULT coop = g_pDevice->TestCooperativeLevel();

if(coop != D3D_OK)
{
	if(coop == D3DERR_DEVICELOST)
	{
		if(m_deviceStatus == DEVICE_LOSTREADY)
			OnDeviceLost();		
	}
	else if(coop == D3DERR_DEVICENOTRESET)
	{
		if(m_deviceStatus == DEVICE_NOTRESET)
			OnDeviceGained();
	}
}

Our OnDeviceLost function and OnDeviceGained look like:

void Game::OnDeviceLost()
{
	try
	{
		//Add OnDeviceLost() calls for DirectX COM objects
		m_deviceStatus = DEVICE_NOTRESET;
	}
	catch(...)
	{
		//Error handling code
	}
}

void Game::OnDeviceGained()
{
	try
	{
		g_pDevice->Reset(&m_pp);
		//Add OnResetDevice() calls for DirectX COM objects
		m_deviceStatus = DEVICE_LOSTREADY;
	}
	catch(...)
	{
		//Error handling code
	}
}

When the program starts we have to set the m_deviceStatus variable so that we can use it. So in our Game::Game() constructor set the variable:

Game::Game(){
	m_deviceStatus = DEVICE_LOSTREADY;
}

Now we need to implement the Render and Cleanup functions. We will just clear the screen and free up memory in these functions.

void Game::Render()
{
	g_pDevice->Clear(0, NULL, D3DCLEAR_TARGET | D3DCLEAR_ZBUFFER, 0xff00ff00, 1.0f, 0);

	if(SUCCEEDED(g_pDevice->BeginScene()))
	{
		// Perform some rendering to back buffer.

		g_pDevice->EndScene();
	}

	// Swap buffers.
	g_pDevice->Present(NULL, NULL, NULL, NULL);
}

void Game::Cleanup()
{
	SAFE_RELEASE(g_pDevice);
}

Finally, we want to render our scene and update it. Remember the Update() method handles device lost events.

We want our game to run with a consistent frame rate so that Update() updates the game at the same frame rate on all PCs. If we just updated the game inconsistently without frame rate, our game would be faster on faster computers and slower on slower computers and also might speed up or slow down if we do not specify a frame rate.

Therefore we use GetTickCount() and pass a change in time to our Update() function. GetTickCount() returns the number of milliseconds that have elapsed since the system was started. We record the start time, and subtract this from the current time of each iteration of the loop. We then set the new start time; repeat this calculation and get the change in time and pass this value to Update(deltaTime).

Our message loop now is defined as:

//Get the time in milliseconds
DWORD startTime = GetTickCount();
float deltaTime = 0;

MSG msg;
memset(&msg, 0, sizeof(MSG));
while(msg.message != WM_QUIT){
	if(PeekMessage(&msg, 0, 0, 0, PM_REMOVE)){
		//Put the message in a recognizable form
		TranslateMessage(&msg);
		//Send the message to the window procedure
		DispatchMessage(&msg);
	}
	else{
		//Update the game
		DWORD t=GetTickCount();
		deltaTime=float(t-startTime)*0.001f;
		//Pass time in seconds
		mygame.Update(deltaTime);
		//Render the world
		mygame.Render();
		startTime = t;
	}
}

Now we have a complete Direct3D framework we can begin with loading an animated model. I will supply you the code so far and then talk about how we can load an animation hierarchy:

#include <windows.h>
#include "d3d9.h"
#include "d3dx9.h"
#include "dxhelper.h"

#define DEVICE_LOSTREADY 0
#define DEVICE_NOTRESET 1

IDirect3DDevice9* g_pDevice = NULL;

int WINAPI WinMain(HINSTANCE hInstance, HINSTANCE hPrevInstance, PSTR cmdLine, int showCmd);
LRESULT CALLBACK WndProc(HWND hWnd, UINT msg, WPARAM wParam, LPARAM lParam);

class Game{
public:
	Game();
	~Game();

	HRESULT Init(HINSTANCE hInstance);
	void Update(float deltaTime);
	void Render();
	void Cleanup();
	
	void OnDeviceLost();
	void OnDeviceGained();
private:
	HWND m_mainWindow;
	D3DPRESENT_PARAMETERS m_pp;
	bool m_deviceStatus;
};

Game::Game(){
	m_deviceStatus = DEVICE_LOSTREADY;
}
Game::~Game(){
}
HRESULT Game::Init(HINSTANCE hInstance){
	WNDCLASS wc;
	//Prepare class for use
	memset(&wc, 0, sizeof(WNDCLASS));
	
	wc.style=CS_HREDRAW | CS_VREDRAW; //Redraws the window if width or height changes.
	//Associate the window procedure with the window
	wc.lpfnWndProc=(WNDPROC)WndProc;

	wc.hInstance=hInstance;
	wc.lpszClassName=L"Direct3D App";

	if(FAILED(RegisterClass(&wc))){
		return E_FAIL;
	}

	m_mainWindow = CreateWindow(L"Direct3D App", //The window class to use
			      L"Direct3D App", //window title
				  WS_OVERLAPPEDWINDOW, //window style
			      200, //x
			      200, //y
			      CW_USEDEFAULT, //Default width
			      CW_USEDEFAULT, //Default height
				  NULL,
				  NULL,
			      hInstance, //Application instance
			      0); //Pointer to value parameter, lParam of WndProc

	if(!m_mainWindow){return E_FAIL;}

	ShowWindow(m_mainWindow, SW_SHOW);
	UpdateWindow(m_mainWindow);

	//Direct3D Initialization

	//Create the Direct3D object
	IDirect3D9* d3d9 = Direct3DCreate9(D3D_SDK_VERSION);

	if(d3d9 == NULL)
		return E_FAIL;

	memset(&m_pp, 0, sizeof(D3DPRESENT_PARAMETERS));
	m_pp.BackBufferWidth = 800;
	m_pp.BackBufferHeight = 600;
	m_pp.BackBufferFormat = D3DFMT_A8R8G8B8;
	m_pp.BackBufferCount = 1;
	m_pp.MultiSampleType = D3DMULTISAMPLE_NONE;
	m_pp.MultiSampleQuality = 0;
	m_pp.SwapEffect = D3DSWAPEFFECT_DISCARD;
	m_pp.hDeviceWindow = m_mainWindow;
	m_pp.Windowed = true;
	m_pp.EnableAutoDepthStencil = true;
	m_pp.AutoDepthStencilFormat = D3DFMT_D24S8;
	m_pp.Flags = 0;
	m_pp.FullScreen_RefreshRateInHz = D3DPRESENT_RATE_DEFAULT;
	m_pp.PresentationInterval = D3DPRESENT_INTERVAL_IMMEDIATE;

	if(FAILED(d3d9->CreateDevice(D3DADAPTER_DEFAULT,
			     D3DDEVTYPE_HAL,
			     m_mainWindow,
			     D3DCREATE_HARDWARE_VERTEXPROCESSING,
			     &m_pp,
			     &g_pDevice)))
		return E_FAIL;

	//We no longer need the Direct3D object
	SAFE_RELEASE(d3d9);

	//Success the Direct3D device was created
	return S_OK;
}

void Game::Update(float deltaTime){

	HRESULT coop = g_pDevice->TestCooperativeLevel();

	if(coop != D3D_OK)
	{
		if(coop == D3DERR_DEVICELOST)
		{
			if(m_deviceStatus == DEVICE_LOSTREADY)
				OnDeviceLost();		
		}
		else if(coop == D3DERR_DEVICENOTRESET)
		{
			if(m_deviceStatus == DEVICE_NOTRESET)
				OnDeviceGained();
		}
	}

}
void Game::Cleanup()
{
	SAFE_RELEASE(g_pDevice);
}

void Game::OnDeviceLost()
{
	try
	{
		//Add OnDeviceLost() calls for DirectX COM objects
		m_deviceStatus = DEVICE_NOTRESET;
	}
	catch(...)
	{
		//Error handling code
	}
}

void Game::OnDeviceGained()
{
	try
	{
		g_pDevice->Reset(&m_pp);
		//Add OnResetDevice() calls for DirectX COM objects
		m_deviceStatus = DEVICE_LOSTREADY;
	}
	catch(...)
	{
		//Error handling code
	}
}

void Game::Render()
{
	if(m_deviceStatus==DEVICE_LOSTREADY){
		g_pDevice->Clear(0, NULL, D3DCLEAR_TARGET | D3DCLEAR_ZBUFFER, 0xff00ff00, 1.0f, 0);

		if(SUCCEEDED(g_pDevice->BeginScene()))
		{
			// Perform some rendering to back buffer.

			g_pDevice->EndScene();
		}

		// Swap buffers.
		g_pDevice->Present(NULL, NULL, NULL, NULL);
	}
}

int WINAPI WinMain(HINSTANCE hInstance, HINSTANCE hPrevInstance, PSTR cmdLine, int showCmd){

	Game mygame;

	if(FAILED(mygame.Init(hInstance))){
		MessageBox(NULL, L"Failed to initialize game", NULL, MB_OK);
		return 1;
	}

	//Get the time in milliseconds
	DWORD startTime = GetTickCount();
	float deltaTime = 0;

	MSG msg;
	memset(&msg, 0, sizeof(MSG));
	while(WM_QUIT != msg.message){
		while(PeekMessage(&msg, 0, 0, 0, PM_REMOVE) != 0){
			//Put the message in a recognizable form
			TranslateMessage(&msg);
			//Send the message to the window procedure
			DispatchMessage(&msg);
		}

		//Update the game
		DWORD t=GetTickCount();
		deltaTime=float(t-startTime)*0.001f;
		//Pass time in seconds
		mygame.Update(deltaTime);
		//Render the world
		mygame.Render();
		startTime = t;
	}

	mygame.Cleanup();
	return (int)msg.wParam;
}

LRESULT CALLBACK WndProc(HWND hWnd, UINT msg, WPARAM wParam, LPARAM lParam){
	//Handle window creation and destruction events
	switch(msg){
	case WM_CREATE:
		break;
	case WM_DESTROY:
		PostQuitMessage(0);
		break;
	}

	//Handle all other events with default procedure
	return DefWindowProc(hWnd, msg, wParam, lParam);
}

Loading an Animation Hierarchy


Hopefully you have found the tutorial useful up until now. In this part I will start by setting the perspective projection and then cover the steps needed to load and animate a mesh. We will be animating our mesh object with hardware acceleration. This involves creating an HLSL .fx file.

Requirements

You will need a method of producing an .x file with animation info. For this I will be using 3d studio max 2014 and an exporter plugin. There are a number of plugins available. If you can't get hold of this then you may have to use Blender, however I don't know if the .x files produced with Blender are sufficient for this tutorial. And I don't have the incentive to find out. So I leave this to the reader. Hopefully you will find a way to produce an .x file with an animation hierarchy in a suitable format for loading into a DirectX application.

Setting up a perspective projection

We have three matrices to create. World, View and Projection. The World matrix represents the world transformation for a set of objects such as meshes. This is the position of these meshes in the game world. The view matrix represents the camera. It has a lookAt component, an Up component that specifies the up direction of the world, y or z. And also an eye component that is the "look from" component; the position of the camera.

Our perspective matrix defines the "fish eye" factor or field-of-view, which is the angle range we can see from our eye. This is typically 45 degrees. We must also specify the aspect ratio, which is the number of width pixels in correspondence with the number of height pixels; the ratio of width to height. Typically set this to WINDOW_WIDTH / WINDOW_HEIGHT. And lastly, the z near plane and z far plane must be specified, these are the cut-off points of our view. Typically the z near plane of a projection frustum is z=1.0f. Z here is the point of cut-off; anything closer to the eye than 1.0 is cut-off, not rendered. Similarly anything further away than zfar is cut-off, not rendered too.

We add the describing transform states with the D3DTS_ constants in the device SetTranform function passing each tranform matrix as parameters. This is done in our Render() function.

D3DXMATRIX view, proj, world;
D3DXMatrixIdentity(&world); //Set to no transform

//Position the camera behind the z axis(z=-10)
//Make Y the up direction of the world
//And look at the centre of the world origin(0,0,0)
D3DXMatrixLookAtLH(&view, &D3DXVECTOR3(0,0,-10.0f), &D3DXVECTOR3(0.0f, 1.0f, 0.0f), &D3DXVECTOR3(0.0f, 0.0f, 0.0f));

//Make the field of view 45 degrees
//Use the window dimensions for aspect ratio so rendered image is not
//stretched when window is resized.
//Set znear to 1.0f and zfar to 10000.0f
RECT rc;
GetClientRect(m_mainWindow, &rc);
D3DXMatrixPerspectiveFovLH(&proj, D3DXToRadian(45.0), (float)rc.width / (float)rc.height, 1.0f, 10000.0f);

g_pDevice->SetTransform(D3DTS_WORLD, &world);
g_pDevice->SetTransform(D3DTS_VIEW, &view);
g_pDevice->SetTransform(D3DTS_PROJECTION, &proj);

Now that we have the scene set up, the basic camera and projection ready - it's time to load a model with animation.

Loading an Animation Hierarchy

In real life humans and animals have bones. Likewise, our game characters have bones. A bone in DirectX is represented with the D3DXFRAME structure. You may just think of this structure as a bone. A bone may have a parent and a sibling. For example a parent bone might be the upper arm and a child bone might be the lower arm. When you move your upper arm, your lower arm, forearm, moves with it. That is why a forearm is the child. If you move your lower arm however, the upper arm is not affected. And hence that is why the upper arm is a parent. Each bone may have a transformation, a rotation and position for example. A sibling is just a bone that shares the same parent as another bone(D3DXFRAME). Let's look at the D3DXFRAME structure to see how we can represent a bone in code.

struct D3DXFRAME{
	LPSTR Name;
	D3DXMATRIX TransformationMatrix;
	LPD3DXMESHCONTAINER pMeshContainer;
	D3DXFRAME* pFrameSibling;
	D3DXFRAME* pFrameFirstChild;
};

A bone has a name, a transformation, and optionally a mesh associated with it; and optionally a sibling and a child. With this structure we can represent a whole hierarchy or skeleton in other words. By associating sibling bones and child bones we can link all the D3DXFRAME bones together, which in turn will be a representation of a skeleton such as a human or an animal.

The names of the bones could be "right leg", "left leg", "right forearm" for example to give you an idea. The transformations defined in a basic D3DXFRAME are the local bone transformations. These are local to the bones in contrast with the world transformations, which are the actual transformations in the world; the final transforms. In our game we require the world transformations of the bones to render them at the exact positions in the world; so we will extend this structure to include them. For easy reference we will call the new structure Bone.

struct Bone: public D3DXFRAME
{
	D3DXMATRIX WorldMatrix;
};

The WorldMatrix is the combination of a bone's local matrix with its parent's WorldMatrix. This is simply a multiplication of the two so that the child bone inherits the transformation of its parent.

We must traverse the bone hierarchy to calculate each of the new matrices. This is done with the following recursive function:

void CalculateWorldMatrices(Bone* child, D3DXMATRIX* parentMatrix){
	D3DXMatrixMultiply(&child->WorldMatrix, &child->TransformationMatrix, parentMatrix);

	//Each sibling has same parent as child
	//so pass the parent matrix of this child
	if(child->pFrameSibling){
		CalculateWorldMatrices((Bone*)child->pFrameSibling, parentMatrix);
	}

	//Pass child matrix as parent to children
	if(child->pFrameFirstChild){
		CalculateWorldMatrices((Bone*)child->pFrameFirstChild, &child->WorldMatrix);
	}
}

Then to calculate all of the bones matrices that make up the skeleton we call CalculateWorldMatrices on the root node, the parent bone of the hierarchy with the identity matrix as the parent. This will traverse all children and siblings of those children and build each of the world matrices.

To load a bone hierarchy from an .x file we must implement the ID3DXAllocateHierarchy interface. This interface defines 4 functions that we must implement ourselves. Then we pass the implemented object in a call to D3DXLoadMeshHierarchyFromX(). That will create a skeleton of a character. And after we have the skeleton we can apply skinning by using an HLSL effect file to make our character effectively have skin.

To implement the functions declared in ID3DXAllocateHierarchy we provide a new class definition that inherits from it. We will call this class AllocateHierarchyImp. The new class and inherited functions effectively looks like this:

Note:  STDMETHOD is a macro defined as virtual HRESULT __stdcall. It declares a virtual function that is a function that must be implemented by an inheriting class and uses the standard calling convention __stdcall.


class AllocateHierarchyImp : public ID3DXAllocateHierarchy{
public:
	STDMETHOD(CreateFrame)(LPCSTR Name, 
					      LPD3DXFRAME* ppNewFrame);

	STDMETHOD(CreateMeshContainer)(LPCSTR Name, 
			CONST D3DXMESHDATA* pMeshData,
			CONST D3DXMATERIAL* pMaterials,
			CONST D3DXEFFECTINSTANCE* pEffectInstances,
			DWORD NumMaterials,
			CONST DWORD* pAdjacency,
			LPD3DXSKININFO pSkinInfo,
			LPD3DXMESHCONTAINER* ppNewMeshContainer);

	STDMETHOD(DestroyFrame)(LPD3DXFRAME pFrameToFree);

	STDMETHOD(DestroyMeshContainer)(LPD3DXMESHCONTAINER pMeshContainerBase);
};

In these functions we handle the allocation of memory for bones and the deallocation of memory we allocated ourselves for bones and associated bone meshes. CreateFrame is fairly simple; we just allocate memory for a bone with new Bone; and allocate memory for the name of the bone with new char[strlen(Name)+1];.

CreateMeshContainer on the other hand is more complicated. Bear in mind these functions are called by the D3DXLoadMeshHierarchyFromX() function. Information about the mesh we are loading is passed to these functions.

Before I jump into the code for these functions we should consider a class that will provide the mechanism of loading a skinned mesh separately for each of our animated characters. Thus we will create a class called SkinnedMesh that caters for each individual character. This class is outlined as:

SkinnedMesh.h
class SkinnedMesh{
public:
	SkinnedMesh();
	~SkinnedMesh();
	void Load(WCHAR filename[]);
	void Render(Bone* bone);
private:
	void CalculateWorldMatrices(Bone* child, D3DXMATRIX* parentMatrix);
	void AddBoneMatrixPointers(Bone* bone);

	D3DXFRAME* m_pRootNode;
};

We need to define a mesh container structure so that we can hold a mesh associated with each bone and prepare for skinning the mesh. Like with the Bone when we extended the D3DXFRAME, we extend the D3DXMESHCONTAINER to represent a mesh associated with a bone. The D3DXMESHCONTAINER looks like this:

struct D3DXMESHCONTAINER{
	LPSTR Name;
	D3DXMESHDATA MeshData;
	LPD3DXMATERIAL pMaterials;
	LPD3DXEFFECTINSTANCE pEffects;
	DWORD NumMaterials;
	DWORD* pAdjacency;
	LPD3DXSKININFO pSkinInfo;
	D3DXMESHCONTAINER* pNextMeshContainer;
};

Time for a cup of coffee.

MeshData holds the actual mesh. pMaterials holds material and texture info. pEffects may hold effects associated with the mesh. pAdjacency holds adjacency info, which is indices of faces, triangles, adjacent to each other. And pSkinInfo holds skinning info such as vertex weights and bone offset matrices that are used to add a skin effect to our animations.

And our extended version to cater for skinning looks like this:

SkinnedMesh.h
struct BoneMesh: public D3DXMESHCONTAINER
{
	vector<D3DMATERIAL9> Materials;
	vector<IDirect3DTexture9*> Textures;

	DWORD NumAttributeGroups;
	D3DXATTRIBUTERANGE* attributeTable;
	D3DXMATRIX** boneMatrixPtrs;
	D3DXMATRIX* boneOffsetMatrices;
	D3DXMATRIX* localBoneMatrices;
};

The attribute table is an array of D3DXATTRIBUTERANGE objects. The AttribId of this object corresponds to the material or texture to use for rendering a subset of a mesh. Because we are working with a COM object for the mesh, the memory for it will be deallocated after the function completes unless we add a reference using AddRef(). So we call AddRef on the pMesh of MeshData: pMeshData->pMesh->AddRef().

Notice boneMatrixPtrs; these are pointers to world bone transformation matrices in the D3DXFRAME structures. This means if we change the world transform of a bone these will be affected or in other words these will point to the changed matrices. We need the world transformations to perform rendering. When we animate the model, we call CalculateWorldMatrices to calculate these new world matrices that represent the pose of the bones, the bone transformations. A boneMesh may be affected by a number of bones so we use pointers to these bones matrices instead of saving them twice or multiple times for bone meshes and also so we only have to update one bone matrix with our animation controller for that bone to take effect. Using the modified local transformations of the model from the animation controller, we get these matrices from the bones that influence a mesh. We then use the boneoffset matrices to calclate the local transformations as these are not stored and offset matrices are stored in pSkinInfo. When we multiply a bone offset matrix with a bone's world matrix we get the bone's local transformation without it's affecting parent's world transformation. We want to do this when we pass the transformation to the skinning shader. The mesh in this case is the mesh associated with one of the bones, found in the D3DXFRAME structure pMeshContainer.

Now that you understand the Bone and BoneMesh structures somewhat we can begin to implement the ID3DXAllocateHierachy. We'll start with CreateFrame. In this function we allocate memory for the name of the bone as well as memory for the bone itself:

SkinnedMesh.cpp
HRESULT AllocateHierarchyImp::CreateFrame(LPCSTR Name, LPD3DXFRAME *ppNewFrame)
{
	Bone *bone = new Bone;
	memset(bone, 0, sizeof(Bone));

	if(Name != NULL)
	{
		//Allocate memory for name
		bone->Name = new char[strlen(Name)];
		strcpy(bone->Name, Name);
	}

	//Prepare Matrices
	D3DXMatrixIdentity(&bone->TransformationMatrix);
	D3DXMatrixIdentity(&bone->WorldMatrix);

	//Return the new bone
	*ppNewFrame = (D3DXFRAME*)bone;

	return S_OK;
}

And the DestroyFrame function should deallocate memory allocated in CreateFrame:

HRESULT AllocateHierarchyImp::DestroyFrame(LPD3DXFRAME pFrameToFree) 
{
	if(pFrameToFree)
	{
		//Free up memory
		if(pFrameToFree->Name != NULL)
			delete [] pFrameToFree->Name;

		delete pFrameToFree;
	}
	pFrameToFree = NULL;

    return S_OK; 
}

A single mesh can have a number of bones influencing it. Each bone has a set of vertex weights associated with it corresponding to each vertex of the mesh. The weights determine how much a vertex is affected by each bone. The greater the weight of a bone, the more a vertex will be affected by the transformation of that bone. This is how the skin works. The weights of each vertex of the model that correspond to affecting bones are passed to the HLSL effect file that performs the skinning on the GPU. And the bones that influence the vertex are passed to the HLSL file as well through the BLENDINDICES0 semantic. These weights and bones are stored in the .x file and therefore are loaded in the MeshData of the D3DXMESHCONTAINER BoneMesh. By rendering a subset of the BoneMesh, we pass these weight and bone parameters to the effect file, which in turn performs the skinning based on these values. We pass the values to the HLSL file during the SkinnedMesh rendering function.

Look back at the BoneMesh structure. Bone offset matrices are inverse matrices that tranform a bone from world space to local space; that is to the transformation uneffected by its parent. These are stored in the .x file and can be retrieved with pSkinInfo of D3DXSKININFO.

To skin a mesh with hardware skinning we need to put the vertex data of each mesh to render in a format that has vertex weight and influencing bone indices. The bone indices are indices of bones that affect the vertex. Each bone in the .x file has a set of vertices that are "attached" to that bone and a weight for each vertex that determines how much the bone affects that vertex. To include this information in our mesh, we must convert the mesh to an "indexed blended" mesh. When we convert the mesh to an indexed blended mesh, the additional bone indices and vertex weights are added to our vertex information within the mesh.

Now is a good time to show you how to load a mesh container since you know about the elements that make up one. Here it is again:

struct BoneMesh: public D3DXMESHCONTAINER
{
	vector<D3DMATERIAL9> Materials;
	vector<IDirect3DTexture9*> Textures;

	DWORD NumAttributeGroups;
	D3DXATTRIBUTERANGE* attributeTable;
	D3DXMATRIX** boneMatrixPtrs;
	D3DXMATRIX* boneOffsetMatrices;
	D3DXMATRIX* localBoneMatrices;
};

localBoneMatrices are calculated when we render the mesh by using boneMatrixPtrs and boneOffsetMatrices so we can pass the local bone matrix array to the shader to perform skinning. In our CreateMeshContainer function we must allocate memory for these matrix arrays and obtain pointers to the world transformations of our bones.

HRESULT AllocateHierarchyImp::CreateMeshContainer(LPCSTR Name,				CONST D3DXMESHDATA *pMeshData,
			CONST D3DXMATERIAL *pMaterials,
			CONST D3DXEFFECTINSTANCE *pEffectInstances,
			DWORD NumMaterials,
			CONST DWORD *pAdjacency,
			LPD3DXSKININFO pSkinInfo,
			LPD3DXMESHCONTAINER *ppNewMeshContainer)
{
	//Allocate memory for the new bone mesh
	//and initialize it to zero
	BoneMesh *boneMesh = new BoneMesh;
	memset(boneMesh, 0, sizeof(BoneMesh));

	//Add a reference to the mesh so the load function doesn't get rid of 	//it
	pMeshData->pMesh->AddRef();
	//Get the device
	IDirect3DDevice9 *pDevice = NULL;
	pMeshData->pMesh->GetDevice(&pDevice);

	//Get the mesh materials and create related textures
	D3DXMATERIAL mtrl;
	for(int i=0;i<NumMaterials;i++){
		memcpy(&mtrl, &pMaterials[i], sizeof(D3DXMATERIAL));

		boneMesh->Materials.push_back(mtrl.MatD3D);

		IDirect3DTexture9* pTexture = NULL;
		//If there is a texture associated with this material, load it into
		//the program
		if(mtrl.pTextureFilename != NULL){
			wchar_t fname[MAX_PATH];
			memset(fname, 0, sizeof(wchar_t)*MAX_PATH);
			mbstowcs(fname, mtrl.pTextureFilename, MAX_PATH);
			D3DXCreateTextureFromFile(pDevice, fname, &pTexture);
			boneMesh->Textures.push_back(pTexture);
		}
		else{
			//Make sure we have the same number of elements in 				//Textures as we do Materials
			boneMesh->Textures.push_back(NULL);
		}
	}

	//Now we need to prepare the mesh for hardware skinning; as 	//mentioned earlier we need the bone offset matrices, and these are
	//stored in pSkinInfo.  Here we get the bone offset matrices and 	//allocate memory for the local bone matrices that influence the 	//mesh.  But of course this is only if skinning info is available.
	if(pSkinInfo != NULL){
		boneMesh->pSkinInfo = pSkinInfo;
		pSkinInfo->AddRef();

		DWORD maxVertInfluences = 0;
		DWORD numBoneComboEntries = 0;
		ID3DXBuffer* boneComboTable = 0;

		//Convert mesh to indexed blended mesh to add additional 			//vertex components; weights and influencing bone indices.
		//Store the new mesh in the bone mesh.
		pSkinInfo->ConvertToIndexedBlendedMesh(pMeshData->pMesh, 
			D3DXMESH_MANAGED | D3DXMESH_WRITEONLY,  
			30, 
			0, //Not used
			0, //Not used
			0, //Not used
			0, //Not used
			&maxVertInfluences,
			&numBoneComboEntries, 
			&boneComboTable,
			&boneMesh->MeshData.pMesh);

		if(boneComboTable != NULL) //Not used
			boneComboTable->Release();

		//As mentioned, the attribute table is used for selecting 				//materials and textures to render on the mesh.  So we aquire 			//it here.
		boneMesh->MeshData.pMesh->GetAttributeTable(NULL, &boneMesh->NumAttributeGroups);
		boneMesh->attributeTable = new D3DXATTRIBUTERANGE[boneMesh->NumAttributeGroups];
		boneMesh->MeshData.pMesh->GetAttributeTable(boneMesh->attributeTable, NULL);

		//Next we load the offset matrices and allocate memory for 			//the local bone matrices.  skin info holds the number of bones 		//that influence this mesh in terms of the bones used to create 		//the skin.
		int NumBones = pSkinInfo->GetNumBones();
		boneMesh->boneOffsetMatrices = new D3DXMATRIX[NumBones];
		boneMesh->localBoneMatrices = new D3DXMATRIX[NumBones];

		for(int i=0;i < NumBones;i++){
			boneMesh->boneOffsetMatrices[i] = *(boneMesh->pSkinInfo->GetBoneOffsetMatrix(i));
		}
	}

	//Return new mesh
	*ppNewMeshContainer = boneMesh;
	return S_OK;
}

Hopefully you understood that code to create a mesh ready for animating.

But before we animate it we have to provide the mesh deallocation implementation. This is simply a case of deallocating the memory we allocated ourselves and releasing the COM objects used:

HRESULT AllocateHierarchyImp::DestroyMeshContainer(LPD3DXMESHCONTAINER pMeshContainerBase)
{
	BoneMesh* boneMesh = (BoneMesh*)pMeshContainerBase;

	//Release textures
	int nElements = boneMesh->Textures.size();
	for(int i=0;i<nElements;i++){
		if(boneMesh->Textures[i] != NULL)
			boneMesh->Textures[i]->Release();
	}

	//Delete local bone matrices and offset if we have skin info
	if(boneMesh->pSkinInfo != NULL){
		delete[] boneMesh->localBoneMatrices;
		delete[] boneMesh->boneOffsetMatrices;
		delete[] boneMesh->attributeTable;
	}

	//Release mesh and skin info
	if(boneMesh->pSkinInfo){boneMesh->pSkinInfo->Release();}
	if(boneMesh->MeshData.pMesh){boneMesh->MeshData.pMesh->Release();}

	return S_OK;
}

Now that the AllocateHierarchy functions are implemented we can go ahead and call D3DXLoadMeshHierarchyFromX passing the AllocateHierarchy object to it. This is done in the SkinnedMesh::Load function. When we call this function we retrieve a pointer to the root bone of the hierarchy that allows us to traverse the whole hierarchy with this one bone to calculate new matrices for animation for example. With just the root node we can add matrix pointers to each of our meshes that correspond to the world transformations of each bone and effectively will point to matrices that make up the animation when we animate the model.

In our SkinnedMesh::Load function is where we call D3DXLoadMeshHierarchyFromX. First we need to create an instance of the AllocateHierarchy; Our SkinnedMesh implementation then becomes:

SkinnedMesh::SkinnedMesh(){
}
SkinnedMesh::~SkinnedMesh(){
}
void SkinnedMesh::Load(WCHAR filename[]){
	AllocateHierarchyImp boneHierarchy;

	D3DXLoadMeshHierarchyFromX(filename, D3DXMESH_MANAGED, 
							   g_pDevice, &boneHierarchy,
							   NULL, &m_pRootNode, NULL);
}
void SkinnedMesh::Render(Bone *bone){
}
void SkinnedMesh::CalculateWorldMatrices(Bone *child, D3DXMATRIX *parentMatrix){
	D3DXMatrixMultiply(&child->WorldMatrix, &child->TransformationMatrix, parentMatrix);

	//Each sibling has same parent as child
	//so pass the parent matrix of this child
	if(child->pFrameSibling){
		CalculateWorldMatrices((Bone*)child->pFrameSibling, parentMatrix);
	}

	//Pass child matrix as parent to children
	if(child->pFrameFirstChild){
		CalculateWorldMatrices((Bone*)child->pFrameFirstChild, &child->WorldMatrix);
	}
}
void SkinnedMesh::AddBoneMatrixPointers(Bone *bone){
}

Now in our game object we can test whether the hierarchy of one of our .x files can be loaded. Place SkinnedMesh model1; in the private members of your Game object. And call model1.Load("Your file.x") in the Init() function of Game. You will need to put an .x file containing a bone hierarchy into the directory that the game runs from. You can test whether a hierarchy was loaded using a break point. Hopefully all is good. You loaded a bone hierarchy.

We still have a few things to setup before model animation can occur. With the HLSL shader that we create, we define an interpolation of vertices from a start pose to a final pose. Each start and end pose of an animation is known as an animation set and these should typically be stored in the .x file. Whenever we pass a vertex to the HLSL effect it will be updated to a new position and then that new position will be passed the HLSL effect file and be updated and this is how we create a skinned animation but we need to setup the matrices that make this animation work. We must pass the bone tranformations to this effect file uneffected by their parents in order to calculate new vertex positions with the vertex shader. For these tranformations we calculate them in our Render function using bone pointer matrices and bone offset matrices. So we need to add bone matrix pointers to each bone mesh of the hierarchy. Then when we render the mesh we can easily access these from the array of matrix pointers to the world matrices of the bones that affect the mesh skin.

These bone matrix pointers are added to each mesh that is affected by bones; we use pointers so that when a bone's transformation changes the pointers will be affected and resultingly the mesh skin too. To add pointers we must traverse the whole hierarchy and check for a bone mesh; if one exists and has skinning information, we add the matrix pointers to affecting bones. The affecting bones are the bones contained in pSkinInfo:

void SkinnedMesh::AddBoneMatrixPointers(Bone *bone){
	if(bone->pMeshContainer != NULL){
		BoneMesh* boneMesh=(BoneMesh*)bone->pMeshContainer;

		if(boneMesh->pSkinInfo != NULL){
			//Get the bones affecting this mesh' skin.
			int nBones=boneMesh->pSkinInfo->GetNumBones();

			//Allocate memory for the pointer array
			boneMesh->boneMatrixPtrs = new D3DXMATRIX*[nBones];

			for(int i=0;i<nBones;i++){
				Bone* bone=(Bone*)D3DXFrameFind(m_pRootNode, boneMesh->pSkinInfo->GetBoneName(i));
				if(bone != NULL){
					boneMesh->boneMatrixPtrs[i]=&bone->WorldMatrix;
				}
				else{
					boneMesh->boneMatrixPtrs[i]=NULL;
				}
			}
		}
	}

	//Traverse Hierarchy
	if(bone->pFrameSibling){AddBoneMatrixPointers((Bone*)bone->pFrameSibling);}
	if(bone->pFrameFirstChild){AddBoneMatrixPointers((Bone*)bone->pFrameFirstChild);}
}

We call this function passing the root node to it to setup all the pointers to influencing mesh bones world matrices. This is done after loading the hierarchy. Also add a call to CalculateWorldMatrices in the Load function to add world matrices to each of the bones. If you don't add these the model will be displayed as a jumble of meshes.

void SkinnedMesh::Load(WCHAR filename[]){
	AllocateHierarchyImp boneHierarchy;

	if(SUCCEEDED(D3DXLoadMeshHierarchyFromX(filename, D3DXMESH_MANAGED, 
							   g_pDevice, &boneHierarchy,
							   NULL, &m_pRootNode, NULL))){
		D3DXMATRIX identity;
		D3DXMatrixIdentity(&identity);
		CalculateWorldMatrices((Bone*)m_pRootNode, &identity);

		AddBoneMatrixPointers((Bone*)m_pRootNode);
	}
}

Now we need to free the memory of the matrix pointers when the skinned mesh is destroyed. This again involves traversing the hierarchy and freeing memory used by pointers. Add the following function to the SkinnedMesh class:

void SkinnedMesh::FreeBoneMatrixPointers(Bone *bone){
	if(bone->pMeshContainer != NULL){
		BoneMesh* boneMesh=(BoneMesh*)bone->pMeshContainer;

		if(boneMesh->boneMatrixPtrs != NULL){
			delete[] boneMesh->boneMatrixPtrs;
		}
	}

	//Traverse Hierarchy
	if(bone->pFrameSibling){FreeBoneMatrixPointers((Bone*)bone->pFrameSibling);}
	if(bone->pFrameFirstChild){FreeBoneMatrixPointers((Bone*)bone->pFrameFirstChild);}
}

And call it on SkinnedMesh destruction.

SkinnedMesh::~SkinnedMesh(){
	FreeBoneMatrixPointers((Bone*)m_pRootNode);
}

Animating a Hierarchy


Finally everything is set up for us to add the skinning effect and animate the model with an animation controller. First we create the effect; we will make this global so we can use it in the Render function of our SkinnedMesh.

ID3DXEffect* g_pEffect=NULL;

This effect will be our interface to the HLSL effect file. We can upload variables to the file through this interface. Create a new effect file called skinning.fx; this is simply an ASCII text file. This will be our shader that performs skinning. We create the effect with D3DXCreateEffectFromFile(). Call this from the Init function of your Game object. Just set flags to D3DXSHADER_DEBUG for now because the shader is not known to work yet.

//Create effect
//Only continue application if effect compiled successfully
if(FAILED(D3DXCreateEffectFromFile(g_pDevice, L"skinning.fx", NULL, NULL, D3DXSHADER_DEBUG, NULL, &g_pEffect, NULL))){
	return E_FAIL;
}

Modify OnDeviceLost and OnDeviceGained to cater for the effect file:

void Game::OnDeviceLost()
{
	try
	{
		//Add OnDeviceLost() calls for DirectX COM objects
		g_pEffect->OnLostDevice();
		m_deviceStatus = DEVICE_NOTRESET;
	}
	catch(...)
	{
		//Error handling code
	}
}

void Game::OnDeviceGained()
{
	try
	{
		g_pDevice->Reset(&m_pp);
		//Add OnResetDevice() calls for DirectX COM objects
		g_pEffect->OnResetDevice();
		m_deviceStatus = DEVICE_LOSTREADY;
	}
	catch(...)
	{
		//Error handling code
	}
}

Now we need to implement the Render function of the SkinnedMesh and the HLSL file. In this file we calculate both skinning and lighting of the model. We first define our vertex structure that corresponds to the vertex structure of the index blended mesh; this will be the input vertex data to the shader:

struct VS_INPUT_SKIN
{
     	float4 position: POSITION0;
   	float3 normal: NORMAL;
     	float2 tex0: TEXCOORD0;
	float4 weights: BLENDWEIGHT0;
     	int4 boneIndices: BLENDINDICES0;
};

Here we get the position of the vertex that we will modify in the shader; and we get the normal, which is the direction vector of the vertex and used in lighting. The weights are the weights of the affecting bones, which can be found by the bone indices. We use the weights and the bone matrices to determine the new position of the vertex for each vertex and normals. Therefore we store the matrices in a matrix array as follows:

extern float4x4 BoneMatrices[40];

To calculate the new vertex positions we apply each bone weight to a multiplication of the original vertex position and the bone transformation matrix and sum up the results. However there is one more thing - the combination of weights must add up to 1, which is equivelent to 100%. See, each weight applies a percentage of effect on a vertex so they must add up to 1. Therefore we calculate the last weight as 1-totalWeights; one minus the sum total so that they definitely add up to one.

Here is the complete shader for performing skin and lighting:

//World and View*Proj Matrices
matrix matWorld;
matrix matVP;
//Light Position
float3 lightPos;
//Texture
texture texDiffuse;

//Skinning variables
extern float4x4 BoneMatrices[40]; 
extern int MaxNumAffectingBones = 2;

//Sampler
sampler DiffuseSampler = sampler_state
{
   Texture = (texDiffuse);
   MinFilter = Linear;   MagFilter = Linear;   MipFilter = Linear;
   AddressU  = Wrap;     AddressV  = Wrap;     AddressW  = Wrap;
   MaxAnisotropy = 16;
};

//Vertex Output / Pixel Shader Input
struct VS_OUTPUT
{
     float4 position : POSITION0;
     float2 tex0     : TEXCOORD0;
     float  shade	 : TEXCOORD1;
};

//Vertex Input
struct VS_INPUT_SKIN
{
     float4 position : POSITION0;
     float3 normal   : NORMAL;
     float2 tex0     : TEXCOORD0;
	 float4 weights  : BLENDWEIGHT0;
     int4   boneIndices : BLENDINDICES0;
};

VS_OUTPUT vs_Skinning(VS_INPUT_SKIN IN)
{
    VS_OUTPUT OUT = (VS_OUTPUT)0;

    float4 v = float4(0.0f, 0.0f, 0.0f, 1.0f);
    float3 norm = float3(0.0f, 0.0f, 0.0f);
    float lastWeight = 0.0f;
    
    IN.normal = normalize(IN.normal);
    
    for(int i = 0; i < MaxNumAffectingBones-1; i++)
    {
	//Multiply position by bone matrix
	v += IN.weights[i] * mul(IN.position, BoneMatrices[IN.boneIndices[i]]);
	norm += IN.weights[i] * mul(IN.normal, BoneMatrices[IN.boneIndices[i]]);
	    
	//Sum up the weights
	lastWeight += IN.weights[i];
    }
    //Make sure weights add up to 1
    lastWeight = 1.0f - lastWeight;
    
    //Apply last bone
    v += lastWeight * mul(IN.position, BoneMatrices[IN.boneIndices[MaxNumAffectingBones-1]]);
    norm += lastWeight * mul(IN.normal, BoneMatrices[IN.boneIndices[MaxNumAffectingBones-1]]);
    
    //Get the world position of the vertex
    v.w = 1.0f;
	float4 posWorld = mul(v, matWorld);
    OUT.position = mul(posWorld, matVP);
    //Output texture coordinate is same as input
    OUT.tex0 = IN.tex0;
    
	//Calculate Lighting
    norm = normalize(norm);
    norm = mul(norm, matWorld);
	OUT.shade = max(dot(norm, normalize(lightPos - posWorld)), 0.2f);
     
    return OUT;
}

//Pixel Shader
float4 ps_Lighting(VS_OUTPUT IN) : COLOR0
{
	float4 color = tex2D(DiffuseSampler, IN.tex0);
	return color * IN.shade;
}

technique Skinning
{
	pass P0
	{
		VertexShader = compile vs_2_0 vs_Skinning();
		PixelShader  = compile ps_2_0 ps_Lighting();
	}
}

The technique tells the system to use vertex and pixel shader version 2 and to pass the output of vs_Skinning to the input of ps_Lighting. The pixel shader ps_Lighting essentially "Lights" the pixels of the texture.

Now that we have the vertex shader, we can use it. And render the model. In this Render function we get a handle to the technique with g_pEffect->GetTechniqueByName("Skinning") and pass the mesh to it; and glory be the shader will perform its work. The Render function will be called on the root bone and traverse the bone hierarchy and render each of the mesh containers associated with the bones of the hierarchy.

Here is the Render function:

void SkinnedMesh::Render(Bone *bone){
	//Call the function with NULL parameter to use root node
	if(bone==NULL){
		bone=(Bone*)m_pRootNode;
	}

	//Check if a bone has a mesh associated with it
	if(bone->pMeshContainer != NULL)
	{
		BoneMesh *boneMesh = (BoneMesh*)bone->pMeshContainer;

		//Is there skin info?
		if (boneMesh->pSkinInfo != NULL)
		{		
			//Get the number of bones influencing the skin
			//from pSkinInfo.
			int numInflBones = boneMesh->pSkinInfo->GetNumBones();
			for(int i=0;i < numInflBones;i++)
			{
				//Get the local bone matrices, uneffected by parents
				D3DXMatrixMultiply(&boneMesh->localBoneMatrices[i],
								   &boneMesh->boneOffsetMatrices[i], 
								   boneMesh->boneMatrixPtrs[i]);
			}

			//Upload bone matrices to shader.
			g_pEffect->SetMatrixArray("BoneMatrices", boneMesh->localBoneMatrices, boneMesh->pSkinInfo->GetNumBones());

			//Set world transform to identity; no transform.
			D3DXMATRIX identity;				
			D3DXMatrixIdentity(&identity);

			//Render the mesh
			for(int i=0;i < (int)boneMesh->NumAttributeGroups;i++)
			{
				//Use the attribute table to select material and texture attributes
				int mtrlIndex = boneMesh->attributeTable[i].AttribId;
				g_pDevice->SetMaterial(&(boneMesh->Materials[mtrlIndex]));
				g_pDevice->SetTexture(0, boneMesh->Textures[mtrlIndex]);
				g_pEffect->SetMatrix("matWorld", &identity);
				//Upload the texture to the shader
				g_pEffect->SetTexture("texDiffuse", boneMesh->Textures[mtrlIndex]);
				D3DXHANDLE hTech = g_pEffect->GetTechniqueByName("Skinning");
				g_pEffect->SetTechnique(hTech);
				g_pEffect->Begin(NULL, NULL);
				g_pEffect->BeginPass(0);

				//Pass the index blended mesh to the technique
				boneMesh->MeshData.pMesh->DrawSubset(mtrlIndex);

				g_pEffect->EndPass();
				g_pEffect->End();
			}
		}
	}

	//Traverse the hierarchy; Rendering each mesh as we go
	if(bone->pFrameSibling!=NULL){Render((Bone*)bone->pFrameSibling);}
	if(bone->pFrameFirstChild!=NULL){Render((Bone*)bone->pFrameFirstChild);}
}

Now that we have the shader in place and the render function we can aquire an animation controller and control the animations of the model.

We get an animation controller from the D3DXLoadHierarchyFromX function. We will add this controller to the SkinnedMesh class in the private members:

ID3DXAnimationController* m_pAnimControl;

Then in our SkinnedMesh Load function add this as a parameter to D3DXLoadMeshHierarchyFromX:

D3DXLoadMeshHierarchyFromX(filename, D3DXMESH_MANAGED, 
							 g_pDevice, &boneHierarchy,
							 NULL, &m_pRootNode, 								 	&m_pAnimControl)

The way animation works is there are a number of animation sets stored in the model or .x file that correspond to different animation cycles such as a walk animation or jump. Depending on the character, each animation has a name and we can set the current animation using its name. If we have different characters we will want to access or set different animations per character using name strings, e.g. SetAnimation("Walk"), SetAnimation("Sit") like that. For this we can use a map of strings to animation IDs. With this map we can get the ID of each animation set by using the name along with the map. A map has an array of keys and values associated with those keys. The key here is the name of the animation and the value is its animation set ID.

Lastly once we have the animation sets we can play an animation by calling m_pAnimControl->AdvanceTime(time, NULL);

First let's get the animation sets and store their names and IDs in a map. For this we will create a function in our SkinnedMesh class void GetAnimationSets(). Create a map by including <map> and make sure using namespace std; is at the top of the SkinnedMesh cpp file. Create the map called map<string, dword="DWORD">animationSets; For this you will also need to include <string>. using namespace std means we can use map and string without std::map or std::string for example if you didn't know already. We will also add another two functions void SetAnimation(string name) and void PlayAnimation(float time).

The skinned mesh now looks like:
class SkinnedMesh{
public:
	SkinnedMesh();
	~SkinnedMesh();
	void Load(WCHAR filename[]);
	void Render(Bone* bone);

private:
	void CalculateWorldMatrices(Bone* child, D3DXMATRIX* parentMatrix);
	void AddBoneMatrixPointers(Bone* bone);
	void FreeBoneMatrixPointers(Bone* bone);
	//Animation functions
	void GetAnimationSets();

	D3DXFRAME* m_pRootNode;
	ID3DXAnimationController* m_pAnimControl;
	map<string, int>animationSets;
public:
	void SetAnimation(string name);
	void PlayAnimation(D3DXMATRIX world, float time);
};

We get and save the animation sets to our map with the following function:

void SkinnedMesh::GetAnimationSets(){
	ID3DXAnimationSet* pAnim=NULL;

	for(int i=0;i<(int)m_pAnimControl->GetMaxNumAnimationSets();i++)
	{
		pAnim=NULL;
		m_pAnimControl->GetAnimationSet(i, &pAnim);

		//If we found an animation set, add it to the map
		if(pAnim != NULL)
		{
			string name = pAnim->GetName();
			animationSets[name]=i;//Creates an entry
			pAnim->Release();
		}
	}
}

We set the active animation set with SetAnimation:

void SkinnedMesh::SetAnimation(string name){
	ID3DXAnimationSet* pAnim = NULL;
	//Get the animation set from the name.
	m_pAnimControl->GetAnimationSet(animationSets[name], &pAnim);

	if(pAnim != NULL)
	{
		//Set the current animation set
		m_pAnimControl->SetTrackAnimationSet(0, pAnim);
		pAnim->Release();
	}
}

When we update the game we call the following function to play the active animation:

void SkinnedMesh::PlayAnimation(D3DXMATRIX world, float time){
	//The world matrix here allows us to position the model in the scene.
	m_pAnimControl->AdvanceTime(time, NULL);//Second parameter not used.
	//Update the matrices that represent the pose of animation.
	CalculateWorldMatrices((Bone*)m_pRootNode, &world);
}

Usage:

In the SkinnedMesh::Load function add the following line on hierarchy load success:

//Save names of sets to map
GetAnimationSets();

In the Game::Init function, set the active animation set - for example if we have a walk cycle animation:

string set="Walk";
model1.SetAnimation(set);

And then play the animation in Game::Update():

D3DXMATRIX identity;
D3DXMatrixIdentity(&identity);
model1.PlayAnimation(identity, deltaTime*0.5f);

There is one more thing we often want to do. That is render static non-moving meshes that are part of the hierarchy. We might for example have a mesh that doesn't have skin info; so we need to save this; Notice that we create an indexed blended mesh only if there is skin info. Well now we need to save the mesh if there is no skin info:

In our CreateMeshContainer function:

if(pSkinInfo != NULL){
	//...
}
else{
	//We have a static mesh
	boneMesh->MeshData.pMesh = pMeshData->pMesh;
	boneMesh->MeshData.Type = pMeshData->Type;
}

Now we have the static meshes saved in BoneMesh structures we can render them. But we need first to light the mesh with a lighting shader; Add this to the shader file:

//Vertex Input
struct VS_INPUT
{
     float4 position : POSITION0;
     float3 normal   : NORMAL;
     float2 tex0     : TEXCOORD0;
};

VS_OUTPUT vs_Lighting(VS_INPUT IN)
{
    VS_OUTPUT OUT = (VS_OUTPUT)0;

	float4 posWorld = mul(IN.position, matWorld);
    float4 normal = normalize(mul(IN.normal, matWorld));
    
    OUT.position = mul(posWorld, matVP);
    
	//Calculate Lighting
	OUT.shade = max(dot(normal, normalize(lightPos - posWorld)), 0.2f);
	
	 //Output texture coordinate is same as input
    OUT.tex0=IN.tex0;
     
    return OUT;
}

technique Lighting
{
    pass P0
    {	
        VertexShader = compile vs_2_0 vs_Lighting();
        PixelShader  = compile ps_2_0 ps_Lighting();        
    }
}

Now we can render the static meshes of our model; We have a static mesh if there is no pSkinInfo. Here we set the lighting technique to active and render the mesh with texturing:

if (boneMesh->pSkinInfo != NULL)
{
	//...
}
else{
	//We have a static mesh; not animated.
	g_pEffect->SetMatrix("matWorld", &bone->WorldMatrix);

	D3DXHANDLE hTech = g_pEffect->GetTechniqueByName("Lighting");
	g_pEffect->SetTechnique(hTech);

	//Render the subsets of this mesh with Lighting
	for(int mtrlIndex=0;mtrlIndex<(int)boneMesh->Materials.size();mtrlIndex++){
		g_pEffect->SetTexture("texDiffuse", boneMesh->Textures[mtrlIndex]);
		g_pEffect->Begin(NULL, NULL);
		g_pEffect->BeginPass(0);

		//Pass the index blended mesh to the technique
		boneMesh->MeshData.pMesh->DrawSubset(mtrlIndex);

		g_pEffect->EndPass();
		g_pEffect->End();
	}
}

That's us done! We have an animated model that we can work with. We can set the active animation and render it with skinning!

Saving an .x File


In this part we will export an animation hierarchy from 3d studio max.

Note:  The vertex shader only supports a fixed number of bones for a character so you will need to create a model with about max 40 bones.


  1. Place the exporter plugin in the plugins directory of max. Fire up 3d Studio Max. New Empty Scene.
  2. Go to Helpers in the right-hand menu.
  3. Select CATParent.
  4. Click and drag in the perspective viewport to create the CATParent triangle object.
  5. Double click Base Human in the CATRig Load Save list.
  6. Model a rough human shaped character around the bones. E.g. create new box edit mesh.
  7. Click on the CATRig triangle. Go to motion in the menu tabs.
  8. Click and hold Abs and select the little man at the bottom.
  9. Press the stop sign to activate the walk cycle.
  10. Go to modifiers and select skin modifier. On the properties sheet you will see Bones:; click Add. Select all the bones. And click Select. Now if you play the animation the skin should follow the bones.
  11. Lastly, you need to add a material to the mesh, click the material editor icon and drag a material to the mesh.
  12. Now export the scene or selected model using the exporter plugin. You will need to export vertex normals animation and select Y up as the worlds up direction to suit the game. Select Animation in the export dialog. And select skinning! can't forget that. Set a frame range e.g. 0 to 50 and call the set "walk". Click Add Animation Set. And Save the model.
  13. Now you can check that the model exported successfully using DXViewer utility that comes with the DirectX SDK.
  14. Now you can try loading the model into the program.

You may have to adjust the camera. E.g.

D3DXMatrixLookAtLH(&view, &D3DXVECTOR3(0,0.0f,-20.0f), &D3DXVECTOR3(0.0f, 10.0f, 0.0f), &D3DXVECTOR3(0.0f, 1.0f, 0.0f));

Article Update Log


12 April 2014: Initial release
17 April 2014: Updated included download
22 April 2014: Updated
24 April 2014: Updated

Matrix Inversion using LU Decomposition

$
0
0

Introduction


The forums are replete with people trying to learn how to efficiently find inverses of matrices or solve the classic \(Ax=b\) problem. Here's a decent method that is fairly easy to learn and implement. Hopefully it might also serve as a stepping stone to learning some of the more advanced matrix factorization methods, like Cholesky, QR, or SVD.

Overview


In 1948, Alan Turing came up with LU decomposition, a way to factor a matrix and solve \(Ax=b\) with numerical stability. Although there are many different schemes to factor matrices, LU decomposition is one of the more commonly-used algorithms. Interestingly enough, Gauss elimination can be implemented as LU decomposition. The computational effort expended is about the same as well.

So why would anyone want to use this method? First of all, the time-consuming elimination step can be formulated so that only the entries of \(A\) are required. As well, if there are several matrices of \(b\) that need to be computed for \(Ax=b\), then we only need to do the decomposition once. This last benefit helps us compute the inverse of \(A\) very quickly.

How It Works


Let's start with an \(Ax=b\) problem, where you have an \(n\)x\(n\) matrix \(A\) and \(n\)x\(1\) column vector \(b\) and you're trying to solve for a \(n\)x\(1\) column vector \(x\). The idea is that we break up \(A\) into two matrices: \(L\), which is a lower triangular matrix, and \(U\), which is an upper triangular matrix. It would look something like this:
\[
\left [
\begin{matrix}
a_{11} & a_{12} & a_{13} \\
a_{21} & a_{22} & a_{23} \\
a_{31} & a_{32} & a_{33} \\
\end{matrix} \right ] = \left [
\begin{matrix}
l_{11} & 0 & 0 \\
l_{21} & l_{22} & 0 \\
l_{31} & l_{32} & l_{33} \\
\end{matrix} \right ] \left [
\begin{matrix}
u_{11} & u_{12} & u_{13} \\
0 & u_{22} & u_{23} \\
0 & 0 & u_{33} \\
\end{matrix} \right ]
\]
This seems like a lot more work, but allows us to use some cool math tricks. Our original equation, substituted with our decomposition is now \((LU)x=b\):
\[
\left (
\left [ \begin{matrix}
l_{11} & 0 & 0 \\
l_{21} & l_{22} & 0 \\
l_{31} & l_{32} & l_{33} \\
\end{matrix} \right ]
\left [ \begin{matrix}
u_{11} & u_{12} & u_{13} \\
0 & u_{22} & u_{23} \\
0 & 0 & u_{33} \\
\end{matrix} \right ]
\right )
\left [ \begin{matrix}
x_1 \\
x_2 \\
x_3 \\
\end{matrix} \right ] =
\left [ \begin{matrix}
b_1 \\
b_2 \\
b_3 \\
\end{matrix} \right ]
\]
If we shift the parentheses, we get the following:
\[
\left [ \begin{matrix}
l_{11} & 0 & 0 \\
l_{21} & l_{22} & 0 \\
l_{31} & l_{32} & l_{33} \\
\end{matrix} \right ]
\left (
\left [ \begin{matrix}
u_{11} & u_{12} & u_{13} \\
0 & u_{22} & u_{23} \\
0 & 0 & u_{33} \\
\end{matrix} \right ]
\left [ \begin{matrix}
x_1 \\
x_2 \\
x_3 \\
\end{matrix} \right ]
\right )
=
\left [ \begin{matrix}
b_1 \\
b_2 \\
b_3 \\
\end{matrix} \right ]
\]
Looking just inside the parentheses, we can see another \(Ax=b\) type problem. If we say that \(Ux=d\), where \(d\) is a different column vector from \(b\), we have 2 separate \(Ax=b\) type problems:
\[
\left [ \begin{matrix}
l_{11} & 0 & 0 \\
l_{21} & l_{22} & 0 \\
l_{31} & l_{32} & l_{33} \\
\end{matrix} \right ]
\left [ \begin{matrix}
d_1 \\
d_2 \\
d_3 \\
\end{matrix} \right ]
=
\left [ \begin{matrix}
b_1 \\
b_2 \\
b_3 \\
\end{matrix} \right ]
\\
\left [ \begin{matrix}
u_{11} & u_{12} & u_{13} \\
0 & u_{22} & u_{23} \\
0 & 0 & u_{33} \\
\end{matrix} \right ]
\left [ \begin{matrix}
x_1 \\
x_2 \\
x_3 \\
\end{matrix} \right ]
=
\left [ \begin{matrix}
d_1 \\
d_2 \\
d_3 \\
\end{matrix} \right ]
\]
It looks like we just created more work for ourselves, but we actually made it easier. If we look at the problems, the matrices on the left are in a form like row echelon form. Using forward and back substitutions, we can solve easily for all the elements of the \(x\) and \(d\) matrices. We first solve \(Ld=b\) for \(d\), then we substitute into \(Ux=d\) to solve for \(x\). The real trick to this method is the decomposition of \(A\).

The Catch


There are a couple catches to this method:
  • The matrix \(A\) must be square to use LU factorization. Other factorization schemes will be necessary if \(A\) is rectangular.
  • We have to be sure that \(A\) is a nonsingular (i.e. invertible) matrix. If it can't be inverted, then the decomposition will produce an \(L\) or \(U\) that is singular and the method will fail because there is no unique solution.
  • To avoid division by zero or by really small numbers, we have to implement a pivoting scheme just like with Gaussian elimination. This makes the problem take the form \(PA=LU\), where P is a permutation matrix that allows us to swap the rows of A. P is usually the identity matrix with rows swapped such that \(PA\) produces the \(A\) matrix with the same rows swapped as P. Then the \(Ax=b\) problem takes the form \(LUx=Pb\) since \(PA=LU\).
  • Some of the entries in the \(L\) and \(U\) matrices must be known before the decomposition, or else the system has too many unknowns and not enough equations to solve for all the entries of both matrices. For what's formally known as Doolittle decomposition, the diagonal entries of the \(L\) matrix are all 1. If we use Crout decomposition, the diagonals of the \(U\) matrix are all 1.
The method presented here won't have the pivoting part implemented, but it shouldn't be a problem to implement later.

The Algorithm


For a square matrix \(A\) with entries \(a_{ij},\,i=1,\cdots,n,\,j=1,\cdots,n\), the Crout decomposition is as follows:

First:
\[
l_{i1} = a_{i1},\,\textrm{for}\,i=1,2,\cdots,n\\
u_{1j} = \frac{a_{1j}}{l_{11}},\,\textrm{for}\,j=2,3,\cdots,n
\]
For \(j=2,3,\cdots,n-1\):
\[
l_{ij} = a_{ij}-\sum_{k=1}^{j-1}l_{ik}u_{kj},\,\textrm{for}\,i=j,j+1,\cdots,n \\
u_{jk} = \frac{a_{jk}-\sum_{i=1}^{j-1}l_{ji}u_{ik}}{l_{jj}},\,\textrm{for}\,k=j+1,j+2,\cdots,n
\]
Finally:
\[
l_{nn}=a_{nn}-\sum_{k=1}^{n-1}l_{nk}u_{kn}
\]
That's it! If you notice, \(A\) is being traversed in a specific way to build \(L\) and \(U\). To start building \(L\), we start with \(a_{11}\) and then traverse down the rows in the same column until we hit \(a_{n1}\). To start building \(U\), we start at \(a_{12}\) and traverse along the same row until we hit \(a_{1n}\). We then build \(L\) further by starting at \(a_{22}\) and traverse along the column until we hit \(a_{n2}\), then we build \(U\) further by starting at \(a_{23}\) and traverse along the row until \(a_{2n}\), and so on.

Since the 1's on the diagonal of \(U\) are given as well as the 0's in both the \(L\) and \(U\) matrices, there's no need to store anything else. In fact, there's a storage-saving scheme where all the calculated entries of both matrices can be stored in a single matrix as large as \(A\).

From here, \(d\) can be solved very easily with forward-substitution:
\[
d_1 = \frac{b_1}{l_{11}} \\
d_i = \frac{b_i - \sum_{j=1}^{i-1}l_{ij}d_j}{l_{ii}},\,\textrm{for}\,i=2,3,\cdots,n
\]
As well, \(x\) can be solved very easily with back-substitution:
\[
x_n = d_n \\
x_i = d_i - \sum_{j=i+1}^n u_{ij}x_j,\,\textrm{for}\,i=n-1,n-2,\cdots,1
\]

A Numerical Example


Let's try to solve the following problem using LU decomposition:
\[
\left [ \begin{matrix}
3 & -0.1 & -0.2 \\
0.1 & 7 & -0.3 \\
0.3 & -0.2 & 10 \\
\end{matrix} \right ]
\left [ \begin{matrix}
x_1 \\ x_2 \\ x_3 \\
\end{matrix} \right ]
=
\left [ \begin{matrix}
7.85 \\ -19.3 \\ 71.4 \\
\end{matrix} \right ]
\]
First, we copy the first column to the \(L\) matrix and the scaled first row except the first element to the \(U\) matrix:
\[
L =
\left [ \begin{matrix}
3 & 0 & 0 \\
0.1 & - & 0 \\
0.3 & - & - \\
\end{matrix} \right ],\,\,\,
U =
\left [ \begin{matrix}
1 & -0.0333 & -0.0667 \\
0 & 1 & - \\
0 & 0 & 1 \\
\end{matrix} \right ]
\]
Then we compute the following entries:
\[
l_{22} = a_{22} - l_{21}u_{12} = 7-(0.1)(-0.0333) = 7.00333 \\
l_{32} = a_{32} - l_{31}u_{12} = -0.2-(0.3)(-0.0333) = -0.19 \\
u_{23} = \frac{a_{23}-l_{21}u_{13}}{l_{22}} = \frac{-0.3-(0.1)(-0.0667)}{7} = -0.0419 \\
l_{33} = a_{33}-l_{31}u_{13}-l_{32}u_{23} = 10-(0.3)(-0.0667)-(-0.19)(-0.0419) = 10.012 \\
\]
Inserting them into our matrices:
\[
L =
\left [ \begin{matrix}
3 & 0 & 0 \\
0.1 & 7.00333 & 0 \\
0.3 & -0.19 & 10.012 \\
\end{matrix} \right ],\,\,\,
U =
\left [ \begin{matrix}
1 & -0.0333 & -0.0667 \\
0 & 1 & -0.0419 \\
0 & 0 & 1 \\
\end{matrix} \right ]
\]
This is the LU factorization of the matrix. You can check if \(LU=A\). Now, we use back- and forward-substitution to solve the problem:
\[
d_1 = \frac{b_1}{l_{11}} = 7.85/3 = 2.6167 \\
d_2 = \frac{b_2-l_{21}d_1}{l_{22}} = (-19.3-(0.1)(2.6167))/7.00333 = -2.7932 \\
d_3 = \frac{b_3-l_{31}d_1-l_{32}d_2}{l_{33}} = (71.4-(0.3)(2.6167)-(-0.19)(-2.7932))/10.012 = 7 \\
\]
\[
x_3 = d_3 = 7 \\
x_2 = d_2 - u_{23}x_3 = -2.7932-(-0.0419)(7) = -2.5 \\
x_1 = d_1 - u_{12}x_2 - u_{13}x_3 = 2.6167-(-0.0333)(-2.5)-(-0.0667)(7) = 3 \\
\]
So the solution to the problem is:
\[
\left [ \begin{matrix}
x_1 \\ x_2 \\ x_3 \\
\end{matrix} \right ]
=
\left [ \begin{matrix}
3 \\ -2.5 \\ 7 \\
\end{matrix} \right ]
\]
This solution can easily be verified by plugging it back into \(Ax=b\).

MATLAB Code


Here's some quick MATLAB code for LU decomposition:

function [L,U] = lucrout(A)
	[~,n] = size(A);
	L = zeros(n,n);
	U = eye(n,n);
	L(1,1) = A(1,1);
	for j=2:n
		L(j,1) = A(j,1);
		U(1,j) = A(1,j) / L(1,1);
	end
	for j=2:n-1
		for i=j:n
			L(i,j) = A(i,j);
			for k=1:j-1
				L(i,j) = L(i,j) - L(i,k)*U(k,j);
			end
		end
		for k=j+1:n
			U(j,k) = A(j,k);
			for i=1:j-1
				U(j,k) = U(j,k) - L(j,i)*U(i,k);
			end
			U(j,k) = U(j,k) / L(j,j);
		end
	end
	L(n,n) = A(n,n);
	for k=1:n-1
		L(n,n) = L(n,n) - L(n,k)*U(k,n);
	end
end

Matrix Inverse with LU Decomposition


LU decomposition is nice for solving a series of \(Ax=b\) problems with the same \(A\) matrix and different \(b\) matrices. This is advantageous for computing the inverse of \(A\) because only one decomposition is required. The definition of the inverse of a matrix \(A^{-1}\) is a matrix such that \(AA^{-1}=I\), where \(I\) is the identity matrix. This looks like this for a general 3x3 matrix:
\[
\left [ \begin{matrix}
A_{11} & A_{12} & A_{13} \\
A_{21} & A_{22} & A_{23} \\
A_{31} & A_{32} & A_{33} \\
\end{matrix} \right ]
\left [ \begin{matrix}
a_{11}^\prime & a_{12}^\prime & a_{13}^\prime \\
a_{21}^\prime & a_{22}^\prime & a_{23}^\prime \\
a_{31}^\prime & a_{32}^\prime & a_{33}^\prime \\
\end{matrix} \right ]
=
\left [ \begin{matrix}
1 & 0 & 0 \\
0 & 1 & 0 \\
0 & 0 & 1 \\
\end{matrix} \right ]
\]
This can be set up like \(n\) \(Ax=b\) problems with different \(b\) matrices and the \(x\) matrix becomes the nth column in the inverse matrix. For example, the first problem is:
\[
\left [ \begin{matrix}
A_{11} & A_{12} & A_{13} \\
A_{21} & A_{22} & A_{23} \\
A_{31} & A_{32} & A_{33} \\
\end{matrix} \right ]
\left [ \begin{matrix}
a_{11}^\prime \\
a_{21}^\prime \\
a_{31}^\prime \\
\end{matrix} \right ]
=
\left [ \begin{matrix}
1 \\
0 \\
0 \\
\end{matrix} \right ]
\]
The second column of the inverse can be computed by changing \(b\) to \([0,1,0]^T\), the third column with \([0,0,1]^T\), and so on. This method is quick because only back- and forward-substitution is required to solve for the column vectors after the initial LU decomposition.

Beyond LU Decomposition


There are a lot of other matrix factorization schemes besides LU, like Cholesky or QR factorization, but the general idea of decomposing a matrix into other matrices is roughly the same. The real key to computational savings comes from knowing beforehand what kind of matrix you're factoring and choosing the appropriate algorithm. For example, in structural finite element analysis, the matrix being decomposed is always symmetric positive definite. Cholesky decomposition is way more efficient and quicker than LU for those kinds of matrices, so it's preferred.

Conclusion


LU decomposition is a great tool for anyone working with matrices. Hopefully you can make use of this simple, yet powerful method.

Article Update Log


16 Apr 2014: Initial release

Setting an Appropriate Tone for Your Game

$
0
0
Today, we have a very interesting topic regarding embodied cognition which will be extremely useful in setting an appropriate atmosphere and character perception in your game. The term embodied cognition is a philosophical term which has also been studied in psychology and it basically means that our rational thoughts are interconnected with our sensory experiences. Let's start of by having a look at these two experiments in psychology and hopefully you'll start seeing what I mean and how this applies to games:

Experiment One: Holding a cup of coffee


coffee.png

This study was conducted in order to determine whether temperature affects our judgement of things. What the researchers did was they had the participants hold either a cup of warm coffee, a cup of room temperature or a cup of iced coffee. Later on, the participants had to make a judgement on a particular person based on a set of information given to them. Overall, those people holding a warm cup of coffee rated that person higher in terms of traits that are related to warmth, for example, kindness. Meanwhile, those holding the ice cup rated these traits lower than the those with the standard room temperature cups. This suggests that temperature plays an important role in influencing our emotions and rational judgements of things.

So it's extremely important to consider things such as weather and season in your game. Whatever season you set your game in: Summer, Winter, Spring or Autumn will reflect the predominant atmosphere of your game - Spring and Summer (sunny, clear sky, blooming plants) will reflect a more positive atmosphere whilst Winter and Autumn (rain, clouds, snow, dead trees) reflect a more depressing atmosphere. Along with the overall weather, small things such as having the stove turned on in the background will affect our overall response. This stuff ties in neatly with a concept called the Halo Effect. The Halo Effect states that when we have just one characteristic of somebody (e.g. warmth), we tend to favor all of that person's other attributes including things such as attractiveness and over-estimating their height.

Experiment Two: Physical Stability


stability.png


This was more of the same as experiment one, the only difference was instead of testing temperature the researchers decided to test physical properties. Participants sat on either stable or unstable furniture and then they had to rate a set of social relationships, given a certain description about that relationship. Those who sat on stable furniture rated these social relationships as more stable overall compared to those who sat on unstable furniture. Not only did they rate these relationships higher in terms of stability, but they also had a higher preference towards stability than those who sat on unstable furniture.

Furthermore, several other experiments were conducted to indicate things such as color, physical distance between people, making a frown face vs. a smiley face and flexing your arm vs. extending your arm can affect our cognitive judgements. Whilst we can't control things such as making the audience flex their arms or putting on their smiley face, most things else you can control, including stability. You might not be able to control the stability of the chair that your audience is sitting on, but as long as the characters in the game are on something stable or unstable, the audience will put themselves in the character's shoes and experience that feeling.

Tiny things like these matter a LOT. It doesn't just affect our perceptions of others, but it also affects ourselves and our decision making. When we feel warmer, we are more likely to do generous things and feel more trustworthy towards others. It's a beautiful phenomenon that translates extremely well into games and storytelling. Have fun!

This was reposted from my website: http://gamingpoint.org/2014/04/embodied-cognition-atmosphere-setting/

Let There Be Shadow!

$
0
0
Shadows in Unity is something that in most cases is a given through the use of surface shaders, but sometimes you don't want to use a surface shader for whatever reason and create your own vertex/fragment shader. The biggest advantage is that everything is in your hands now, but this is also one of the drawbacks because you now have to handle a lot of stuff that Unity conveniently handled for you in a surface shader. Among such things are support for multiple lights and shadows.

Luckily, Unity provides you the means to get this working! The catch? Documentation on this is lacking or even non-existent. I was in the same position as most people and somewhat clueless on how to get shadows in my vertex/fragment shader, I did my fair share of googling and found some clues that didn't quite do the trick, but gave me a good impression on where to search. I also went through a compiled surface shader to see if I could figure out how they did it. All of the research combined and some trying out finally gave me the results I needed: Shadows! And now I will share it with whoever is interested.

Before I begin, I want to make note that, as mentioned earlier, Unity solves a lot of cases for you when you are using surface shaders; among such things are the inner workings when you are using deferred or forward rendering. With your own vertex/fragment shaders, you will need to take that into account yourself for some cases. Truth is, I only needed to get this to work with forward rendering and only briefly tested how this works with deferred rendering and although I did not notice anything off, I can't guarantee it will work in all cases, so keep that in mind!

I will start off with showing you the shader that casts (and receives) a nice shadow and break it down, going over the different elements of interest. It's a simple diffuse shader that looks like this:

Shader "Sample/Diffuse" 
{
	Properties 
	{
		_DiffuseTexture ("Diffuse Texture", 2D) = "white" {}
		_DiffuseTint ( "Diffuse Tint", Color) = (1, 1, 1, 1)
	}

	SubShader 
	{
		Tags { "RenderType"="Opaque" }

		pass
		{		
			Tags { "LightMode"="ForwardBase"}

			CGPROGRAM

			#pragma target 3.0
			#pragma fragmentoption ARB_precision_hint_fastest

			#pragma vertex vertShadow
			#pragma fragment fragShadow
			#pragma multi_compile_fwdbase

			#include "UnityCG.cginc"
			#include "AutoLight.cginc"

			sampler2D _DiffuseTexture;
			float4 _DiffuseTint;
			float4 _LightColor0;

			struct v2f
			{
				float4 pos : SV_POSITION;
				float3 lightDir : TEXCOORD0;
				float3 normal : TEXCOORD1;
				float2 uv : TEXCOORD2;
				LIGHTING_COORDS(3, 4)
			};

			v2f vertShadow(appdata_base v)
			{
				v2f o;

				o.pos = mul(UNITY_MATRIX_MVP, v.vertex);
				o.uv = v.texcoord;
				o.lightDir = normalize(ObjSpaceLightDir(v.vertex));
				o.normal = normalize(v.normal).xyz;

				TRANSFER_VERTEX_TO_FRAGMENT(o);

				return o; 
			}

			float4 fragShadow(v2f i) : COLOR
			{					
				float3 L = normalize(i.lightDir);
				float3 N = normalize(i.normal);	 

				float attenuation = LIGHT_ATTENUATION(i) * 2;
				float4 ambient = UNITY_LIGHTMODEL_AMBIENT * 2;

				float NdotL = saturate(dot(N, L));
				float4 diffuseTerm = NdotL * _LightColor0 * _DiffuseTint * attenuation;

				float4 diffuse = tex2D(_DiffuseTexture, i.uv);

				float4 finalColor = (ambient + diffuseTerm) * diffuse;

				return finalColor;
			}

			ENDCG
		}		

	} 
	FallBack "Diffuse"
}

If you have ever worked with vertex/fragment shaders you will notice that there isn't much to be noted except for a few macros, but let's address the first things you will need to do to get those shadows.

The first thing you will need to define is the LightMode pass Tag:

Tags { "LightMode"="ForwardBase"}

This will tell unity that this pass will make use of the main light that will cast our shadow (there's more to this tag, check the link for more info). Unity handles each light in their own pass, so if we want to work with multiple lights, this value in another pass would change to ForwardAdd.

Next to the tag, we also need to define the following:

#pragma multi_compile_fwdbase

This is to ensure the shader compiles properly for the needed passes. As with the tag, for any additional lights in their own pass, fwdbase becomes fwdadd.

To make use of all the needed code/macros to sample shadows in our shader, we will need to include the AutoLight.cginc that holds all the goodness:

#include "AutoLight.cginc"

Now that Unity knows all it needs on how to handle the lights, we just have to get the relevant data to get our shadow to appear and for that we only have to do 3 things:

  1. Make Unity generate/include the needed parameters to sample the shadow.
  2. Fill these parameters with values that makes sense.
  3. Get the final values.

To make Unity "generate" the values we need, all we have to do is add the LIGHTING_COORDS macro to our vertex to our fragment struct like so:

struct v2f
{
	float4 pos : SV_POSITION;
	float3 lightDir : TEXCOORD0;
	float3 normal : TEXCOORD1;
	float2 uv : TEXCOORD2;
	LIGHTING_COORDS(3, 4)
};

The LIGHTING_COORDS macro defines the parameters needed to sample the shadow map and the light map depending on the light source. The numbers specified are the next 2 available TEXCOORD semantics. So if I would need a viewing direction for a specular highlight, the struct would look like this:

struct v2f
{
	float4 pos : SV_POSITION;
	float3 lightDir : TEXCOORD0;
	float3 normal : TEXCOORD1;
	float2 uv : TEXCOORD2;
	float3 viewDir : TEXCOORD3;
	LIGHTING_COORDS(4, 5)
};

This is much like defining them yourself, except that now it's guaranteed for Unity that they're using the right values for the right light sources with perhaps also a cookie texture attached to them. If you're curious as to what gets defined exactly, check out the AutoLight.cginc file.

Next up is the vertex shader. Having the values is one thing, but we need them to hold the right data and Unity provides another macro that fills it up with the right data for the right situation, this is done with the TRANSFER_VERTEX_TO_FRAGMENT macro. This macro must be defined before returning the v2f struct, so your vertex shader would look something like this:

v2f vertShadow(appdata_base v)
{
	v2f o;

	o.pos = mul(UNITY_MATRIX_MVP, v.vertex);
	o.uv = v.texcoord;
	o.lightDir = normalize(ObjSpaceLightDir(v.vertex));
	o.normal = normalize(v.normal).xyz;

	TRANSFER_VERTEX_TO_FRAGMENT(o);

	return o; 
}

Not much is to be said about this, other than that it takes care of calculating the light and shadow coordinates for you for the different lights.

At this moment, all we have left is to create our fragment program that is able to use the LIGHT_ATTENUATION macro that returns the correct values we need for our shadow. You can use the attenuation value like you would normally, for diffuse shading I use it in the diffuse term like this in the fragment shader:

float4 fragShadow(v2f i) : COLOR
{					
	float3 L = normalize(i.lightDir);
	float3 N = normalize(i.normal);	 

	float attenuation = LIGHT_ATTENUATION(i) * 2;
	float4 ambient = UNITY_LIGHTMODEL_AMBIENT * 2;

	float NdotL = saturate(dot(N, L));
	float4 diffuseTerm = NdotL * _LightColor0 * _DiffuseTint * attenuation;

	float4 diffuse = tex2D(_DiffuseTexture, i.uv);

	float4 finalColor = (ambient + diffuseTerm) * diffuse;

	return finalColor;
}

And there you have it, everything you need to get that lovely shadow in your vertex/fragment shaders. The LIGHT_ATTENUATION samples the shadowmap and returns the value for you to use. Once again, if you want to know what LIGHT_ATTENUATION exactly does, check out the AutoLight.cginc.

There is still one little thing to be noted however. For Unity to have something cast and/or receive a shadow, you must provide a shadow receiver and caster pass which I didn't provide here. Instead of making them yourself, I simply added a fallback shader that has these passes so I don't have to add them myself and make the shader bigger than it already is. You can of course add this to a .cginc or put them all the way down and never look back at it, but just adding a fallback works just as well for our shadow purpose.

I hope this clears things up a bit for those struggling to get their shaders to cast and/or receive shadows. Feel free to leave me a comment or mail me if you have any questions or remarks on this post!
Viewing all 17825 articles
Browse latest View live


<script src="https://jsc.adskeeper.com/r/s/rssing.com.1596347.js" async> </script>